How to export images for Facebook, Instagram and your website from Photoshop
There are many people wondering how to export images to Facebook, Instagram and websites from Photoshop the most effectively. Understanding this problem, SaDesign Retouching will give the instructions in the following article for your reference.
export images to Facebook, InstagramIn this article we will talk more about optimizing JPEG export for Facebook and Instagram, as well as the best export settings for displaying images on your website. Before diving in, please note that for most cases, simple image rendering is possible. Instagram is the only platform that requires a specific frame rate, but you can also use it for other purposes.
All the cases discussed below will have the same topic: the size of the exported JPEG file will play a big role in how quickly your web page will load. That is very important as it will affect Google ranking and search visibility.
In order for viewers to see any website or social networking site, content downloaded to their device needs to be through a browser or app. The larger the media files on those sites are, the longer the time it takes to download them, and the longer it takes viewers to view the page.
A report shows that 53% of website visits are ignored if a page loads longer than 3 seconds. In most cases, the main factor of increasing load times is because the image has not been optimized for the web and is too large in size.
Therefore, what needs to be done is exporting to the smallest file size while retaining the image quality to display your work in the best quality. Firstly, see the file size requirements on Facebook and Instagram, then move on to image optimisation for your own website. Finally, you install to export in Photoshop for the best results.
Facebook uses algorithms to resize and compress uploaded photos to maintain fast load times on the platform. In order to do that, it needs to reduce the large image size, which can significantly decrease their quality.
 export images to Facebook
Here are the settings that you should follow to maintain the best quality in smaller files:
- Resize your photos into one of the sizes support the following: Regular photos: 720px, 960px or 2048px wide and Cover Image: 851px x 315px
- To avoid file compression when you upload the cover photo, please make sure the file size is less than 100KB
- Save your image under JPEG format with sRGB color profile.
If you are uploading using the Facebook mobile app, it's important to note that by default, this app will upload your images in low quality. To avoid this, Facebook has an entry where the “HD” setting is turned off by default and needs to be turned on. Users just need to navigate to Menu FB Mobile => Settings => Account Settings => Videos and Photos and move the slider to the right.
The image sizes mentioned above can also be used to upload to Instagram, however there are exceptions.
 export images to instagram
- When you share photos on Instagram, regardless of whether you're using Instagram for iOS or Android, make sure to upload them in the best possible quality resolution (maximum width 1080 pixels).
- When you share a photo with a width of 320 to 1080 pixels, the system will keep that photo at its original resolution as long as the aspect ratio of the image is between 1.91: 1 and 4:5 (height from 566 to 1350 pixels with a width of 1080 pixels).
- If your aspect ratio is not supported, the image will be cropped to match the supported scale. If you share a photo at a lower resolution, you zoom in it to a width of 320 pixels. If you share a photo in a higher resolution, you zoom out it to a width of 1080 pixels – Instagram.
Website
When exporting images for your online portfolio, be sure to review the Search Engine Optimization (SEO) guidelines. The right SEO determines how your website will be indexed by search engines.
Search engines (such as Google, Bing, Yahoo) use a "web crawler" to index and rank your website relative to its equivalent. So, the better your SEO is, the better your search engine ranking will be, allowing more potential customers to find your website when looking for an editor (or photographer) in your area.
 export images to website
To optimize your images for search engines, you can do two things:
Use a descriptive name with keywords for each image you upload to your website. SEO keywords are the key words and phrases in your web content that make it possible for people to find your website through search engines. For example, if your picture is a portrait of a woman with blue eyes, the file name could be “Professional_retouching_portrait_woman_blue_eyes.jpeg” or something corresponding.
It is just as important to have “alt text” accompanying an image on your website. Alt text was originally created as a means of providing a text descriptor in case an image cannot be loaded. It will use "Alt Text" in place of an image allowing viewers to understand what they'll see.
It's important to make sure that the alt text tells the viewer as much as possible about the image, using as few words as possible. Today, alt text plays an important role in helping search engines crawl and index your website and improve the overall ranking of your website.
Exporting images to the website with Photoshop
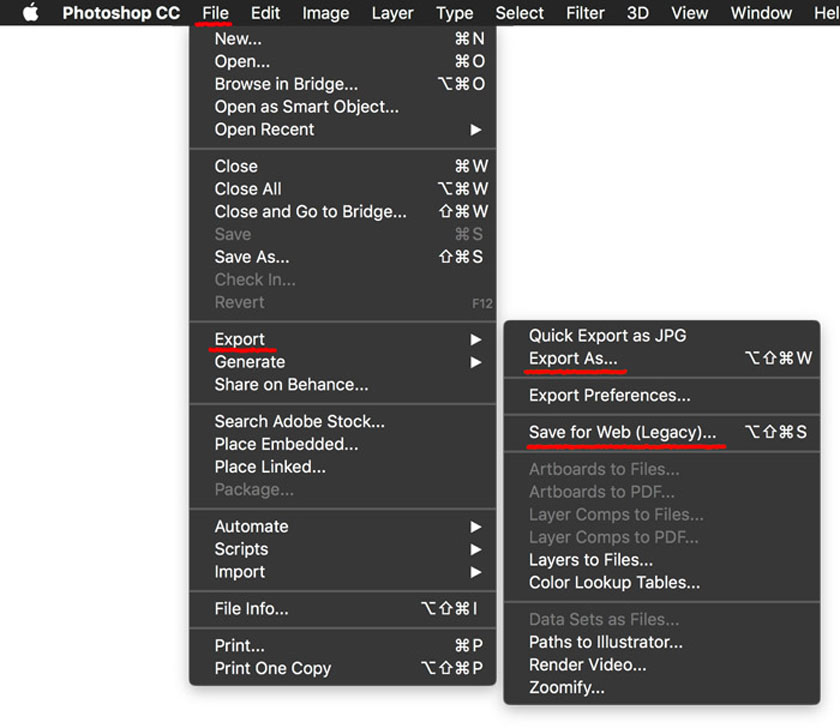
There are several ways you can export images to social media and websites in Photoshop such as using the Export As and Save for Web functions. Although Export As is the newest option, many photographers and editors still prefer to use the Save for Web method. Save for Web stays in the menus in the newest versions of Photoshop and is marked as "Legacy", meaning it still works, but is no longer supported or updated and will eventually be completely replaced by Export As option.
 export images to website from photoshop
The Export settings for Export are similar to those for Save for Web, and you can also read more about the Export dialog box. To quickly access the old export dialog for the web, go to File => Export => Save for Web (Legacy) or press Option + Shift + Command + S (for Mac), Alt + Shft + Ctrl + S ( for Win) . For details, please refer to the video tutorial below:
[embed]https://youtu.be/LmrhsXAAg8A[/embed]Above shares how to export images to Facebook, Instagram and your website from Photoshop, SaDesign Retouching hopes has helped you to grasp the useful information.
Customers who want advice and support to use our professional photo editing services, please leave a comment below the article for the fastest support.
See more The difference between Photoshop and Lightroom