Using Puppet Warp in Adobe Photoshop
Nội dung

In Photoshop, Puppet Warp is also a feature similar to the Liquify filters. It works by placing a mesh on the image. This function can also bend the body or perform motion changes but is based on the joints that the user has shaped with Puppet Warp. Using Puppet Warp in Adobe Photoshop is currently a popular image editing technique. Puppet Warp in Adobe Photoshop Currently, Puppet Warp feature is no longer new to users, it has been from Photoshop CS5 version, this feature is used more in art than editing photos, which helps you understand how to use Puppet Warp in Adobe Photoshop, let's learn in the following section. 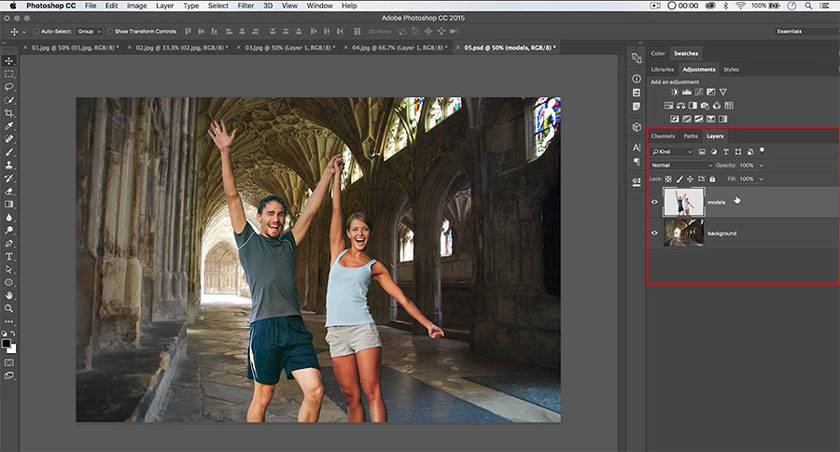 convert layer into a Smart Object In the Options bar, after choosing Puppet Warp in the Edit menu, make sure to choose Normal Blending Mode and More Points on Density - more anchor points will help you manipulate and warp the object easily. You should also turn on Mesh by clicking on the checkbox. By this way, you'll have a visual grid to move or slide around while using the tool. Pressing Alt / Option will allow you to rotate the image relative to the pin you have selected. However, be careful when rotating the image without adding the necessary pins to fix the areas that you don't want to move.
 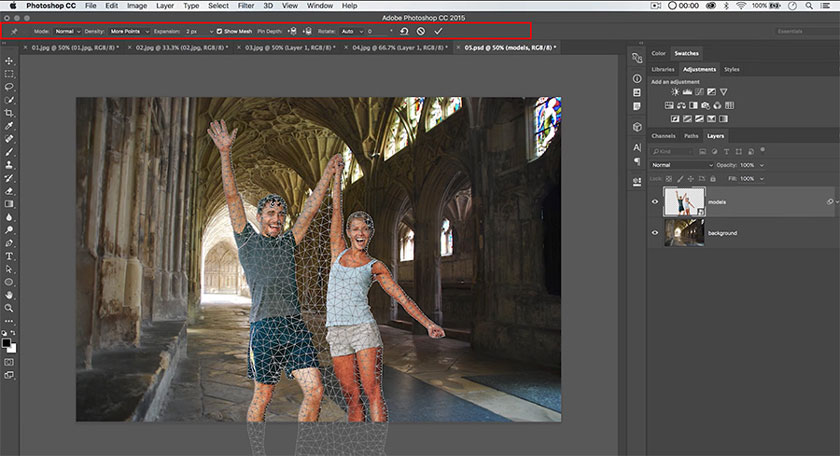 tool Puppet Warp If rotation is not what you want to do, you can also use the pins that you have attached to warp the shape of the subject's body non-destructively. You can select a handle or grid around and move it. By this way, you are using the same tool as Liquify but you have more control. Watch the video below to learn more about how to use Puppet Warp usefully for your next editing project: [embed]https://youtu.be/vmrLHbfltMg[/embed]
Puppet Warp in Adobe PhotoshopHow to use Puppet Warp in Adobe Photoshop
By using Puppet Warp in Photoshop, you can control the structure of your subject's shapes, features, or even reposition some things like hands, legs, hair of the model on the image. By pinning the image, you can create powerful changes or subtle manipulations. Professional photo editing professionals often recommend that you should cut or extract the subject (or objects) that you plan to use Puppet Warp for, and then convert that layer into a Smart Object. This way, Puppet Warp will be applied to the layer like a Smart Filter that you can turn on or off. convert layer into a Smart Object tool Puppet WarpUse Puppet Warp to reposition the subject in the image
- To show a grid area that you have overlapped, click the Pin Depth button above the Options bar.
- To select multiple pins, press Shift + click on your desired pin. Release the Shift key to make a drag of all the pins at once.
- To delete a pin, select it and press Backspace (Delete on Mac) or Alt (Optional on Mac) and click over one pin.
- Click Remove All Pins (curved arrow icon) above the Options bar to do that.
- To select all pins, press Ctrl (Command on a Mac). To deselect all pins, press Ctrl + D (Command + D on a Mac). To hide the grid, press Ctrl + H (Command + H on a Mac).
- To get rid of Puppet Warp, click on the cut circle icon, or press Esc.
- After you turn it into the desired result, press Enter (Return on the Mac) or click the check icon in the Options bar.