Best Selling Products

Plugin Retouch4me
69 USD

Freepik Premium Account
59 USD

Capcut Pro 1 Year
39 USD

Upgrade Genuine Office 365
49 USD

Adobe Premiere Pro Account
99 USD

Windows 10 & 11 Pro Key
36 USD

Autodesk All App Account Copyright
120 USD

Upgrade Duolingo Super
29 USD

ChatGPT Plus Account (GPT-4)
16 USD

Genuine Cheap Canva Pro
39 USD

MidJourney Account
29 USD

Genuine Adobe Illustrator account
99 USD

Copyright Adobe Lightroom Account
59 USD

Upgrade genuine Capture One account
120 USD

Adobe Photoshop Copyright - Full App
120 USD
9 Factors That Determine Quality in Photography
Nội dung
- 1. What is image sharpness?
- 2. Factors affecting the sharpness of a photo
- 2.1. Sensor and resolution
- 2.2. Quality lens
- 2.3. Anti-shake system ( ISO/VR/IBIS)
- 2.4. Shutter speed
- 2.5. ISO and image noise
- 2.6. Aperture and depth of field (DOF)
- 2.7. Focus system (Autofocus / Manual Focus)
- 2.8. Image formats (RAW and JPEG)
- 2.9. Post-production and sharpening techniques
Sharpness is the soul of photography, determining the appeal and professionalism of each frame.
Achieving a truly sharp, blur-free photo is not simply about owning an expensive camera or high-end lens. Sharpness is the result of a perfect combination of equipment, shooting technique, lighting conditions and post-production skills. Many new photographers often wonder why their photos are not clear despite investing in good equipment. The answer lies in understanding the factors that affect sharpness from the sensor, aperture, shutter speed, to ISO, image format and even how you hold the camera.
The following article will help you explore the 9 most important factors that affect the sharpness of photos in photography , along with specific analysis, real-life examples and advice from the perspective of a veteran. When you master these factors, you will see a clear difference in each click of the camera, not only clearer, but also more beautiful, natural and vivid.
1. What is image sharpness?
Sharpness in photography is understood as the ability to clearly and vividly show details, lines and textures of an image. A sharp photo is one in which you can clearly see each strand of hair, each grain of sand, each fold of fabric or small pattern on the object. On the contrary, a blurry or out-of-focus photo makes the viewer feel unfocused, reduces the ability to convey and even completely ruins the beautiful moment.
However, not all frames need to be sharp at the same level. Most photographers will focus on the main focus area of the subject while softening the background to create a natural depth in the photo. Intentional sharpness control helps to create depth, highlights the subject and creates a stronger visual feeling.
.jpg)
Sharpness is not only a technical factor but also a visual language . In some genres such as landscape, macro or architecture, sharpness across the frame is a must to show details; while in portrait or street photography, choosing the right focus area helps to create subtle highlights and express personal style.
2. Factors affecting the sharpness of a photo
The sharpness of a photo does not only depend on the camera you are using, but is a combination of equipment, shooting techniques and post-production . Some people say that "the camera is just a tool, the photographer is the one who decides whether the photo is sharp or blurry". That statement is completely true because understanding and mastering the following factors will help you create images of the highest quality possible.
2.1. Sensor and resolution
The sensor is the heart of the camera and is the first factor that determines sharpness. A good sensor will record more light and detail, thereby resulting in clear, accurate images. Full-frame cameras are often able to capture light and reproduce detail better than crop sensors, especially in low light or high contrast conditions.
The resolution (megapixels) of the sensor also plays an important role. A high resolution sensor allows you to capture images with extremely small details, allowing you to crop or enlarge without losing clarity. However, this does not mean that higher megapixels will make the image sharper. If the sensor is not supported by a good lens and the right shooting technique, the details can still be “soft” or have incorrect colors.
One thing to note is that sensors with high pixel density are more susceptible to camera shake, so when using a high-resolution camera, pay attention to shutter speed and anti-shake to maximize the detail advantage of the sensor.
.jpg)
2.2. Quality lens
If the sensor is the heart, the lens is the “eye” of the camera. No matter how high-end a camera body is, it cannot produce sharp images if it is attached to a poor quality lens. A good lens allows light to pass through with the least distortion, chromatic aberration and dispersion, helping to reproduce images faithfully and clearly from center to edge.
High-end lenses (prime lenses, Canon L series or Sony G Master) are often designed with anti-reflective coatings, aspherical lenses and optimized optical structures, helping to minimize the “soft image” phenomenon even when opening the aperture wide. Meanwhile, popular kit lenses, although more convenient and cheaper, are difficult to ensure high sharpness in complex lighting conditions.
Interestingly, even between lenses of the same focal length, there are significant differences in sharpness. So when investing in equipment, prioritize the lens before the camera body because a good lens can go a long way and significantly improve the quality of your photos.
.jpg)
2.3. Anti-shake system ( ISO/VR/IBIS)
Even a small vibration while shooting can cause the image to be blurred, especially when shooting at slow shutter speeds. That is why camera manufacturers have developed anti-shake systems that can be located in the camera body (IBIS – In-Body Image Stabilization) or in the lens (IS/VR).
Anti-shake compensates for hand movement or environmental shake, allowing you to shoot at slower speeds while still ensuring sharp images. However, this system has its limitations, and it cannot completely replace holding the camera steady. When it comes to landscapes, night shots, or long exposures, using a tripod is still the safest and most effective solution.
Also, remember to turn off image stabilization when the camera is mounted on a tripod, as the stabilization mechanism can cause slight sensor shake and blur the image instead of making it clearer.
.jpg)
2.4. Shutter speed
Shutter speed is the factor that has the most direct impact on the sharpness of the image. If the speed is too slow, even the slightest movement of the hand, model or object will be enough to blur the image. On the contrary, high speed helps to “freeze” the moment, preserve the details and create a clear, vivid feeling.
A basic rule that many photographers follow is that the shutter speed should be equal to or faster than 1/focal length. For example, when shooting with a 100mm lens, the speed should be at least 1/100s to limit shake. Of course, in genres such as sports, wildlife or events, this speed should be increased more to catch fast movements.
However, increasing the shutter speed also reduces the amount of light reaching the sensor, so you need to balance the aperture and ISO to ensure the image is not too dark. It is the balance between brightness and sharpness that every photographer must master.
.jpg)
2.5. ISO and image noise
ISO increases the sensor’s sensitivity to light, allowing you to shoot in low-light conditions. But the higher the ISO, the more noise there is, which causes details to be lost and the image to look “soft.” Noise is especially bad in dark areas, where the sensor has to amplify the signal more strongly.
To get sharp photos, keep your ISO as low as possible, usually between ISO 100–400, unless the light is low or you can’t increase the shutter speed any further. When you must increase your ISO, shoot in RAW format so you can reduce noise in post while still retaining the best detail.
Additionally, using artificial lighting like flash, LED lights or reflectors also helps you maintain a low ISO while still ensuring the photo is bright, sharp and clear.
.jpg)
2.6. Aperture and depth of field (DOF)
Aperture controls the amount of light and depth of field, which is the area of the image that is clearly visible. When you open the aperture wide (f/1.8, f/2.8), the area of focus will be thin, creating a beautiful bokeh effect, highlighting the subject. However, the narrow area of focus also requires you to focus extremely precisely; just a few millimeters off will blur the image.
If you want sharp images across the frame, especially when shooting landscapes or architecture, choose a medium aperture of around f/5.6 – f/8. Choosing the right aperture is an art of balancing sharpness, light and visual emotion . A good photographer knows not only when the image needs to be sharp, but also when to soften it to create depth and emotion.
.jpg)
2.7. Focus system (Autofocus / Manual Focus)
Nothing is more important than accurate focus. No matter how expensive your camera or lens is, if the focus is wrong, the image will be blurry. Today's autofocus systems are very smart, but they don't always understand the photographer's intentions.
For portraits, you should focus on the eyes : the place that attracts the viewer's gaze the most. When shooting landscapes or still life, manual focus combined with magnified Live View mode will help you make more sophisticated adjustments, especially when using a tripod.
Also, pay attention to the appropriate focus mode: AF-S (Single) for still subjects, AF-C (Continuous) for moving subjects, and AF-A when you need the camera to automatically switch flexibly. Using the wrong mode is a common cause of out-of-focus photos even when the other techniques are correct.
.jpg)
2.8. Image formats (RAW and JPEG)
The image format also affects sharpness and post-processing capabilities. RAW images retain all the data captured by the sensor, allowing you to edit, sharpen, or reduce noise without losing quality. JPEG, on the other hand, is a compressed format, with data truncated, causing some detail to be lost forever.
If you really care about maximum sharpness and quality, go with RAW. While RAW files are larger and take up more space, they offer superior post-processing flexibility.
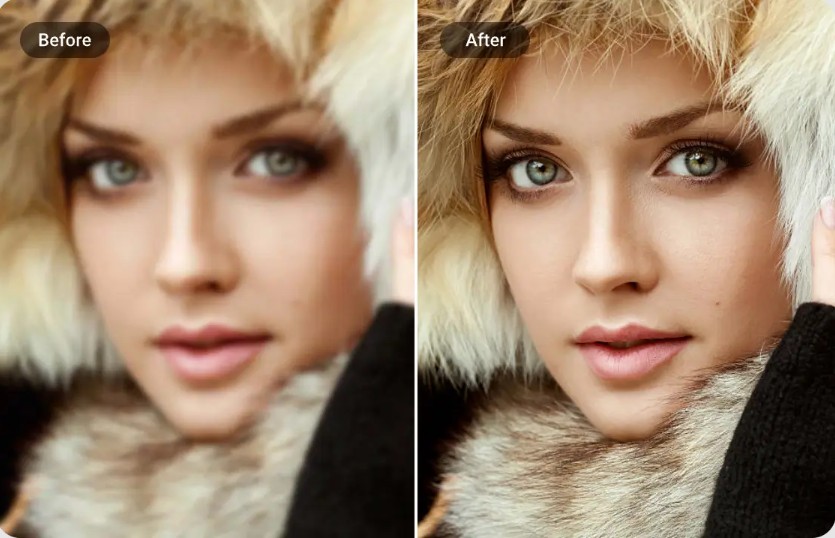
2.9. Post-production and sharpening techniques
Even if you have done all the above factors well, post-processing is still the “last step” to help the photo achieve perfect sharpness. In editing software such as Lightroom, Photoshop or Capture One, tools such as Sharpen, Clarity, Texture can help increase the clarity of details. However, sharpening is a double-edged sword if overused, the photo will look harsh, jagged and unnatural.
A good process is to reduce noise before sharpening , avoiding artificial exaggeration of detail. Then, sharpen only the main subject area, rather than the entire frame, to guide the viewer's eye where it should be focused.
.jpg)
Sharpening also depends on the intended use: images for the web, large format printing or media use all require different parameters. Sometimes a slightly “soft” image on screen will turn out perfectly when printed, that is something that only practical experience can bring.
Buy Genuine Licensed Software at Cheap Prices
Sharpness is not just a technical element, but also the soul of photography. A sharp photo is not simply clear in detail, but also shows the photographer's ability to control light, composition and emotion. Every little vibration, every error in focus or aperture can make the difference between a "normal" photo and a memorable work. To achieve optimal sharpness, you need to combine good equipment, precise technique and delicate post-processing. Practice your observation skills, understand the limits of your equipment and most importantly, practice patiently.


VIP Products


Best Selling Products
Plugin Retouch4me
69 USD
Freepik Premium Account
59 USD
Capcut Pro 1 Year
39 USD
Upgrade Genuine Office 365
49 USD
Adobe Premiere Pro Account
99 USD
Windows 10 & 11 Pro Key
36 USD
Autodesk All App Account Copyright
120 USD
Upgrade Duolingo Super
29 USD
ChatGPT Plus Account (GPT-4)
16 USD
Genuine Cheap Canva Pro
39 USD
MidJourney Account
29 USD
Genuine Adobe Illustrator account
99 USD
Copyright Adobe Lightroom Account
59 USD
Upgrade genuine Capture One account
120 USD
Adobe Photoshop Copyright - Full App
120 USD