Best Selling Products

Genuine Adobe Illustrator account
99 USD

Genuine Cheap Canva Pro
39 USD

ChatGPT Plus Account (GPT-4)
16 USD

Capcut Pro 1 Year
39 USD

MidJourney Account
29 USD

Adobe Photoshop Copyright - Full App
120 USD

Copyright Adobe Lightroom Account
59 USD

Upgrade genuine Capture One account
120 USD

Freepik Premium Account
59 USD

Upgrade Duolingo Super
29 USD

Autodesk All App Account Copyright
120 USD

Upgrade Genuine Office 365
49 USD

Adobe Premiere Pro Account
99 USD

Plugin Retouch4me
69 USD

Windows 10 & 11 Pro Key
36 USD
Discover the Power of Exposure Bracketing – The Secret Behind Perfectly Balanced Photos
Nội dung
Learn how Exposure Bracketing helps you take perfectly exposed photos in any lighting conditions.
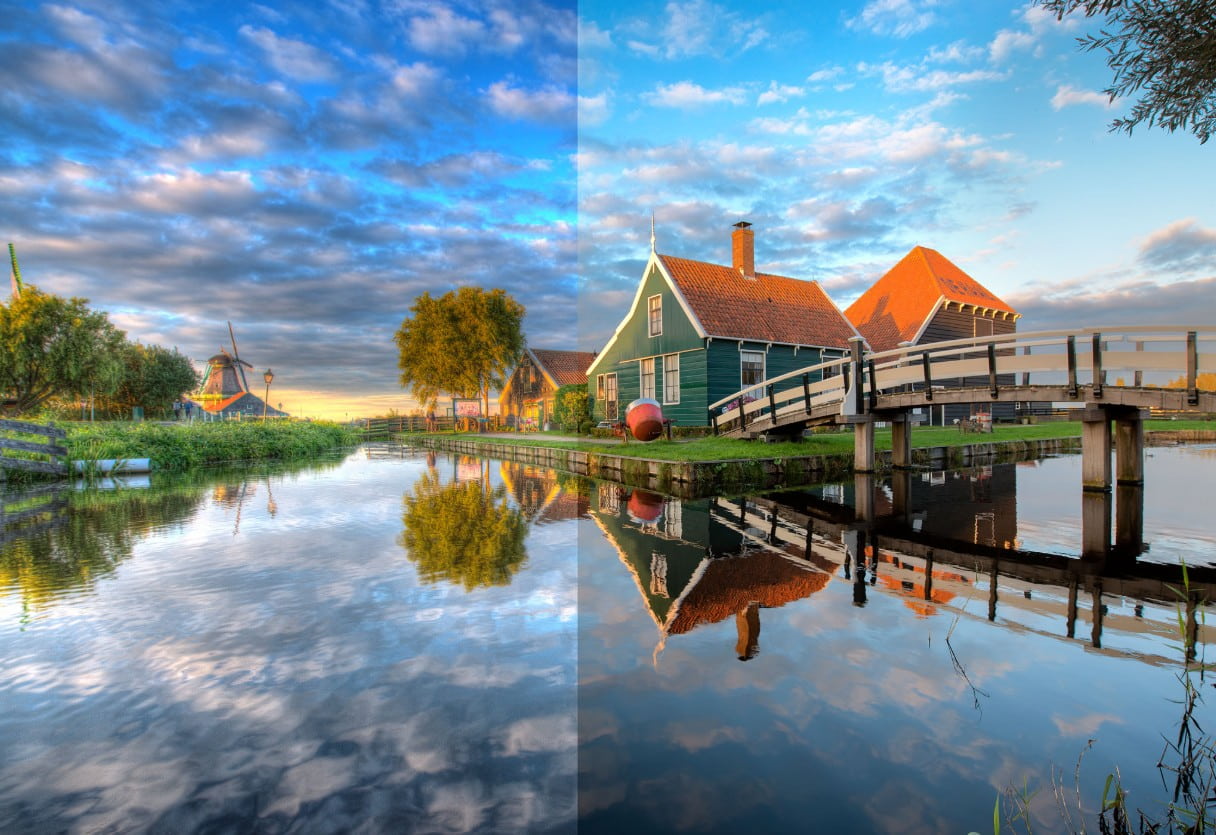
Exposure Blending is a famous post-production technique that helps you overcome the dynamic range limitation of the camera sensor. It allows you to blend multiple photos with different exposure levels, creating a complete photo that shows both bright and dark details in a harmonious and vivid way. But to create a standard Exposure Blending photo, the first indispensable step is Exposure Bracketing : the technique of properly compensating for exposure right from the start.
If you are struggling with backlit photography or are often disappointed by overexposed or underexposed sunset photos, this article will help you understand more about Exposure Bracketing, how to do it, and how to apply it in the Exposure Blending process to create impressive and professional photos.
1. Learn about Exposure Blending
Exposure Blending is a post-processing technique in photography that is used to overcome the limits of Dynamic Range that a camera sensor cannot capture in a single shot. Dynamic Range, or dynamic range, is the difference between the brightest and darkest areas that a camera can record. Although today's cameras are increasingly advanced, they still cannot compare to the ability of the human eye, which can flexibly adapt to constantly changing lighting conditions.
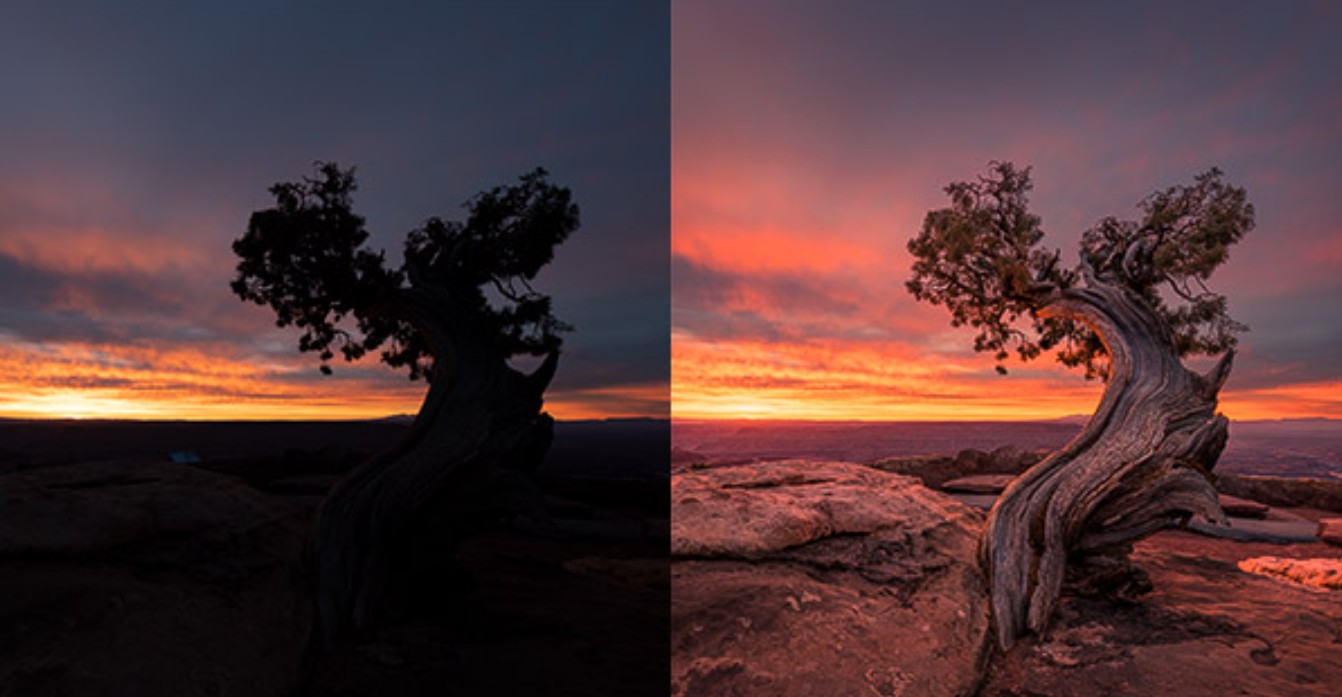
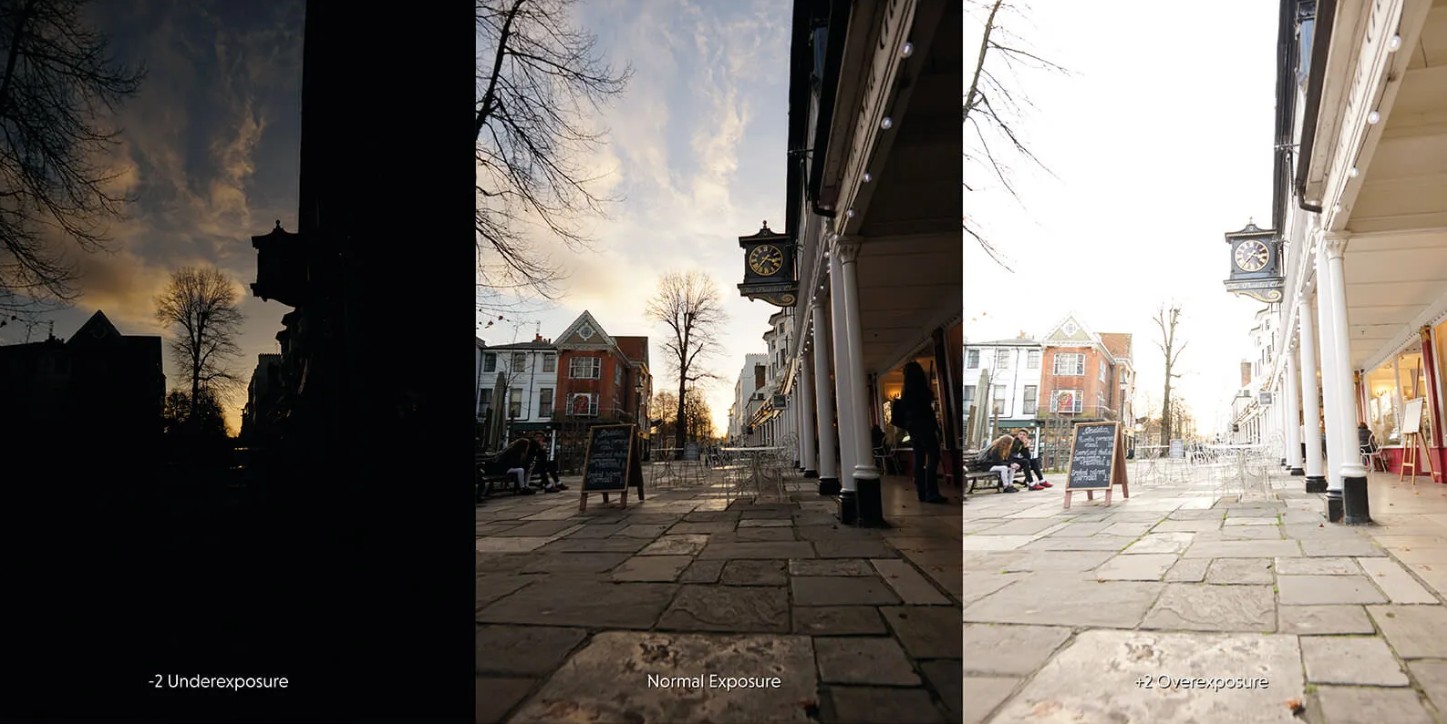
In a high-contrast scene like a sunset, where the sky is bright and the foreground is dark, if you take just one photo, you will have to sacrifice some detail. Exposing for the sky keeps the cloud detail and vibrant colors, but makes the foreground dark. Conversely, exposing for the foreground makes the subject clear but overexposes the sky, completely losing the color gradation.
Exposure Blending solves this problem by combining multiple photos taken at different exposures . When you blend the photos in post-production, you can take the brightest areas from one photo, the darkest areas from another, and combine them to create a finished photo that almost exactly replicates what your eyes see in real life. This technique is often used in landscape , architectural , or interior photography , where the lighting between areas is significantly different.
2. How to take long exposure photos for Exposure Blending
To effectively blend exposures, you need to have photos taken at different exposure levels while maintaining the correct composition. There are two common methods for taking photos for exposure blending: exposure bracketing and shooting manually in Live View mode . Each method has its own advantages, depending on your equipment and shooting habits.
2.1 Exposure Bracketing
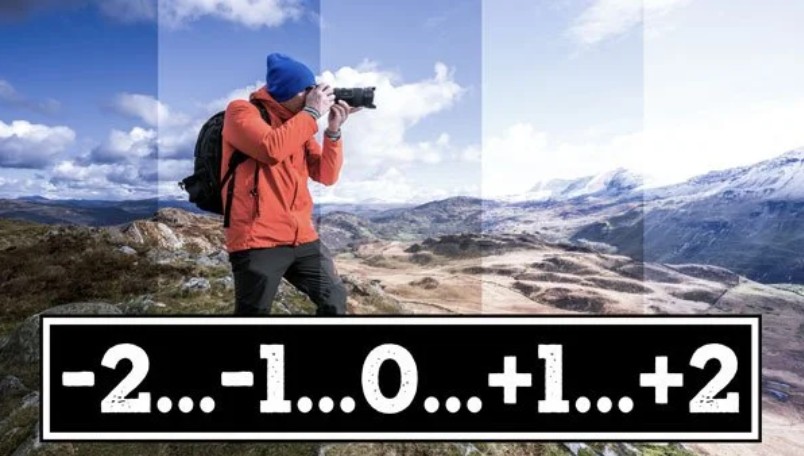
Exposure Bracketing is a technique of taking multiple photos with different exposure levels, usually one normal exposure, one underexposed, and one overexposed. Most digital cameras today have an Auto Exposure Bracketing (AEB) mode that allows you to automatically take 3 or more photos in succession at preset exposure levels, helping to ensure accuracy and save time.
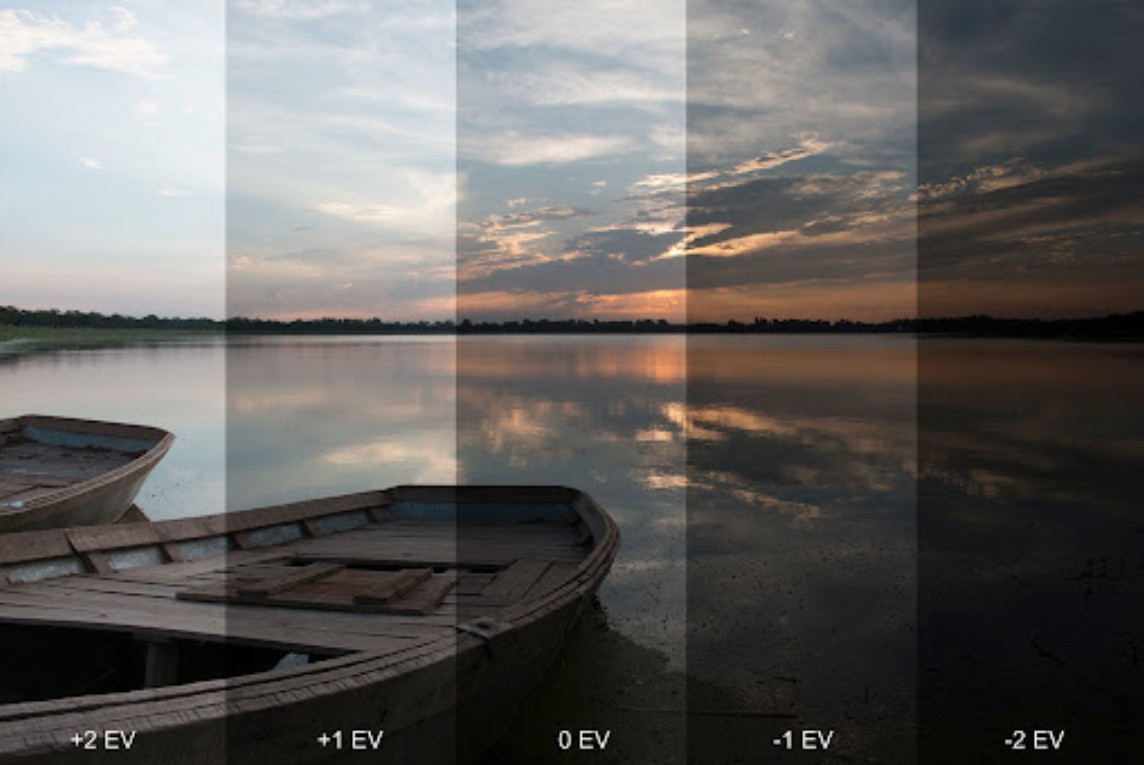
When shooting in high-contrast conditions like sunsets, if you shoot at a single exposure, highlights will be blown out or lost in the shadows. Even if you set the “best” exposure, the camera sensor still won’t be able to capture all the details of the scene. That’s why exposure compensation at different levels helps you capture enough highlight and shadow data to blend in later.
When you are doing exposure bracketing, you should activate the Histogram on your camera screen. Histogram helps you control the highlights and shadows in your frame, ensuring that the highlights are not blown out and the shadows are not blown out. The goal is to create three images: one properly exposed, one underexposed to retain highlight detail, and one overexposed to bring out the shadows.
A common mistake that many people make is not using a tripod when shooting Exposure Bracketing. Because even a slight misalignment of the frame will make it extremely difficult to combine the photos in post-production. A tripod helps ensure that the photos have the same composition, only different in exposure levels, so that the Exposure Blend is smooth and accurate. In bright conditions, you can still shoot handheld, but you need to keep the shutter speed high to avoid image blur.
2.2 Manual mode in Live View
If you don't want to use automatic mode or want complete control over the exposure of each photo, you can shoot manually through the camera's Live View mode .
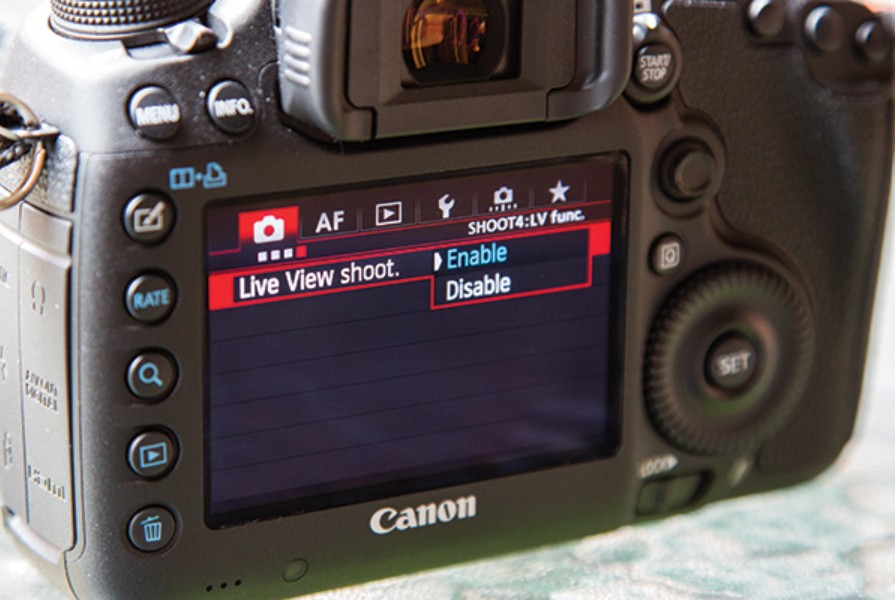
When Live View is enabled, you will see the actual image directly on the LCD screen, along with parameters such as ISO, Aperture, Shutter Speed and Exposure Compensation. For example, on the Canon 5D Mark II, you can see all of these parameters at the bottom of the screen when the camera is in Av (Aperture Priority) mode . This makes it easy to control the light and make precise adjustments before pressing the shutter.
In Live View, you will see a small rectangle in the middle of the frame, this is the metering area . You can move this box to the position you want to meter, such as the sky or the foreground, to see the change on the Histogram. This allows you to take multiple shots with different exposure levels manually, customizing it as you like.
For example, you take one photo exposed to a bright window and one exposed to a darker room. When you combine them using Exposure Blending, you get a photo that has both indoor and outdoor details.
3. When should you use Exposure Blending?
Exposure Blending isn't always necessary, but in many situations it's the only option to preserve all the detail in your image. Here are some typical cases:
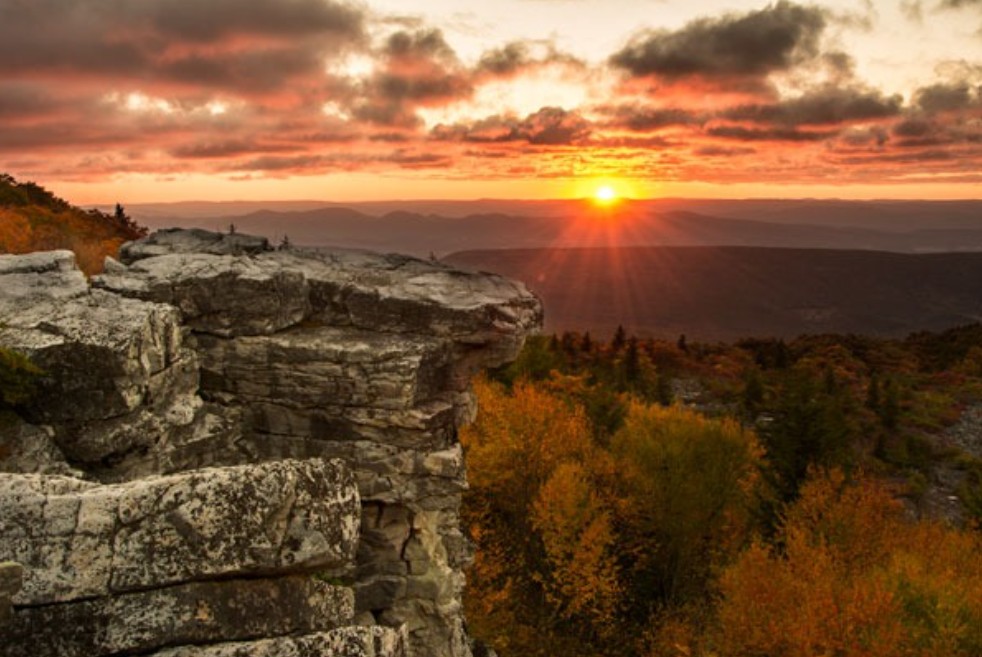
The first is when shooting high contrast landscapes , such as sunsets or sunrises. This is when the sky is bright, while the ground or foreground is usually dark. If you take just one shot, you won’t be able to get both the bright and dark areas perfectly.
The second is when shooting architecture or interiors , especially when the house is dark but the windows are flooded with light. Using Exposure Blending helps you keep both the interior and exterior details, creating a natural, realistic feel.
Additionally, in backlit photography , when the subject is facing a strong light source, Exposure Bracketing and Blend Exposure will help you retain the subject's details without burning the background behind.
There are many ways to achieve similar effects to Exposure Blending, such as using an ND Grad (Neutral Density Filter) to balance the light between the bright and dark areas. However, good filters are often very expensive, while cheap filters can reduce the image quality. In contrast, Exposure Blending only requires shooting skills and post-processing, making it a cheap option that still gives impressive results.
In some cases, you can also use HDR (High Dynamic Range) : a feature that automatically combines multiple photos with different exposures. However, HDR often produces images with unnatural colors and contrast, while Exposure Blending allows you to manually control each area of light, resulting in softer, more realistic results.
4. Results after Exposure Blending
When done correctly, the final results will amaze you. The resulting image will not only retain detail in both the highlights and shadows, but will also recreate the feel of the scene you saw with your own eyes. The sky will be vibrant, the layers of clouds will be clearly visible, while the foreground will remain bright, sharp, and natural.
Exposure Blending is especially useful for landscape photography enthusiasts, where the light is constantly changing and there is strong contrast. It allows you to express the entire space, depth, color and light in a single frame.
Exposure Bracketing and Exposure Blending are not just techniques, but also ways for photographers to control light as desired. Understanding and applying these two techniques correctly helps you actively master all lighting conditions, creating photos that are realistic, emotional and full of personal imprint.
From early sunrises at sea, to red sunsets behind the mountains, to bright windows in a dark room, all can be captured perfectly with intelligent exposure control. The key is to master the correct exposure compensation, understand the Histogram, and know how to use a tripod, aperture, ISO and shutter speed properly.


VIP Products


Best Selling Products
Genuine Adobe Illustrator account
99 USD
Genuine Cheap Canva Pro
39 USD
ChatGPT Plus Account (GPT-4)
16 USD
Capcut Pro 1 Year
39 USD
MidJourney Account
29 USD
Adobe Photoshop Copyright - Full App
120 USD
Copyright Adobe Lightroom Account
59 USD
Upgrade genuine Capture One account
120 USD
Freepik Premium Account
59 USD
Upgrade Duolingo Super
29 USD
Autodesk All App Account Copyright
120 USD
Upgrade Genuine Office 365
49 USD
Adobe Premiere Pro Account
99 USD
Plugin Retouch4me
69 USD
Windows 10 & 11 Pro Key
36 USD