Best Selling Products
How to create a meeting on Zoom
Nội dung
- 1. How to create meeting rooms and online classrooms on Zoom
- 1.1. Create a Zoom room on iPhone
- 1.2. Create a Zoom room on Android phone
- 1.3. The simplest way to create a Zoom room on a computer
- 1.4. The simplest way to create a Zoom room on iPad
- 2. How to create a Zoom meeting room, unlimited online learning
- 2.1. Use a Zoom Pro paid account
- 2.2. Using an educational account (.edu)
- 2.3. How to use temporary accounts (workaround)
- 3. Some other functions of Zoom
- 3.1. Some other Zoom functions you should know
- 3.2. Options on the main interface
- 4. Instructions for upgrading Zoom Pro account at SaDesign
Zoom Pro offers advanced features to optimize your online meeting experience, from unlimited meeting time to smart management capabilities. Discover the steps to create a meeting on Zoom to improve work efficiency!

1. How to create meeting rooms and online classrooms on Zoom
Creating a meeting on Zoom is also very simple. Below are detailed instructions in each different case that you should refer to.
1.1. Create a Zoom room on iPhone
Step 1: Install the Zoom app
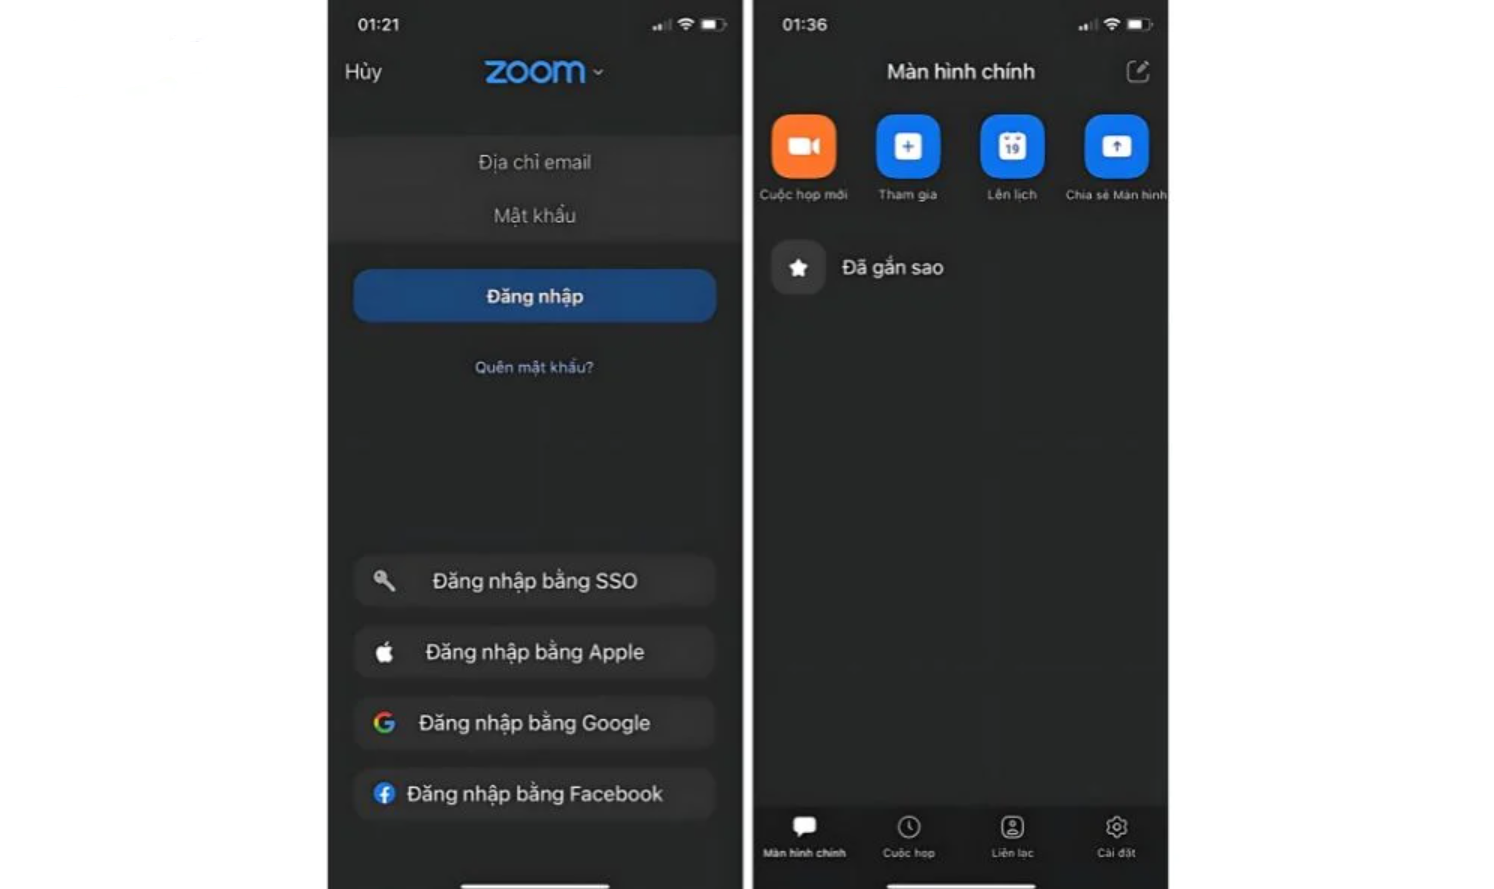
Go to the App Store on your iPhone and search for the Zoom app. Once downloaded, open the app and sign in with your Google, Facebook, or Apple ID account.
Step 2: Start a new meeting
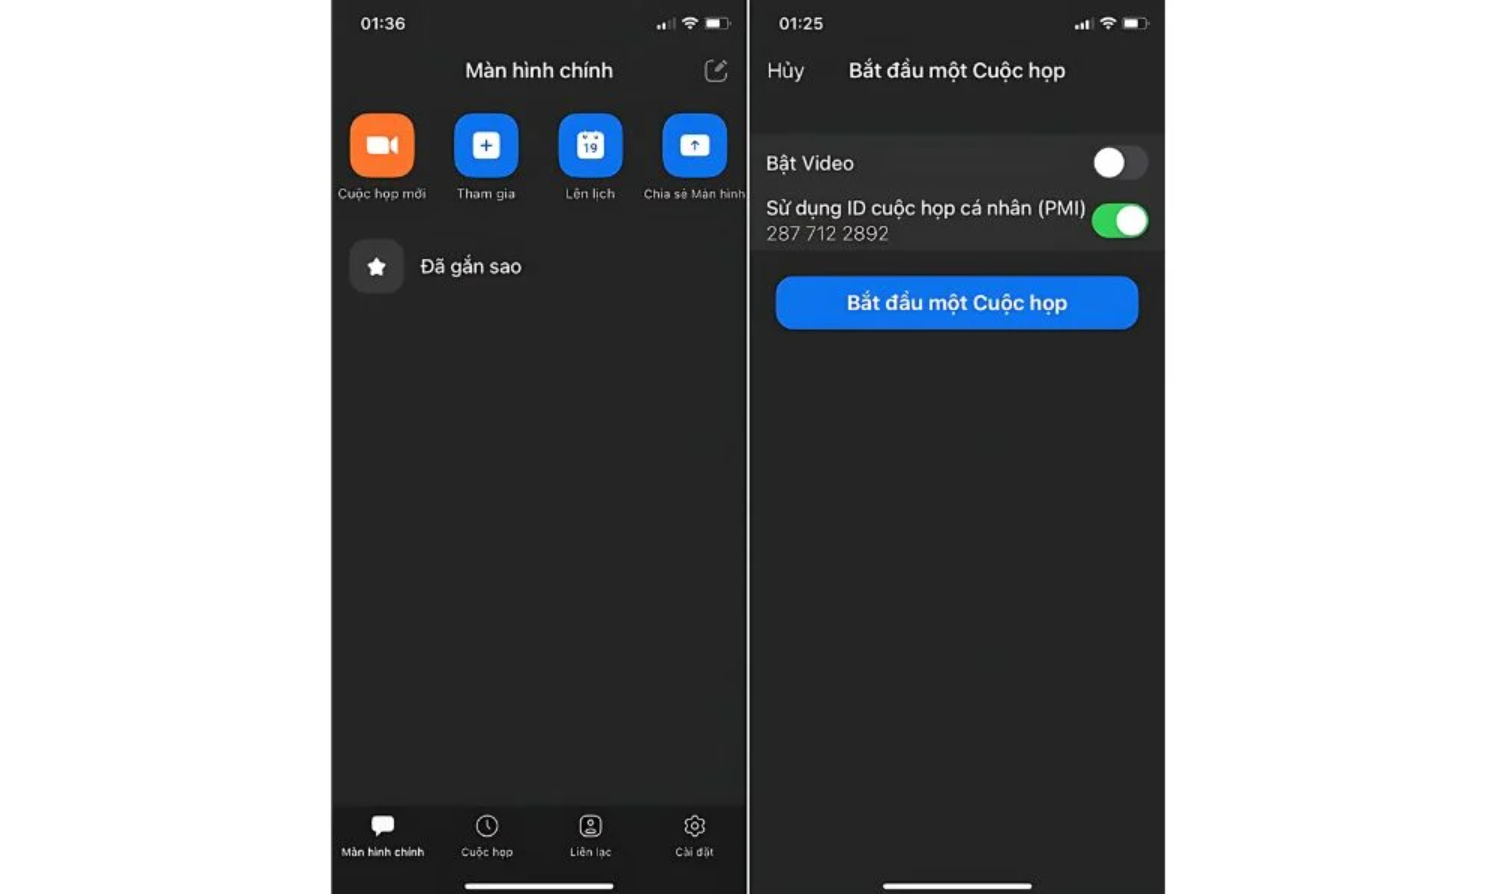
After logging in, on the main interface, click on the “New Meeting” icon with the camera icon.
You can turn the video on or off as needed and then select “ Start Meeting ” to open a new meeting room.
Step 3: Invite participants
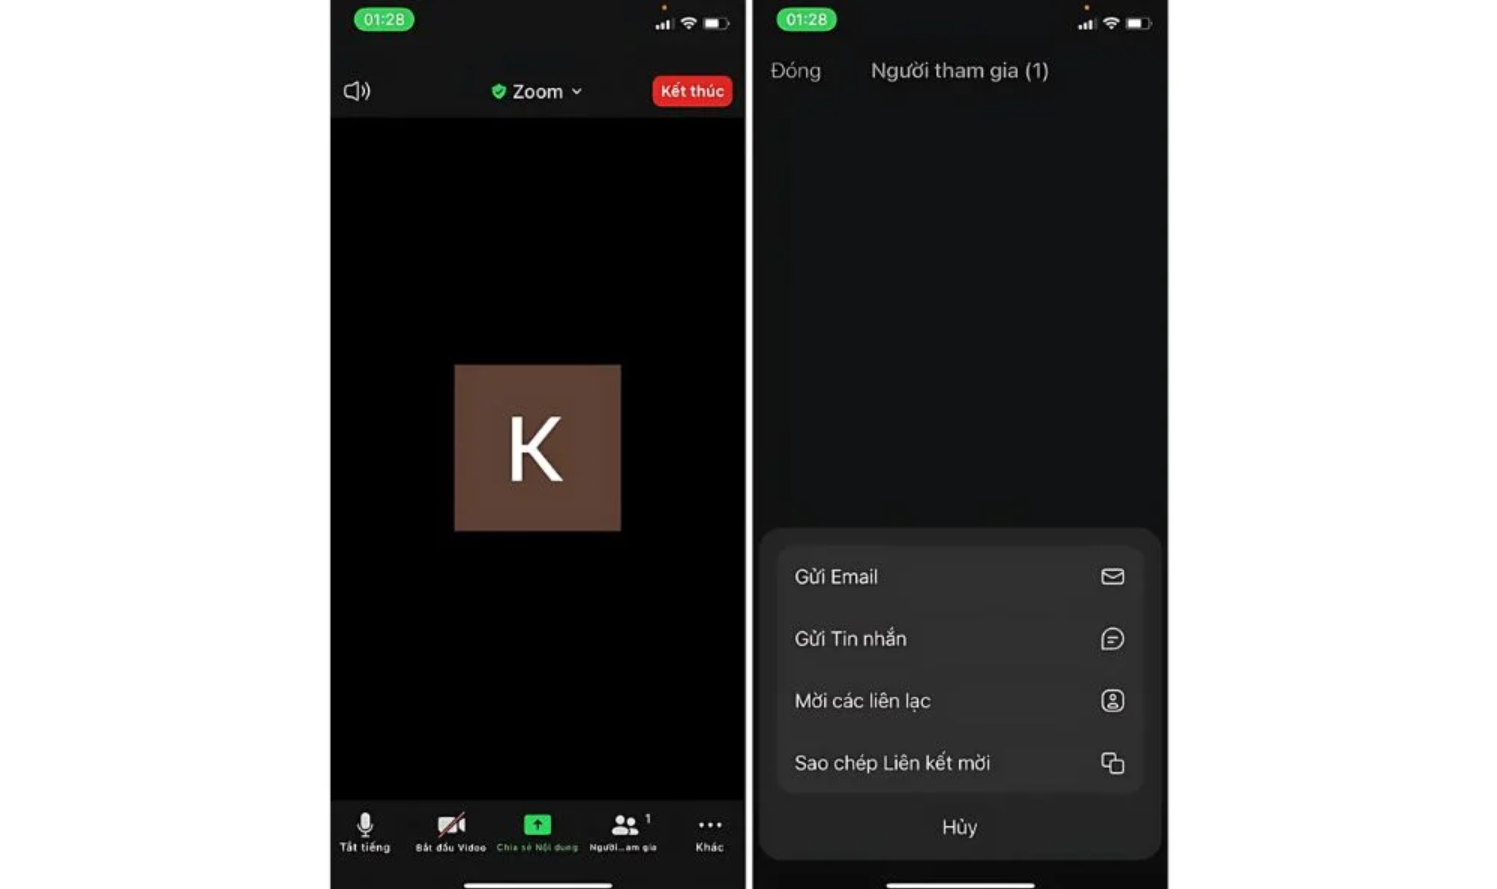
Once the meeting has started, you can invite others to join by clicking the “ Participants ” button.
Then select “ Invite ” and “ Copy Link ”.
1.2. Create a Zoom room on Android phone
Step 1: Install the Zoom app
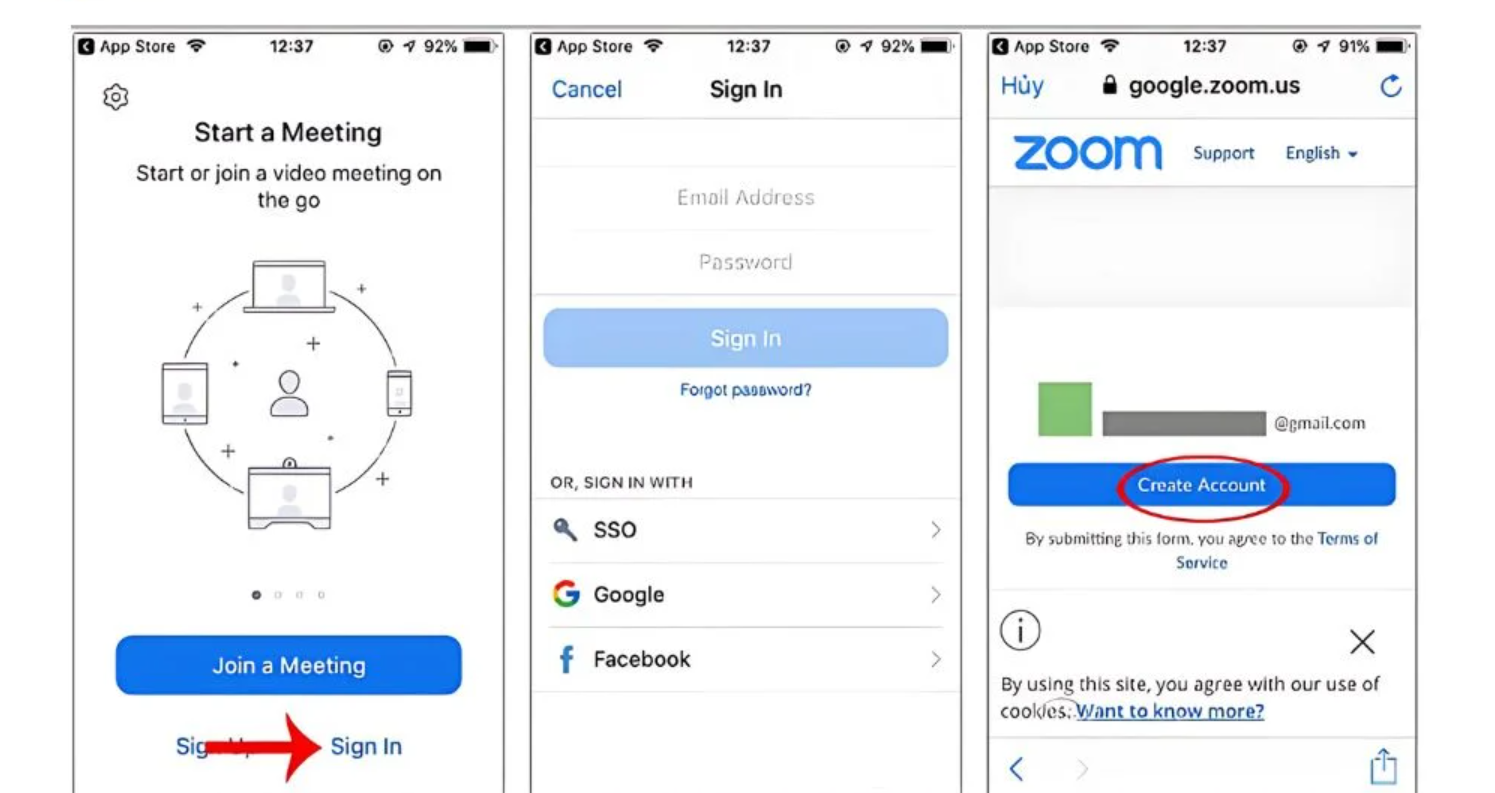
Go to the Google Play Store, search for Zoom and download the app. Once installed, open the app and log in.
Step 2: Create a new meeting
Similar to iPhone, tap the “ New Meeting ” icon and select video or audio options before starting the meeting.
Step 3: Share the join link
Once the meeting room is open, you can also copy the meeting room link and share it with people who need to join by selecting “ Participants ” and “ Invite ”.
1.3. The simplest way to create a Zoom room on a computer
You will know how to create a Zoom Meeting on your computer quickly with the instructions below:
Step 1: Install Zoom software and register an account
If you don't have Zoom software on your computer, you need to download and install it from the official website. Then, register for a free account using your email or Google or Facebook account.
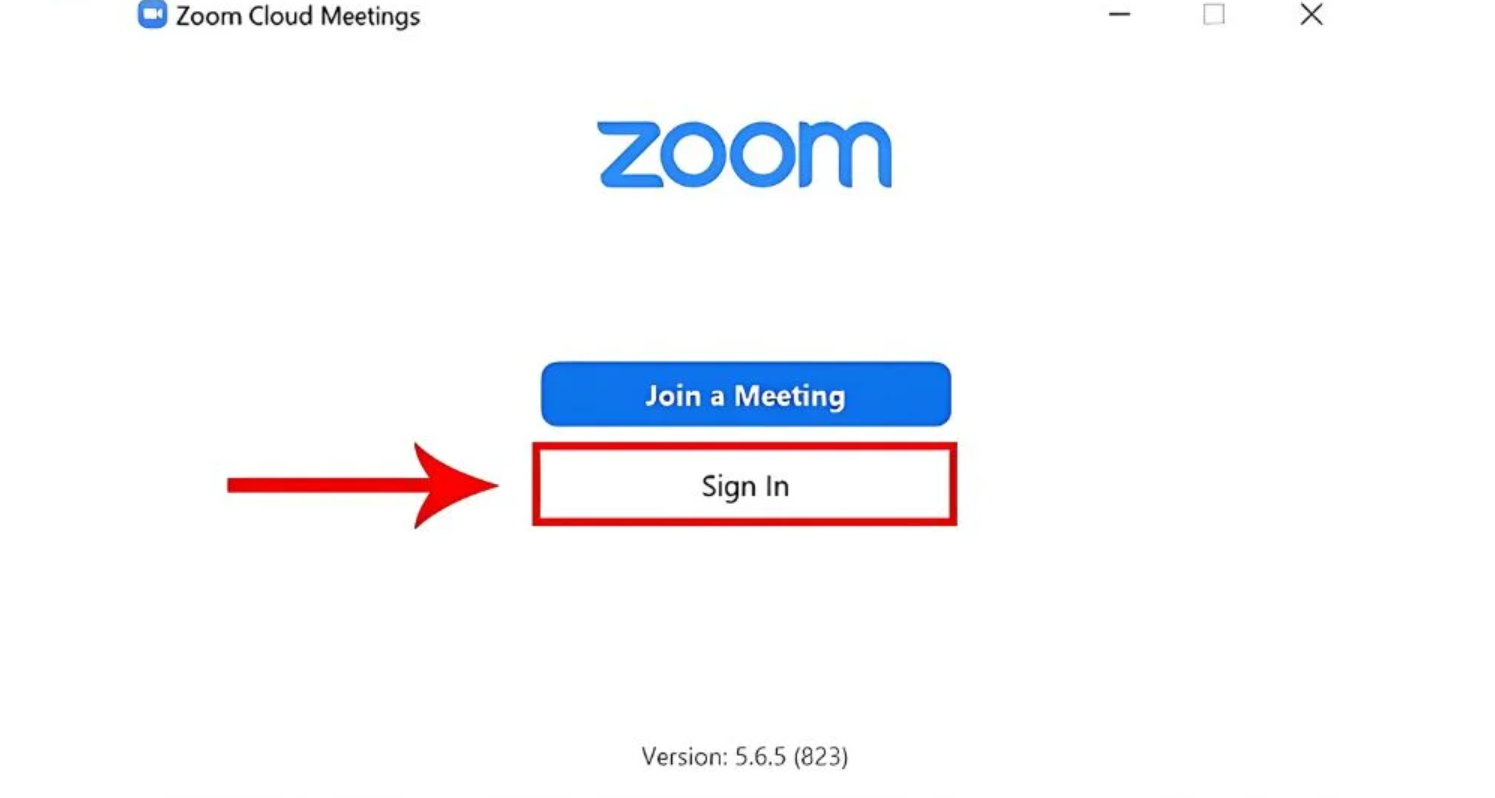
Step 2: Log in to the Zoom app
Open the Zoom application installed on your computer and log in with your account. After logging in successfully, the main Zoom interface window will appear.
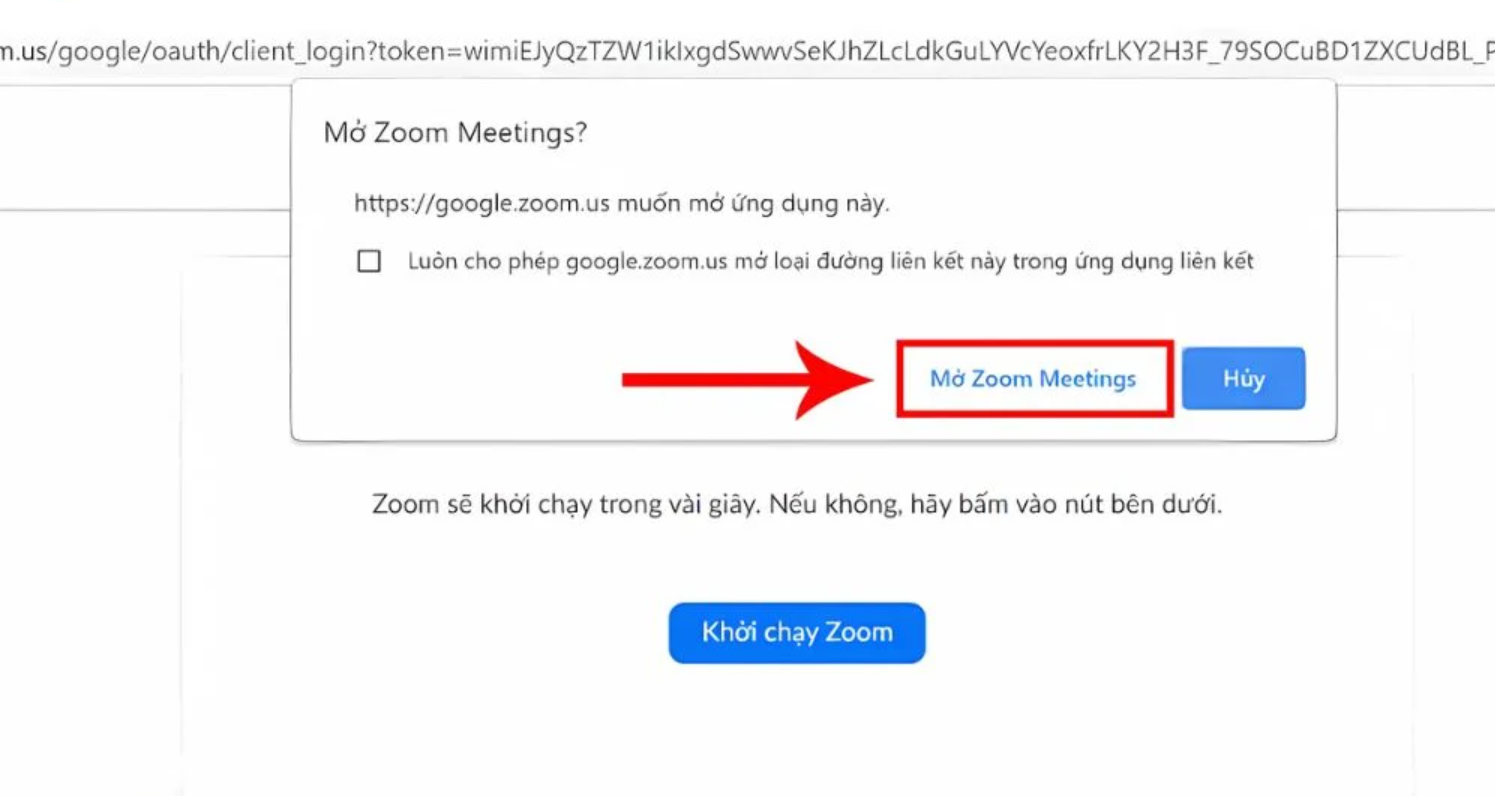
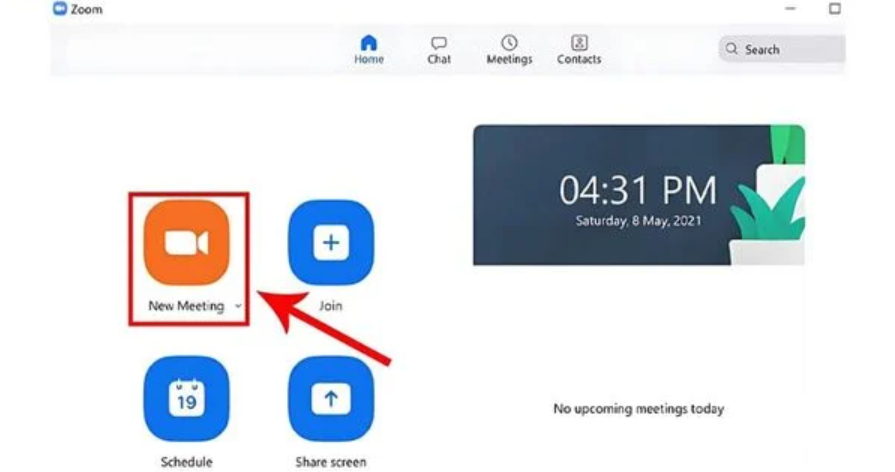
Step 3: Create a new meeting
On the main interface, click on the "New Meeting" button , the camera icon.
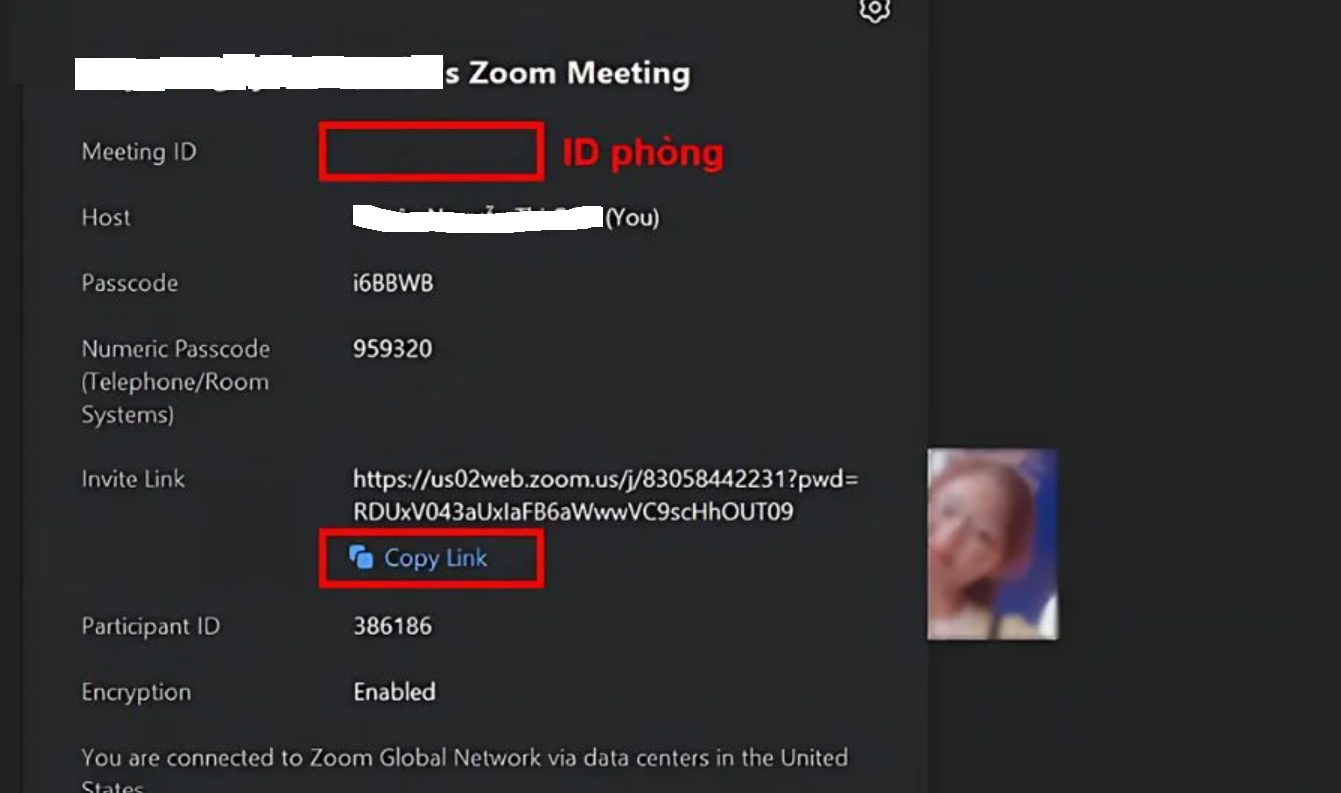
Step 4: Share the meeting ID or link
Once the meeting room is created, you'll see the room ID and a " Copy Invitation " option to copy the meeting link or code. Send this information to attendees so they can access the room.
Step 5: Customize the meeting
While the meeting is in progress, you can manage participants, turn your camera and microphone on/off, share your screen, record the meeting, or end the meeting room. These options are located on the bottom toolbar of the Zoom interface.
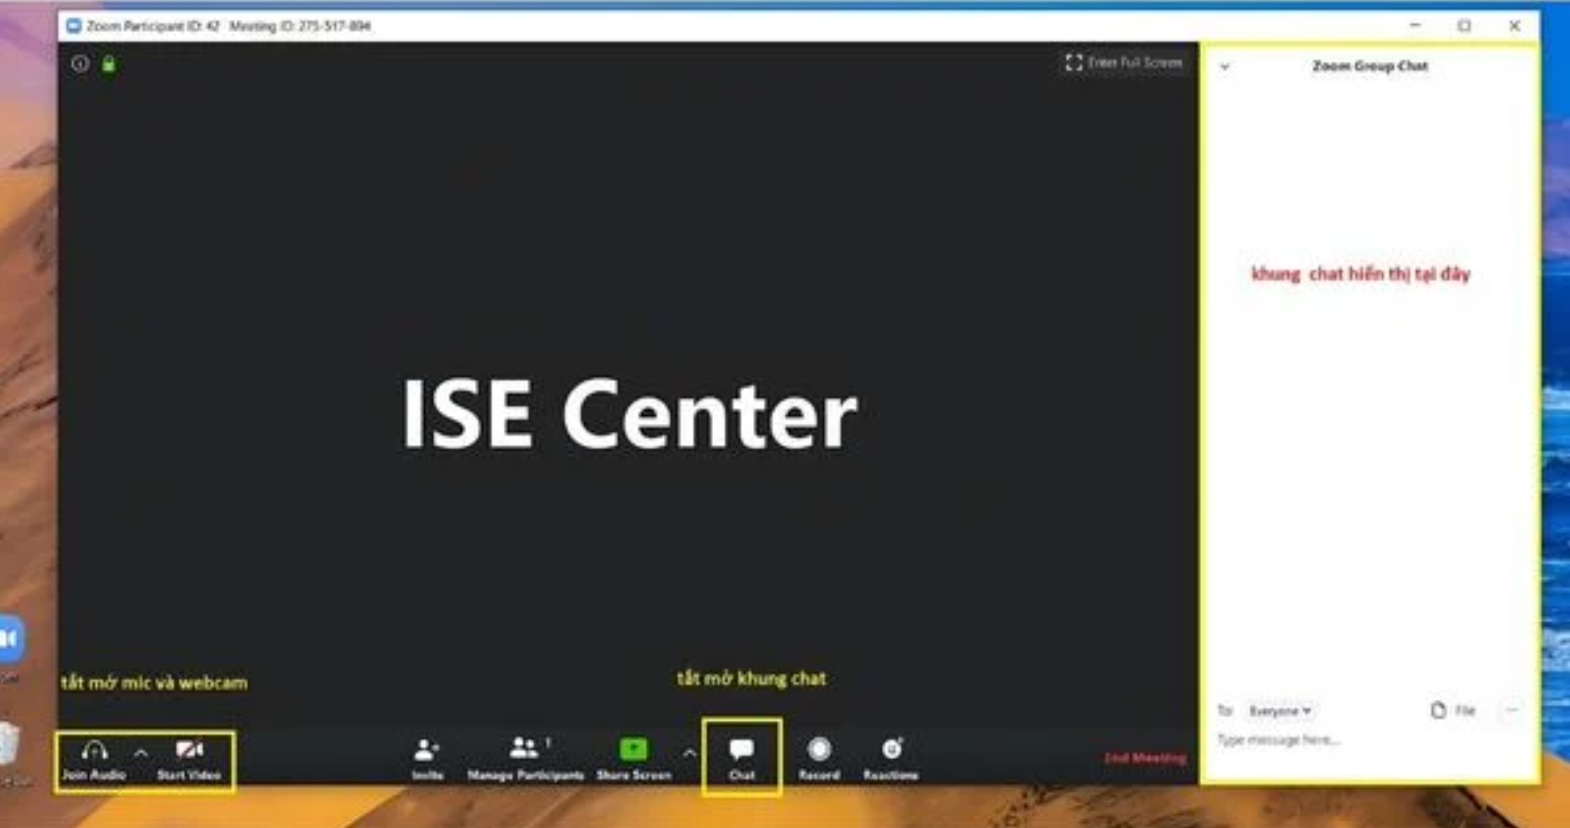
Additionally, if you want to schedule a meeting for later, Zoom also offers a " Schedule " option for you to pre-set the date and time. With this feature, users can customize the time, password, and meeting details.
1.4. The simplest way to create a Zoom room on iPad
Creating a Zoom room on iPad is similar to creating a Zoom room on iPhone. Here are the detailed steps to help you meet via Zoom on iPad:
Step 1: Install the Zoom app from the App Store
First, open the App Store on your iPad and search for the Zoom app. Download and install it like any other app.
Step 2: Log in to the Zoom app
Once installed, open the app and log in with your Zoom account.
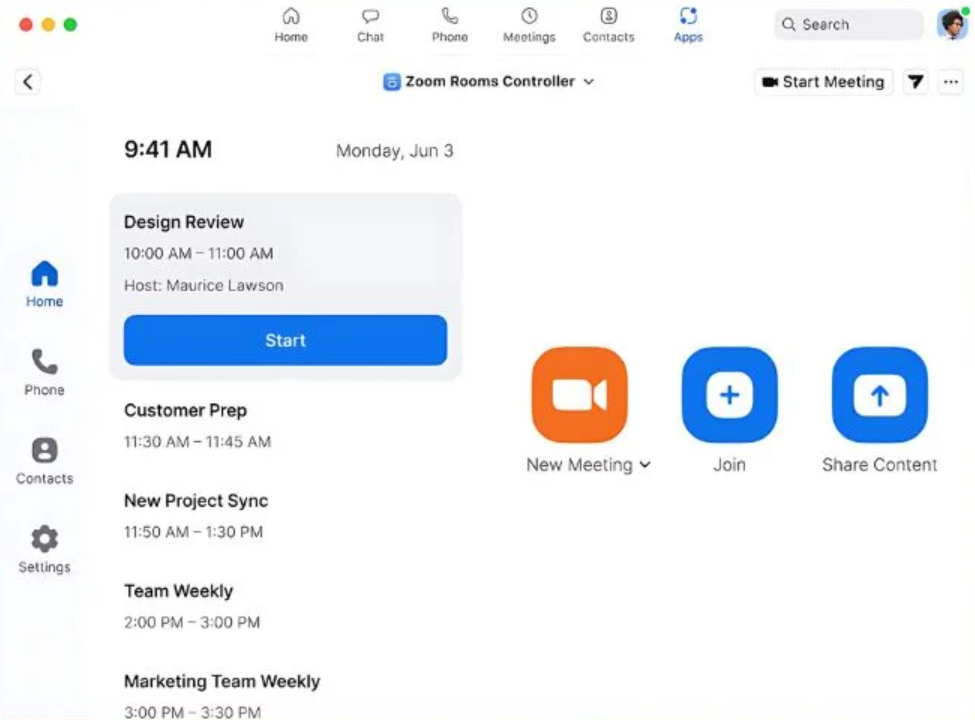
Step 3: Create a new meeting
On the main Zoom interface, click on the "New Meeting" icon with a camera image.
Select the video on/off option and press " Start a Meeting ".
Step 4: Share the meeting link
Once the meeting room is open, you can copy the room link or meeting code by tapping the " Participants " button , then selecting " Invite ".
Next, select " Copy Invite Link " to send to those you want to invite to join.
Step 5: Manage the meeting
During the meeting, you can manage participants, share your screen, record, and end the meeting using tools available on the Zoom control bar.
2. How to create a Zoom meeting room, unlimited online learning
Creating a Zoom meeting room with no time limit is an optimal way to avoid studying or long meetings. The way to do it is also very simple, specifically as follows:
2.1. Use a Zoom Pro paid account
Zoom has a free user policy with a maximum meeting time of 40 minutes for meeting rooms with many participants. To avoid the limit, the easiest way is to upgrade to Zoom Pro or other paid plans.
These plans let you host meetings that last up to 24 hours without interruption. You also get access to a variety of advanced features like waiting rooms, meeting recording, and support for larger numbers of participants.
2.2. Using an educational account (.edu)
Zoom supports email accounts from educational institutions, specifically those with .edu extensions, to grant unlimited access to online meetings.

These accounts are often free or have special offers for students and faculty. You can contact your educational institution to sign up for email.edu and take advantage of this feature.
2.3. How to use temporary accounts (workaround)
For users without a paid account or email.edu, a commonly used trick is to restart the meeting after 40 minutes if it is interrupted. While this is not optimal, it allows the meeting to continue without having to pay an additional registration fee.
3. Some other functions of Zoom
3.1. Some other Zoom functions you should know
Zoom is highly appreciated for its many features that help optimize the learning process, meetings and information exchange. Here are some other functions of this software that you should know:
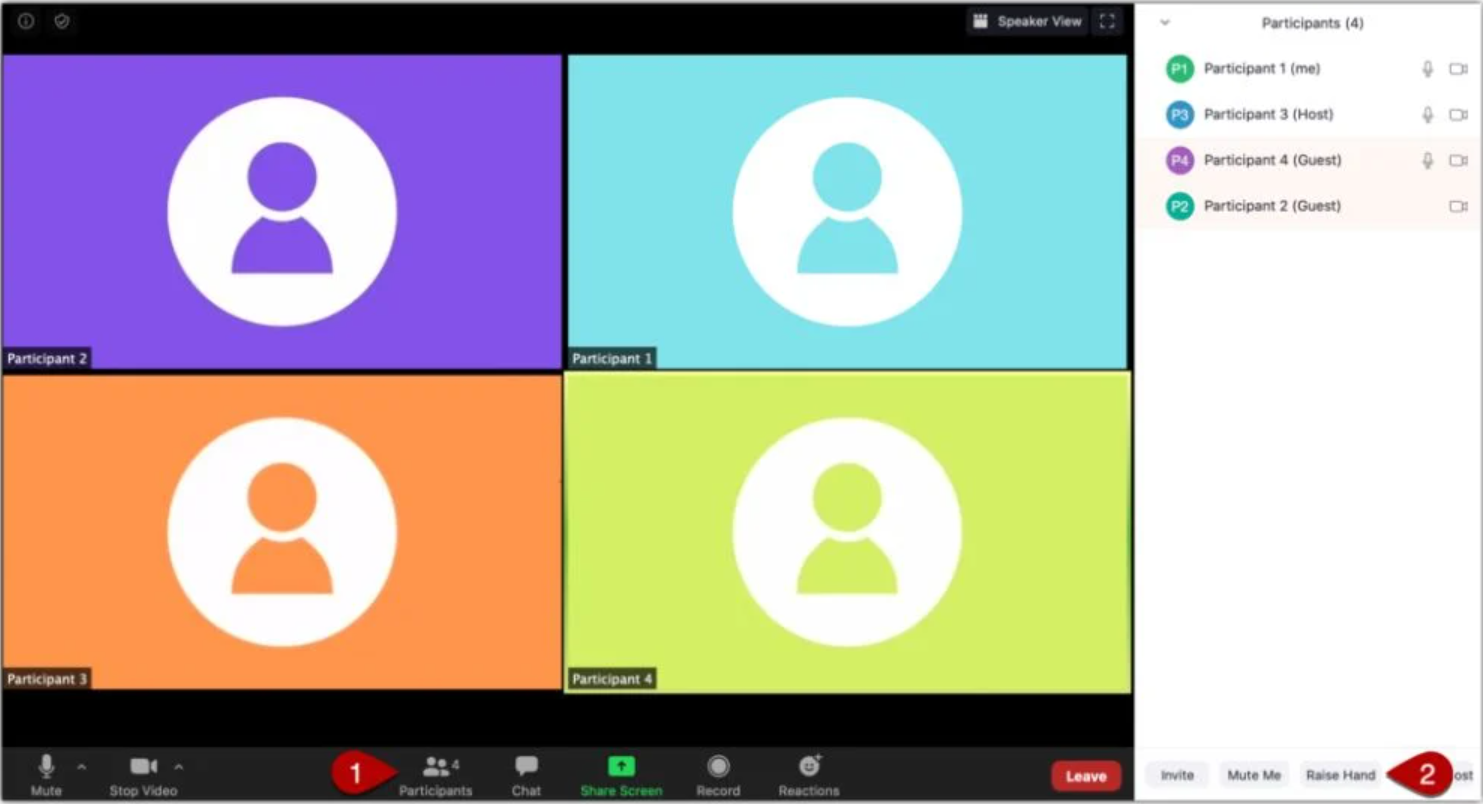
Home: This is the main interface where you can start or schedule a meeting, share your screen, or join planned meetings.
Chat: This feature lets you message colleagues or team members right within the app. You can share documents, send images, and hold group conversations.
Meetings: This is where all the meetings you've scheduled or received invitations to are stored. You can view, edit, or cancel meetings here.
Contacts: This feature manages all your contacts, allowing you to quickly invite people to meetings or chat privately with them.
3.2. Options on the main interface
New Meeting: This feature allows you to instantly open a new meeting room and start an online meeting with just a few clicks.
Schedule: You can schedule future meetings in advance, including setting times, sending invitations, and managing meeting time efficiently.
Share Screen: This feature allows you to share your computer screen with participants, which is useful when giving presentations or live instructions.
4. Instructions for upgrading Zoom Pro account at SaDesign

In fact, you first need to have a Zoom Free account. After paying for the Zoom Pro package, SaDesign staff will directly guide you to upgrade to the Pro version.
Zoom Pro is really necessary to keep your work uninterrupted. To optimize costs, come to SaDesign to upgrade at the cheapest price on the market.
NOTE:
· Expiry date: 1 Month
· Call time: 30 hours
· Number of participants: 100 people
· 5GB cloud meeting recording
· Admin controls (advanced meeting controls, enable and disable recording, chat encryption, and notifications)
---------------------------
Installation and support contact information:
🏡 SADESIGN Software Company Limited
📨 Email: phamvansa@gmail.com
🌍 Website: https://sadesign.ai


