Best Selling Products

ChatGPT Plus Account (GPT-4)
16 USD

Adobe Premiere Pro Account
99 USD

Plugin Retouch4me
69 USD

Genuine Adobe Illustrator account
99 USD

Capcut Pro 1 Year
39 USD

Autodesk All App Account Copyright
120 USD

Adobe Photoshop Copyright - Full App
120 USD

Upgrade Genuine Office 365
49 USD

MidJourney Account
29 USD

Upgrade genuine Capture One account
120 USD

Windows 10 & 11 Pro Key
36 USD

Copyright Adobe Lightroom Account
59 USD

Upgrade Duolingo Super
29 USD

Genuine Cheap Canva Pro
39 USD

Freepik Premium Account
59 USD
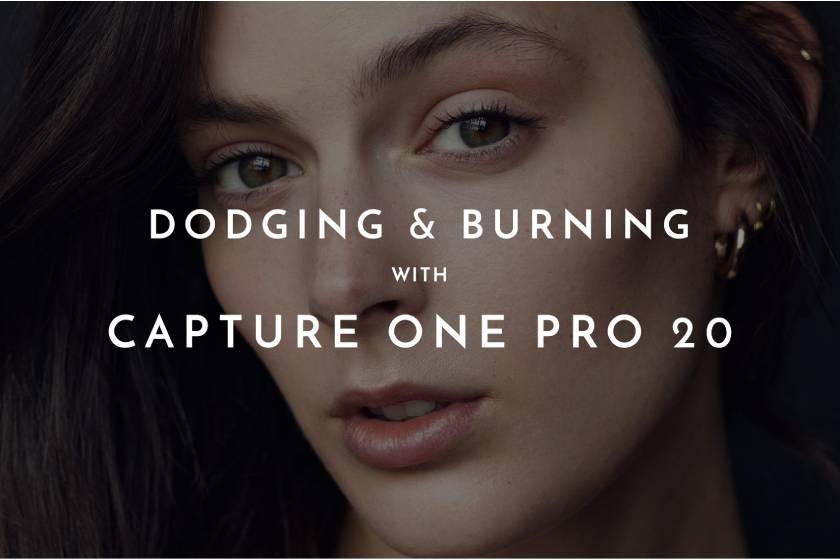
Learn about Dodging and Burning in Capture One Pro 20
Nội dung
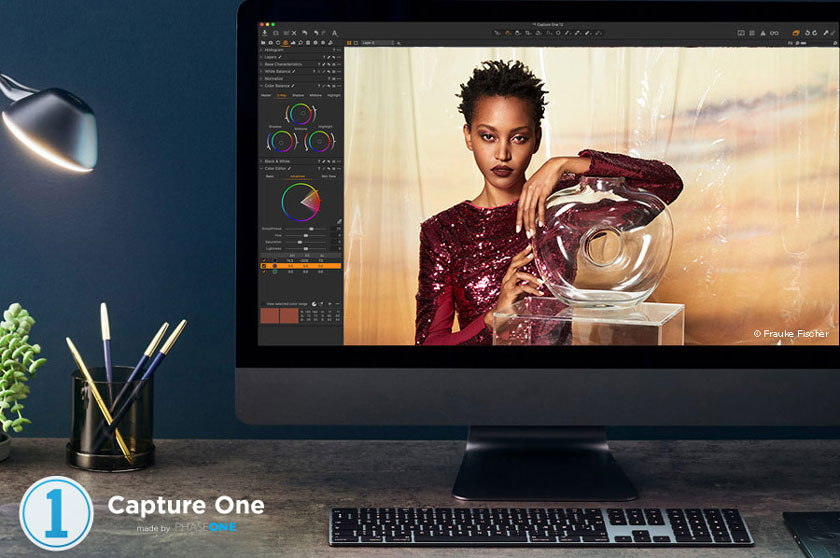
Capture One 20 (13.1) is excellent photo editing software with extremely easy-to-use tools. Capture One 20 helps you create your best photos with crisp, true-to-life colors. In the following article, let's learn about Dodging and Burning in Capture One Pro 20.
Dodging and BurningCapture One Pro 20 software introduction
In the latest version of Capture One there have been many important improvements in skin retouching; In particular the brush tool and the healing brush. These tools allow you to easily remove skin blemishes, with the ability to Dodging and Burning is more suitable than Adobe Photoshop.
For experienced editors, you will definitely understand what Dodging and Burning is. However, many people still do not understand these two tools.
Dodging and Burning is an experimental retouching technique that allows us to dodge (lighten) or burn (darken) specific areas of the image. It helps smooth transitions and makes skin, background, product or hair look even and flawless, while preserving texture and detail.
Caption One Pro 20Error detection and disc burning have been possible in Capture One Pro for more than three years now, since the introduction of layers in version 11. But the capabilities of these layers have been significantly improved according to time.
Layer masking performance has been improved, allowing you to visualize your changes faster, the number of possible layers has increased.
Capture One 20 has a lot of advantages, mainly focusing on three factors: flexibility, quality and portability.
Raw-level editing, which allows you to make changes to all parts of the image at any time, as long as no changes are made and the adjustments of each layer adapt to all. also other parts.
Additionally, help maintain maximum quality by working with raw feed information, not flattening it through the grading process. Finally, instead of leaving a large PSD or TIFF file, the whole editing included a few megabytes of metadata file.
However, there is a slight downside, is that the number of tools is still more than in Photoshop.
If your edits are too broad, such as a nice image, then you should use Photoshop. However, if you are working on a portrait, you may find that the advantages of staying in Capture One far outweigh the toolkit have diminished.
So how can one dodge and burn a raw file in Capture One Pro?
SETTING UP DODGE & BURN IN CAPTURE ONE PRO 20
If you're familiar with dodge and burn in Photoshop, then transferring that skill to Capture One should be pretty straightforward, as it largely mimics its raster-based companion.
Since the blending modes are not currently available in Capture One, the 50% gray layer is not an option here. So we have to use the traditional mask and curve approach. They are equally simple, but require two classes; One to dodge and one to burn.
Creating your layer stack is the biggest difference for those switching from Photoshop, as there are some slight differences in the typical adjustments made. Depending on how you normally dodge and burn your, you will need 3 to 7 layers as outlined below.
Three minimal layers including corrective avoidance (lighten), corrective dodge and corrective burn layer to help us visualize areas of attention, by eliminating color distractions .
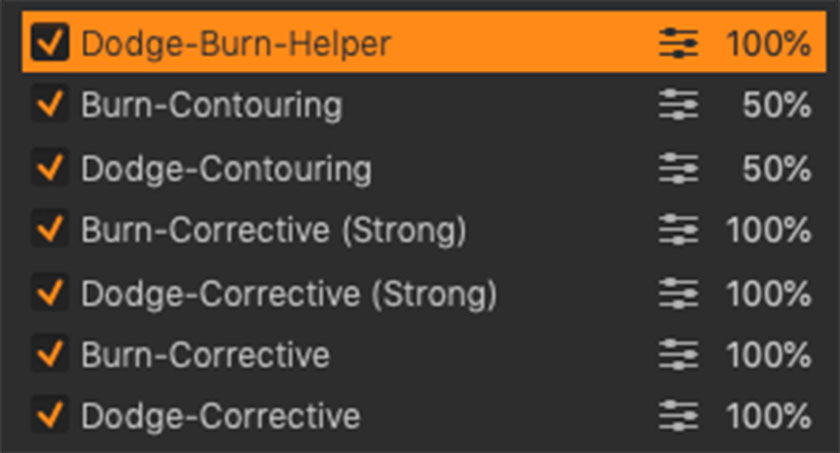 Setting Up Dodge and Burn
When needing to brighten or darken impressively, I recommend adding a pair of strong correction recording layers and a strong correction write layer to your stack.
After editing, if you want to give your image more depth and dimension through the contouring process, you can do this through another pair of layers we call line dodging. contour and write contour.
For each of these layers, you'll go to the layers panel and add a new adjustment layer and label it. Now, you might think that manually creating up to 7 layers and applying adjustments to each layer is pretty tedious.
Below we'll give you some tips on how to speed up the process, but first we must learn to walk before we can run. Let's start by breaking down the adjustments for each layer you will need.
Adjust the Dodge and Burn
After adding your new layer label it as repair dodge and proceed to adjust the curves as shown here. On the RGB curve you will set your Input value to 124 and your Output value to 146.
Like its counterpart, we will create a fix log layer and make adjustments to the opposing curves in the RGB curve by setting Input to 146 and Export to 124.
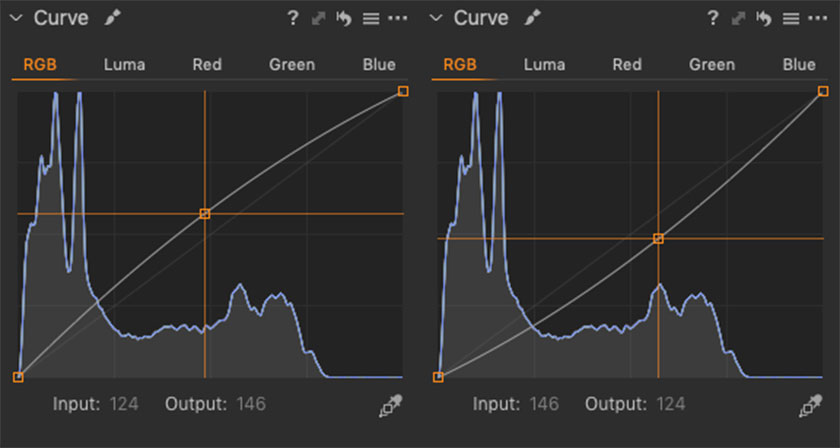 Adjust the Dodge and Burn
Adjust the Dodge and Burn (Strong)
For strong adjustment layers, we will make adjustments to both the RGB curve and the Luma curve to make the effect much more dramatic.
For the corrected (strong) dodge layer, in the RGB curve the Input and Output values should be set to 137 and 153 respectively, while the Input and Output values of the Luma curve should be set to 141. and 174.
For our strong write class, we will make significant adjustments in the other direction. For the RGB curve, Input is set to 137 and output to 121, and in the Luma curve set Input to 142 and Output to 110.
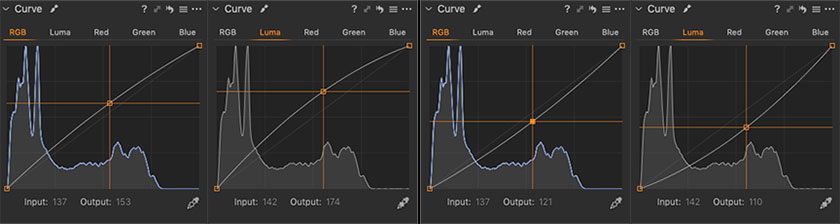 Adjust the Dodge and Burn Strong
Contouring Dodge and Burn
For the dodge and contour write layers, the settings are actually the same as those of dodge and write-fix. However, you'll adjust the layer opacity to 50% instead of the 100% used in other settings.
The reason is because unlike in adjustment layers, in creating lines, we are stylizing the image rather than fixing something, so we want the flexibility to amplify or decrease the effect. of our adjustments.
After finishing your mask, increase the opacity to 70% to make it more visible. Conversely, you can lower them to 40% or less to make them fade.
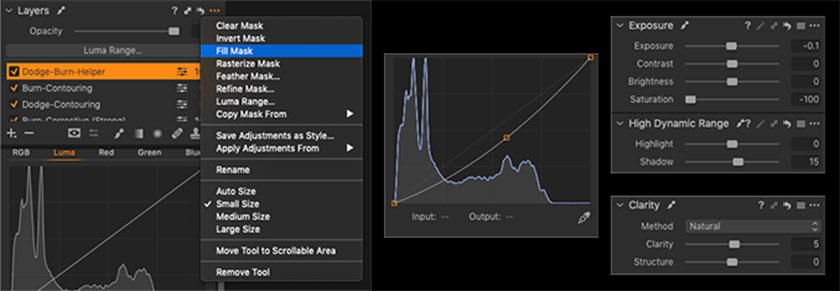
The help of layers
Reducing the brightness of the image and removing color, will help you detect imperfections that need fixing.
The first thing we have to do is create the Help layer and fill the mask from the […] icon at the top right of the Layers pane. Unlike other layers, this one must be fully filled in to be able to see the effect.
Then, we proceed to adjust the Saturation value to -100, Exposure to -0.1, and the Input and Output of the RGB curves to 146 and 115, respectively.
We have made the image black and white and darkened it. To further refine the helper, in the High Dynamic Range section, adjust the Shadows slider to 15 and the Clarity slider to 5.
This will prevent the black from being completely dark and devoid of detail, and the clarity will aid in further highlighting the imperfections.
 The help of layers
YOUR ACCURATE WORK
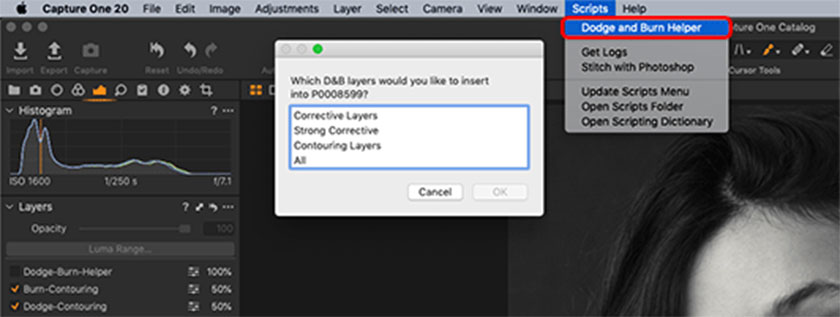
Use Capture One Dodge and Burn Helper Script are built directly into Capture One Pro for Mac OS, and create an entire stack for you in one go.
An alternative approach is to use donor photos in the Capture One session or catalog. In it, you create the entire layer overlay and copy all the adjustments from and into your image for editing.
The last option, is to normalize the adjustments made in each layer by creating Capture One style presets for each layer, and then applying each style to a new layer.
For example you would create a fix dodge preset by making the adjustments as noted above, saving it to an identical style. Then to use it you will select the style, right click and apply it to a new layer.
You will repeat this for each layer on your stack. While this method takes a long time, at least it ensures consistency in adjustments from image to image.
 Create layer on your stack
BUSH INSTALLATION
The last thing you need to do is to install your brush. Just like in Photoshop, a tablet like the Wacom Intuos Pro is recommended to give you a precise level of control.
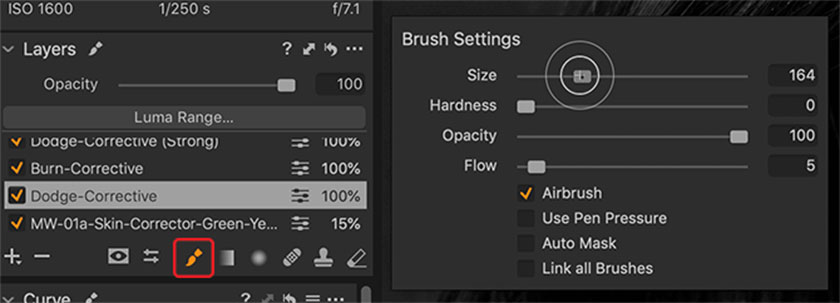
Select the brush tool in the layers panel, then right-click anywhere in the image to bring up the brush settings. Adjust your brush settings as noted in the screenshot.
The Hardness setting is 0, Opacity to 100 and Flow to 5. As with Photoshop, you can make sizing adjustments using the '[' and ']' keys.
 Setup Bush
The rest of dodge and burn follow the same approach you would in Photoshop. All are illustrated in the video below. To review the mask at any time and make sure that you are painting the desired areas, use the 'M' key to show and hide the mask.
If you find your edges too hard in the Contouring or Corrective layers, with your layer selected, click the '...' icon at the top right of the Layers pane and choose Feather Mask to apply the degree of opacity. desired for the mask.
Keep the numbers low for the editing layers and higher for the contour layers. Make sure you only do this once at the end of your editing.
To better understand this whole process, the video below illustrates dodging and burning in Capture One as summarized above:
[embed]https://youtu.be/sF0-8pnnXek[/embed]The video above was recorded prior to the release of Capture One 20 (13.1) with brush and curative enhancements, so you can find a summary of those changes in this video.
[embed]https://youtu.be/3XJ12rb4kg0[/embed]As with Photoshop, proficiency in Dodging and Burning takes practice. So, be patient and stick with it. This process will become quicker and easier as you gain more experience with it!
If there are any problems with these two tools on Capture One, feel free to leave a comment below, the SaDesign Retouching Academy team will help you out. Wish you a good day.
See more The new Capture One 12 has been released


VIP Products


Best Selling Products
ChatGPT Plus Account (GPT-4)
16 USD
Adobe Premiere Pro Account
99 USD
Plugin Retouch4me
69 USD
Genuine Adobe Illustrator account
99 USD
Capcut Pro 1 Year
39 USD
Autodesk All App Account Copyright
120 USD
Adobe Photoshop Copyright - Full App
120 USD
Upgrade Genuine Office 365
49 USD
MidJourney Account
29 USD
Upgrade genuine Capture One account
120 USD
Windows 10 & 11 Pro Key
36 USD
Copyright Adobe Lightroom Account
59 USD
Upgrade Duolingo Super
29 USD
Genuine Cheap Canva Pro
39 USD
Freepik Premium Account
59 USD