Best Selling Products

Genuine Adobe Illustrator account
99 USD

Windows 10 & 11 Pro Key
36 USD

ChatGPT Plus Account (GPT-4)
16 USD

Upgrade Genuine Office 365
49 USD

Copyright Adobe Lightroom Account
59 USD

Adobe Photoshop Copyright - Full App
120 USD

Plugin Retouch4me
69 USD

Adobe Premiere Pro Account
99 USD

Genuine Cheap Canva Pro
39 USD

Capcut Pro 1 Year
39 USD

Freepik Premium Account
59 USD

MidJourney Account
29 USD

Upgrade Duolingo Super
29 USD

Upgrade genuine Capture One account
120 USD

Autodesk All App Account Copyright
120 USD
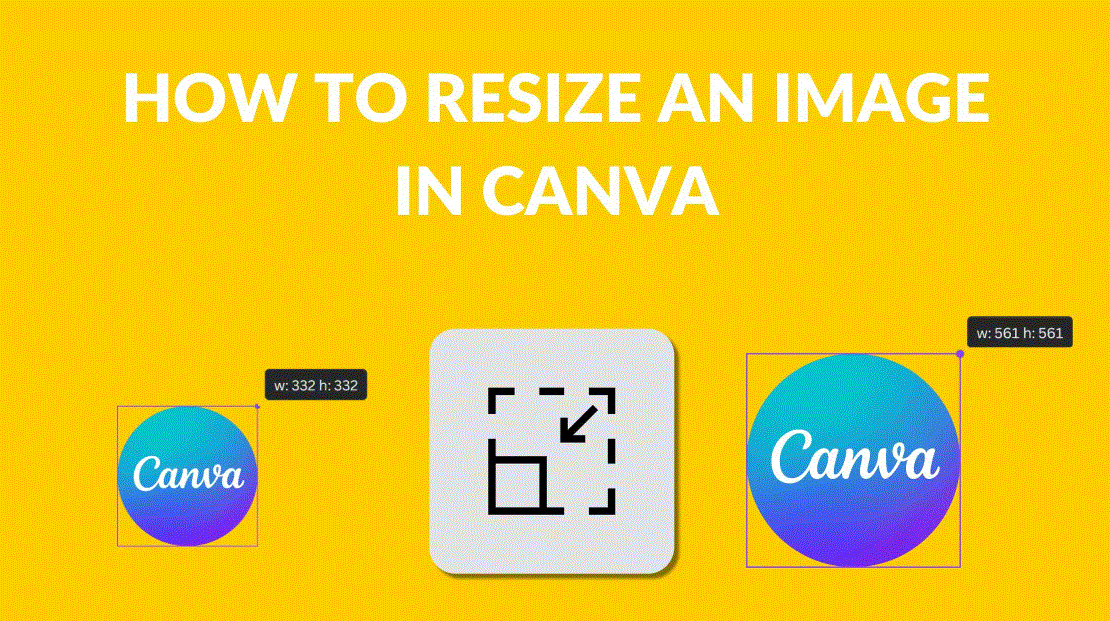
The Easiest Ways to Resize Images in Canva
Nội dung
- 2. How to Resize Images in Canva
- 2.1. Using the Resize Feature
- 2.2. Resizing Manually
- 3. Tips for Better Resizing Results in Canva
- 3.1. Optimize Content After Resizing
- 3.2. Use Canva Pro to Save Time
- 3.3. Check Dimensions Before Publishing
- 4. Practical Applications of Resizing in Canva
- 4.1. Designing Social Media Posts
- 4.2. Preparing Print Materials
- 5. Frequently Asked Questions (FAQs)
- 1. Does Canva Free include the Resize feature?
- 2. Can I choose custom dimensions?
- 3. How can I find the standard dimensions for different platforms?
- 4. Should I adjust the layout after resizing?
- 5. Why should I upgrade Canva through Appvip?
- 6. Conclusion
Canva is an online design tool loved by many thanks to its user-friendly interface and diverse features. One of the secrets to creating professional-looking designs is knowing how to resize images correctly.
1. Why Resize Images in Canva?
Resizing images is an important step that determines the professionalism of any design. No matter how beautiful or creative an image may be, if it does not match a platform’s standard dimensions, important details may get cropped, text may become misaligned, or the design may not appear as originally intended. This not only reduces visual appeal but also affects how effectively your message is communicated. By knowing how to resize properly, you can easily control the layout and ensure that every important detail stands out and grabs attention from the very first glance.
Resizing in Canva offers many practical benefits for users:
Ensure consistency across all platforms: Every social media platform and print product has its own size requirements. Adjusting to the correct dimensions helps images display perfectly on Facebook, Instagram, websites, or presentation slides.
Improve message delivery: Images with proper dimensions make content clearer, easier to understand, and more engaging. A well-balanced layout helps your message stay memorable longer.
Save time and effort: Instead of redesigning from scratch after discovering incorrect dimensions, Canva allows you to adjust sizes in just a few steps, helping you complete projects efficiently and professionally.
Create diverse content more easily: Once you understand how to resize designs, you can reuse the same design across multiple platforms while maintaining layout consistency and image quality.
For these reasons, resizing in Canva is not just a technical task but also an essential secret to elevating every design project, from social media posts to printed documents and professional presentations.
(2).jpg)
2. How to Resize Images in Canva
2.1. Using the Resize Feature
The Resize feature is one of Canva Pro’s most powerful tools, allowing you to quickly change design dimensions without losing layout structure or image quality. Instead of recreating a design from scratch, you can repurpose it for various platforms, from social media posts and posters to presentation slides, with just a few simple clicks.
Step 1: Open Your Design
First, log in to Canva and select the design you want to edit. This allows you to work directly on your existing project without creating a new one, saving both time and effort. Make sure the design is finalized in terms of layout, content, and images before resizing.
-
Visit Canva.com and log into your account.
-
Select the design you want to edit.
-
Open the design file and ensure all elements are positioned correctly.
Step 2: Select the Resize Feature
Once your design is open, you will see the Resize option in the top toolbar. This is where Canva allows you to adjust the width and height of your design flexibly. This feature is especially useful when creating multiple versions of the same design for different platforms.
-
Click Resize on the toolbar.
-
Canva will display common preset sizes such as Instagram Post, Facebook Cover, Poster, and more.
-
You can also enter custom dimensions to meet your specific needs.
Step 3: Enter New Dimensions
At this stage, enter the desired width and height for your design. Canva supports various units such as pixels, inches, centimeters, and millimeters, making it easy to customize for different purposes. Once completed, choose Copy & Resize to keep the original design and create a new resized version.
-
Enter the desired width and height.
-
Select the appropriate measurement unit: px, cm, mm, or inch.
-
Click Copy & Resize to create a duplicate without affecting the original design
(1).jpg)
2.2. Resizing Manually
Even if you are not using Canva Pro, resizing designs is still completely possible through manual methods. Instead of using the Resize feature, you can create a new project with your desired dimensions and copy all content from the original design. This allows you to preserve the layout, images, and text without upgrading your account.
Step 1: Create a New Project
First, create a new project with custom dimensions that suit your needs. Canva’s Custom Size feature allows you to enter precise width and height values, ensuring the final product displays in the correct proportions.
-
Click Create a Design on the Canva interface.
-
Select Custom Size to enter dimensions.
-
Determine the platform or intended use to choose the appropriate size.
Step 2: Enter Dimensions
After selecting Custom Size, enter the exact width and height required. Canva supports various measurement units such as pixels, centimeters, millimeters, and inches, giving you flexibility for different use cases. Once done, click Create New Design to open the new project.
-
Enter the desired width and height.
-
Select the measurement unit: px, cm, mm, or inch according to your needs.
-
Click Create New Design to open the new project.
Step 3: Copy Content from the Original Design
Now return to the original design and select all content, including images, text, icons, and other elements. Copy everything and paste it into the newly created project. This ensures all design details remain intact while adapting to the new dimensions.
-
Open the original design and select all content.
-
Click Copy or press Ctrl + C.
-
Return to the new project and Paste or press Ctrl + V.
-
Review the layout and make minor adjustments if necessar
-
(2).jpg)
-
2.3. Choose Automatic Sizes for Different Platforms
One of Canva’s most convenient features is its collection of pre-designed size templates for popular platforms. Instead of calculating and entering dimensions manually, you simply select the appropriate design type and Canva automatically adjusts the canvas size. This saves time and ensures images and content display correctly without being cropped or distorted.
Popular Canva size templates include:
-
Instagram Post: 1080 × 1080 pixels – ideal for standard square feed posts.
-
Instagram Story: 1080 × 1920 pixels – perfect for full-screen mobile stories.
-
Facebook Cover: 820 × 312 pixels – ensures personal profiles and fan pages look balanced and professional.
-
YouTube Thumbnail: 1280 × 720 pixels – the standard size for video thumbnails, helping attract viewers while maintaining image quality.
In addition to these common templates, Canva also offers numerous sizes for Pinterest, LinkedIn, Twitter, printed posters, and presentation slides. With just a few clicks, you can create designs optimized for any platform without worrying about dimensions or image quality.
3. Tips for Better Resizing Results in Canva
3.1. Optimize Content After Resizing
After resizing a design, not everything will automatically fit perfectly. Some elements such as images, icons, or text may become misaligned or unbalanced. Therefore, reviewing and adjusting each detail is essential to ensure the design remains visually appealing and harmonious. Check spacing between elements, font sizes, and image proportions so the final product looks polished and professional.
Additionally, optimizing content helps communicate your message more effectively. For example, if text becomes too lengthy, you can adjust font sizes or reorganize the layout to make information easier to absorb. Canva provides drag-and-drop tools, alignment options, and grid displays to help you make these adjustments quickly and accurately.
3.2. Use Canva Pro to Save Time
If you frequently need to resize designs for multiple platforms, upgrading to Canva Pro can save significant time. The automatic Resize feature allows you to change dimensions with just a few clicks, eliminating the need to create new projects or manually copy content. This is particularly useful for marketers, social media designers, and anyone managing multiple communication channels.
Canva Pro also lets you save favorite dimensions and apply them directly to future designs, making reuse faster while maintaining image quality. This reduces workload, improves efficiency, and allows you to focus more on creativity rather than worrying about dimensions.
3.3. Check Dimensions Before Publishing
Before publishing or sharing a design, always verify that its dimensions meet the platform’s requirements or intended purpose. A correctly sized design will display properly on social media, websites, or printed materials, avoiding cropping or distortion. This ensures a professional final product and leaves a positive impression on viewers.
In addition, reviewing dimensions gives you an opportunity to fine-tune small details such as margins, text spacing, or image placement before publishing. Canva offers preview modes that allow you to check how designs will appear across different platforms, ensuring all elements are balanced and the content is communicated exactly as intended.
(1).png)
4. Practical Applications of Resizing in Canva
4.1. Designing Social Media Posts
Resizing allows you to create perfectly proportioned posts for platforms such as Instagram, Facebook, Pinterest, and LinkedIn without redesigning from scratch. This not only saves time but also ensures that images, text, and other design elements appear balanced and attractive. A properly formatted post helps your brand or content stand out on social media and increases engagement potential.
4.2. Preparing Print Materials
For printed products such as posters, flyers, brochures, or business cards, correct dimensions are essential to ensure sharp print quality and balanced layouts. Without proper sizing, images may appear pixelated, text may be cut off, or proportions may become distorted. Canva enables you to create print-ready designs with precise dimensions while maintaining a professional layout down to the smallest details.
4.3. Creating Presentation Slides
Adjusting slide dimensions ensures presentation content is displayed clearly and fits perfectly within the screen, preventing text overflow or image cropping. By designing slides with appropriate dimensions, you can organize elements, images, charts, and text more effectively, making presentations easier to follow and more impactful. Canva supports standard slide sizes such as 16:9 and 4:3, making them compatible with popular presentation software like PowerPoint and Google Slides.
(1).png)
5. Frequently Asked Questions (FAQs)
1. Does Canva Free include the Resize feature?
If you are using Canva Free, the automatic Resize feature is not available. However, you can still resize designs manually by creating a new project with custom dimensions and copying content from the original design. To save time and streamline the process, consider upgrading to Canva Pro through Appvip and enjoy professional resizing capabilities.
2. Can I choose custom dimensions?
Absolutely! When creating a new design in Canva, you can enter your preferred width and height using pixels, centimeters, millimeters, or inches. This flexibility allows you to tailor designs for specific platforms or purposes, from social media content to print materials, while maintaining a balanced and visually appealing layout.
3. How can I find the standard dimensions for different platforms?
Canva provides ready-made templates with standard dimensions for platforms such as Instagram, Facebook, YouTube, and print products. Simply select the relevant design type, and Canva will automatically adjust the canvas size, saving you time and ensuring the design displays correctly without needing external research.
4. Should I adjust the layout after resizing?
Yes. After resizing, certain elements such as text, images, or icons may need repositioning to maintain balance and harmony. Canva’s drag-and-drop tools and smart alignment features help you optimize layouts quickly, ensuring the final design looks both attractive and professional.
5. Why should I upgrade Canva through Appvip?
Upgrading Canva through Appvip provides a smoother design experience and access to premium features, including automatic Resize, unlimited design storage, and premium templates. It is an ideal solution for marketers, designers, and individuals who want to elevate their projects, save time, and improve productivity.
6. Conclusion
Resizing images in Canva is an essential step to ensure every design looks polished and works effectively across different platforms. By applying the simple yet effective techniques outlined in this article, you can easily optimize designs, save time, and enhance the visual appeal of every project. Canva offers maximum flexibility, helping transform your ideas into beautiful, professional, and impressive designs like never before.


VIP Products


Best Selling Products
Genuine Adobe Illustrator account
99 USD
Windows 10 & 11 Pro Key
36 USD
ChatGPT Plus Account (GPT-4)
16 USD
Upgrade Genuine Office 365
49 USD
Copyright Adobe Lightroom Account
59 USD
Adobe Photoshop Copyright - Full App
120 USD
Plugin Retouch4me
69 USD
Adobe Premiere Pro Account
99 USD
Genuine Cheap Canva Pro
39 USD
Capcut Pro 1 Year
39 USD
Freepik Premium Account
59 USD
MidJourney Account
29 USD
Upgrade Duolingo Super
29 USD
Upgrade genuine Capture One account
120 USD
Autodesk All App Account Copyright
120 USD