Best Selling Products

MidJourney Account
29 USD

Upgrade genuine Capture One account
120 USD

Genuine Adobe Illustrator account
99 USD

Autodesk All App Account Copyright
120 USD

Adobe Photoshop Copyright - Full App
120 USD

Adobe Premiere Pro Account
99 USD

Capcut Pro 1 Year
39 USD

Windows 10 & 11 Pro Key
36 USD

Genuine Cheap Canva Pro
39 USD

Upgrade Duolingo Super
29 USD

Copyright Adobe Lightroom Account
59 USD

Plugin Retouch4me
69 USD

ChatGPT Plus Account (GPT-4)
16 USD

Upgrade Genuine Office 365
49 USD

Freepik Premium Account
59 USD
The simplest way to use the Gradient Tool in Photoshop
Nội dung
- 1. What is the Gradient Tool in Photoshop?
- 2. Types of Gradients in Photoshop
- 2.1 Gradient Fills
- 2.2 Linear Gradient
- 2.3 Radial Gradient
- 2.4 Angle Gradient
- 2.5 Reflected Gradient
- 2.6 Diamond Gradient
- 2.7 Gradient Library
- 2.8 Custom Gradients
- 3. How to create a Solid Gradient
- 4. Instructions for creating Noise Gradient
- 5. How to fill color with Gradient Tool in Photoshop
- 6. Conclusion
If you are a graphic designer, you must have heard of the Gradient Tool in Photoshop. This is a powerful tool that helps create impressive color effects, bringing depth and vibrancy to your works. In this article, we will explore how to use the Gradient Tool in the simplest and most effective way, from basic concepts to advanced techniques. Let's start your creative journey with the Gradient Tool with Sadesign!
If you are a graphic designer, you must have heard of the Gradient Tool in Photoshop. This is a powerful tool that helps create impressive color effects, bringing depth and vibrancy to your works. In this article, we will explore how to use the Gradient Tool in the simplest and most effective way, from basic concepts to advanced techniques. Let's start your creative journey with the Gradient Tool with Sadesign !
1. What is the Gradient Tool in Photoshop?
The Gradient Tool is a tool in Adobe Photoshop that allows you to create smooth transitions between two or more different colors. This tool is not only useful for creating backgrounds for images, but can also be applied to create special effects for text and images. With the flexibility of the Gradient Tool, you can easily create unique and attractive works of art.
2. Types of Gradients in Photoshop
2.1 Gradient Fills
Gradient Fills is a standout feature in Photoshop that allows users to create smooth and subtle color effects. To use the Gradient Tool, simply press the G key or select the rectangle icon from the left toolbar. Once the tool is activated, you can choose from a variety of gradient styles such as linear, radial, angle, reflected, and diamond, each of which offers a unique experience in creating color effects.
When you start using Gradient Fills, a cursor that looks like a plus sign will appear. Simply click and drag the cursor to define the start and end points for your gradient. If the distance between these two points is large, the color transition will be smoother; conversely, if the distance is small, the transition will feel choppy. This allows you to control and fine-tune the color effect to your liking.
.png)
2.2 Linear Gradient
Linear Gradient is the most basic type of gradient, allowing the color to transition in a straight line from one point to another. With this feature, users can create smooth, simple, yet eye-catching effects. When applying Linear Gradient, you can easily control the direction and length of the gradient, bringing flexibility to your design.
The strength of Linear Gradient is its ability to create unique background and image effects. By changing two colors, you can create beautiful pictures or highlight elements in your design. Linear Gradient is great for creating flat backgrounds, simple yet effective color transitions.
.png)
2.3 Radial Gradient
Radial Gradient is a type of gradient that creates a transition of color from a central point in all directions. This creates a striking circular effect, with the starting point being the center and the color shades gradually transitioning outward. Radial Gradients are often used to create lighting effects or circular backgrounds, bringing life to a design.
Using Radial Gradients, you can easily create a sense of depth and space in your work. Designs with Radial Gradients can create a cozy feel and draw attention to the center of the image, making it a useful tool in creating unique works of art.
.png)
2.4 Angle Gradient
Angle Gradient allows you to create color transitions at an angle. With this gradient, the colors blend clockwise from the start point to the end point around the angle. This creates a unique and interesting color effect, different from traditional gradients.
Angle Gradient is great for creating dynamic and complex effects. You can use it to highlight elements in your design, or create backgrounds with depth and movement, making your work more impressive.
.png)
2.5 Reflected Gradient
Reflected Gradient creates a reflective effect, similar to doubling the color from the starting point to the sides. This creates a sense of symmetry and balance, suitable for designs that require harmony and uniformity. Reflected Gradient is useful for creating backgrounds or design elements with a highly artistic nature.
Using Reflected Gradient, you can create impressive images with depth and variety in color. This effect makes your work more vivid and attractive, especially in art and fashion related designs.
.png)
2.6 Diamond Gradient
Diamond Gradient is a gradient style that creates a diamond shape, with a starting point as a diamond trajectory and transitioning to an ending point. This gradient style gives a unique and deep look, often used to create backgrounds and artistic design elements.
Diamond Gradient is ideal for creating geometric effects and abstract art. With the subtle arrangement of colors, you can create unique works of art that attract the viewer's attention and convey a powerful message.
.png)
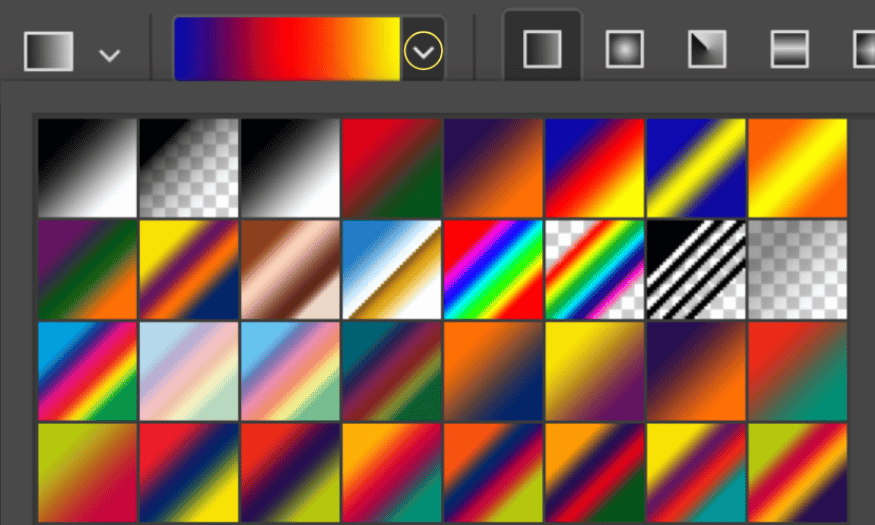
2.7 Gradient Library
Photoshop provides a large library of ready-made gradients that you can use right away. When you select the Gradient Tool, you can access this library via the drop-down arrow next to the gradient fill dialog box. This makes it easy to find and apply gradients without having to create them yourself.
Additionally, you can also expand your gradient library by adding new gradients from different collections like Pastels, Color Harmonies, and many more. This feature enhances your creativity, allowing you to experiment and combine different styles in your designs.
2.8 Custom Gradients
To create gradients that are completely unique and tailored to your needs, Photoshop allows you to customize gradients. Simply click the Gradient Fill dialog box and access the Gradient Editor to edit existing gradients or create new ones. This feature gives you the ultimate flexibility in creating gradients of your choice.
You can create gradients as either Solid or Noise. Solid gradients create a continuous color transition, while Noise gradients create a random scattering of colors, giving your designs an interesting and unique effect. Customizing gradients allows you to express your personal style and create unique works of art.
3. How to create a Solid Gradient
When you want to create a Solid Gradient in Photoshop, you are presented with a smooth gradient slider that allows you to fully customize the appearance of the gradient. Through this slider, you can adjust different elements to create the most satisfying color effect. Below is a table describing the important components in the process of creating a Solid Gradient:
.png)
Ingredient
Describe
Smoothness
Affects the color transition in the gradient. At 100%, the gradient will create a gradual transition; values less than 100% will create a more dramatic transition.
Color Stop
Specify the colors in the gradient. Double-click a color stop to open the Color Picker dialog box. You can also move the color stops to adjust them without affecting the gradient.
Midpoint
Controls the blending of colors in the gradient. The default midpoint is 50%, but you can move it to customize the transition.
Opacity Stop
Set on color stops, affects the opacity of each color in the gradient. Click on an opacity stop to adjust its transparency.
Location
Determines the actual position of the color and opacity stops. 0% is on the left side of the slider, while 100% is on the right side.
Delete
Allows you to delete a color or opacity stop in the gradient slider. Click the stop to turn on the black triangle, then press Delete to remove it.
Adding Stops
Add a color or opacity stop to the slider by clicking above the slider for opacity stop or below for color stop.
Once you’ve finished creating your custom gradient, don’t forget to give it a name and hit New to add it to your gradient library. If you want to save your gradient for future use, simply hit Save to export your gradient as a GRD file. This way, you can easily access and use it in future projects.
4. Instructions for creating Noise Gradient
Noise Gradients offer a completely different experience than traditional gradients. With Noise Gradients, you can create interesting, random, and unique color effects. Below is a table describing the important components in the process of creating a Noise Gradient:.png)
Ingredient
Describe
Roughness
A roughness value greater than 20% will create different colored lines in the gradient slider; as the value increases, these lines will become more distinct and sharp. Conversely, if the value is less than 20%, the gradient will feel smoother.
Color Model
You can choose between color modes like RGB, HSB, and LAB. RGB combines the three primary colors red, green, and blue to create a range of colors. HSB is based on Hue, Saturation, and Brightness. LAB reflects how humans perceive color, allowing for a more nuanced description of color. The gray and white sliders determine the range of colors contained in the noise gradient.
Restrict Colors
When this option is enabled, the colors in the gradient slider will be limited to less saturated colors, creating a clean look for the design.
Add Transparency
This option allows you to add a transparent noise effect to the slider, represented by a checkerboard pattern, giving a unique feel to the gradient.
Randomize
Click this button to randomize the colors in the gradient slider, allowing you to create interesting and unique color variations.
Once you understand each element, you can easily create a unique and creative Noise Gradient in your design. Experiment with different settings to discover the endless potential that Noise Gradient brings!
5. How to fill color with Gradient Tool in Photoshop
Step 1: Create a selection
Define a selection : To apply the Gradient effect accurately, create a selection where you want to fill it with color.
Selection tool : You can use the available tools like square, circle, or create your own custom shape.
Tip : If you just want to experiment, create a small square selection for easy adjustment.
Step 2: Select the Gradient tool
Find the tool : Click on the Paint Bucket icon and hold to reveal the Gradient icon.
Show Toolbar : After selecting Gradient, the toolbar will appear at the top of the Photoshop window, allowing you to customize it easily.
Step 3: Choose color
Color Palette : Look at the color palette with small squares on the right hand side to select the color you want to apply.
Start and End Color : The two overlapping color boxes in the lower left corner will define the color for the start point (top box) and end point (bottom box). The colors will blend according to the mode you choose.
Step 4: Select effect type
Gradient Type Selection : You can choose between effect types like Linear, Radial, Angular, Reflected, and Diamond.
Preview : On the Gradient bar on the left, you will see samples to visualize the effect you want to apply.
Step 5: Drag and Drop
Drag to apply : Click and hold the mouse to drag from the start point (darkest color) to the end point.
Choose the end point : The end point does not have to be right at the corner or edge of the picture.
Note : A shorter distance between the start and end points will create a more abrupt color transition, which can make the effect look unnatural.
6. Conclusion
The Gradient Tool in Photoshop is an extremely useful tool for any designer. With the simple steps above, you can create beautiful and impressive gradients for your works. Experiment with different types of gradients and create unique effects, bringing your ideas to life.


VIP Products


Best Selling Products
MidJourney Account
29 USD
Upgrade genuine Capture One account
120 USD
Genuine Adobe Illustrator account
99 USD
Autodesk All App Account Copyright
120 USD
Adobe Photoshop Copyright - Full App
120 USD
Adobe Premiere Pro Account
99 USD
Capcut Pro 1 Year
39 USD
Windows 10 & 11 Pro Key
36 USD
Genuine Cheap Canva Pro
39 USD
Upgrade Duolingo Super
29 USD
Copyright Adobe Lightroom Account
59 USD
Plugin Retouch4me
69 USD
ChatGPT Plus Account (GPT-4)
16 USD
Upgrade Genuine Office 365
49 USD
Freepik Premium Account
59 USD