Best Selling Products

Upgrade genuine Capture One account
120 USD

Capcut Pro 1 Year
39 USD

Genuine Adobe Illustrator account
99 USD

Autodesk All App Account Copyright
120 USD

Windows 10 & 11 Pro Key
36 USD

Copyright Adobe Lightroom Account
59 USD

ChatGPT Plus Account (GPT-4)
16 USD

Adobe Photoshop Copyright - Full App
120 USD

Upgrade Genuine Office 365
49 USD

Adobe Premiere Pro Account
99 USD

Upgrade Duolingo Super
29 USD

Plugin Retouch4me
69 USD

Freepik Premium Account
59 USD

Genuine Cheap Canva Pro
39 USD

MidJourney Account
29 USD
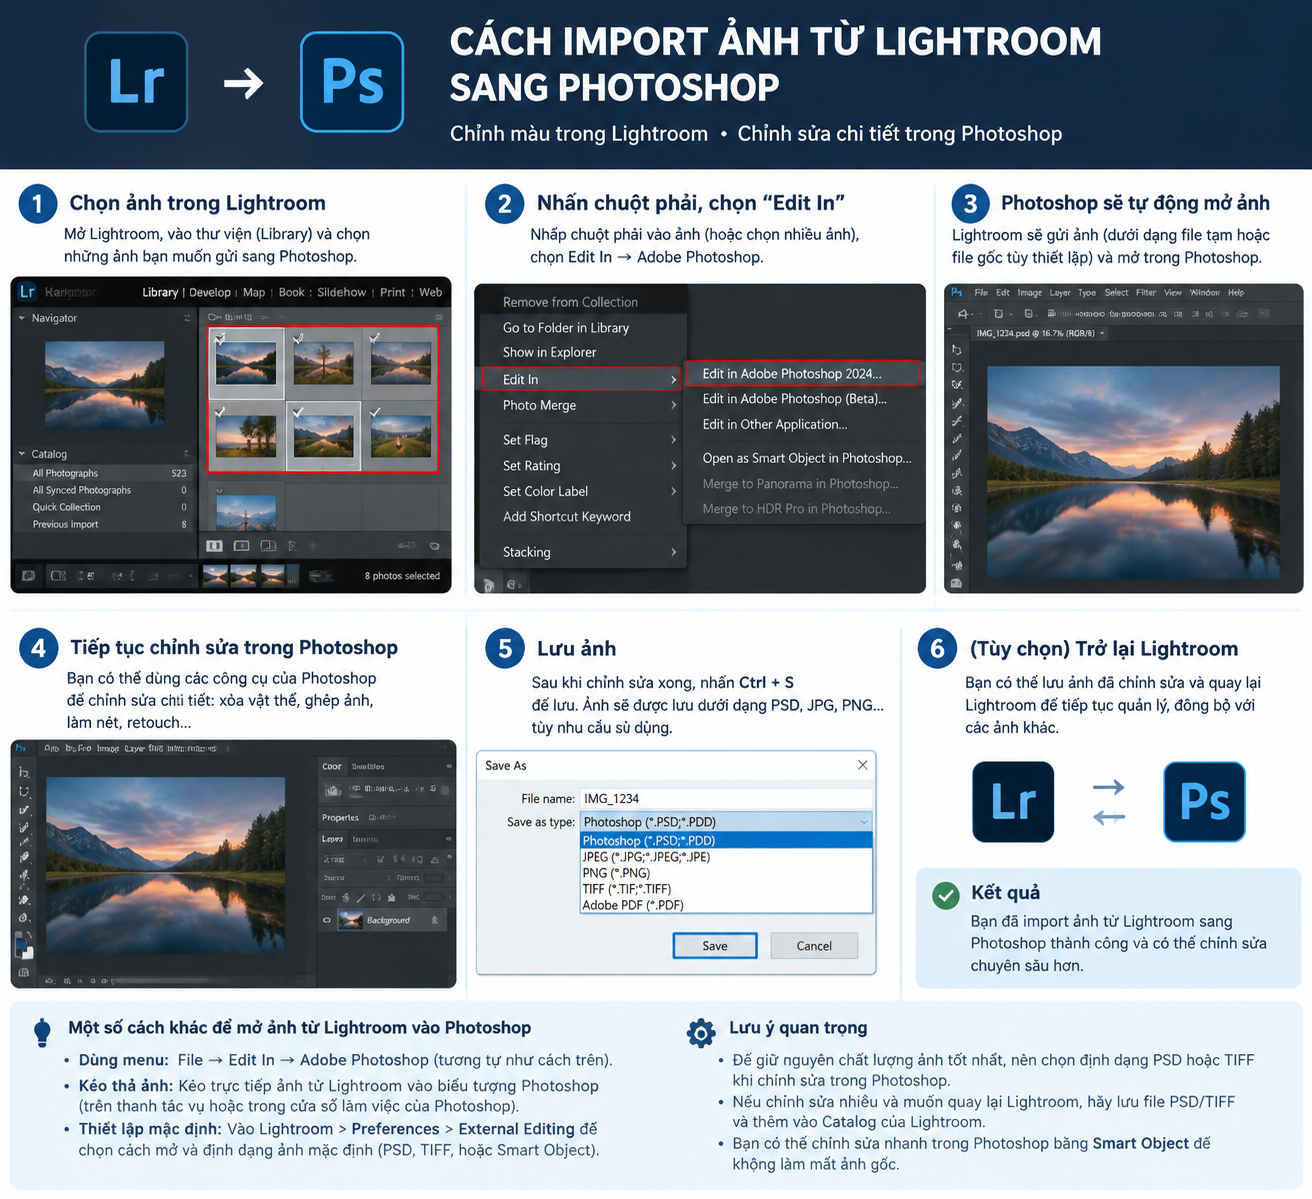
Transferring photos from Lightroom to Photoshop: How to import photos from Lightroom to Photoshop
Nội dung
- 1. Choose a Preset to Define the Photo Style
- 2. Correct Lens Distortion Before Adjusting Other Parameters
- 3. Adjust the brightness to match the photographer's vision.
- 4. Fine-tune the white balance and tone for the most natural-looking skin.
- 5. Explore Tone Profile Options to Create Depth in Your Photos
- 6. Transfer the image to Photoshop for detailed processing.
- 7. Transfer your work from Photoshop back to Lightroom to finish.
- 8. Add Film Effects to Enhance the Vintage Look of the Photo
- 9. Conclusion
For any photographer using Lightroom and Photoshop simultaneously, moving an image back and forth between the two programs might seem simple, but without following a proper procedure, image quality and color accuracy can easily be affected.
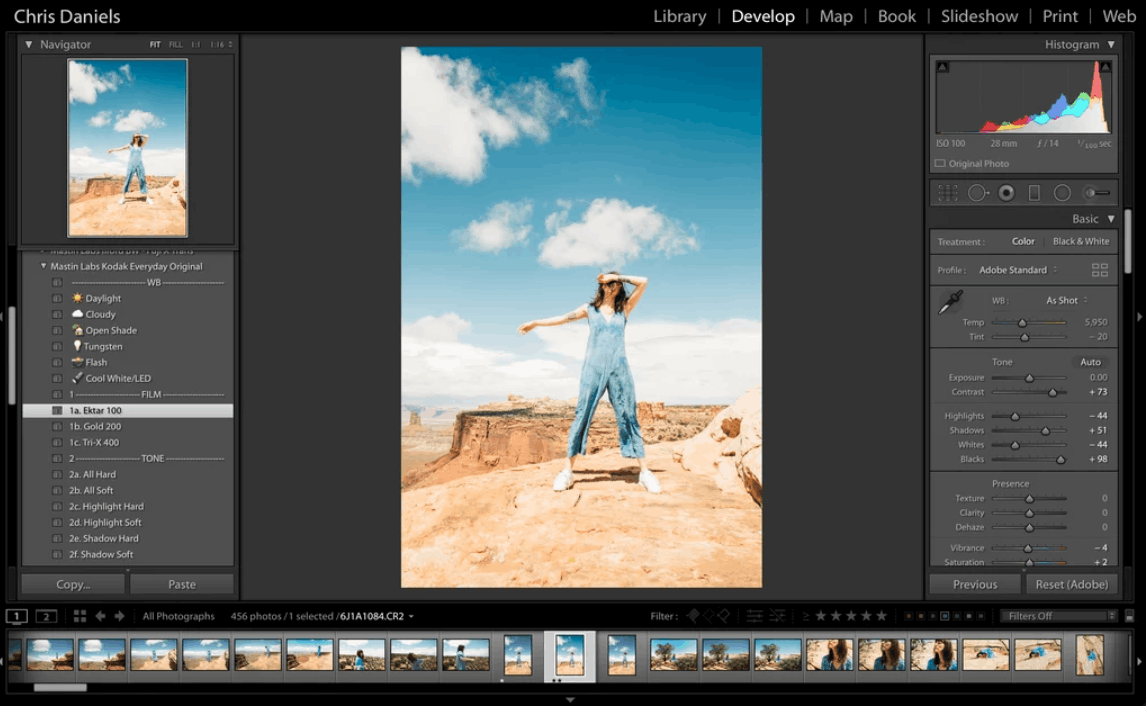
1. Choose a Preset to Define the Photo Style
The first and most fundamental step in the entire editing process is choosing a preset that matches the spirit of the photograph. A quality preset doesn't just change the colors; it also recreates the characteristics of each film type, from contrast and skin tone to how light and shadows are rendered. Choosing a preset from the start helps you visualize the overall direction of the image, making subsequent adjustments more consistent and clearly directed, rather than making disjointed and aimless edits.
Each preset usually has its own personality; some lean towards warm and vibrant tones, suitable for landscapes or photos with prominent red and orange colors, while others are more gentle and clear, ideal for portraits or wedding photos. Take the time to experiment with several different presets on the same photo to feel the difference before making your final decision.
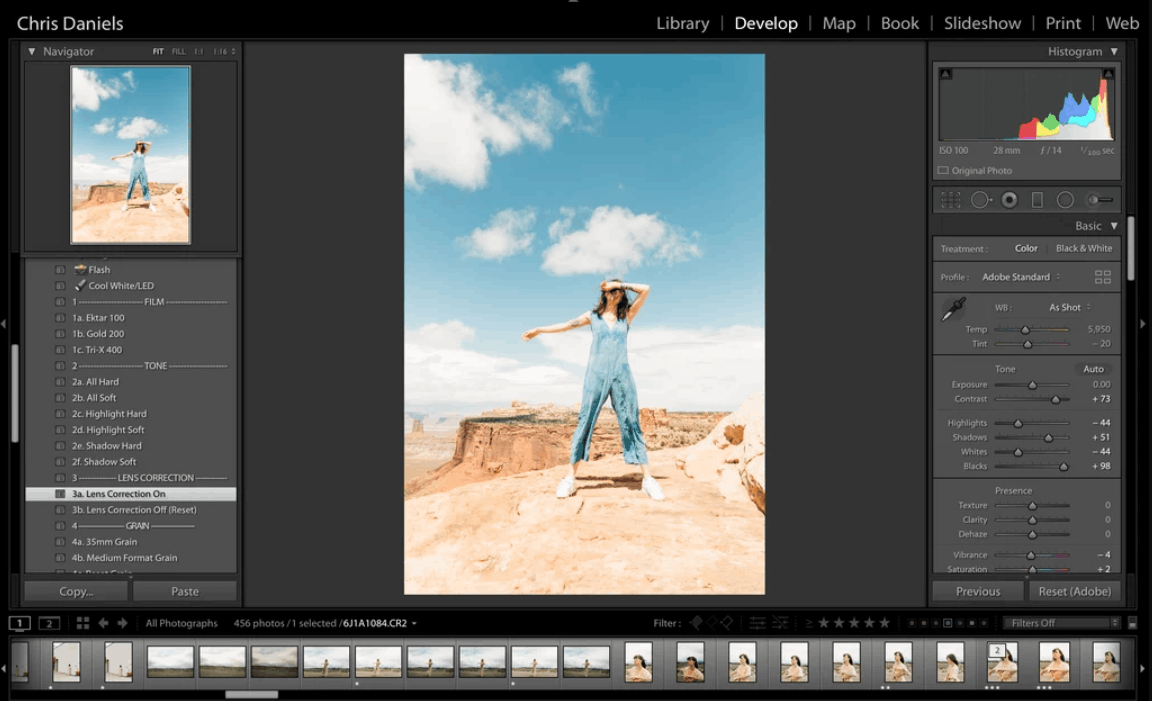
2. Correct Lens Distortion Before Adjusting Other Parameters
This is a step that is often overlooked but has a significant impact on the final result. Lens calibration should be performed immediately after applying the preset and before adjusting the exposure, because this operation not only eliminates distortion caused by the lens's optical characteristics but also addresses vignetting.
Depending on the type of lens you're using, corner distortion correction can significantly alter the overall brightness of the image, sometimes making it noticeably brighter than before correction. For this reason, if you adjust the exposure before correcting lens distortion, the brightness settings you just established may become inaccurate after Lightroom automatically rebalances the brightness at the corners of the image. Therefore, always prioritize lens correction as the first step on your to-do list.
3. Adjust the brightness to match the photographer's vision.
After distortion correction and vignetting have been removed, this is a good time to reassess the overall exposure. In most cases, you'll need to slightly increase the brightness because the common tendency in digital photography is to slightly underexpose the image to preserve detail in the highlights, especially when shooting RAW files.
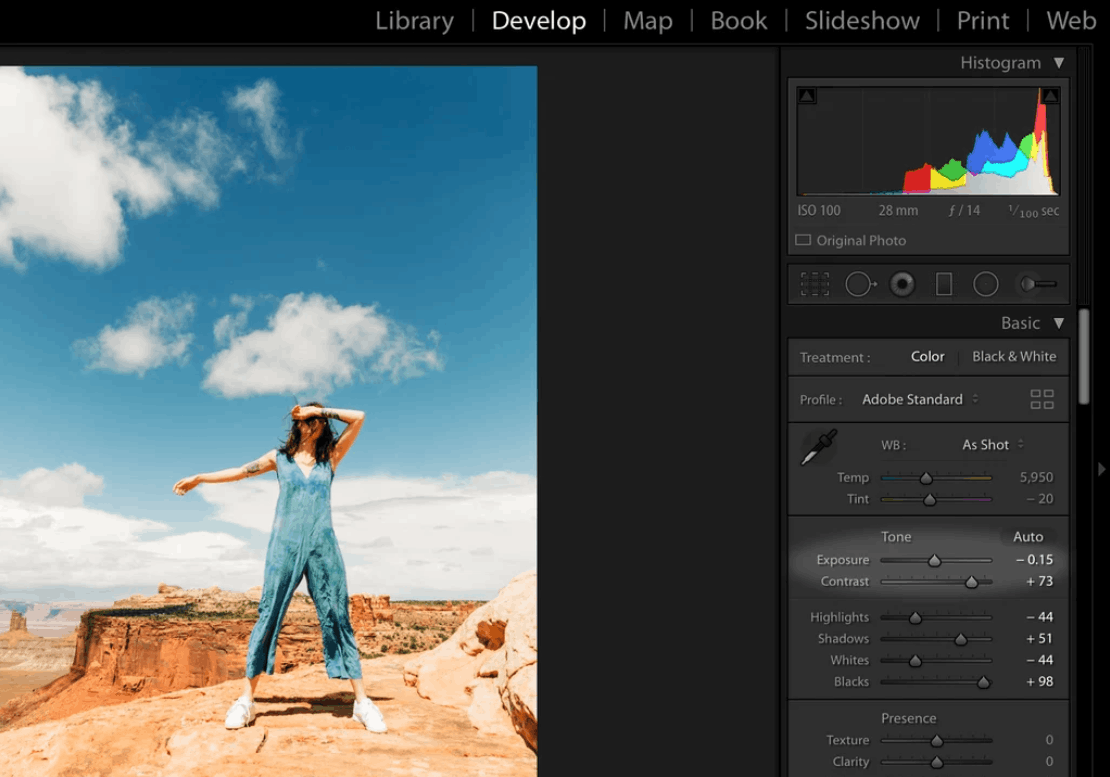
However, the degree of adjustment depends heavily on individual photography habits and lighting conditions. Some people are used to shooting in low light to avoid overexposure, while others prefer to let the camera automatically meter the light and only intervene when absolutely necessary. The important thing is to carefully observe the histogram, ensuring that detail in both bright and dark areas is preserved harmoniously, avoiding loss of detail in important areas of the photograph.
4. Fine-tune the white balance and tone for the most natural-looking skin.
This is perhaps the step that many beginners find most confusing, but it is also the most crucial step in determining the authenticity of the photograph, especially for photos of people.
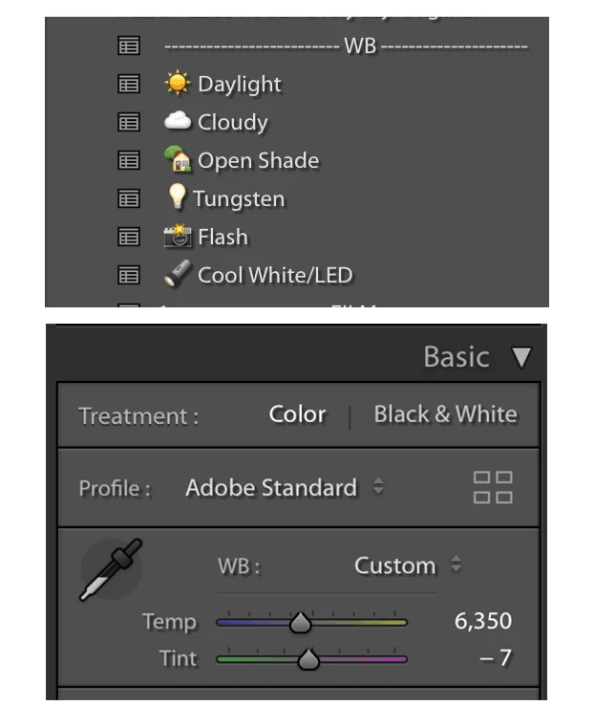
A few general principles can help guide you when adjusting color temperature and tint. If the photo tends to be cool, drag the temperature slider towards yellow to warm the tone. Conversely, if the photo tends to be too warm, drag the slider towards blue to balance it out. For tint, if the subject's skin has a greenish tint, drag the tint slider towards magenta; if the skin is excessively purplish-pink, drag it towards green to neutralize it. A helpful tip is to carefully observe the shadows in the photo, as this is often where color deviations that need adjustment are most evident.
5. Explore Tone Profile Options to Create Depth in Your Photos
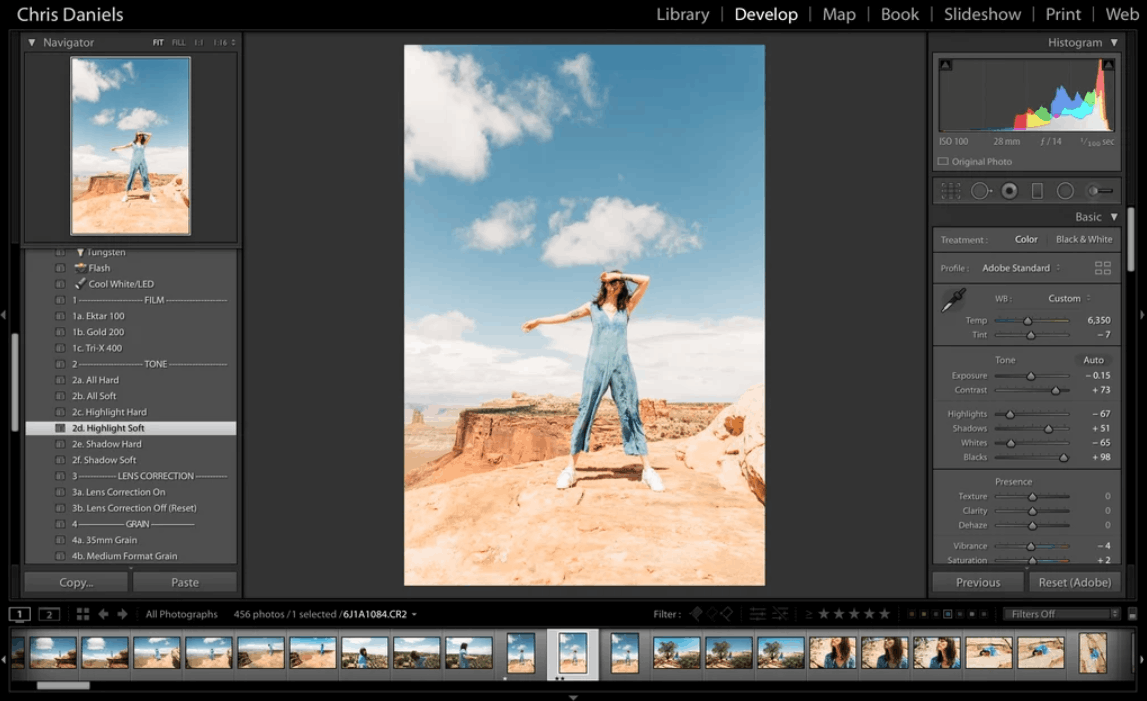
This is an optional feature, but it's a highlight that helps your presets more realistically recreate the feel of traditional film. When professional labs scan film with Fuji scanners, they often have many different tone correction options such as hardening the entire tone, softening the entire tone, hardening only the highlights, softening only the highlights, hardening the shadows, or softening the shadows.
Similar options are also built into high-quality presets, allowing you to selectively fine-tune contrast in specific areas of light and shadow, rather than applying it uniformly to the entire image. While entirely optional, experimenting with different tone profiles can add depth and personality to the final product, making your photos stand out from those that simply use presets.
6. Transfer the image to Photoshop for detailed processing.
If your photo requires additional editing that Lightroom can't handle, such as removing complex objects, layering multiple exposures, or fine-tuning details using hand-drawn tools, this is the right time to transfer it to Photoshop. It's important to note that this step should be done before proceeding with any further editing in Lightroom.
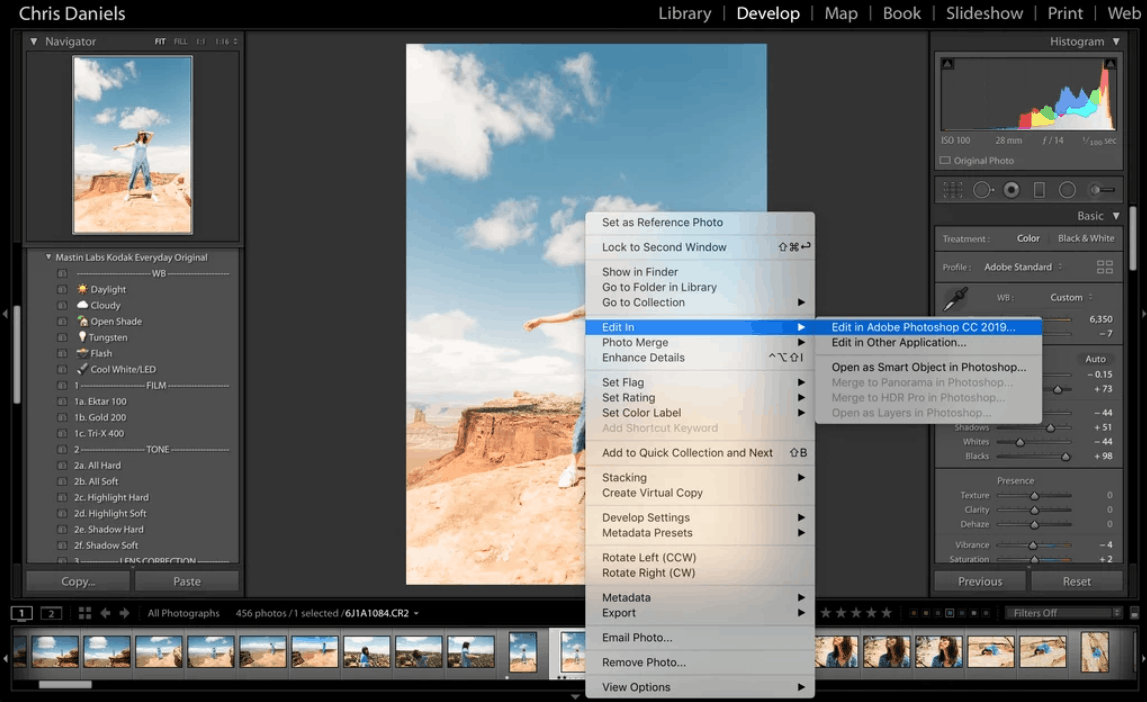
The process is quite simple: just right-click on the selected image, then choose "Edit," and then select "Edit using Adobe Photoshop." Lightroom will automatically open Photoshop and transfer the RAW file along with all the adjustments you've made so you can continue working. This way, you don't have to worry about losing your edits; everything will be preserved and you can continue developing on that platform.
7. Transfer your work from Photoshop back to Lightroom to finish.
After completing all necessary editing operations in Photoshop, the next step is to save the file by going to the save file option in the toolbar. Unless you actively set a different option, Photoshop will default to saving the image in PSD format and automatically send this file back to Lightroom.
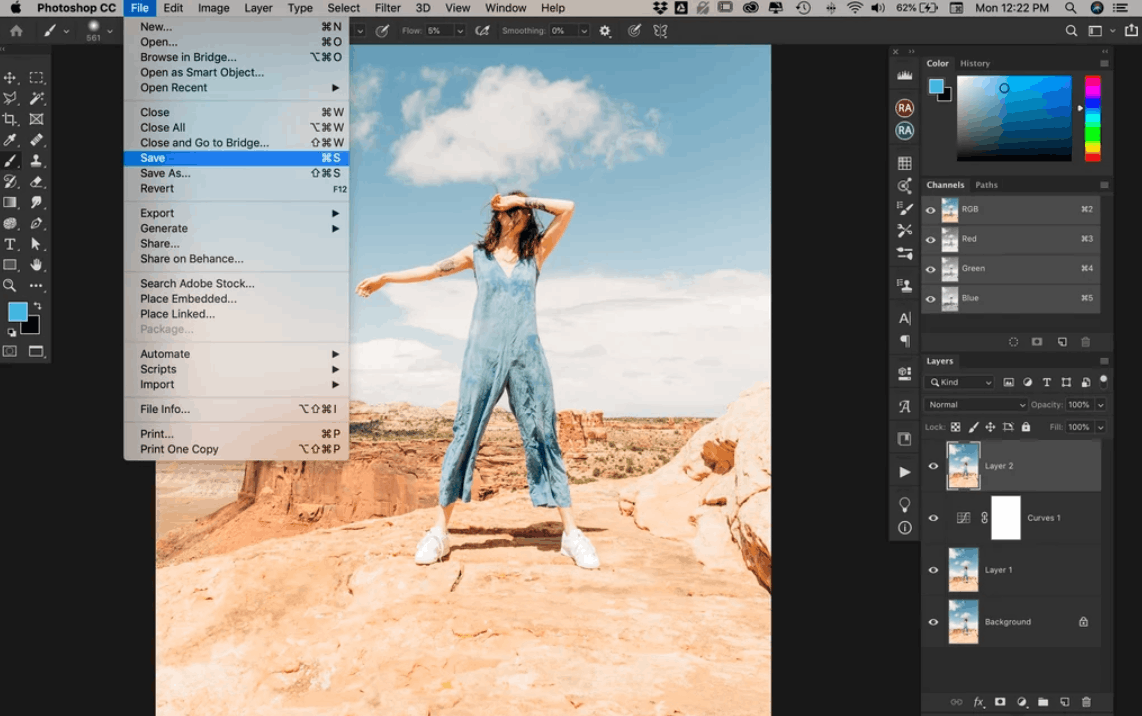
Shortly after, you will see the new PSD file appear right next to the original RAW file in your Lightroom library. You need to switch your workflow to this PSD file; from this point onward, all subsequent editing will be done on the newly created file instead of the original RAW file.
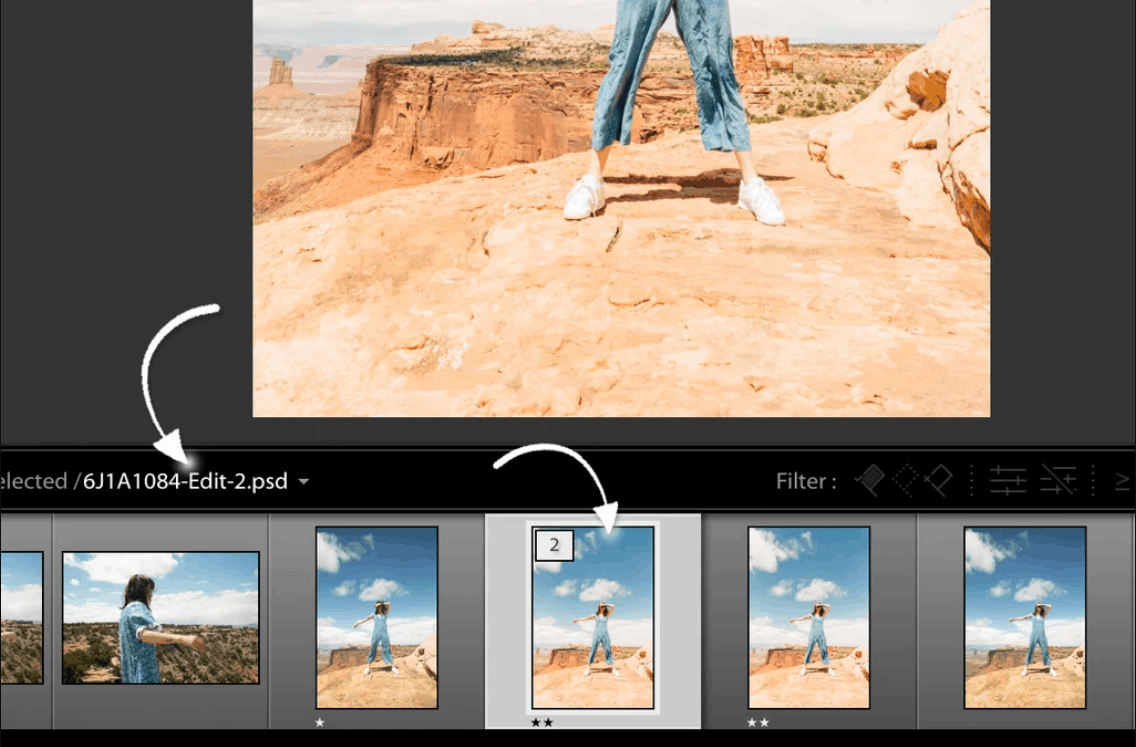
8. Add Film Effects to Enhance the Vintage Look of the Photo
This is the final step, and also the reason why the entire process is arranged in the order described above. After selecting the correct PSD file that was just brought back from Photoshop, you are free to choose the desired film grain effect and apply it to the image.
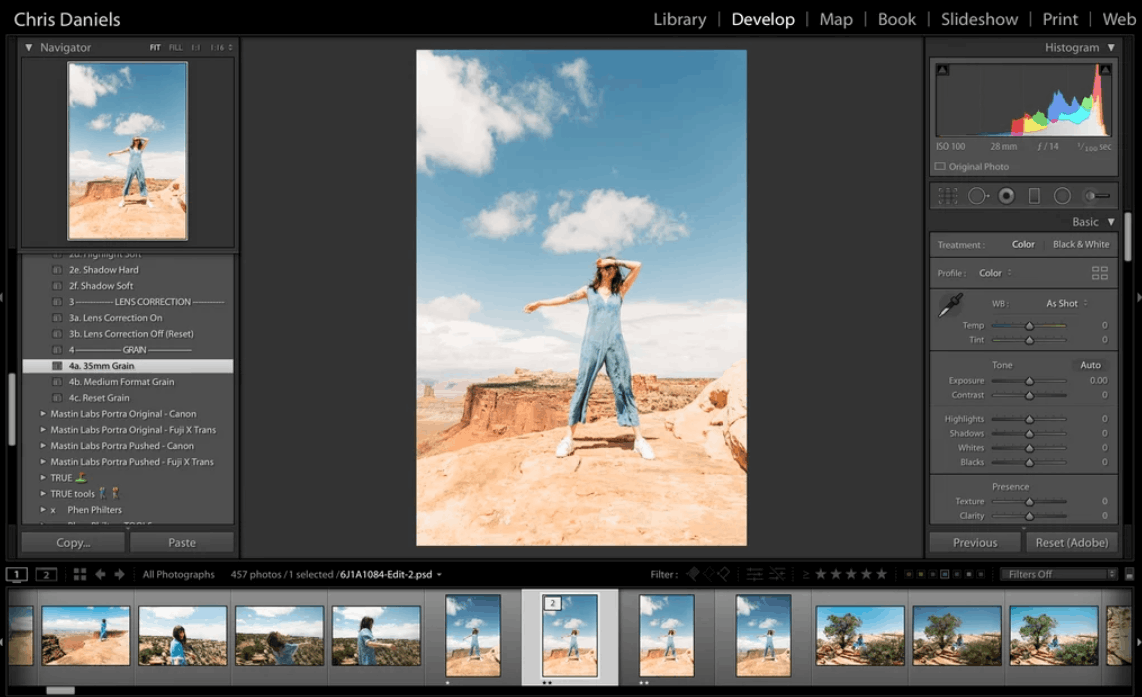
Leaving this step until last ensures that the grain structure won't be disrupted by any other editing, resulting in a consistent and natural look, as if the photo were actually taken and developed using traditional film. Additionally, if the photo requires further cropping, you should also do this on the same PSD file. Once complete, this will be the final version of the photo, ready to be exported and shared.
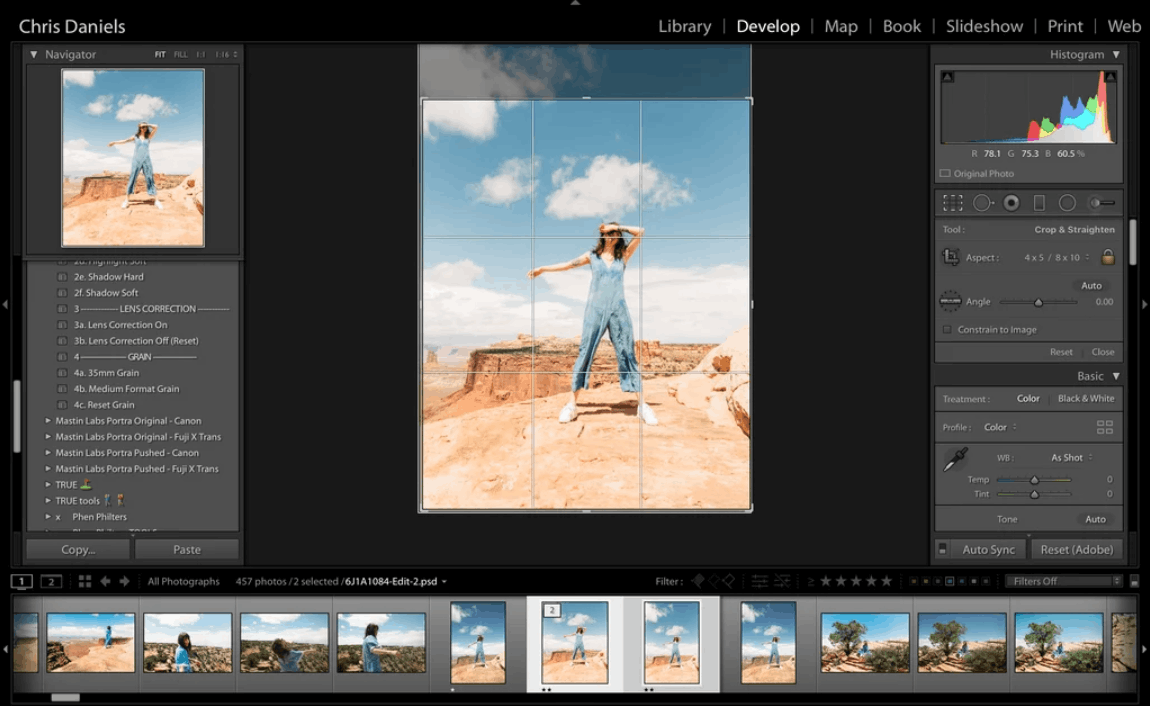
9. Conclusion
Following a clear process when working in parallel between Lightroom and Photoshop not only saves you time but also ensures that image quality is always maintained at its best. By completing almost all basic edits on the RAW file before transferring it to Photoshop, and only adding film grain after all the advanced editing is complete, you will get an image that retains the necessary sharpness while also conveying the vintage feel and emotion you want to express.





















VIP Products








Best Selling Products
Upgrade genuine Capture One account
120 USD
Capcut Pro 1 Year
39 USD
Genuine Adobe Illustrator account
99 USD
Autodesk All App Account Copyright
120 USD
Windows 10 & 11 Pro Key
36 USD
Copyright Adobe Lightroom Account
59 USD
ChatGPT Plus Account (GPT-4)
16 USD
Adobe Photoshop Copyright - Full App
120 USD
Upgrade Genuine Office 365
49 USD
Adobe Premiere Pro Account
99 USD
Upgrade Duolingo Super
29 USD
Plugin Retouch4me
69 USD
Freepik Premium Account
59 USD
Genuine Cheap Canva Pro
39 USD
MidJourney Account
29 USD