Best Selling Products
10 Quick and Easy Lightroom Tips You May Not Know
Nội dung
Nowadays, using photo editing software is no longer strange to those who love photography. One of the most popular software today is Lightroom. In this article, SaDesign will share 10 interesting Lightroom tips you need to know.

Use Caps Lock for Auto Advance feature
When you want to work quickly in the Library, you may need to use the Caps Lock key on your keyboard. When Caps Lock is on, you can use a shortcut to add metadata to an image so you can automatically move to the next image.
(2).jpg)
P: used to select and mark an image
U: used to remove a flag from an image, or skip the image
Number keys from 1-5: used to add the corresponding number of stars
Number keys 6-9 to add a color label
Auto Advance is simple to use but very effective. It can improve your photo editing process. You can quickly move to another photo by clicking and holding the mouse on the metadata icon. Lightroom will automatically move to the next photo. If you do not want to use the Caps lock key, you can turn on Auto Advance from the Photo-> Auto Advance menu bar.
Edit from Smart Preview
(4).jpg)
Smart Previews feature in LightroomSmart Previews in Lightroom Smart Previews is known as a cool trick of Lightroom. It helps the software build smaller versions of the photos inside the Lightroom Catalog. You can continue editing when disconnected. This is quite convenient for laptop users, who have large image libraries stored on external drives. When you leave your hard drive at home, you can continue editing images thanks to Smart Previews. Adobe has just added a new feature to Smart Previews, you can edit images quickly and feel a significant increase in performance. Here's how the new feature works: Smart Previews are smaller files than Raw photos. You can work faster, even when accessing photos with full parameters and resolutions. Lightroom can use Smart Previews to edit the original.
Lights Out mode focuses on the photo
(3).png)
Edit images with Lightroom Editing images with Lightroom To enter Lights Out mode, press the L key on the Library module. The area around the image will be blurred, the subject you want to edit will be highlighted and clearer. Click again to completely darken the area around the image. Press L a third time to reset the view. Lights Out mode works quite well when viewed as a grid or a single image. This mode only temporarily dims the interface, helping you focus on the photo.
Add Your Logo to Lightroom
You can use Lightroom with the Identity Plate feature to position your brand. With this feature, you can add your unique logo or image to the upper left corner of the Lightroom photo editing software. Using the Identity feature is quite simple. Just go to menu -> Identity Plate Setup to suit your workspace. Currently, there are 2 Identity Plate options:
Check Use a styled text identity plate: to use the system font, type your brand name or name in the Identity Plate.
Check Use a graphical identity plate to use a transparent PNG image as an icon.
Identity Plate is a perfect feature of Lightroom. It helps you introduce your unique image or brand to customers.
Beware of Clipping
(2).jpg)
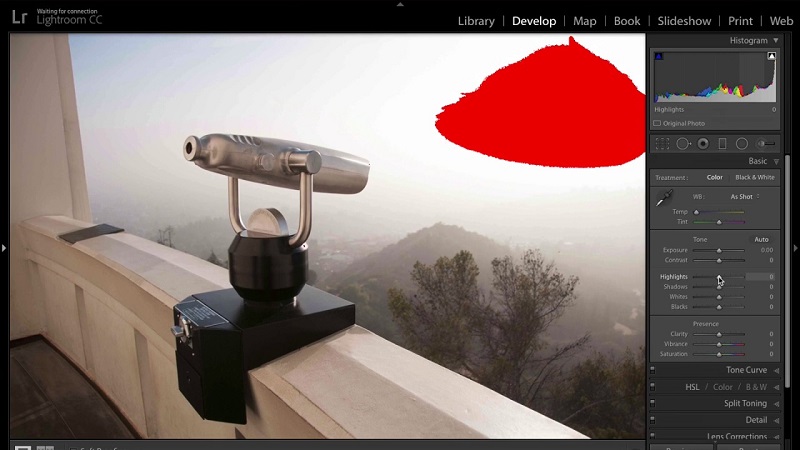
When you push an image too far in post-processing, the highlights or shadows lose meaningful detail. This can happen during the photo shoot. When we underexpose or overexpose, these problems often occur in post-processing. You can fix this by holding down the J key while in the Develop module. Or use your cursor to click on the small triangle in the upper corner of the Histogram to turn the feature on/off. The red areas are where the highlights in the image will be cut off. Meanwhile, the green areas indicate the loss of shadow detail. Drag the sliders if you want to avoid losing detail in the photo. While the green areas indicate the loss of shadow detail. Drag the sliders up if you want to avoid losing detail.
Drag and drop to manage Presets
These are quick, convenient settings that you can use to adjust your images. If you have accumulated quite a few presets, you need to organize them over time. On the presets panel, you can drag or drop to organize and arrange them in the order you want. If you want to create a new folder, just right-click on the Presets panel, and select New folder. Name the folder, and you have a completely new preset storage folder. Dividing presets by style will help you easily search when editing photos.
Improve Lightroom performance
If your lightroom is having speed issues, to improve the speed you can do the following steps:
In the Preferences tab, select Performance, if you use an integrated graphics card or an old GPU, you can turn off the Use Graphics Processor feature.
In the Preferences tab select File Handling, increase the size of Camera Raw Cache.
Periodically, run File -> Optimize Catalog, this is considered a way to clean and tidy up Lightroom.
Be creative while cropping the image
You can enter Crop mode by pressing R on your keyboard in the Develop Module. In a Crop image, you will be impressed by the variety of Crop overlays, or grids. While in Crop mode, simply press O on your keyboard to select different Crops. You can get creative with your cropping. Place important parts at intersections to create symmetry in the image.
Reduce your Lightroom Presets
(2).jpg)
Your Lightroom PresetsYour Lightroom Preset Lightroom is known for its large number of presets. To be able to apply them lightly. Instead of applying the entire effect, you can use a layer in Photoshop and then use the preset. Download the Lightroom plugin, and then go to the File > Plug-In Manager menu to install. After the plugin is installed, File > Plug-in Extras > The Fader to use the new plugin. You can choose a Lightroom Preset to drag and drop and apply it to the photo you want to edit. Drag the Opacity slider to be able to control the level of the preset on the photo best.


