Best Selling Products

Freepik Premium Account
59 USD

MidJourney Account
29 USD

Windows 10 & 11 Pro Key
36 USD

Adobe Premiere Pro Account
99 USD

Autodesk All App Account Copyright
120 USD

Adobe Photoshop Copyright - Full App
120 USD

Genuine Cheap Canva Pro
39 USD

Genuine Adobe Illustrator account
99 USD

Plugin Retouch4me
69 USD

Upgrade Genuine Office 365
49 USD

Capcut Pro 1 Year
39 USD

ChatGPT Plus Account (GPT-4)
16 USD

Copyright Adobe Lightroom Account
59 USD

Upgrade genuine Capture One account
120 USD

Upgrade Duolingo Super
29 USD
7 OneDrive Storage Tricks You Wish You Knew Sooner!
Nội dung
- 1. How to save data on OneDrive simply
- 1.1. Instructions on how to upload files, photos, videos to OneDrive
- 1.2. Instructions on how to sync OneDrive with your computer
- 1.3. Instructions on how to share files in OneDrive
- 2. Instructions for 7 tricks to save data on OneDrive
- 2.1. Regularly back up data from your computer to OneDrive
- 2.2. Set up automatic backup of email attachments to OneDrive
- 2.3. Sync 2 storage services Google Drive with OneDrive
- 2.4. Limit users and time to access shared links
- 2.5. Instructions for restoring old file versions
- 2.6. Access data on OneDrive from mobile devices
- 2.7. Enhanced security with Personal Vault
- 3. Important notes when saving data on OneDrive
- 3.1. Save storage space by cleaning the Recycle Bin
- 3.2. 2 ways to check OneDrive capacity
OneDrive is a cloud data storage and sharing service that is popular and widely used by many users. Follow the content below of SaDesign to learn 7 effective tips for saving data on OneDrive.
With OneDrive, users can store, access, and share their data easily and securely. When storing data on OneDrive, organizations do not need to worry about losing important data or the complexity of sharing files. In addition, the system also ensures that data can be ready to use anywhere, anytime.
1. How to save data on OneDrive simply
OneDrive is a popular platform widely used to store and share data online. Refer to the content below of SaDesign to know how to store data on OneDrive in the simplest and most detailed way.
1.1. Instructions on how to upload files, photos, videos to OneDrive
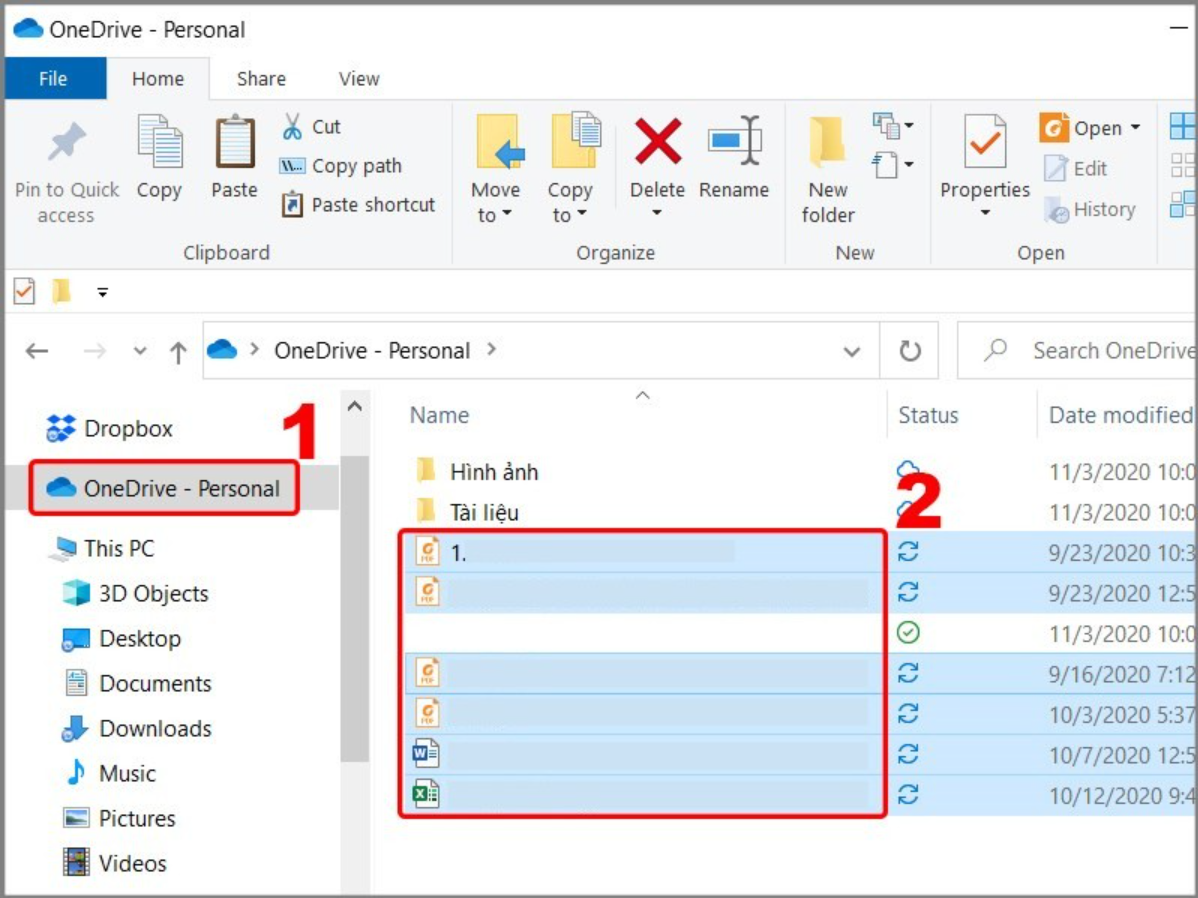
Step 1: First, select the file, photo or video you want to share on OneDrive, press Ctrl + C to copy.
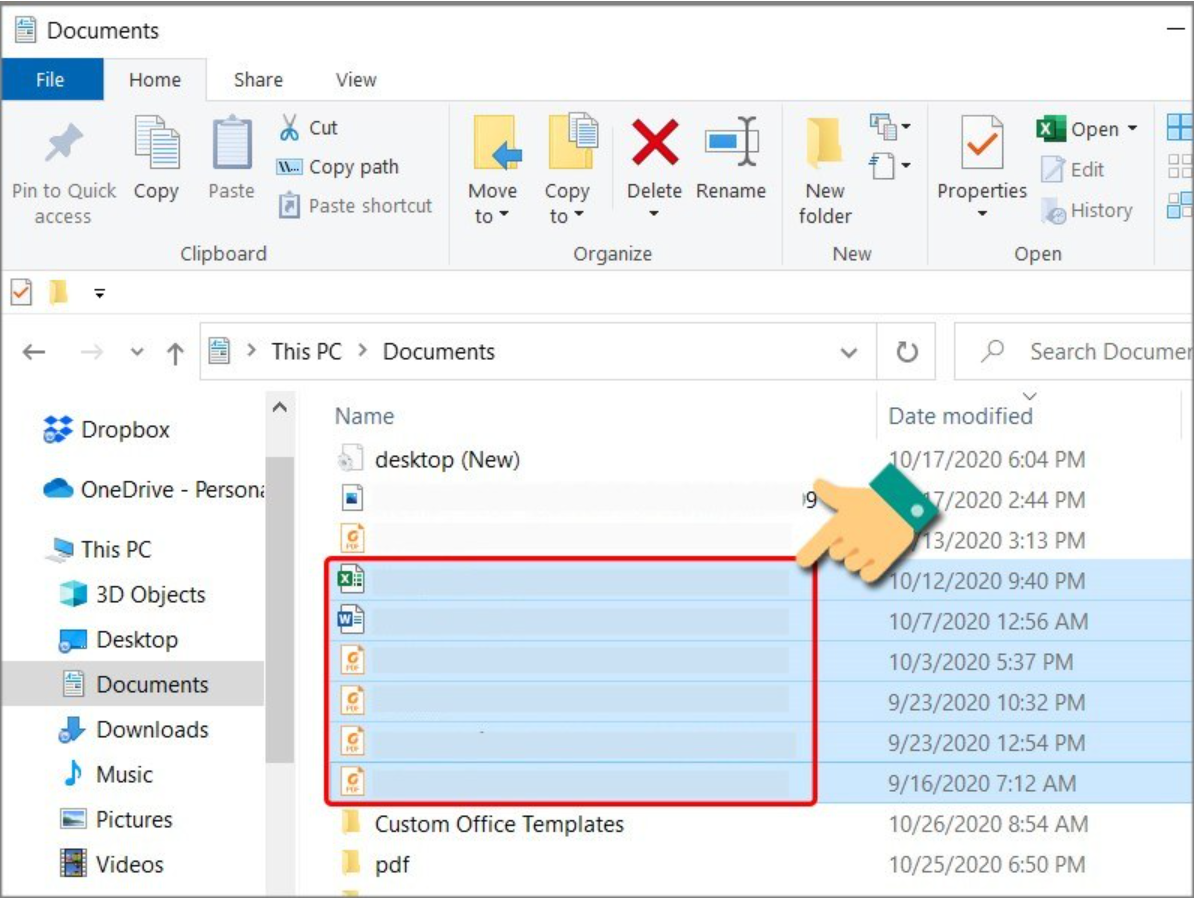
Step 2: Next, press the Windows + E key combination at the same time to open File Explorer. In the list of options that the system displays in the left menu, click OneDrive. Then use the Ctrl + V key combination to paste the files, photos, videos that you selected in step 1 into the OneDrive folder.
1.2. Instructions on how to sync OneDrive with your computer
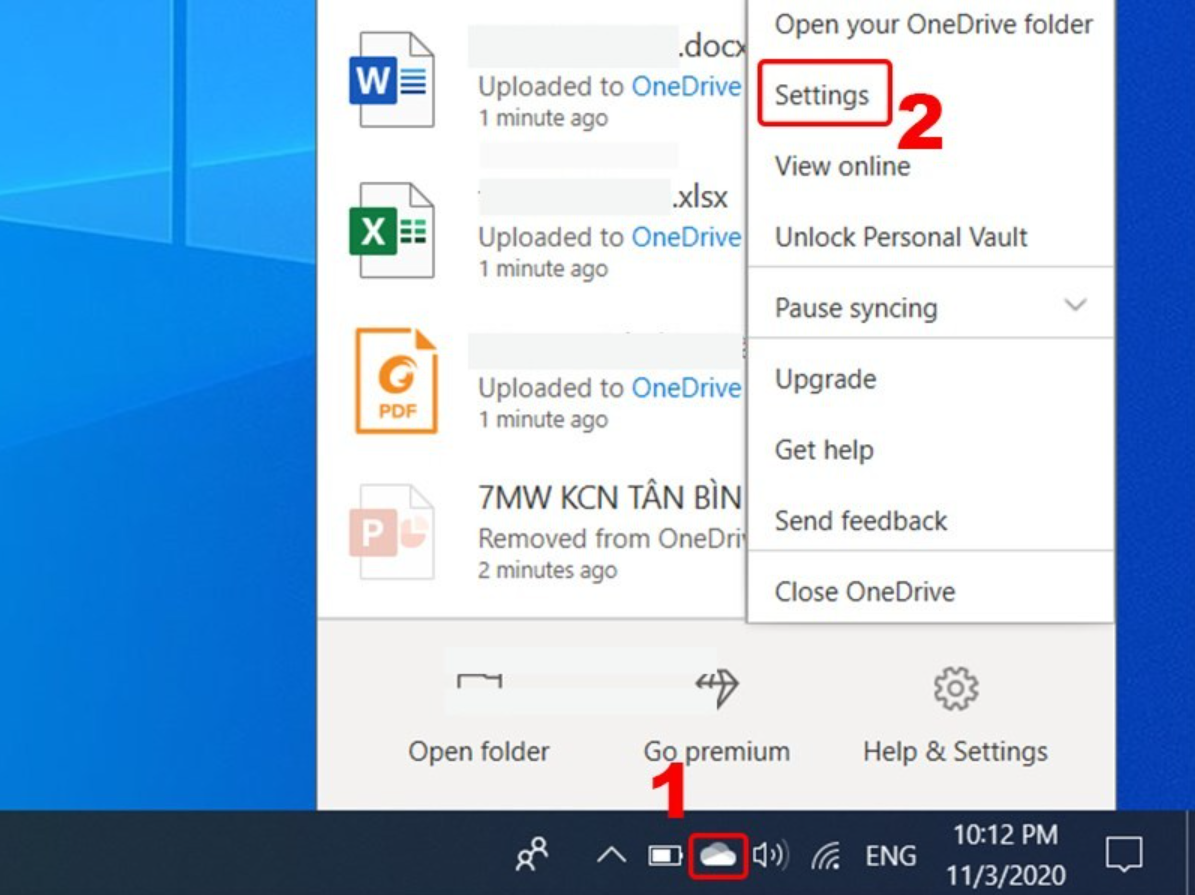
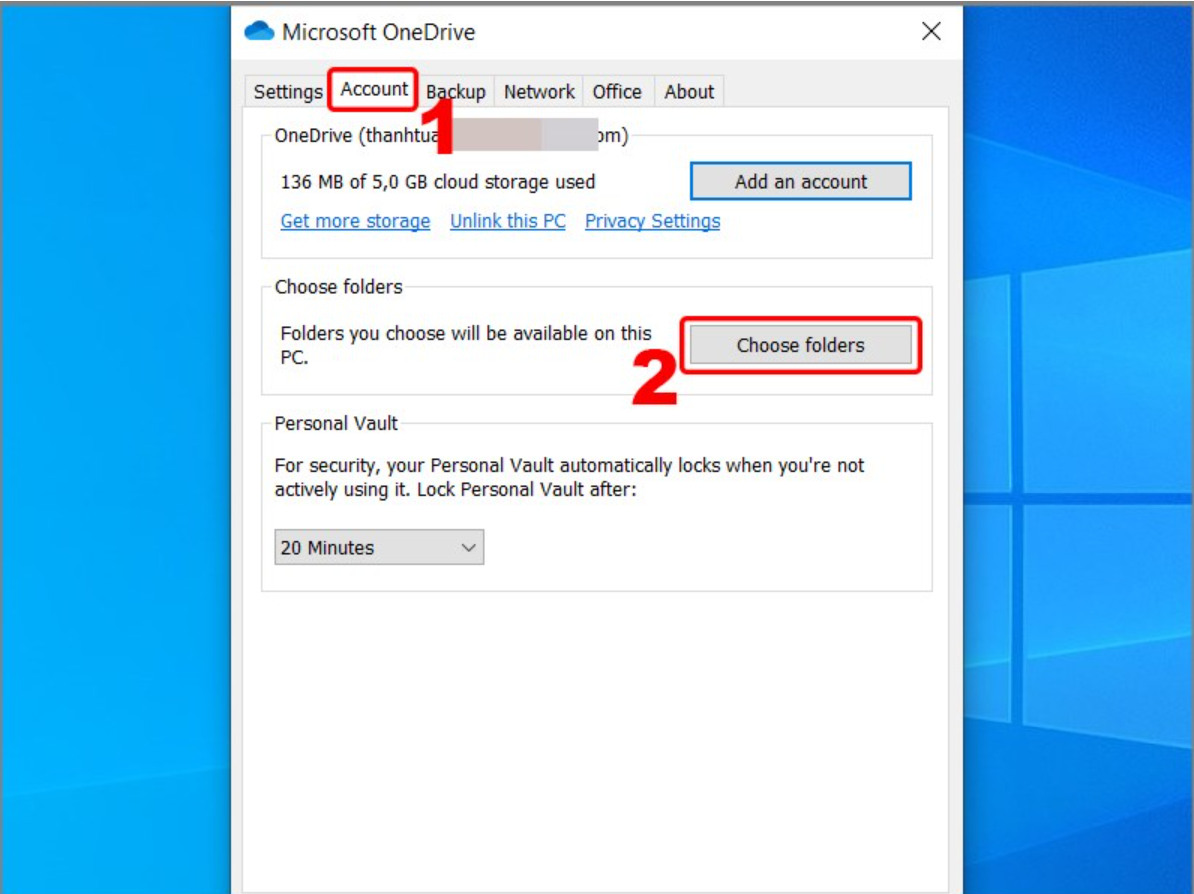
Step 1: To sync OneDrive with your computer, first right-click on the cloud icon in the lower right corner of your computer screen, select Settings.
Step 2: A new window will appear on the screen as shown below. Click on the Account tab > Choose folders.
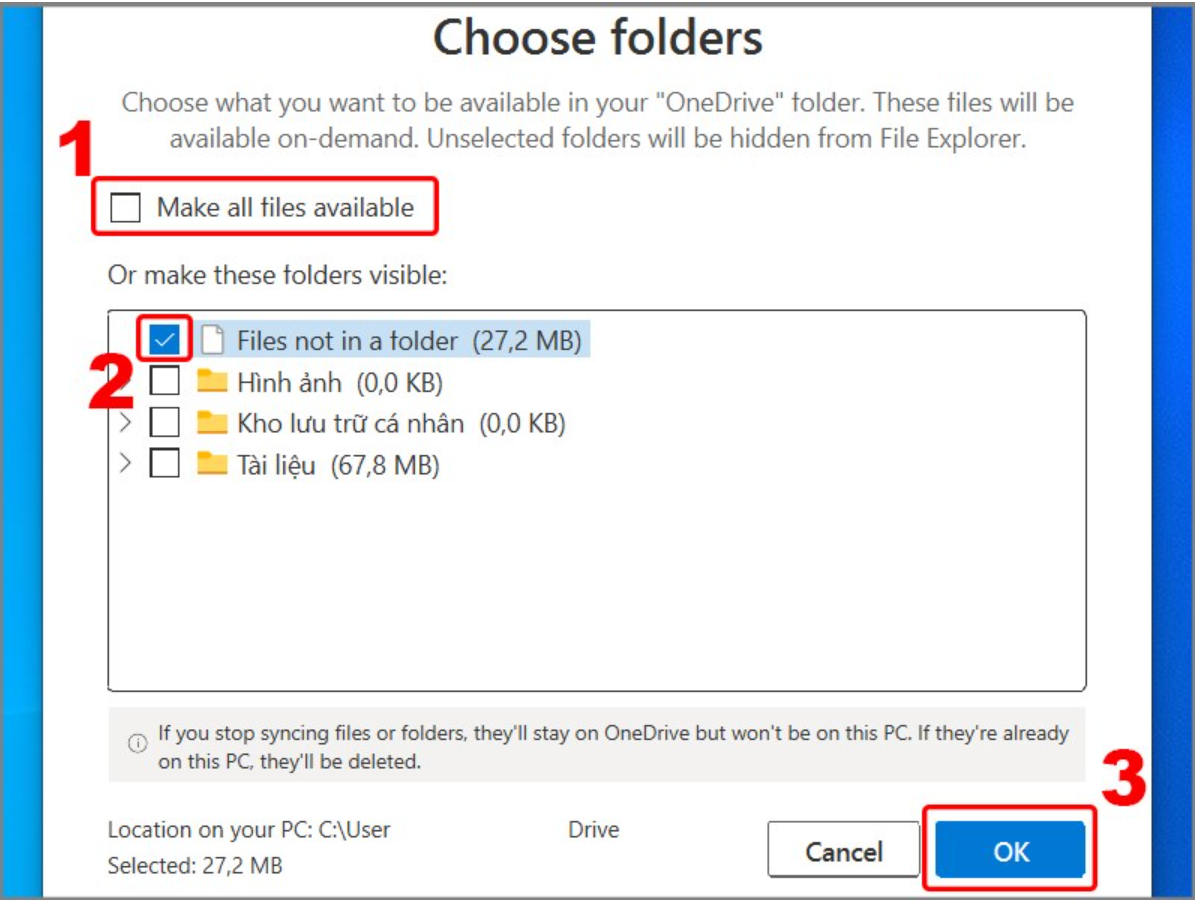
Step 3: At the location where the text Make all files available is displayed, uncheck the option. At the location Or make these folders visible, select the folder you want to sync and then select OK to complete the operation.
1.3. Instructions on how to share files in OneDrive
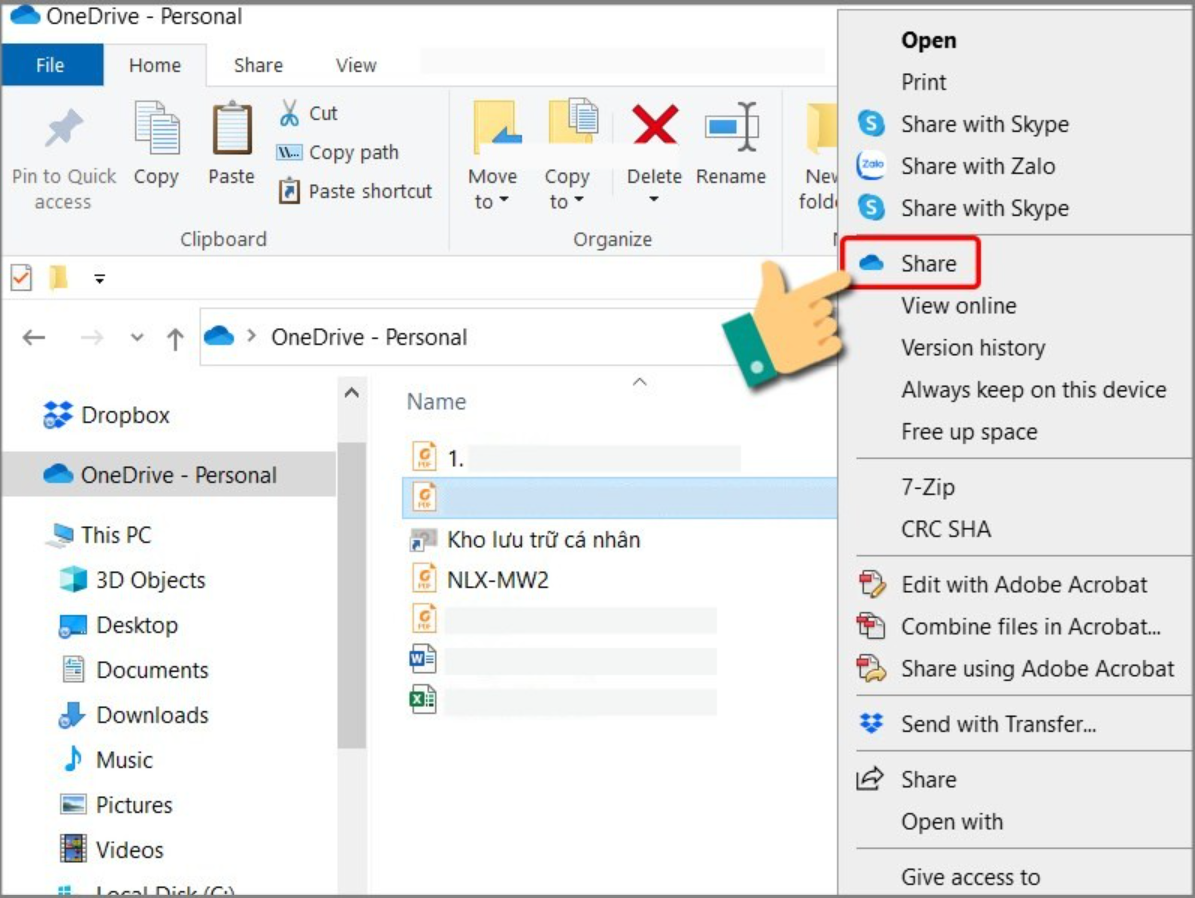
Step 1: First, open the OneDrive application on your computer, select the file you want to share, then right-click to open the options as shown below, then click Share.

Step 2: Next, click Anyone with the link can view to select sharing permissions. Enter the email address you want to share the file with in OneDrive, click Send.
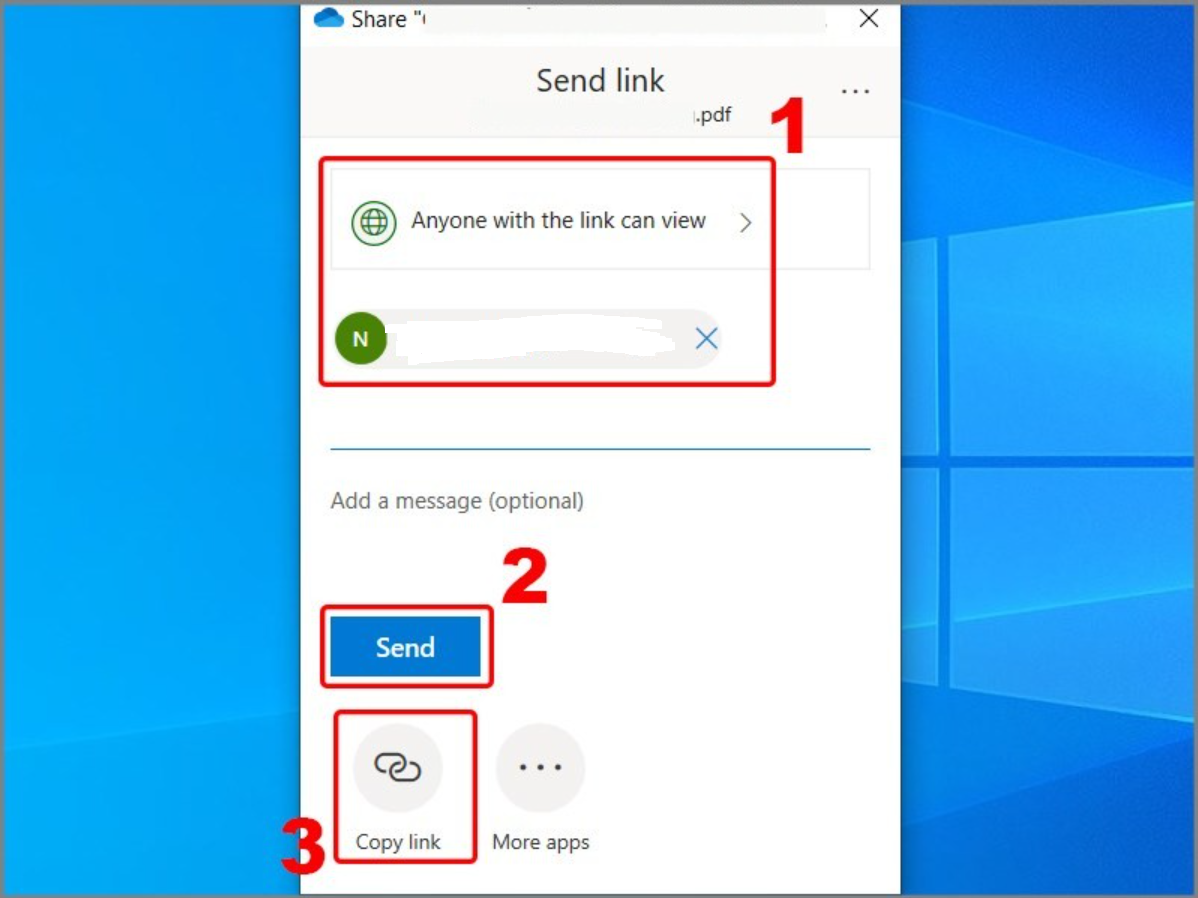
After completing the operation, a system notification will appear on the computer screen confirming successful sharing.
.png)
After sharing the link, if you do not want others to access your file, you can also stop sharing by following these steps:
Step 1: First, right-click on the file you want to stop sharing and select Share.
Step 2: A window will appear on the screen as shown below, select the three dots icon in the upper right corner and then click Manage access.
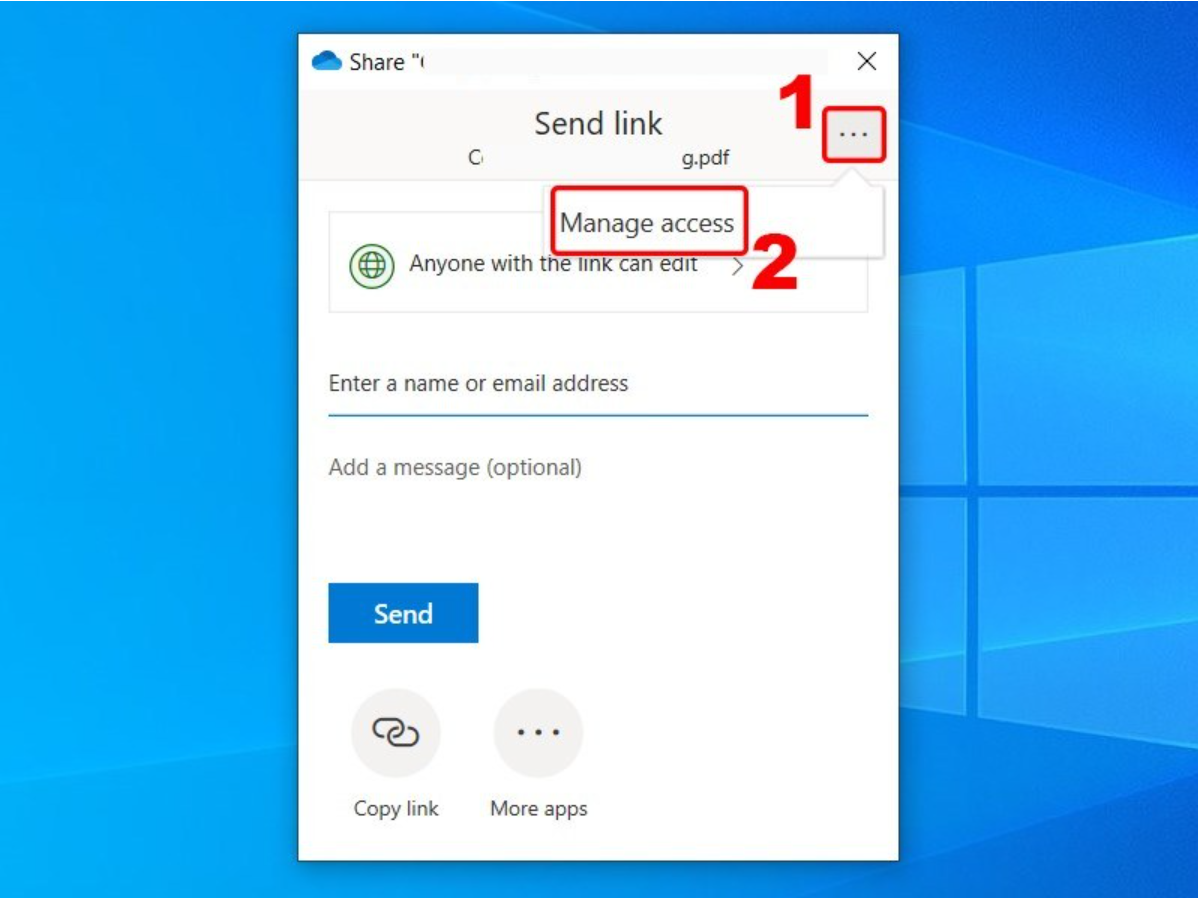
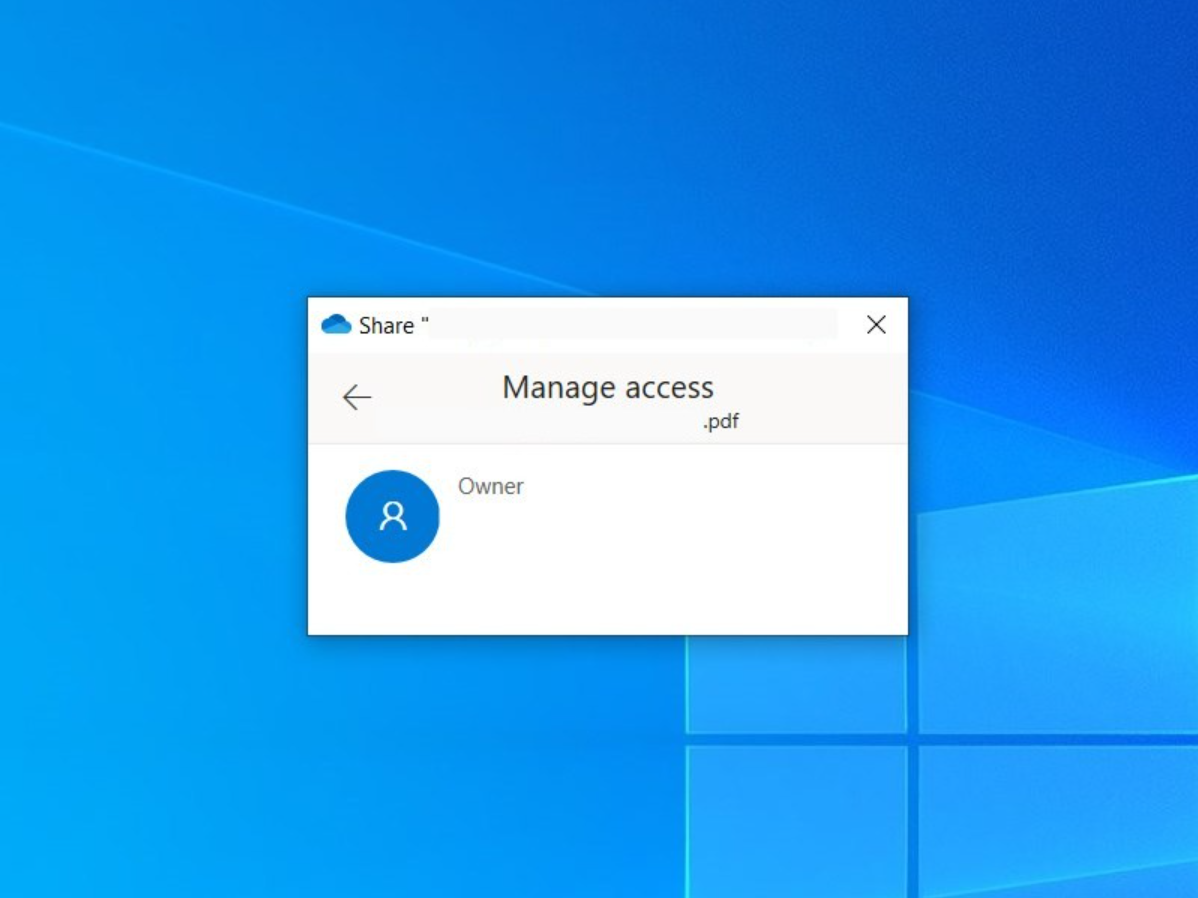
Step 3: At the location where the sharing link is displayed, click the X icon to delete the link. Then, click the arrow icon next to the email address of the person you are sharing the file with and click Stop Sharing.
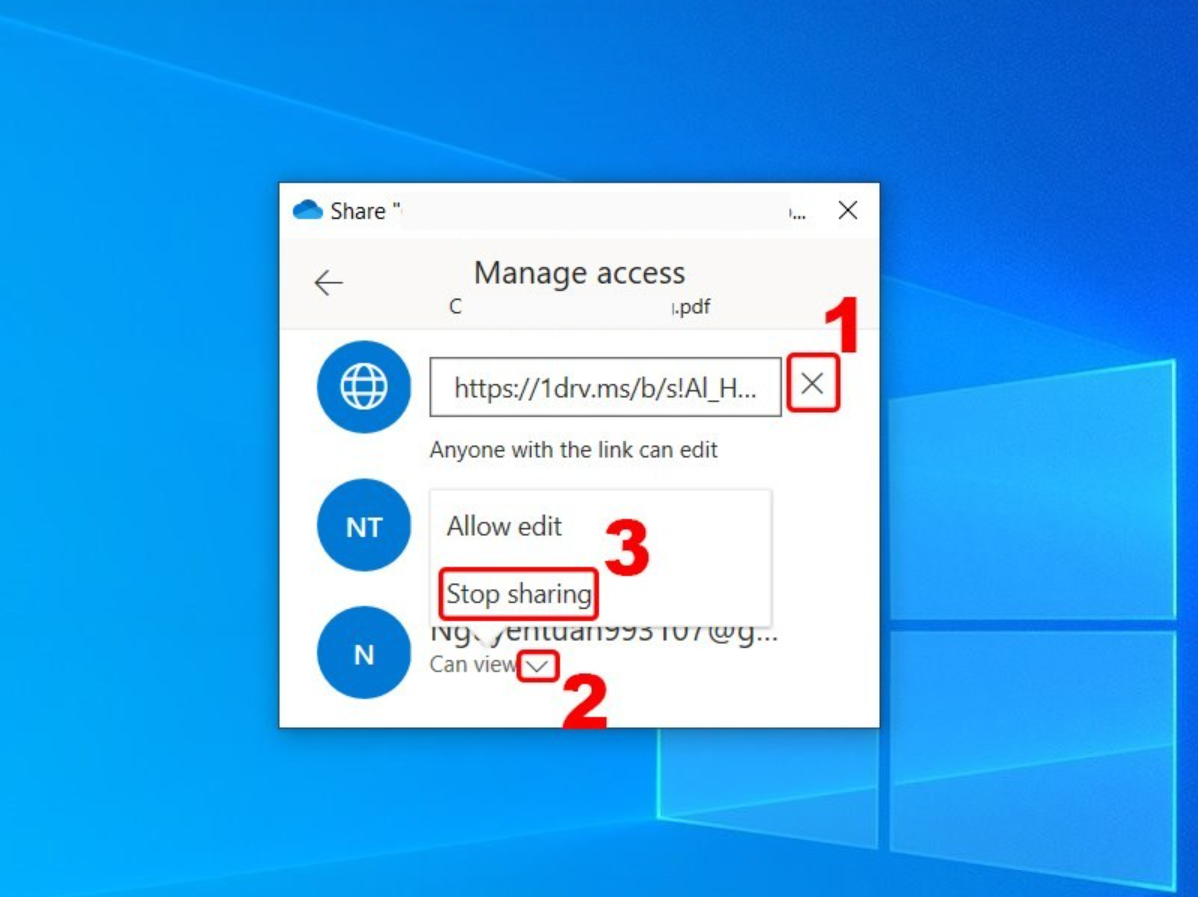
A message will appear on the screen that the sharing operation was successful as shown below.
2. Instructions for 7 tricks to save data on OneDrive
During the storage process on OneDrive, to make operations more convenient and effective, please refer to the 7 tips for storing data on OneDrive below!
2.1. Regularly back up data from your computer to OneDrive
OneDrive users can enable the feature of backing up data from their computer to OneDrive to ensure consistency and reduce the risk of data loss due to unexpected incidents. To back up data from your computer to OneDrive, the specific steps are as follows:
Step 1: Click the OneDrive icon on your computer's taskbar, which will be white or blue.
Step 2: Then click on the Setting icon to open the menu.
Step 3: In the options that appear on the screen, click Manage Backup.
Step 4: Next, select the folders you want to sync to OneDrive by moving them to On status.
Step 5: Finally, click Save changes to complete the process of configuring data backup to OneDrive.
2.2. Set up automatic backup of email attachments to OneDrive
Setting up the ability to automatically back up email attachments to OneDrive helps users ensure data safety, without having to worry about losing important attachments anymore.
To back up email attachments to OneDrive, follow these steps:
Step 1: First, you need to sign up for a Microsoft Power Automate account.
Step 2: Then, visit the Microsoft Power Automate Outlook email sync to OneDrive page.
Step 3: Click Save Outlook.com attachments to your OneDrive to complete the configuration process.
.png)
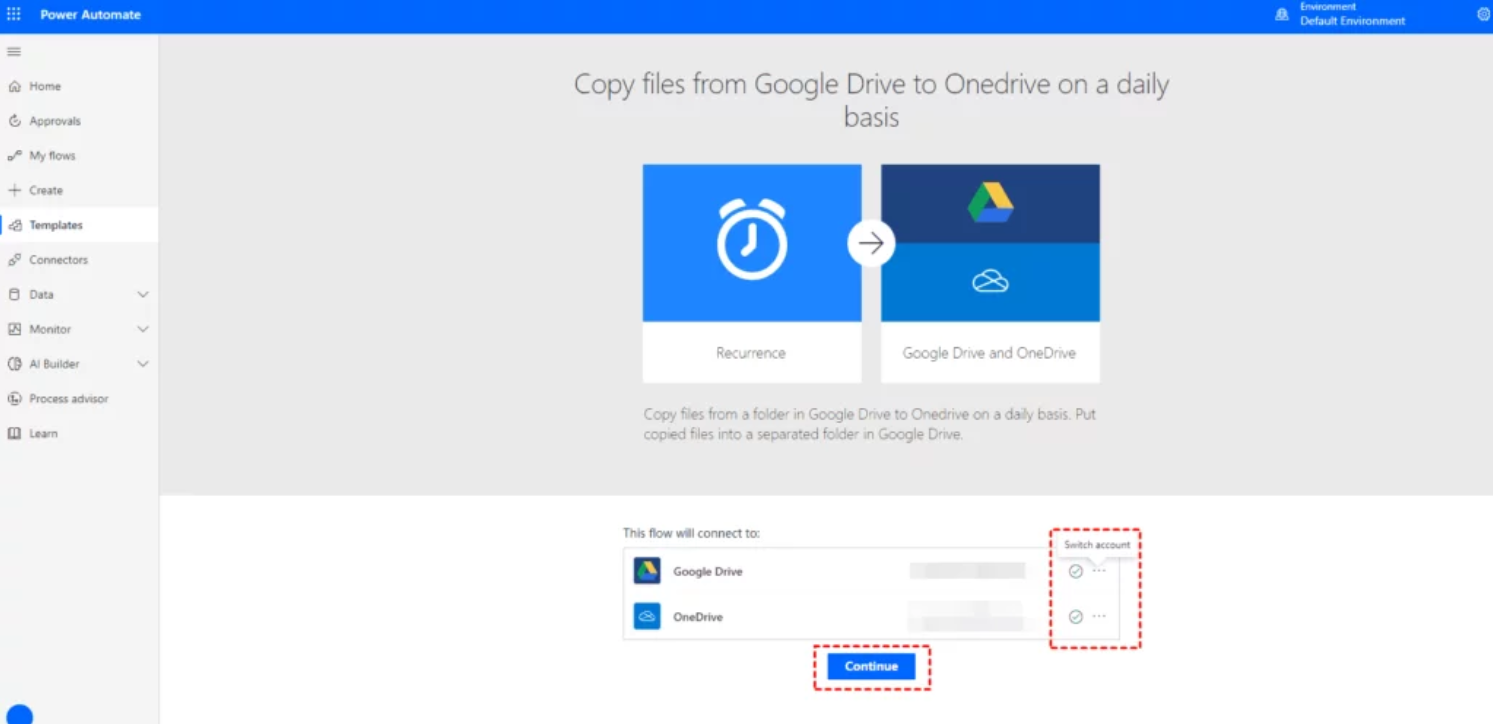
2.3. Sync 2 storage services Google Drive with OneDrive
Syncing Google Drive with OneDrive helps users optimize their work process more effectively. Instead of asking partners, customers... to switch to OneDrive, syncing your OneDrive with Google Drive will help organizations easily exchange work and collaborate more conveniently.
Step 1: Log in to the Power Automate account created in the above content.
Step 2: Then you access the Google Drive sync page with OneDrive.
Step 3: Finally, click Sync new OneDrive Files to Google Drive Files and follow the instructions as shown below to complete the configuration process.
2.4. Limit users and time to access shared links
When sharing files or folders on OneDrive, the system allows users to customize who is allowed to access and for how long. This feature is very useful in ensuring security and controlling the data sharing process.
The steps to set up visitor and/or access time limits are specifically instructed as follows:
Step 1: First click on the Share icon on the folder or file you want to share.
Step 2: Then select Everyone with the link can edit to allow people with the link to have access to the data. In addition, you can select Specific People to specify specific visitors.
Step 3: To set the expiration date for the link, click on Expiration date.

2.5. Instructions for restoring old file versions
A feature that users love when saving data on OneDrive is the ability to restore previous versions of files. Specifically, the system will automatically save the change history for all files. From there, users can not only restore deleted files but also easily find older versions of documents.
The specific operations are as instructed below:
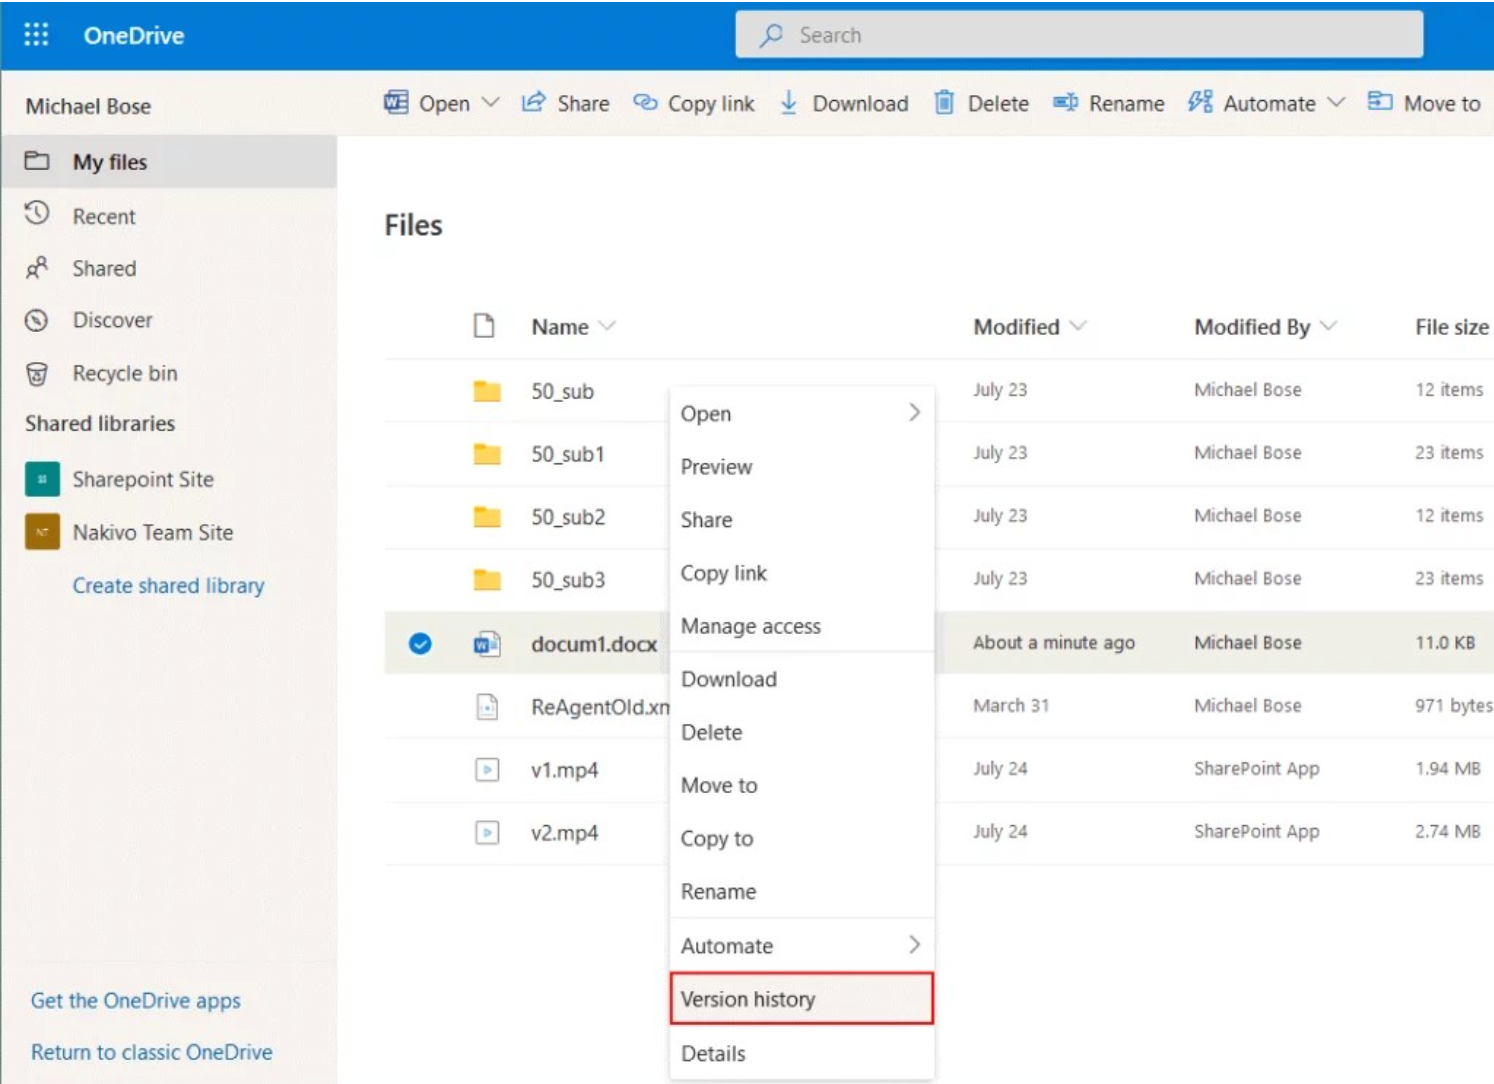
Step 1: First, the user needs to right-click on the file he wants to recover.
Step 2: Then click on Version History from the drop-down list.
Step 3: Right-click on the version you want to restore and click Restore.
2.6. Access data on OneDrive from mobile devices
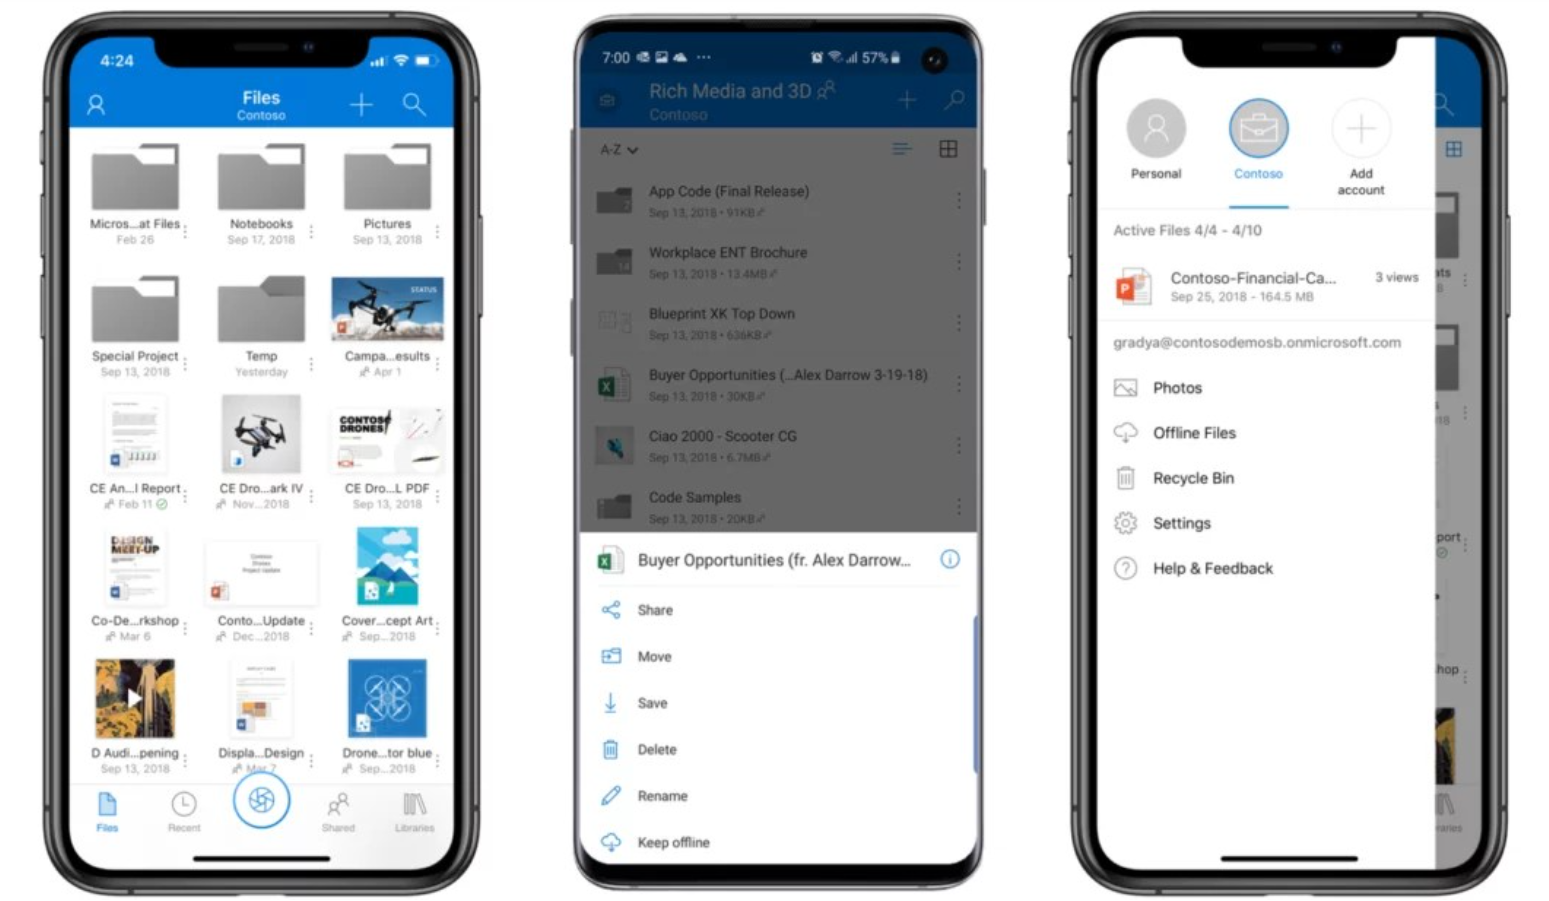
OneDrive is compatible with many different electronic devices, working on computers, mobile devices, tablets... As long as there is an Internet connection, users can access their data anytime, anywhere.
To use OneDrive on your mobile device, do the following:
Step 1: Depending on the device's operating system, Android or iOS, users can find and download the OneDrive application.
Step 2: Just log in to your OneDrive account and you can start using it.
2.7. Enhanced security with Personal Vault
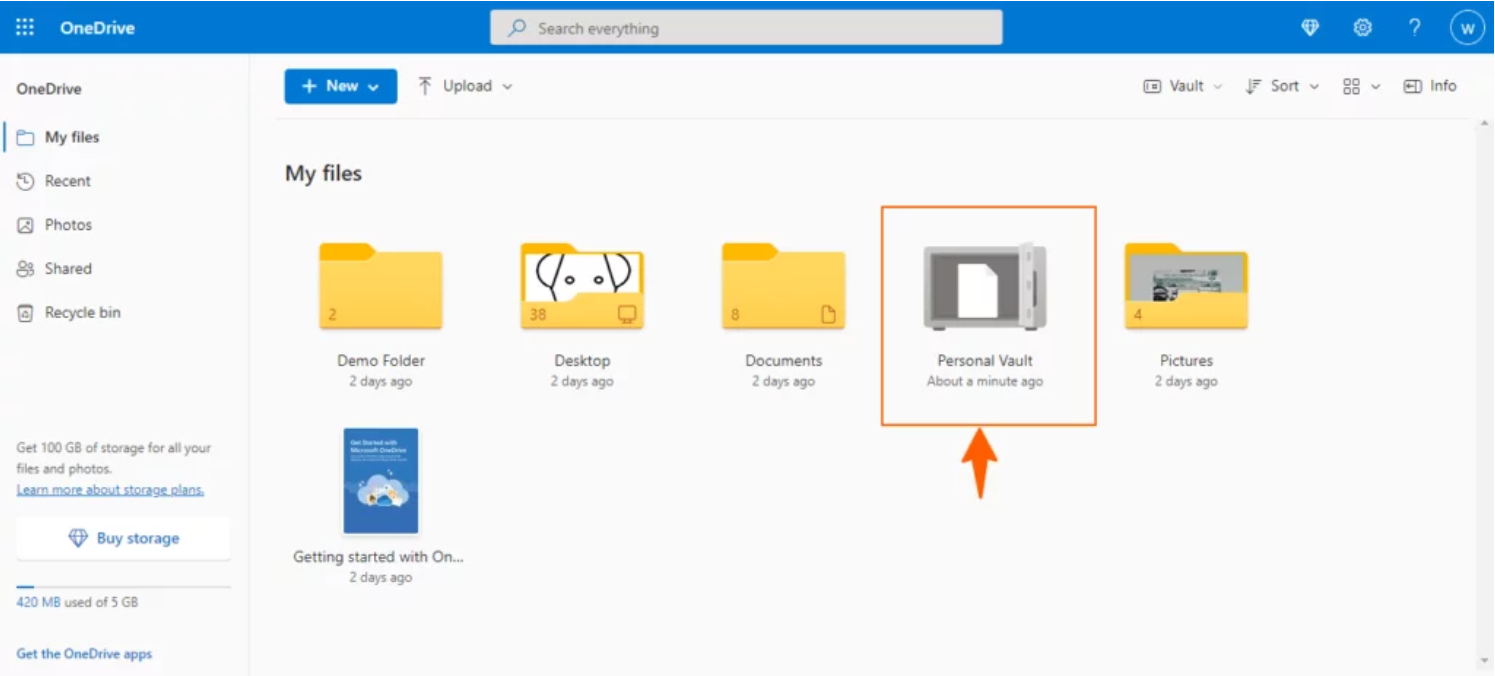
If you store a lot of important personal information in your OneDrive account and want to add multiple layers of security, use the Personal Vault feature.
If you have this feature set, after opening a file in Personal Vault, the system will require two-factor authentication. And after being unlocked but not performing any operations, Personal Vault will automatically lock again after 20 minutes.
The steps to store data in OneDrive's Personal Vault include 3 specific steps as follows:
Step 1: First, open the OneDrive app on your device and select the Personal Vault folder.
Step 2: The first time you open Personal Vault, it will ask you to enable two-factor authentication. Now, follow the on-screen prompts to complete the verification.
Step 3: Then proceed to move existing personal files from OneDrive to Personal Vault. In addition, you can also upload new data to Personal Vault.
3. Important notes when saving data on OneDrive
Here are some important notes when saving data on OneDrive to make the user's work process more efficient and optimized.
3.1. Save storage space by cleaning the Recycle Bin
When a user deletes a folder or file in OneDrive, that folder will be moved to the Recycle Bin. This means that the cloud system is still storing that folder. Therefore, regularly cleaning the Recycle Bin is one of the effective ways to free up OneDrive space.
The steps to clean up the trash on OneDrive are as simple as follows:
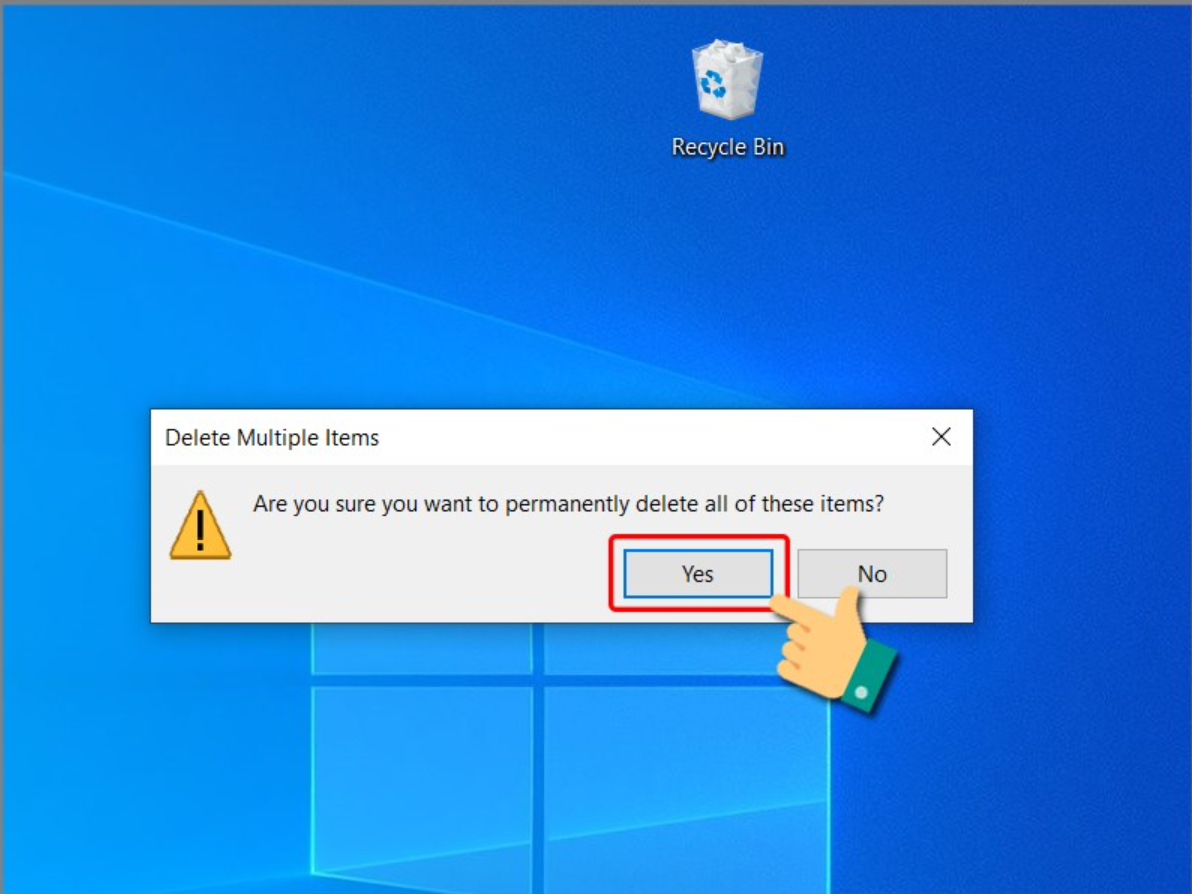
Right-click the Recycle Bin icon on your desktop.
Among the items that appear, click Empty Recycle Bin as shown below.
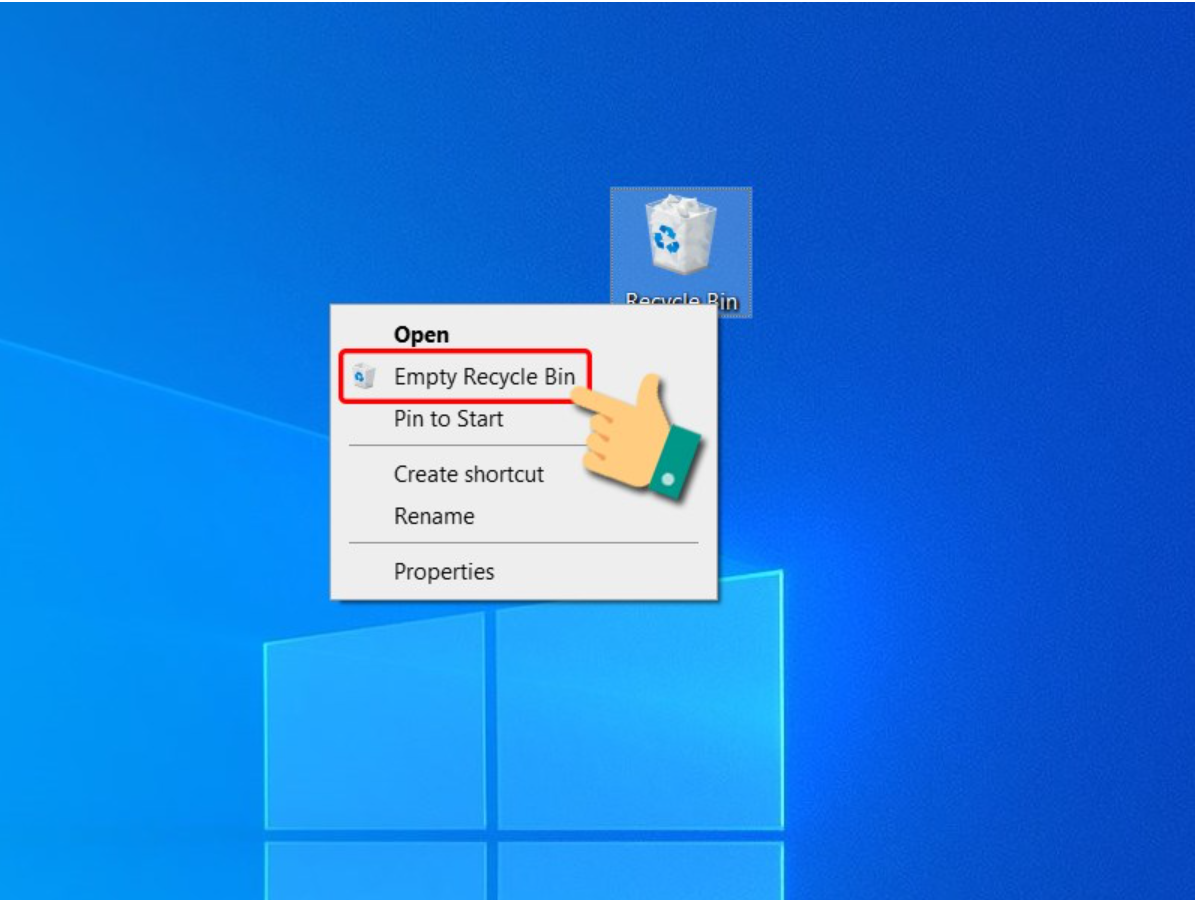
Then, you just need to click OK to confirm the operation of deleting files in the trash.
3.2. 2 ways to check OneDrive capacity
To check OneDrive capacity on your computer, users follow these 2 simple steps:
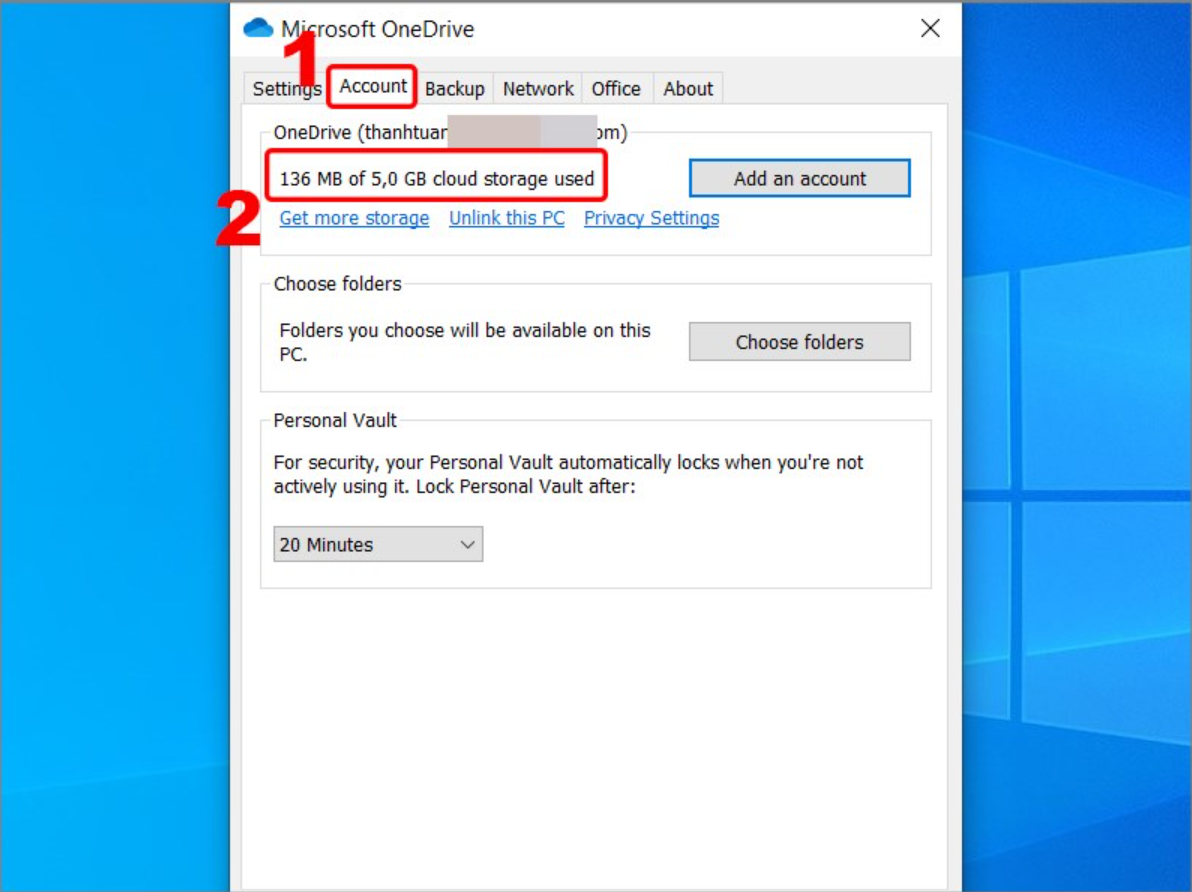
Step 1: On the computer screen, right-click on the cloud icon in the lower right corner and select Settings to open the application settings.

Step 2: A new window will appear on the screen, click on the Account tab to see OneDrive capacity as shown below.
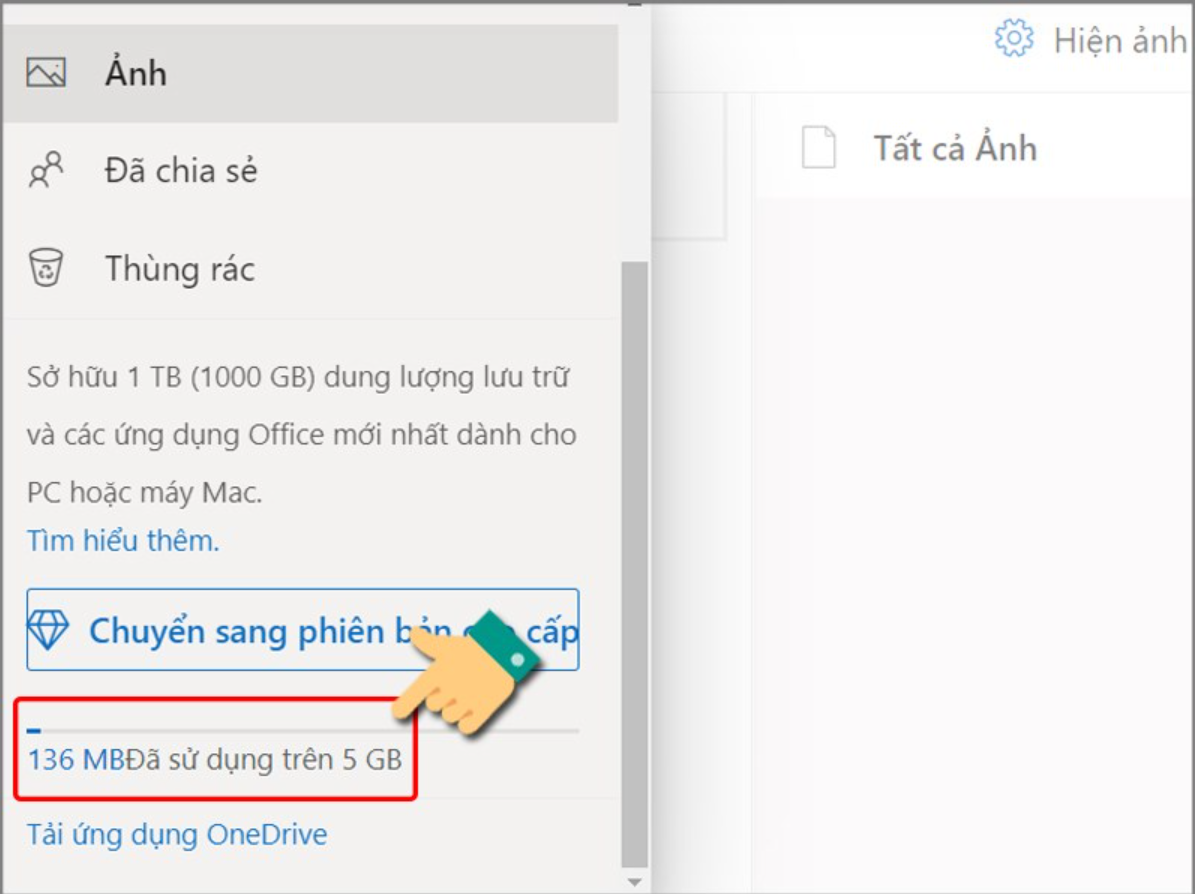
In addition, users can also view OneDrive capacity directly on the website. The system will display the capacity in the lower left corner of the interface.
With the ability to store data on OneDrive, users can control and protect their data securely. In addition, if your organization wants to learn more about other OneDrive features or is interested in a related service package to optimize data storage and integrate many features, please contact SaDesign.


VIP Products


Best Selling Products
Freepik Premium Account
59 USD
MidJourney Account
29 USD
Windows 10 & 11 Pro Key
36 USD
Adobe Premiere Pro Account
99 USD
Autodesk All App Account Copyright
120 USD
Adobe Photoshop Copyright - Full App
120 USD
Genuine Cheap Canva Pro
39 USD
Genuine Adobe Illustrator account
99 USD
Plugin Retouch4me
69 USD
Upgrade Genuine Office 365
49 USD
Capcut Pro 1 Year
39 USD
ChatGPT Plus Account (GPT-4)
16 USD
Copyright Adobe Lightroom Account
59 USD
Upgrade genuine Capture One account
120 USD
Upgrade Duolingo Super
29 USD