Best Selling Products
Blur - clarify some misconceptions about image blur
Nội dung

Blur images in photoshop through Bluring tool, which is a professional photo editing tool. In this feature, it is shown in great detail in the Filter Menu and gives you a lot of customization or creativity.  As any professional retoucher knows, there is a strictly low chance of excessive blur in the high-end image editing community. On many online forums is a place where many editors post their work so that colleagues can comment and advise on corrections, and I am also a regular person on that site to see , so I meet quite a few editors who advise "never use the Bluring tool" or Blur filters. Of course, while the goal is to educate novices on how to fix up an outfit, there is a problem that arises when someone does it and gives advice literally, in order to avoid harm. to everyone's point of view.. The most important thing to keep in mind is that there is no such thing as a good or bad tool, but how you will use it. When you test your blur needs selectively on aspects of an image, it's a very important step to one's workflow.
 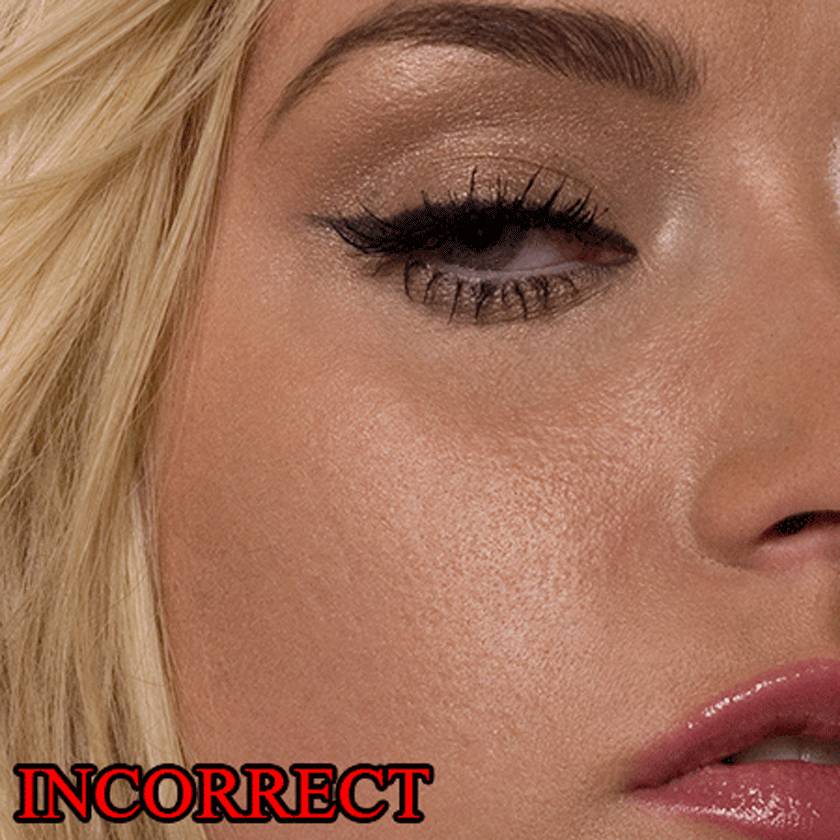 In the image above you can see that the sample skin looks smoother than in the corner shot, but when you look at it overall you will see that the blur is not natural, it's like a layer of plastic or porcelain on top. such facial skin. So, you see, this is the effect you're trying to achieve when you want your skin to become smoother. That's why this method is completely wrong, instead to make the skin look more natural and realistic, you should choose to use Dodging and Burning to do it, surely the effect will be very surprising. Here is also an example of proper use of the Bluring effect
 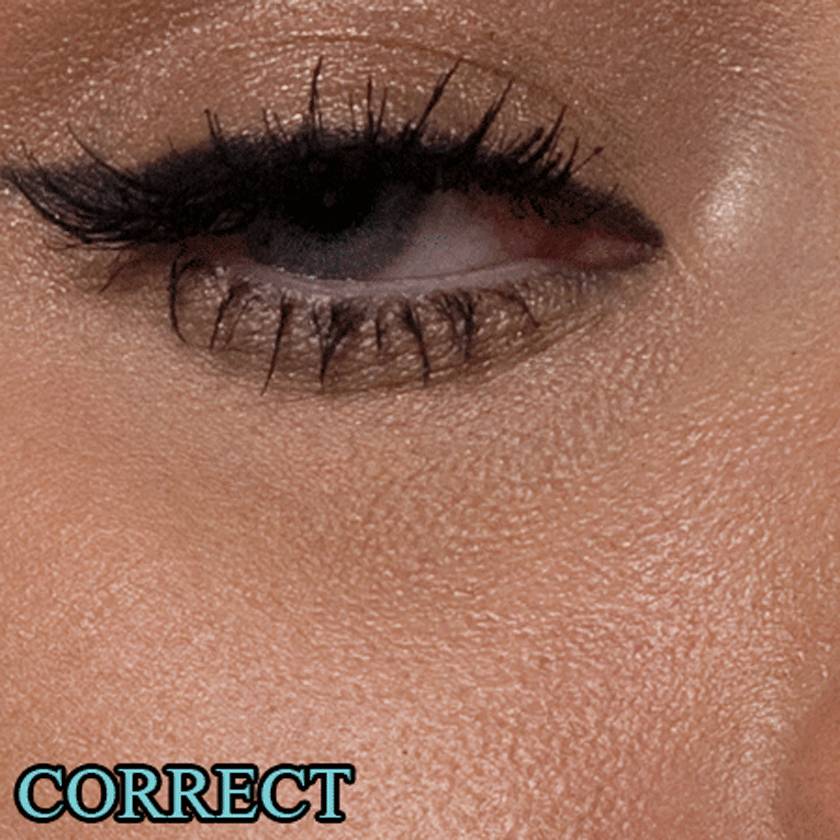 After you apply Dodging and Burning on the photo you see, in this photo the skin looks more natural, although it has an inconsistent amount of detail in the skin, but it gives a realistic look. more real. With selective blurring (and in some cases sharpening) making the details right to the image is a very important step in creating a perfectly retouched work, and it's also really great advice when you're using the sculpting tool in different aspects of an image, especially in the model's skin.
 As any professional retoucher knows, there is a strictly low chance of excessive blur in the high-end image editing community. On many online forums is a place where many editors post their work so that colleagues can comment and advise on corrections, and I am also a regular person on that site to see , so I meet quite a few editors who advise "never use the Bluring tool" or Blur filters. Of course, while the goal is to educate novices on how to fix up an outfit, there is a problem that arises when someone does it and gives advice literally, in order to avoid harm. to everyone's point of view.. The most important thing to keep in mind is that there is no such thing as a good or bad tool, but how you will use it. When you test your blur needs selectively on aspects of an image, it's a very important step to one's workflow.
 Here are some examples of improper use of the Bluring tool or Blur filters
 In the image above you can see that the sample skin looks smoother than in the corner shot, but when you look at it overall you will see that the blur is not natural, it's like a layer of plastic or porcelain on top. such facial skin. So, you see, this is the effect you're trying to achieve when you want your skin to become smoother. That's why this method is completely wrong, instead to make the skin look more natural and realistic, you should choose to use Dodging and Burning to do it, surely the effect will be very surprising. Here is also an example of proper use of the Bluring effect
  After you apply Dodging and Burning on the photo you see, in this photo the skin looks more natural, although it has an inconsistent amount of detail in the skin, but it gives a realistic look. more real. With selective blurring (and in some cases sharpening) making the details right to the image is a very important step in creating a perfectly retouched work, and it's also really great advice when you're using the sculpting tool in different aspects of an image, especially in the model's skin.
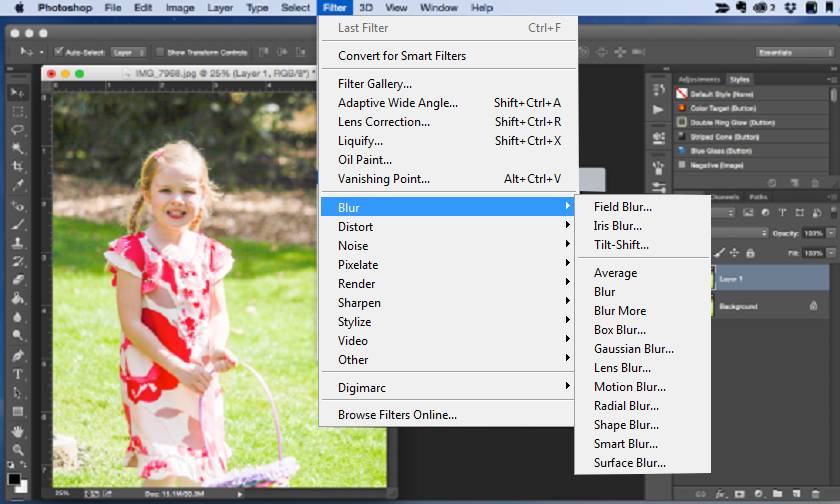
 Learn Blur Features in Photoshop's Filter Menu

- Box Blur: this is the effect of blurring the image based on the neutral color value of the surrounding pixels, this effect is very useful for creating special effects.
- Gaussian Blur: blur the selection by an adjustable degree, the higher the Radius value, the stronger the blur. Box Blur and Gaussian Blur are hard to distinguish at first glance, but if you increase the level of Blur, you will see: Box Blur blurs the image from color edges, and Gaussian Blur blurs in a way that homogenizes the colors side by side. .
- Lens Blur: adds blur to the image to create an effect for areas of narrower depth.
- Motion Blur: blur in specific direction from -360 degrees to +360 degrees and specified intensity from 1 - 999
- Radial Blur: this effect is very strong, it blurs in a rich and varied way in the direction of spread
- Shape Blur: allows to blur according to a specified shape.
- Smart Blur: Accurately blurs the image, is responsible for refining the array of colors, converting the image to a simple form of colored pixels.
- Surface Blur: allows blurring, creating smooth, smooth surfaces, removing dots and dots while preserving edge details.
Sadesign Co., Ltd. provides the world's No. 1 warehouse of cheap copyrighted software with quality: Panel Retouch, Adobe Photoshop Full App, Premiere, Illustrator, CorelDraw, Chat GPT, Capcut Pro, Canva Pro, Windows Copyright Key, Office 365 , Spotify, Duolingo, Udemy, Zoom Pro...
Contact information
SADESIGN software Company Limited


