Best Selling Products

Capcut Pro 1 Year
39 USD

Upgrade Duolingo Super
29 USD

ChatGPT Plus Account (GPT-4)
16 USD

Freepik Premium Account
59 USD

Autodesk All App Account Copyright
120 USD

Adobe Photoshop Copyright - Full App
120 USD

Copyright Adobe Lightroom Account
59 USD

Genuine Cheap Canva Pro
39 USD

MidJourney Account
29 USD

Upgrade genuine Capture One account
120 USD

Plugin Retouch4me
69 USD

Upgrade Genuine Office 365
49 USD

Genuine Adobe Illustrator account
99 USD

Windows 10 & 11 Pro Key
36 USD

Adobe Premiere Pro Account
99 USD
How to Remove People From Photos Using Photoshop in Seconds!
Nội dung
- 1. Introduction to removing people in travel photos using Photoshop
- 2. Steps to remove people in Photoshop with Content-Aware Fill
- 3. Remove extra people with Clone Stamp and Healing Brush in Photoshop
- 4. Tips to quickly remove people from outdoor travel photos
- 5. Frequently Asked Questions About Removing People in Photoshop
- 6. Conclusion
Learn how to remove people from travel photos with Photoshop extremely easily, helping you have "clean" and perfect photos as if taken in a deserted place. With just a few simple steps, all unnecessary details will disappear immediately.
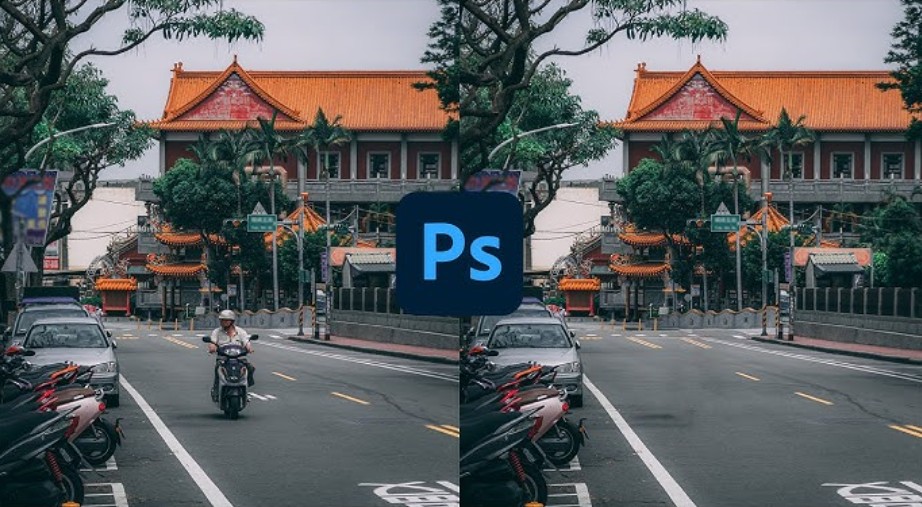
During trips, no one wants their beautiful moments to be ruined by strangers accidentally entering the frame. You can stand in front of a majestic landscape, a deserted beach, or a picturesque old street, but when you go home and review the photos, there are always a few unintentional figures that make the composition messy and the emotions interrupted. Fortunately, with Photoshop , "removing people" is no longer a skill reserved for professionals. Thanks to the great advances in artificial intelligence (AI) and image analysis algorithms, you can make unnecessary details disappear in minutes while still keeping the photo natural, smooth and surprisingly realistic.
This article will help you understand the principles and processing steps, thereby mastering the essential tools such as Content-Aware Fill , Clone Stamp Tool , Healing Brush , or Patch Tool : the core “weapons” of Photoshop in processing travel photos. When you understand how each tool works, removing people in photos is no longer a “magical” thing, but becomes a technical operation that can be controlled and refined down to the pixel.
1. Introduction to removing people in travel photos using Photoshop
Travel photography is a combination of technique and emotion. A good travel photo not only captures the landscape but also tells a story, conveying the atmosphere and feeling of that moment. However, you do not always have the opportunity to take photos in the ideal setting, especially in famous places such as Bali, Santorini or Hoi An ancient town, where the large number of tourists makes it almost impossible to take photos “without people”.
Therefore, removing people in Photoshop is not simply a technical operation, but a part of the post-production process that helps photographers "clean up" the frame, bringing viewers to focus on what is really important. Compared to mobile applications such as Snapseed or PicsArt, Photoshop excels thanks to its ability to analyze details, recreate backgrounds and control the continuity between image areas.
.jpg)
Photoshop's tools can understand and simulate texture, lighting, and tone to recreate erased areas that blend seamlessly with the surrounding context. This is especially useful in complex situations like erasing people on a beach, on a street, or in a scene with lots of patterns and reflections.
Not only that, but removing people also reshapes the composition of the image. When distracting elements disappear, the focal point becomes stronger, helping the viewer “read” the photo according to the photographer’s intention. An empty scene can sometimes evoke more emotion than a noisy crowd.
2. Steps to remove people in Photoshop with Content-Aware Fill
Among Photoshop’s modern tools, Content-Aware Fill is the most highly regarded technology when it comes to removing unwanted people or objects. Introduced in Photoshop CS5 and continuously improved in recent versions, this feature uses smart algorithms to “guess” suitable content for the erased area, based on surrounding pixels.
Content-Aware Fill essentially works as a semi-automatic image reconstruction system. When you select an area to remove, Photoshop analyzes the texture, lighting, and color of the surrounding areas, then synthesizes a “background template” and automatically fills in the missing area. This makes removing people incredibly fast while still maintaining a natural look.
.jpg)
The basic steps are as follows:
Open the photo in Photoshop and select the Lasso Tool or Object Selection Tool to circle the person or object you want to remove.
Go to the Edit > Content-Aware Fill menu .
In the Content-Aware Fill window, the software will display two frames: the left is the selected area, the right is a preview of the results.
Adjust the “Sampling Area” (the area Photoshop uses to sample the background). If there are any unwanted details, you can remove them using the Brush tool in the same interface.
Click OK and Photoshop will automatically replace the erased area with the corresponding background.
A quick tip is to create a new layer before doing this, by selecting Edit > Content-Aware Fill > Output To: New Layer . This will preserve the original image, while also allowing you to adjust the results of the person removal without affecting the rest of the image.
When applying Content-Aware Fill to travel photos, it works best with uniform backgrounds like sky, ocean, sand, or grass. Areas with intricate details like fences, architecture, or shadows require additional refinement with the Clone Stamp or Healing Brush to achieve absolute perfection.
3. Remove extra people with Clone Stamp and Healing Brush in Photoshop
While Content-Aware Fill is powerful, in real-world professional work, the Clone Stamp Tool and Healing Brush Tool remain indispensable. They allow editors to manually control details, especially in landscape photos with repeating textures like brick walls, roof tiles, or fences.
The Clone Stamp Tool works on the principle of “sampling”. When you hold down the Alt key and click, Photoshop will remember that area as a template. Then, when you brush over the area you want to erase, the software will overwrite the sample content in the new location, pixel by pixel. This method requires meticulousness, but in return, you have complete control over the results, from the direction of light, color transitions to material textures.
However, using the Clone Stamp alone can make the edits look “hard” or too perfect, which can be unnatural. That’s why the Healing Brush Tool is often used for final touches. This tool blends the color and light between the sample and edits, creating a smooth, seamless border.
.jpg)
In professional practice, retouchers often combine both tools on multiple layers. They might clone out a large portion of the image, then use healing to “finish” the tonalities. Working this way, you can easily undo each step or adjust the opacity to achieve the most natural effect.
This technique is especially useful for images with a lot of spatial depth, where the lighting and sharpness change with distance. By understanding how to control the texture and gradient of the light, you can recreate erased areas as realistically as if no one had ever been there.
4. Tips to quickly remove people from outdoor travel photos
Travel photography often has its own challenges: large backgrounds, lots of people, and constantly changing light. Therefore, post-production requires a combination of techniques to achieve fast results without losing the natural look.
One of the most common tips is to erase in small batches rather than selecting the entire person at once. Working in sections allows you to control the edges and ensure the background color blends in. This technique is especially useful when working with Content-Aware Fill, as the software will give more accurate results if the selection is not too large.
When faced with a background with a repeating structure like a wall, tiles, or tree line, the Patch Tool becomes the optimal choice. By locating the unwanted person and dragging it to a similar background area, Photoshop will automatically replace it with a suitable texture. This is a fast and effective technique, often used in editing travel photos or photos of crowded events.
Additionally, you can combine with Layer Mask to manually mask and restore parts of the background. This is useful when the erased area is close to important details such as sleeves, hair or edges of clothes, if erasing too much can break the photo composition.
.jpg)
Another thing to keep in mind is lighting. When removing people from outdoor photos, pay attention to the direction of the light and the shadows. If you remove a person standing in the sun, don't forget to remove the corresponding shadows. In the case of reflective backgrounds (like water or tile floors), you'll need to restore the reflections with a Clone Stamp or a soft brush, making sure the reflections and colors are consistent.
5. Frequently Asked Questions About Removing People in Photoshop
Many beginners often ask how to remove people and objects in Photoshop quickly and naturally. Here are some in-depth answers to common problems:
What’s the fastest way to remove people in Photoshop?
The answer is to use the Content-Aware Fill or Remove Tool (in newer versions of Photoshop). They use AI to automatically identify areas to remove, allowing you to complete the process in just a few clicks.
Which tool should a beginner use?
If you’re new to Photoshop, start with Content-Aware Fill, as it’s semi-automated, easy to understand, and requires little manual intervention. Once you’re comfortable with it, you can try the Clone Stamp or Healing Brush for more advanced tweaking.
Can you remove people from photos using Photoshop on your phone?
Yes, but Photoshop Express only offers basic features and is still less capable of handling complex details than the desktop version. For important photos, it is better to edit on a computer for more accurate results.
.jpg)
When to use Clone Stamp over Content-Aware Fill?
Clone Stamp is suitable when the background of the image has a lot of repeating patterns or clear structures such as brick walls, railings, or tiled roofs. In these cases, Clone Stamp allows you to accurately copy the texture while maintaining visual continuity.
Does removing people from photos leave traces?
If you do it right, using the Clone Stamp and Healing Brush properly, the edits will be almost unnoticeable. The most important thing is to keep the lighting and textures consistent.
Can you restore the background after removing a person?
Yes. If you overdo it, you can use the History Brush Tool or restore the erased area with a Layer Mask . The Healing Brush and Patch Tool can also help restore lost texture.
6. Conclusion
In photography, Photoshop is not just an editing tool, but a creative medium. Removing people from travel photos is not simply “erasing” something, but completing the visual story, bringing the viewer to focus on the real emotion and subject of the photo. When you master tools from Content-Aware Fill, Clone Stamp to Healing Brush, you will not only be able to “clean” the frame, but also have a deeper understanding of how light, texture and composition work in photography. It is this understanding that makes a professional photo editor. A good travel photo not only tells the story of where you have been, but also reflects how you see the world. And sometimes, to tell that story perfectly, you just need to “erase” a few unnecessary details not to hide the reality, but to honor the most original moment.


VIP Products


Best Selling Products
Capcut Pro 1 Year
39 USD
Upgrade Duolingo Super
29 USD
ChatGPT Plus Account (GPT-4)
16 USD
Freepik Premium Account
59 USD
Autodesk All App Account Copyright
120 USD
Adobe Photoshop Copyright - Full App
120 USD
Copyright Adobe Lightroom Account
59 USD
Genuine Cheap Canva Pro
39 USD
MidJourney Account
29 USD
Upgrade genuine Capture One account
120 USD
Plugin Retouch4me
69 USD
Upgrade Genuine Office 365
49 USD
Genuine Adobe Illustrator account
99 USD
Windows 10 & 11 Pro Key
36 USD
Adobe Premiere Pro Account
99 USD