Best Selling Products

ChatGPT Plus Account (GPT-4)
16 USD

Freepik Premium Account
59 USD

Copyright Adobe Lightroom Account
59 USD

Upgrade Genuine Office 365
49 USD

Windows 10 & 11 Pro Key
36 USD

Autodesk All App Account Copyright
120 USD

Upgrade genuine Capture One account
120 USD

Adobe Premiere Pro Account
99 USD

Genuine Adobe Illustrator account
99 USD

Upgrade Duolingo Super
29 USD

Adobe Photoshop Copyright - Full App
120 USD

Capcut Pro 1 Year
39 USD

Plugin Retouch4me
69 USD

Genuine Cheap Canva Pro
39 USD

MidJourney Account
29 USD
Instructions on how to professionally and accurately resize 3x4 photos.
Nội dung
- 1. Understand the standard specifications for 3x4 photo size.
- 1.1. Dimensions 3x4 in Centimeters (cm)
- 1.2. The 3x4 size is measured in pixels (px).
- 2. How to resize a 3x4 photo using Photoshop
- 2.1. Setting up a selection using the Crop Tool
- 2.2. Adjusting the framing and composition of the portrait
- 2.3. Advanced color and background processing
- 3. Optimize 3x4 photos online using Canva.
- 3.1. Creating custom sizes in Canva
- 3.2. Align the image within the frame.
- 4. Mobile app that supports quickly resizing 3x4 photos.
- 4.1. Use dedicated apps for iOS and Android
- 4.2. Basic steps to follow on Mobile
- 5. Create smart, automatic ID photos with the web appvip.ai
- 6. Important notes for taking a 3x4 photo that meets regulations.
- 6.1. Attire and demeanor when taking photos
- 6.2. Lighting and Background Conditions
- 7. Common mistakes when resizing 3x4 photos
- 7.1. Image stretching error with incorrect aspect ratio.
- 7.2. Exporting files with excessively low quality.
- 8. How to layout 3x4 photos for printing economically and efficiently.
- 8.1. Use 10x15 cm paper size for printing ID photos.
- 8.2. Choosing the right printing paper material
- 9. Conclusion
Detailed instructions on how to adjust 3x4 photo size to international standards on computers and phones. Discover the fastest, most professional, and accurate photo ID creation tools available today.
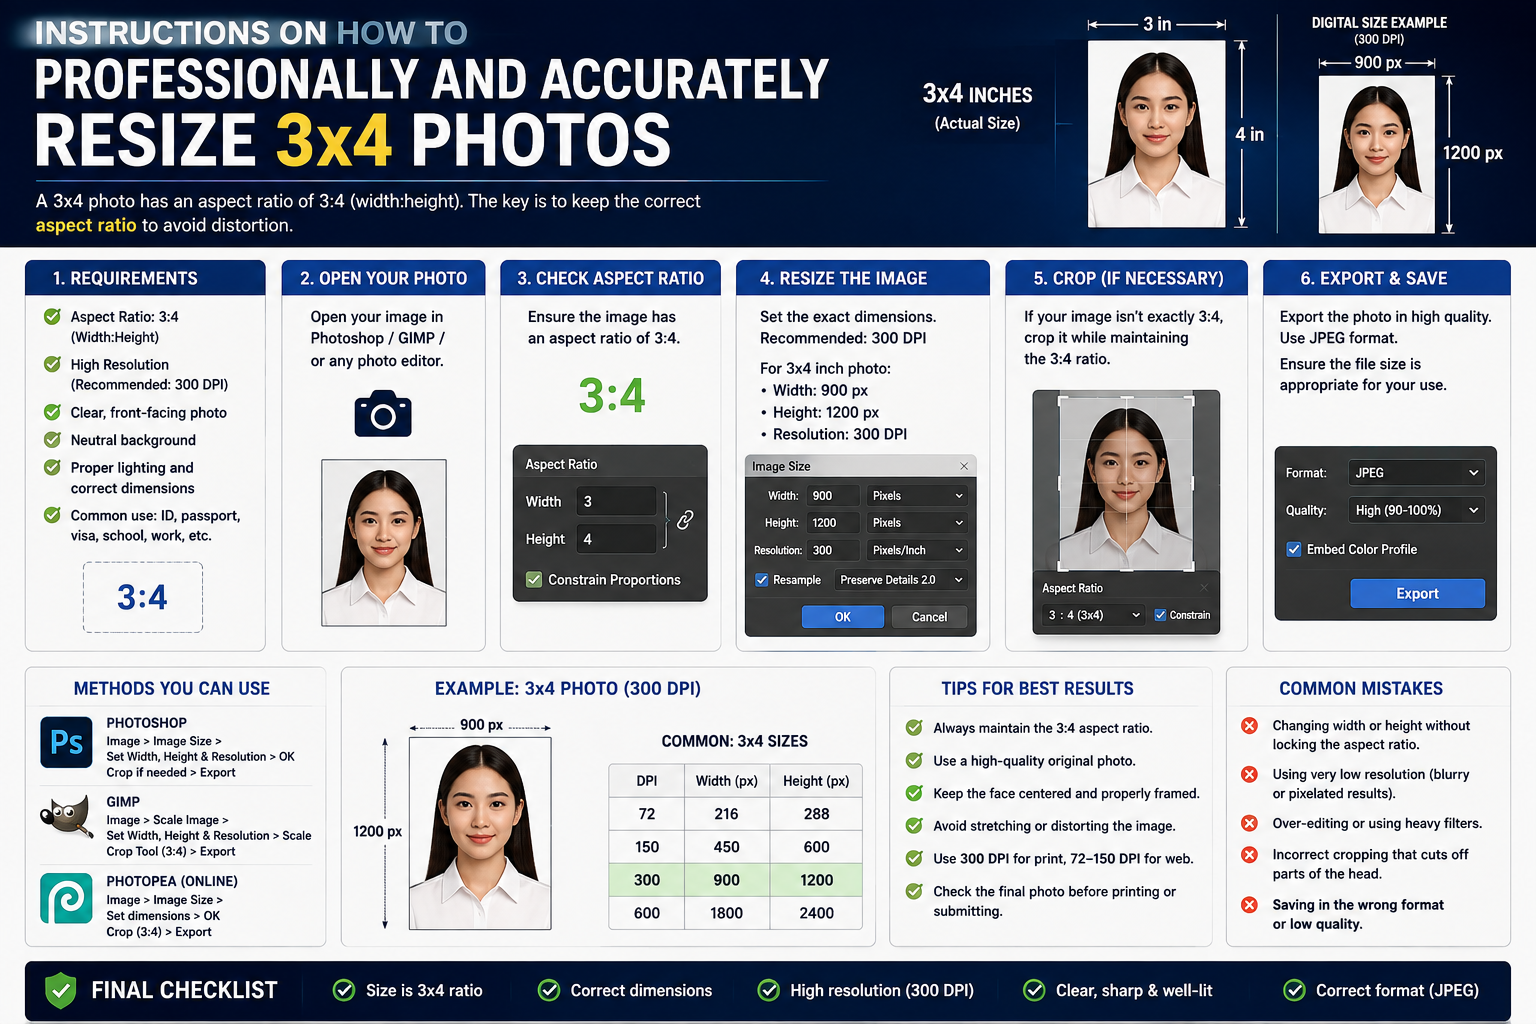
1. Understand the standard specifications for 3x4 photo size.
Before starting any editing, understanding the technical specifications is crucial to ensuring the final print is not blurry or distorted. The 3x4 size actually refers to the ratio of the width to the length of the photo.
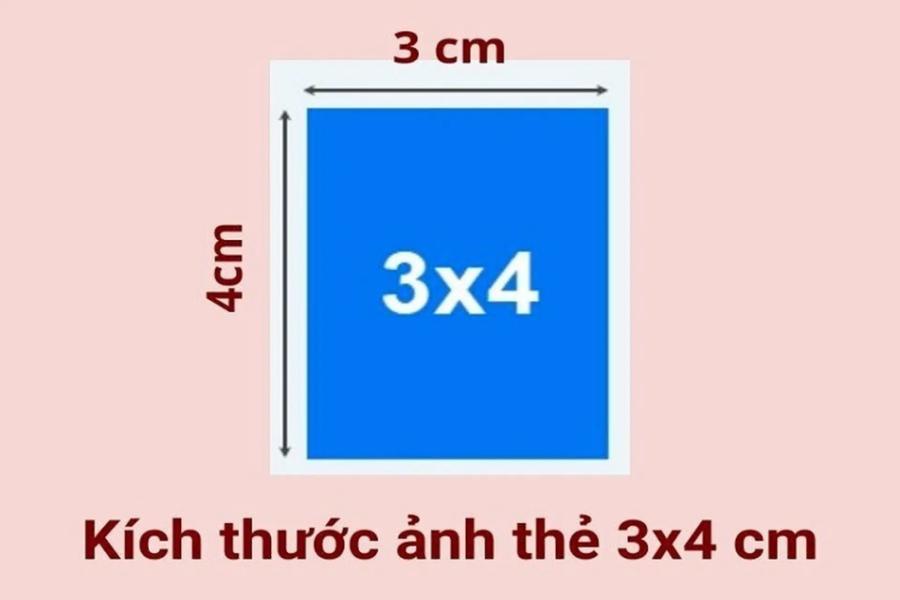
1.1. Dimensions 3x4 in Centimeters (cm)
For physical printing purposes, centimeters are generally the preferred unit of measurement. A standard 3x4 photograph will have an exact width of 3cm and a length of 4cm . This is the common standard in Vietnam for most types of driver's licenses, student ID cards, or basic personnel documents.
1.2. The 3x4 size is measured in pixels (px).
In the digital environment, image size is measured in pixels. Depending on the resolution (DPI - Dots Per Inch), the number of pixels will vary to ensure sharpness.
-
72 DPI resolution: Corresponding size is approximately 85 x 113 pixels (commonly used for web display).
-
300 DPI resolution: Corresponding size is approximately 354 x 472 pixels (this is the standard for high-quality photo printing).
Understanding the relationship between physical size and technical resolution helps users avoid pixelated images when printing.
2. How to resize a 3x4 photo using Photoshop
Adobe Photoshop consistently ranks at the top of the list of the world's most professional photo editing tools thanks to its ability to deeply manipulate every detail. To create a perfect 3x4 passport photo, users need to follow strict layout setup steps.
2.1. Setting up a selection using the Crop Tool
Start by opening the original image file in Photoshop. Press the C shortcut key to activate the Crop Tool. On the properties bar at the top of the screen, change the mode from "Ratio" to "W x H x Resolution". Here, directly enter 3cm in the width box and 4cm in the height box. The Resolution should be set to 300 Pixels/Inch to achieve maximum smoothness of the image surface.
2.2. Adjusting the framing and composition of the portrait
After the aspect ratio has been fixed, a frame will appear on the original image. Users drag the corners of the frame so that the face is centered, the top of the head is a suitable distance from the top edge, and the shoulders are symmetrical. The golden rule in ID photos is to keep the eyes looking straight ahead and the nose axis aligned on the midline of the frame.
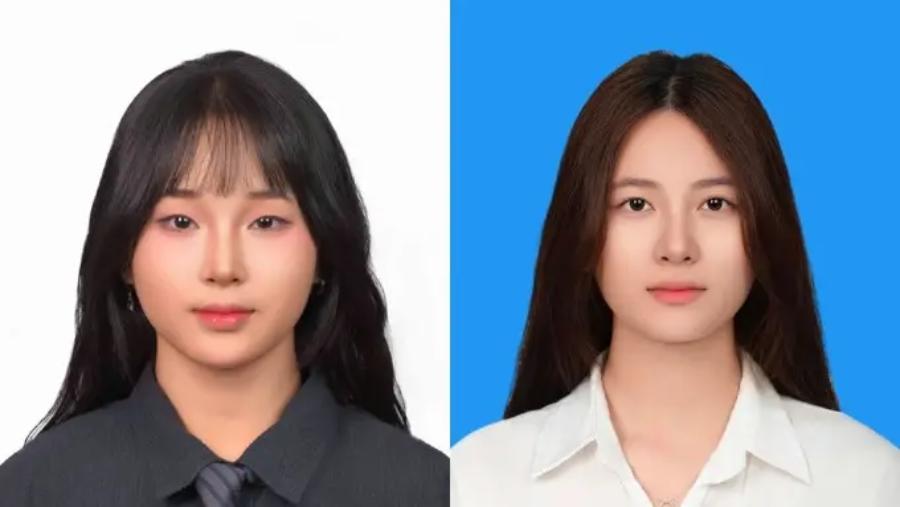
2.3. Advanced color and background processing
The background color of a 3x4 photo is usually blue or white, depending on the specific requirements of each type of application. Use the Quick Selection Tool (W) to separate the subject from the background, then create a new layer underneath and fill it with a uniform color. Applying additional brightness/contrast or color balance adjustments will help the skin look more natural and radiant.
3. Optimize 3x4 photos online using Canva.
For those who are not graphic design professionals, Canva is a great alternative thanks to its intuitive drag-and-drop interface and flexible customization options without the need to install resource-intensive software.
3.1. Creating custom sizes in Canva
To access the Canva homepage, users select the "Custom Size" option in the upper right corner of the screen. Here, you need to convert the measurement unit from "px" to "cm" before entering 3 in the width box and 4 in the height box. The system will automatically create a blank design page with the correct proportions.
3.2. Align the image within the frame.
Upload your portrait photo to your Canva library and drag it into the workspace. You can zoom in to focus on the face, but be careful not to lose sight of the shoulders. Canva's Smart Guides feature will display purple lines to help you know exactly when the photo is centered.
4. Mobile app that supports quickly resizing 3x4 photos.
The development of mobile technology allows us to create high-quality ID photos in just seconds right on our smartphones.
4.1. Use dedicated apps for iOS and Android
There are many applications such as "Passport Size Photo Maker" or "ID Photo Application" that allow users to choose from pre-designed 3x4 photo templates. These applications often integrate automatic face recognition tools, making photo cropping absolutely accurate without much manual intervention.
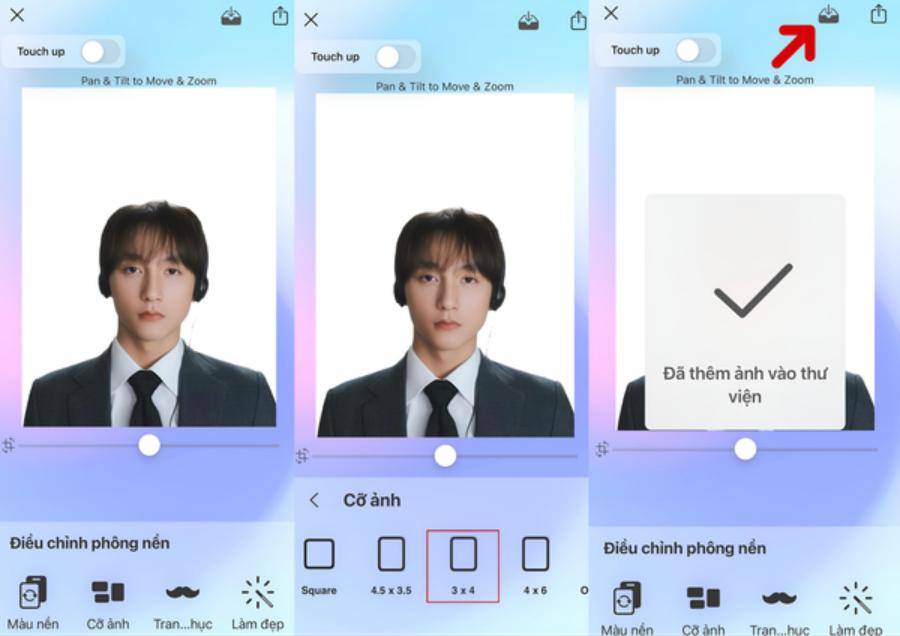
4.2. Basic steps to follow on Mobile
Users simply need to take a photo in good lighting conditions, then import it into the application. Select the desired country or 3x4 size. The application will automatically remove the background and allow you to choose the desired background color. Finally, the file will be exported as JPG or PNG format for storage or direct email sending.
5. Create smart, automatic ID photos with the web appvip.ai
In the age of artificial intelligence, image processing has entered a new era with the support of advanced AI algorithms. Appvip.ai is one of the leading platforms providing automated ID photo editing solutions, completely eliminating complex manual operations while ensuring high aesthetic quality.
When accessing this system, users will experience a streamlined workflow. Integrated artificial intelligence automatically recognizes facial features, smoothly removes cluttered backgrounds, and replaces them with a standard 3x4 background. Importantly, this tool also supports a natural beauty enhancement feature, helping to correct minor skin imperfections without compromising the authenticity of the portrait. This is an ideal choice for busy individuals who still want a professional profile picture.
6. Important notes for taking a 3x4 photo that meets regulations.
Correct size is only a necessary condition; a standard ID photo also depends on many other factors related to appearance and shooting technique.
6.1. Attire and demeanor when taking photos
The person being photographed should ideally wear a collared shirt in a subtle color to create a serious image. Hair should be neatly combed, not obscuring the forehead or ears. For those wearing glasses, ensure the glasses do not cause glare and do not obscure the pupils.
6.2. Lighting and Background Conditions
The light should be evenly distributed from both sides to avoid casting shadows on the face. A light source that's too strong from behind will darken the subject, while upward lighting can create unwanted, eerie effects. If shooting at home, take advantage of natural light from a window and stand in front of a flat, plain-colored wall.
7. Common mistakes when resizing 3x4 photos
Many people, despite their efforts to edit, still end up with unsatisfactory results due to fundamental errors in data processing.
7.1. Image stretching error with incorrect aspect ratio.
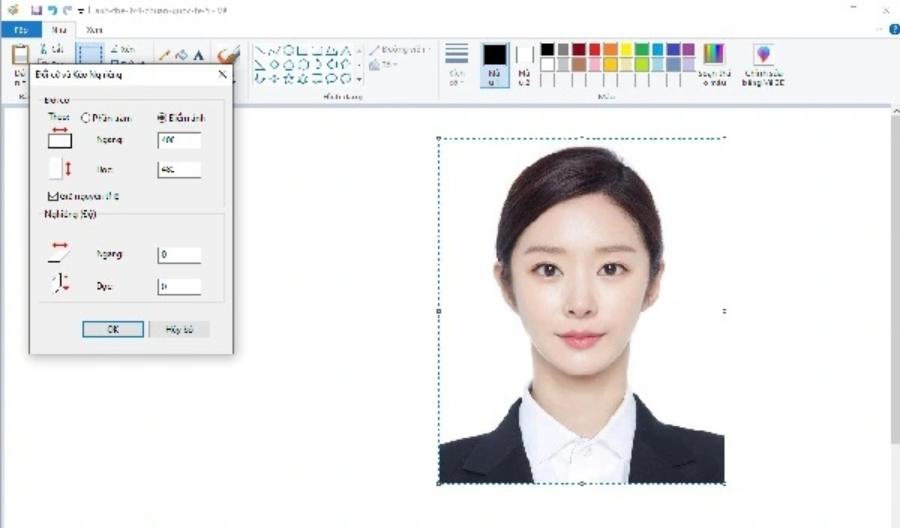
The most common mistake is resizing by dragging the side edges instead of the corners. This makes the face appear unnaturally fatter or thinner, completely altering the subject's appearance. Always hold down the Shift key (in older software versions) or use the Constrain Proportions feature when zooming.
7.2. Exporting files with excessively low quality.
To save space, some people compress images excessively, resulting in graininess. This is extremely dangerous if the images are used for scanning into national data management systems, as the computers will have difficulty recognizing your biometric characteristics.
8. How to layout 3x4 photos for printing economically and efficiently.
Once you have a complete set of images, arranging them onto the printing paper will significantly save you on material costs.
8.1. Use 10x15 cm paper size for printing ID photos.
Typically, a 10x15 cm (4x6 inch) sheet of photo paper can hold about 8 to 10 3x4 photos. Users can use Photoshop or even Microsoft Word to arrange the photos close together, leaving a small white space in between for easy cutting.
8.2. Choosing the right printing paper material
Print quality depends heavily on the type of paper used. It's best to choose specialized photo printing paper (glossy or matte) with a weight of 200gsm or more. Glossy paper will produce vibrant colors, while matte paper offers a luxurious feel and resists fingerprints.
9. Conclusion
Adjusting your own 3x4 photo size not only saves costs but also allows you complete control over your personal image in important documents. From specialized software like Photoshop to modern AI tools found on leading technology websites, this process has become simpler and more accessible than ever. With a little attention to proportions, lighting, and composition, anyone can create accurate and aesthetically pleasing ID photos at home. Hopefully, the above information has provided you with a comprehensive overview and the necessary skills to process images professionally!





















VIP Products








Best Selling Products
ChatGPT Plus Account (GPT-4)
16 USD
Freepik Premium Account
59 USD
Copyright Adobe Lightroom Account
59 USD
Upgrade Genuine Office 365
49 USD
Windows 10 & 11 Pro Key
36 USD
Autodesk All App Account Copyright
120 USD
Upgrade genuine Capture One account
120 USD
Adobe Premiere Pro Account
99 USD
Genuine Adobe Illustrator account
99 USD
Upgrade Duolingo Super
29 USD
Adobe Photoshop Copyright - Full App
120 USD
Capcut Pro 1 Year
39 USD
Plugin Retouch4me
69 USD
Genuine Cheap Canva Pro
39 USD
MidJourney Account
29 USD