Best Selling Products

Autodesk All App Account Copyright
120 USD

Adobe Premiere Pro Account
99 USD

Copyright Adobe Lightroom Account
59 USD

Windows 10 & 11 Pro Key
36 USD

Adobe Photoshop Copyright - Full App
120 USD

ChatGPT Plus Account (GPT-4)
16 USD

Upgrade genuine Capture One account
120 USD

Capcut Pro 1 Year
39 USD

Genuine Adobe Illustrator account
99 USD

Genuine Cheap Canva Pro
39 USD

MidJourney Account
29 USD

Upgrade Duolingo Super
29 USD

Freepik Premium Account
59 USD

Upgrade Genuine Office 365
49 USD

Plugin Retouch4me
69 USD
Revealing 10 Lightroom tricks to make your workflow twice as fast
Nội dung
- 1. Use Caps Lock for Auto Advance feature
- 2. Edit from Smart Preview to work faster
- 3. Lights Out Mode
- 4. Add your Logo or Brand to Lightroom
- 5. Beware of Clipping when editing photos
- 6. Drag and drop to manage Presets neatly
- 7. Improve Lightroom performance
- 8. Be creative when cropping images
- 9. Reduce Preset intensity with The Fader plugin
- 10. Auto-hide panels to optimize workspace
Discover 10 simple yet incredibly effective Lightroom tricks to help you edit your photos faster.

If you regularly use Adobe Lightroom to edit and manage your photos, you must have realized that this is not just a simple software. Lightroom is a powerful tool designed specifically for professional photographers and image creators, helping to optimize post-production processes, organize photos and improve the quality of your work with just a few clicks. However, besides the basic features that everyone knows, Lightroom also contains many small but extremely useful tricks , tips that help you save hours of work, and at the same time make photo editing smoother, faster and more professional.
In this article, we will explore 10 Lightroom tricks that every user should know. Whether you are a beginner or have been using Lightroom for years, these tips will definitely give you a fresh perspective and significantly improve your daily photo editing productivity.
1. Use Caps Lock for Auto Advance feature
One of the small but extremely convenient features in Lightroom is Auto Advance . For those who often work in the Library module , tagging, flagging, or rating hundreds of photos can become time-consuming and tiring. However, with a little trick, just pressing the Caps Lock key , you can shorten this process significantly.
When Caps Lock is on , Lightroom automatically moves to the next photo every time you assign a tag to the current photo. Let's say you're browsing through a series of event photos and want to quickly pick out the best ones. Just press P to mark the selected photos, U to unmark them, or use the number keys 1 to 5 to give each photo a star. Additionally, keys 6 to 9 let you add color labels, making it easier to categorize your photos. After each action, Lightroom automatically moves to the next photo, saving you from having to repeatedly press the arrow keys.
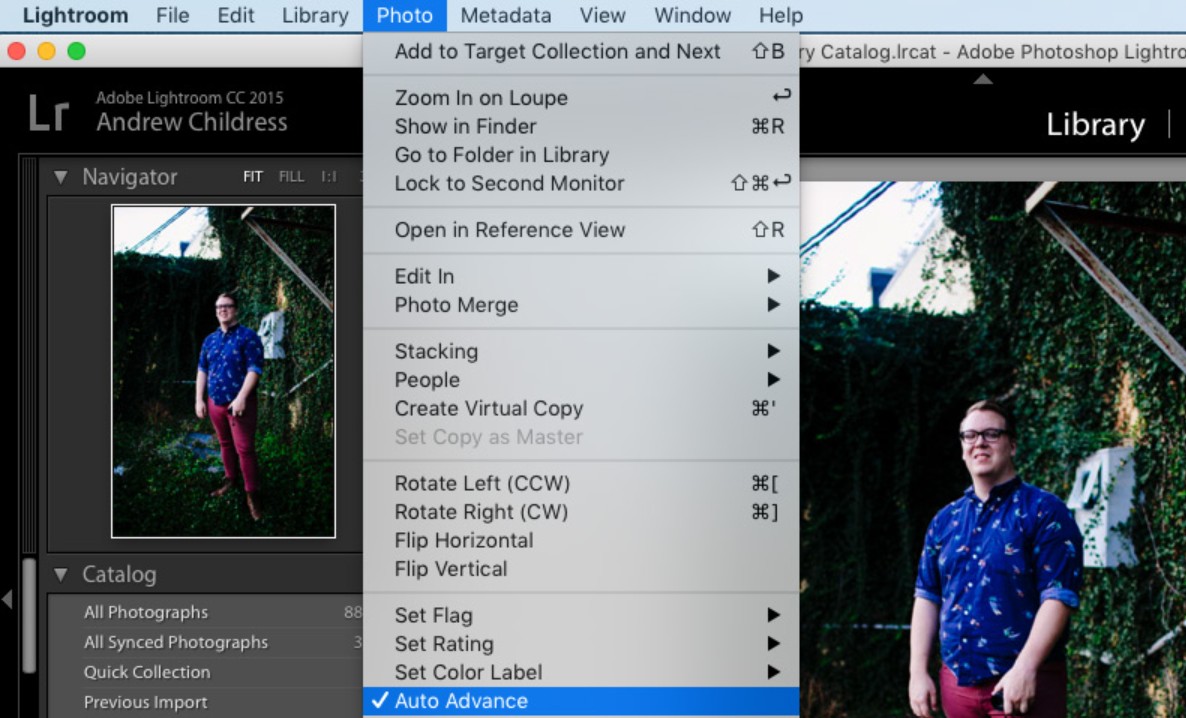
If you don't want to use the Caps Lock key, you can turn Auto Advance on or off manually by going to the Photo > Auto Advance menu . Once you get used to this feature, you'll find it speeds up your workflow by several times, especially useful when processing thousands of photos in large shoots.
2. Edit from Smart Preview to work faster
Smart Previews are one of Lightroom’s “magical” features that not everyone takes advantage of properly. Basically, Smart Previews are miniature versions of the original image, stored in the Lightroom catalog, allowing you to edit even when not connected to the hard drive containing the original file.
This is especially useful if you frequently work with external hard drives or use a laptop with limited storage space. Let's say you're traveling or working from a coffee shop, with Smart Previews you can still open and edit all the photos in your collection without having to carry your original hard drive.
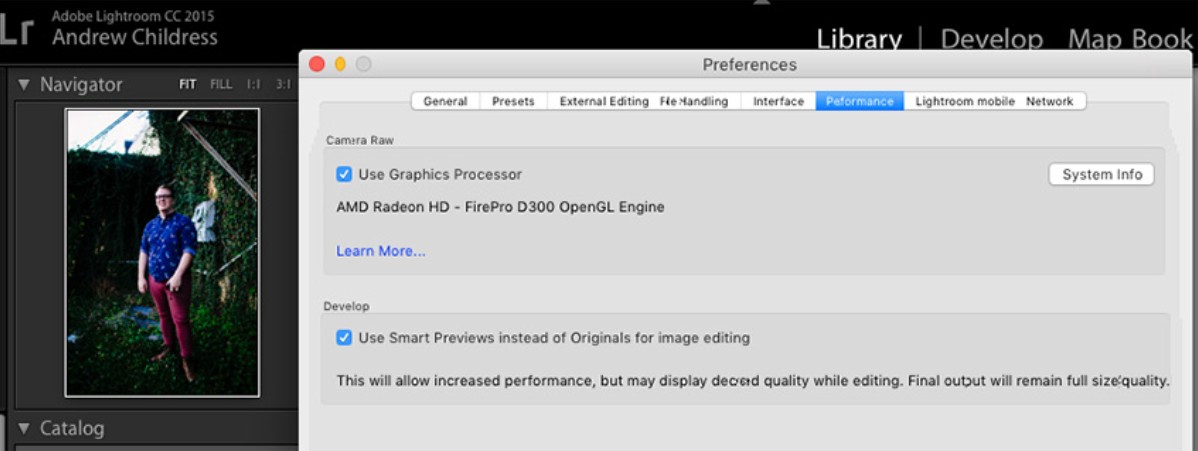
Adobe also added another great feature: you can tell Lightroom to prioritize edits from Smart Previews even when the original image is connected. Since Smart Preview files are much smaller than RAW images, processing speeds will be significantly faster, making your work smoother, especially on less powerful machines.
To enable this feature, go to Preferences > Performance , then check Use Smart Previews instead of Originals for image editing . Once done, Lightroom will automatically use Smart Preview for editing, which helps optimize performance and reduce CPU load, especially when you're editing a lot of photos.
3. Lights Out Mode
Sometimes you just want to look at your photo without being distracted by the interface, toolbars, and surrounding controls. That's where Lights Out comes in.
When you're in the Library or Develop module, simply pressing the L key on your keyboard will automatically darken the interface around your photo, leaving only the main image clearly visible on the screen. Pressing the L key a second time will turn the entire interface completely black, allowing you to focus completely on your photo. Pressing it a third time will return Lightroom to its normal state.
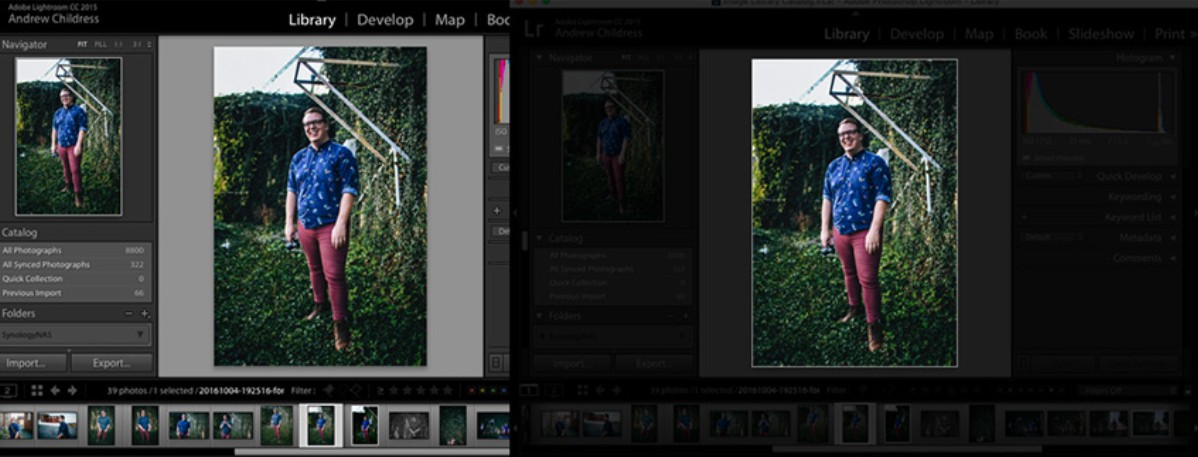
This mode is not only useful when you are viewing photos, but also great for presenting to clients . Removing all distracting elements will make the photo stand out more, helping viewers focus on the details, colors and emotions in the frame.
4. Add your Logo or Brand to Lightroom
A fun way to personalize Lightroom is to add your logo or personal branding to the software interface. Lightroom allows you to do this through the Identity Plate feature .
To customize, go to the Lightroom menu > Identity Plate Setup . Here, you can select Personalized Identity Plate , then decide between two ways to display it: using custom text or a graphic image (usually a transparent PNG file).
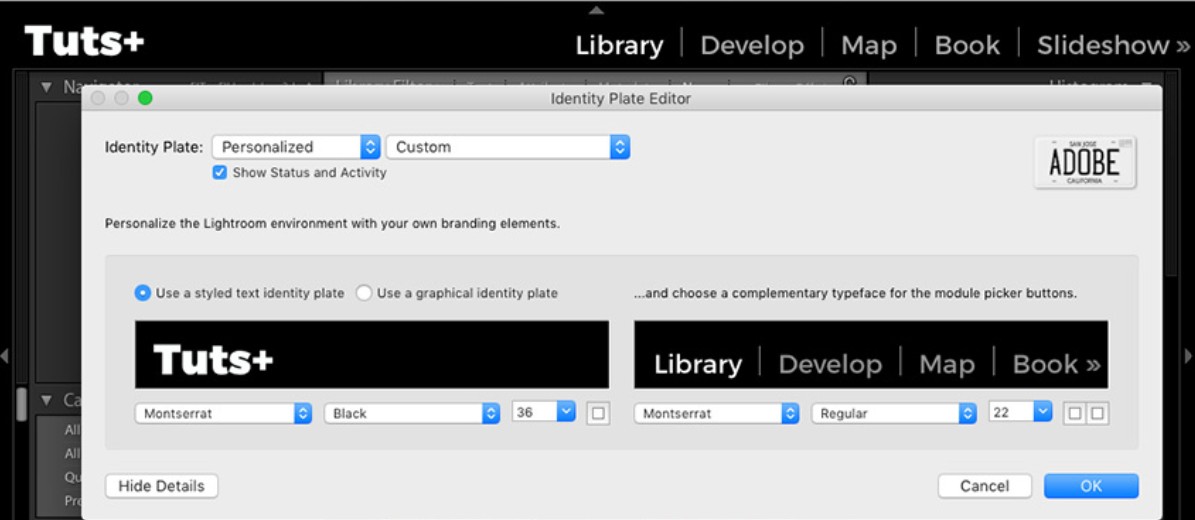
If you choose text, you can customize the font, size, and color to match your brand style. If you choose images, just upload your personal or studio logo and Lightroom will display it right in the workspace.
This feature is especially useful if you regularly present photos to clients or use Lightroom in a team environment. Having a personal logo not only shows professionalism but also creates a unique mark, giving your Lightroom a personal and branded look.
5. Beware of Clipping when editing photos
During post-production, a common mistake that many people make is Clipping , which is losing details in the bright or dark areas of the photo. This happens when you push the parameters too high, causing the bright areas to be "burned" white or the dark areas to be completely black, no longer retaining color information.
To avoid this, Lightroom provides an extremely useful tool. In the Develop module, just press the J key and you will see the areas with blown details displayed in red (blowout) and blue (blackout). This allows you to easily identify and adjust the exposure, highlights, or shadows to rebalance the image.
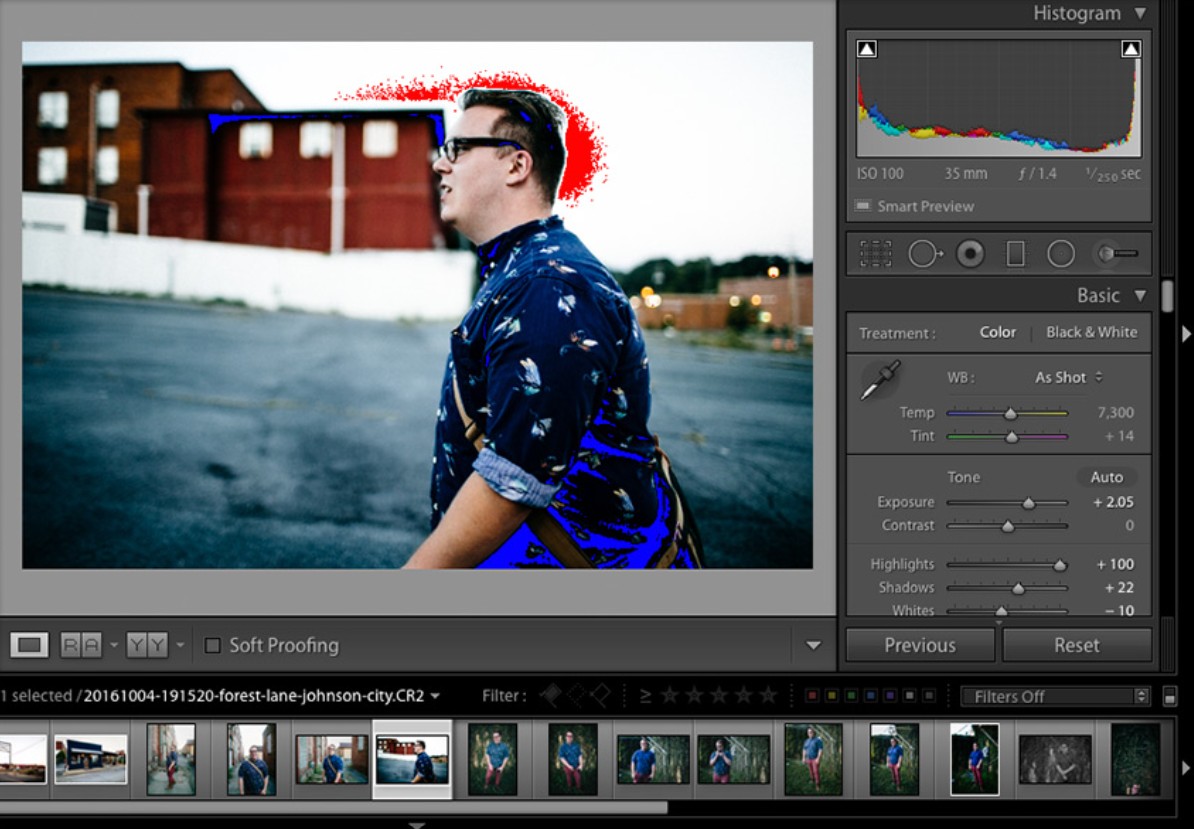
Clipping is a great companion when editing RAW photos, helping you avoid losing valuable image data. Sometimes, just reducing the Exposure a little or pulling back the Highlights can restore lost detail without affecting the overall image.
6. Drag and drop to manage Presets neatly
Presets are the soul of Lightroom. They help you apply color, light, and tone settings in a snap, turning an ordinary photo into a work of art. However, when using Lightroom for a long time, you will easily be "flooded" with hundreds of different presets and finding the right one becomes time-consuming.
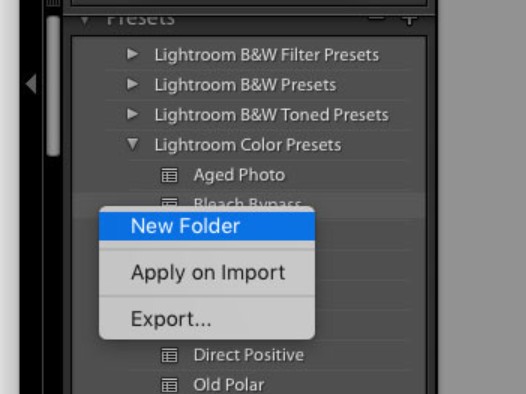
The solution is incredibly simple: reorganize your presets by dragging and dropping them directly in the Presets panel. Lightroom allows you to create subfolders, reorder them, or group them by style, such as “Vintage,” “Cinematic,” “Portrait,” or “Black & White.”
To create a new folder, simply right-click in the Presets panel and select New Folder , then give it a name. Once you have a clear system in place, you’ll find that finding and applying presets becomes much faster. This is also a great way to keep your Lightroom neat and professional, especially if you have a huge preset library.
7. Improve Lightroom performance
A common issue Lightroom users face is slow processing speeds, especially when working with thousands of RAW images. Here are three key things you should check to improve your performance.
First, go to Preferences > Performance and try disabling the Use Graphics Processor option if you have a computer with an integrated GPU or an older graphics card. Many users have found that disabling this option makes Lightroom run significantly smoother.
Next, in Preferences > File Handling , increase the Camera Raw Cache . This is the buffer that Lightroom uses to temporarily store RAW image information to speed up rendering. By default, this is quite low, but you can increase it to 20–30 GB to significantly improve image loading speed.
Finally, periodically run the File > Optimize Catalog command . Optimizing the catalog helps Lightroom clean up old data, reducing the chance of slowing down or freezing when working for a long time. If you do this regularly, Lightroom will run more stably and faster.
8. Be creative when cropping images
Cropping is one of the most important steps in photo post-production. However, not many people know that Lightroom offers a series of creative crop grids to help you position the perfect composition for each frame.
To enter Crop mode, simply press the R key in the Develop module. Then press the O key to switch to different crop grids, including Rule of Thirds , Golden Ratio , Diagonal , Triangle , and more. These grids help you shape your composition according to classic photography principles, ensuring your images are both balanced and visually appealing.

Try placing important elements of your photo at grid intersections or use the Golden Spiral to naturally guide the eye. It’s one of those tricks that can transform an ordinary photo into a perfectly composed masterpiece in just a few easy steps.
9. Reduce Preset intensity with The Fader plugin
Sometimes you apply a preset you like but feel the effect is too strong, losing the natural look of the photo. In that case, The Fader plugin will be an indispensable tool.
This plugin allows you to reduce the intensity of a preset , much like reducing the opacity of a layer in Photoshop. Once you download and install The Fader by going to File > Plug-In Manager , you can access it under the File > Plug-in Extras > The Fader menu .
Here, select the preset you want to apply, then use the Opacity slider to adjust the level of influence. This allows you to subtly blend the original color tone and the preset effect, achieving a more harmonious and natural result.

10. Auto-hide panels to optimize workspace
If you frequently edit on a small laptop , you may find that Lightroom can sometimes feel crowded with too many panels. The good news is that you can auto-hide panels to free up more space for your images.
Just right-click on the filmstrip or the left or right panel , then select Auto Hide & Show . When this feature is enabled, panels will automatically hide when you are not using them, only reappear when you hover your mouse over that area. This frees up your screen, helping you focus more on the photo editing process.
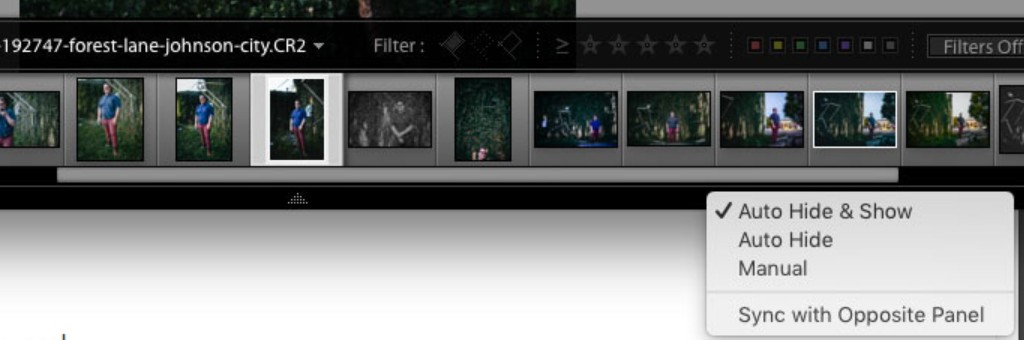
This is a small but extremely effective tip, especially for mobile workers, to optimize space and provide a more intuitive, comfortable editing experience.
Lightroom is a powerful software, but the best part is that it's always hidden with countless subtle features that save you time and improve your work efficiency. From using Caps Lock to speed up photo reviews , to taking advantage of Smart Preview to edit on the go, to personalizing the interface, organizing presets, and optimizing performance.
So, try applying these 10 tips to your workflow right away. Surely, after a short time, you will find Lightroom becomes faster, cleaner and more creative than ever.


VIP Products


Best Selling Products
Autodesk All App Account Copyright
120 USD
Adobe Premiere Pro Account
99 USD
Copyright Adobe Lightroom Account
59 USD
Windows 10 & 11 Pro Key
36 USD
Adobe Photoshop Copyright - Full App
120 USD
ChatGPT Plus Account (GPT-4)
16 USD
Upgrade genuine Capture One account
120 USD
Capcut Pro 1 Year
39 USD
Genuine Adobe Illustrator account
99 USD
Genuine Cheap Canva Pro
39 USD
MidJourney Account
29 USD
Upgrade Duolingo Super
29 USD
Freepik Premium Account
59 USD
Upgrade Genuine Office 365
49 USD
Plugin Retouch4me
69 USD