Best Selling Products
Revealing 3 Simple Ways to Adjust Image Colors in Photoshop
Nội dung
- Simple color correction in Photoshop using Levels tool
- Open the Levels tool
- Color adjustment
- Add color to photos
- Adjust color in Photoshop using the Selective Color tool
- Select the color group to edit
- Color adjustment
- Applying sophisticated editing techniques
- Using the Gradient tool to adjust colors in Photoshop
- Open the Gradient tool
- Apply Gradient to Image
- Create flexible color transition effects
- Easy customization
- Conclusion
Discover 3 easy and effective ways to adjust image colors in Photoshop. From the Levels tool, Selective Color to Gradient, you will learn how to quickly enhance image quality.

Photoshop is not only a powerful photo editing software but also provides countless tools to help users edit color and light professionally. Mastering the color correction tools in Photoshop will help you create more vivid and attractive photos. In this article, SADESIGN helps you discover three simple but effective ways to adjust color in Photoshop.
Simple color correction in Photoshop using Levels tool
The Levels tool in Photoshop is one of the basic but extremely powerful tools when editing the color and brightness of an image. When using Levels, you will adjust the light, dark, and mid-tone values of an image through a histogram. Here is how to use the Levels tool to accurately and effectively color correct an image:
Open the Levels tool

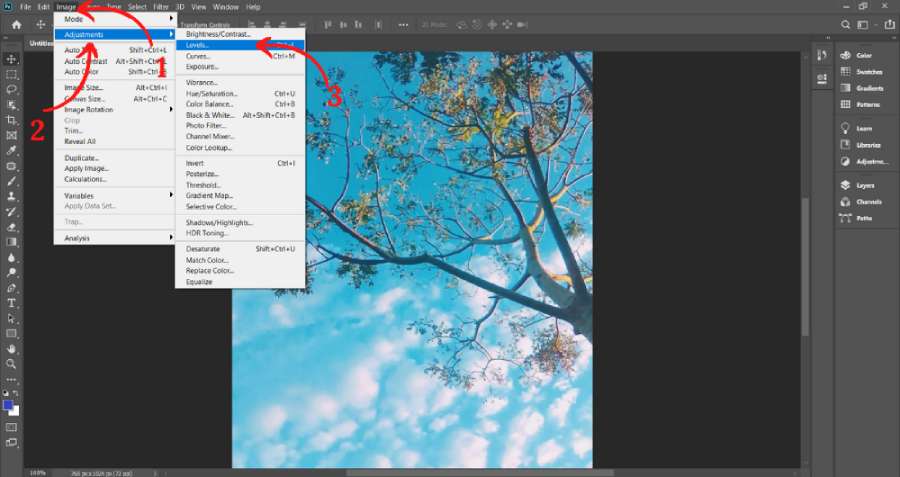
To get started, you'll need to open your image in Photoshop. Then, go to the Image > Adjustments > Levels menu or use the keyboard shortcut Ctrl+L (Windows) or Cmd+L (Mac).
Understanding histograms
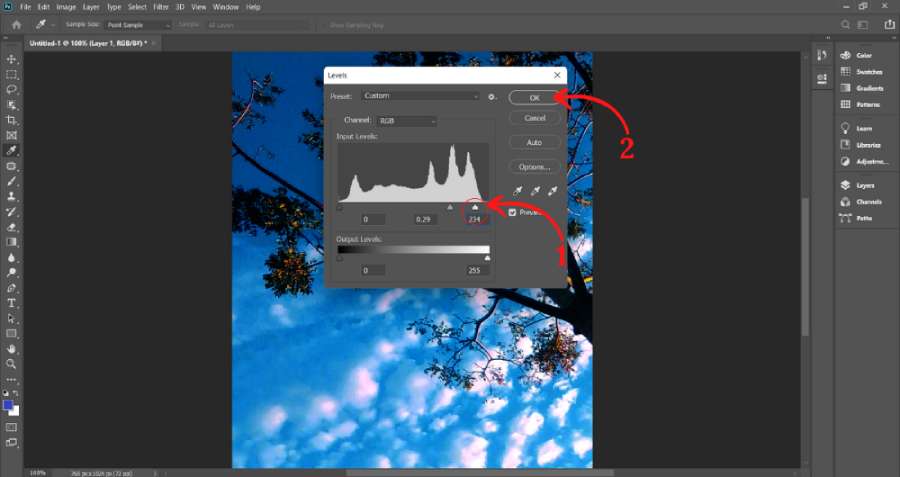
When the Levels tool appears, you’ll see a graph called a histogram. This graph shows the lightness and darkness of your image. The left side is the shadows, the right side is the highlights, and the middle is the midtones.
Color adjustment
In the Levels window, there are three main sliders:
Shadows (Left sidebar): Adjust the darkness of the image.
Midtones: Adjust the average brightness of the photo.
Highlights (Right sidebar): Adjust the brightness of the bright areas in the photo.
You can drag these sliders to improve the contrast and sharpness of your photo. Adjusting these values correctly will help you get a balanced photo with clear and natural light and dark tones.
Add color to photos
One useful feature of the Levels tool is that you can adjust the color for each individual color channel (Red, Green, Blue). To do this, simply select the color channel you want to change and drag the corresponding sliders. This adjustment can make your photo warmer (if you drag the red channel) or cooler (if you drag the blue channel).
The Levels tool is easy to use but incredibly effective at adjusting the brightness and color of your photos. You can create subtle or dramatic color correction effects with just a few simple steps.

@old
Adjust color in Photoshop using the Selective Color tool
Selective Color is a great tool for editing the color of specific elements in a photo without affecting other areas. This tool helps you make precise and detailed changes, allowing you to change the hue of individual color groups (Red, Yellow, Green, Blue, etc.) without losing the overall quality of the photo.
Open the Selective Color Tool
To open this tool, you can go to Image > Adjustments > Selective Color. Once the tool window appears, you will see a panel that allows you to select a group of colors and adjust their tonal values.
Select the color group to edit
In the Selective Color window, you'll see a list of color groups like Reds, Yellows, Greens, Blues, Neutrals, and more. Select the color group you want to edit, such as "Reds" to change the red tones in your photo.
Color adjustment
Once you select a color group, you will see three main sliders:
Cyan: Adjusts the cyan (blue) level.
Magenta: Adjusts the magenta level.
Yellow: Adjust the yellow level.
Black: Adjusts the blackness (darkness).
Adjusting these values will change the hue of the color in your photo without affecting other parts. For example, if you want to make the red tones in your photo darker or lighter, simply change the values of the Cyan, Magenta, and Yellow sliders in the "Reds" group.

Applying sophisticated editing techniques
One of the benefits of the Selective Color tool is the ability to create very detailed color correction effects without affecting the overall image. You can highlight a specific object in the photo or change the color tone of a certain area while keeping the overall look natural and harmonious.
The Selective Color tool is great for creating artistic color editing effects, while also allowing you to create more vibrant and sharper photos.
Using the Gradient tool to adjust colors in Photoshop
Gradient is an indispensable tool if you want to create smooth color transitions from one color to another in your photos. This tool allows you to apply a gradient of color from one point to another, creating impressive color transitions.
Open the Gradient tool
To use the Gradient tool, simply select the Gradient Tool from the left toolbar or press the G keyboard shortcut. Once you select the tool, you'll see a Gradient selector at the top of the screen, allowing you to choose the type of gradient you want to use.
Choose a Gradient Type and Settings
There are many types of Gradients available in Photoshop, ranging from simple gradients like light and dark colors to gradients that blend colors. You can choose a default gradient or create a new one by clicking on the Gradient bar at the top and adjusting the colors and transitions from one color to another.

Apply Gradient to Image
To apply a gradient, simply drag your mouse from the starting point to the end point where you want the gradient to appear in your photo. You can then adjust the blending mode and opacity of the gradient to achieve the effect you want.
Create flexible color transition effects
One of the strengths of the Gradient tool is the ability to change how the gradient is applied. You can create smooth transitions or fade colors at the edges of your photo, depending on your editing goals. If you want a soft light image, you can apply a light gradient from the center of the photo outward. If you want a dark space, you can apply a gradient from a dark color to the center of the photo.
The Gradient tool can open up a lot of creative possibilities, allowing you to experiment with very unique lighting and color effects.
Easy customization
Photoshop provides a Gradient panel that allows you to create and save custom gradients. This allows you to reuse your favorite gradients without having to start from scratch each time.
Overall, Gradient is a powerful tool in Photoshop, not only helping to create smooth effects but also bringing creativity and flexibility in adjusting color and light in graphic design.
Conclusion
Color correction in Photoshop is not only a technique, but also an art. With 3 ways to correct photo color in Photoshop mentioned in the article, you can adjust and create impressive colors for your photos. Understanding how to use each tool will help you save time and bring maximum efficiency to the editing process. Try Photoshop services at SADESIGN to create beautiful and vibrant photos right away.


