Best Selling Products

Adobe Premiere Pro Account
99 USD

Plugin Retouch4me
69 USD

Upgrade Duolingo Super
29 USD

Genuine Cheap Canva Pro
39 USD

MidJourney Account
29 USD

Copyright Adobe Lightroom Account
59 USD

Upgrade genuine Capture One account
120 USD

Capcut Pro 1 Year
39 USD

Windows 10 & 11 Pro Key
36 USD

Genuine Adobe Illustrator account
99 USD

ChatGPT Plus Account (GPT-4)
16 USD

Freepik Premium Account
59 USD

Adobe Photoshop Copyright - Full App
120 USD

Upgrade Genuine Office 365
49 USD

Autodesk All App Account Copyright
120 USD
What is Resolution? Everything About Resolution in Photoshop
Nội dung
- 1. Basic concept of Resolution
- 2. The Importance of Resolution in Printing
- 2.1. Ensure sharpness and detail
- 2.2. Impact on color and print reliability
- 2.3. Minimize risks when cutting and post-printing processing
- 2.4. Optimizing production costs and time
- 2.5. Enhance brand reputation
- 3. How to ensure resolution when printing photos?
- 4. How to handle low resolution image files
- 5. The impact of Resolution on file quality and size
- 5.1. Sharpness & Pixel Count
- 5.2. File size
- 5.3. Processing & rendering speed
- 6. Frequently Asked Questions & Answers
- 7. Tips and Best Practices
A concise but comprehensive “encyclopedia” that explains clearly the concept of resolution and how it affects the quality of printed and displayed images. For those who want to grasp the basics before diving into the technical details.
In the world of graphic design, Resolution is always a concept that makes many designers have a headache. Have you ever wondered why the same photo is sharp when printed, but the file size is different? Or when you enlarge the image, it is broken or blurry? All of these things are directly related to resolution in Photoshop . In this article, SaDesign will "dissect" every aspect of resolution with you. Our goal is not only dry theory but also to provide instructions with practical advice so that you can confidently handle all resolution issues in Photoshop.
1. Basic concept of Resolution
Resolution is understood as resolution or more specifically, the number of pixels displayed on the display screen. The higher the resolution, the more specific and sharp the printed image will be. In case you want to print large images, banners or billboards, you need to pay attention to the resolution index so that the printed publication is deployed most completely.
Resolution tells the viewer the resolution of the current image file. Constrain Proportions to resize according to the original ratio, when changing one size, the other dimension automatically changes according to the image ratio.
For normal printing needs, a camera or smartphone with a 10 megapixel camera can help you take photos with a high enough resolution to print photos in 30×40 ratio without worrying about image distortion.
.png)
2. The Importance of Resolution in Printing
When you start a printing project, whether it is a brochure, poster, catalogue or flyer, resolution is the key factor that determines the output quality. Here are the reasons why you absolutely cannot ignore this parameter:
2.1. Ensure sharpness and detail
A high resolution image (usually 300 PPI for offset printing) will contain a lot of pixels per inch, helping to show the sharpest lines, small details such as fabric fibers, wood grain, or micro-printed letters. If you use a low resolution (for example 72 PPI) for printing, the image will be grainy, blurry, or even “smudged” when viewed closely – especially with large publications. Therefore, right from the file creation step, the designer needs to set the correct resolution to avoid wasting time editing and testing with the printer.
2.2. Impact on color and print reliability
Resolution is not just about “sharpness” or “blurness”, it is also closely related to the color channel separation process and the way the printer applies ink. A file with a high PPI helps the print driver (RIP) analyze and accurately convert each ink dot (DPI) according to the required ratio, limiting banding (black/white streaks) or incorrect ink filling. This is extremely important in publications that require high color accuracy such as fashion catalogs, art poster printing or cosmetic advertising flyers.
.png)
2.3. Minimize risks when cutting and post-printing processing
In offset or digital printing, designers often have to add bleed and trim. With a standard resolution file, when printed and trimmed, the image will not "drift" out of focus or have white borders around it. On the contrary, if the resolution is too low, after cutting, the image border may lose detail, the edges may be blurred, making the product look unprofessional, and even requiring reprinting - causing both cost and time.
2.4. Optimizing production costs and time
Many designers have the idea that “the more PPI the better”, then export files with resolutions up to 600 PPI or more, resulting in very large, cumbersome files when sent to the printer. This not only slows down the upload/download process, but can also cause the printer to have to compress the file, or even reject the file because it exceeds the allowed limit. By clearly understanding the printing requirements – for example, an A3 poster printed on offset only needs 300 PPI or a smaller internal brochure can use 250 PPI – you will balance the quality and file size, helping to quickly circulate between the designer and the printer, shortening the production process.
2.5. Enhance brand reputation
Finally, print quality directly reflects the image and professionalism of the business. A sharp, standard color and neatly cut publication will create a good impression on customers. On the contrary, a blurry, wrong color or misaligned cut product will make viewers underestimate the investment and care of the brand. Therefore, designers need to set a standard input resolution as a "commitment" to quality, contributing to protecting and enhancing the reputation of SaDesign as well as your customers.
.jpg)
3. How to ensure resolution when printing photos?
You need to pay attention to the size and printing material to get the most satisfactory and complete product, otherwise you will waste money and time in the printing process.
Image size, Resolution and printing are the prerequisites for a final graphic design file. To check the resolution of the file, click on Image and select Image size.
Note: you cannot check the resolution in photoshop of each image because at this time it sees the entire canvas as a single image file.
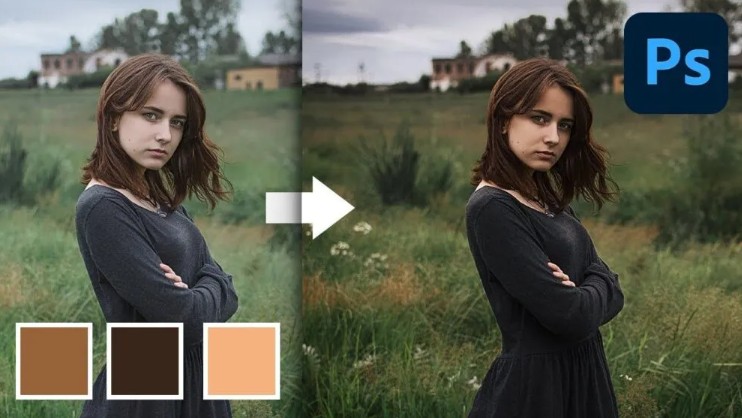
4. How to handle low resolution image files
To improve resolution in photoshop you need to: select Menu Image > Image Size, in the Resample Image section you should switch from Bicubic mode to Bicubic Smoother (best for enlargement).
.png)
In case of image enlargement:
Most Photoshop users do not use RGB or CMYK, here we use Lab Color – another color mode.
Open the file you want to edit and select Image > Mode > Lab Color.
Open Window to select Channels then select Lightness, continue with Smart Sharpen filter via menu Filter > Smart Sharpen
*Please apply multiple times or change as appropriate for each specific case.
Alternatively, you can keep the Lab Color or change it back to RGB mode.
5. The impact of Resolution on file quality and size
5.1. Sharpness & Pixel Count
More pixels means more detail. When printing, if PPI is low, the naked eye will see graininess, a phenomenon called “pixelation”.
The screen has display limitations so 72–96 PPI is enough.
.png)
5.2. File size
PSD: Keeps all layers, smart objects, easy to edit but heavy.
JPEG: Lossy compression, increasing compression reduces size but loses detail.
PNG: Lossless, retains detail but larger files than JPEG.
Increase resolution → increase number of pixels → increase file size exponentially.
5.3. Processing & rendering speed
File is too large, many layers, high resolution → Photoshop works slowly, lags.
Especially with machines with limited RAM, zooming and panning will be difficult.
There are many questions related to resolution that designers often wonder about. In the next part, we will answer each specific case in detail.
6. Frequently Asked Questions & Answers
What is the difference between 72 dpi and 300 dpi?
72 dpi: For screens, focusing on web display.
300 dpi: For printing, ensures sharpness when held directly.
.png)
Does increasing resolution make the image sharper?
If you turn on Resample and use a good interpolation algorithm, the enlarged image will retain some detail but won't be able to create perfect "fake" detail.
If you only increase PPI without resample, you only change the print size, not increase the detail.
How to upscale without breaking?
Use Preserve Details 2.0 in Photoshop CC.
Incorporate AI plugins like Gigapixel AI, but these are usually paid.
Can I change the resolution after capturing/saving the file?
Yes, but only changes print size (Resample off).
To change the number of pixels, Resample must be enabled and interpolation accepted.
Does reducing resolution lose detail?
When Resample is off, reducing PPI only shrinks the print size, preserving detail.
When Resample is enabled, the number of pixels is reduced → image data is lost, which may be blurry or grainy.
In addition to understanding and answering questions, every designer always needs good tips to optimize the process. In the next part, SaDesign will share some Best Practices that have been summarized through many projects.
.png)
7. Tips and Best Practices
Save original file in PSD format: Keep all layers, smart objects for easy editing later.
Take advantage of Smart Object: Insert images into Smart Object to zoom in and out without destroying the original quality.
Use vectors when possible: For simple logos, icons, and graphics, design vectors in Illustrator and then import them into Photoshop. When scaling, there's no fear of losing sharpness.
Create Asset libraries: Use Adobe's Libraries panel to save @1x, @2x, @3x versions.
Fast multi-size export: Use Export As… or Generate Assets (just add the dot extension to the layer name, eg icon.png, icon@2x.png).
Check the file before sending it to print: Reopen the file, look at the separations preview, make sure there are no color deviations or missing bleeds.
Resolution in Photoshop is not just a dry number but is the key to determining the quality of printed products and the display experience on the screen. Hopefully with the above article, SaDesign has helped you answer all questions about resolution in Photoshop.


VIP Products


Best Selling Products
Adobe Premiere Pro Account
99 USD
Plugin Retouch4me
69 USD
Upgrade Duolingo Super
29 USD
Genuine Cheap Canva Pro
39 USD
MidJourney Account
29 USD
Copyright Adobe Lightroom Account
59 USD
Upgrade genuine Capture One account
120 USD
Capcut Pro 1 Year
39 USD
Windows 10 & 11 Pro Key
36 USD
Genuine Adobe Illustrator account
99 USD
ChatGPT Plus Account (GPT-4)
16 USD
Freepik Premium Account
59 USD
Adobe Photoshop Copyright - Full App
120 USD
Upgrade Genuine Office 365
49 USD
Autodesk All App Account Copyright
120 USD