Best Selling Products
Brighten dark areas in Photoshop in just a few SIMPLE steps!
Nội dung
- 1. Benefits of brightening dark areas of photos in Photoshop
- 1.1. Balance the light and dark ratio effectively for photos
- 1.2. Increase image contrast
- 1.3. Images are displayed in detail
- 1.4. Improve vision
- 1.5. Fix underexposed photos
- 1.6. Create open space
- 1.7. Reproducing discolored details
- 2. Instructions for brightening dark areas in Photoshop
- 2.1. Using Shadows/Highlights
- 2.2. Using the Levels tool
- 2.3. Apply Blend mode
- 2.4. Using the Brightness/Contrast tool
- 2.5. Using the Exposure tool
- 3. Refer to some shortcuts to adjust brightness in Photoshop
- 4. Instructions for creating light and dark areas in Photoshop
- 5. Instructions for reducing brightness in Photoshop
Photoshop is a professional graphic design software with many great features to support the best editing. In which, how to brighten dark areas in Photoshop is a very important and useful technique, especially for those new to design. Specifically, how to do it, please read with Sadesign to find out right in the following article!

1. Benefits of brightening dark areas of photos in Photoshop
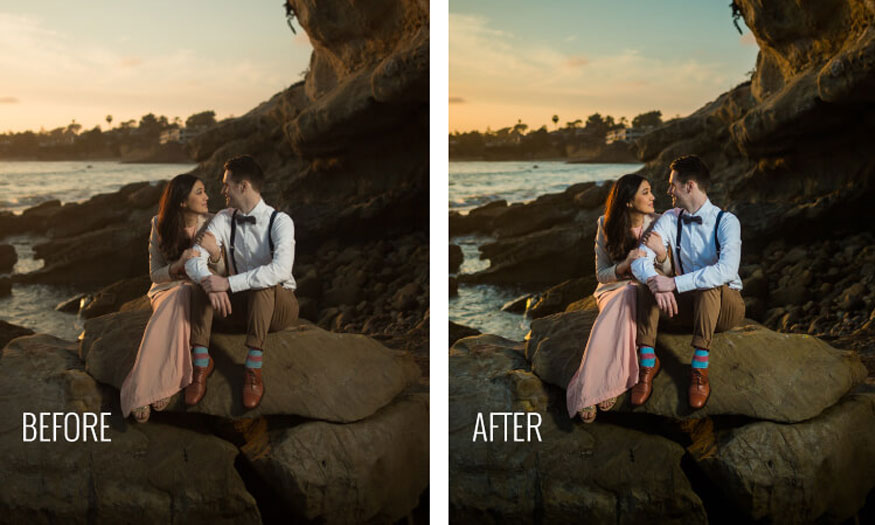
Brightening dark areas in Photoshop brings many outstanding benefits to designers, especially when you want to improve image quality. Specifically, the benefits of brightening dark areas in Photoshop include:
1.1. Balance the light and dark ratio effectively for photos
Every time you take a photo or video, due to insufficient light, some areas of the image will be too bright or too dark. This will cause an unbalanced and unnatural look to the photo.
.jpg)
Adjusting the brightness in Photoshop helps you overcome this problem to help the image have a reasonable and harmonious light and dark ratio.
1.2. Increase image contrast
Contrast is the difference between the lightness and darkness of an image. High-contrast images tend to have clear, vibrant colors, while low-contrast images tend to be dull and blurry.
Applying the method of brightening dark areas in Photoshop helps you enhance the contrast of images, making them more vivid and attractive.
1.3. Images are displayed in detail
Some dark areas of the image may contain important details such as faces, objects, writing, etc. However, due to poor lighting or shooting at an unfavorable angle, these details are obscured or unclear. Brightening dark areas in Photoshop helps to display these details clearly so that the image and content are more meaningful.
.jpg)
Especially with ID photos, adjusting the light and dark is very important because this is a photo that requires high detail. Therefore, when taking a photo, you should pay attention to the standard lighting, and the editing steps should also be careful to create a photo that ensures light balance with high definition.
1.4. Improve vision
Images with too many dark areas will make the viewer feel uncomfortable and tired. On the contrary, images with reasonably bright areas will help bring a comfortable and pleasant feeling to the viewer.
Brightening dark areas in Photoshop improves the viewer's vision, making the image more friendly and approachable.
1.5. Fix underexposed photos
Underexposure is one of the most common photography mistakes. This is when the image is dark or doesn’t have enough light to show the details clearly.
.jpg)
The reason could be that you took the photo in a low-light environment or you didn’t adjust the camera settings correctly. Brightening the dark areas in Photoshop will help you fix these errors so that the image has the right brightness.
1.6. Create open space
If the image has too many dark areas, the space of the image will become cramped and stuffy. On the contrary, with the image having evenly distributed light, will help create a feeling of spacious and airy space.
Brightening dark areas in Photoshop helps you create open space for the image, making the photo more airy and fresh.
1.7. Reproducing discolored details
Some dark areas of the image may be discolored because of insufficient lighting or the shooting and storage process. This causes the image to lose its beauty and vividness.
.jpg)
Brightening dark areas in Photoshop helps to recreate the details that have lost color. Thanks to that, the image has richer, more diverse colors.
2. Instructions for brightening dark areas in Photoshop
To lighten dark areas in Photoshop, we can use many different tools depending on the purpose, as well as usage habits. Here we will introduce some commonly used tools and how to use them:
2.1. Using Shadows/Highlights
When taking photos with high contrast, the dark areas will be underexposed. You can use Shadows/Highlights to fix this. This is considered one of the simple and effective ways to adjust the brightness in Photoshop.
To use this tool, you just need to go to the menu Image => Adjustments => Shadows/Highlights => adjust parameters such as Amount, Tonal Width, Radius,... to help brighten dark areas, while still ensuring that other bright areas of the image are kept the same.
.jpg)
In addition, you can also adjust other parameters such as Color Correction, Midtone Contrast,... to improve image quality.
2.2. Using the Levels tool
Levels is a tool that adjusts the brightness, darkness and contrast of an image by changing the value of the histogram. To do this, go to the menu Image => Adjustments => Levels to drag the slider below the histogram to brighten the dark areas or darken the light areas of the image.
You can select Output Levels to adjust the brightness and darkness in Photoshop of the entire image.
2.3. Apply Blend mode
This is an advanced technique to lighten dark areas in Photoshop using layers and blend modes. You create a new layer on the original image, then choose a light color like white or pale yellow to paint over the dark areas of the image.
.jpg)
Finally, you just need to choose the blending mode for the new layer as Screen, Overlay, Soft Light,… to brighten the dark areas without losing the details of the image.
2.4. Using the Brightness/Contrast tool
This tool has the effect of brightening dark areas in Photoshop very simply and easily. To do this, you just need to go to the menu Image => Adjustments => Brightness/Contrast. Then adjust the Brightness and Contrast sliders to brighten or darken the image in Photoshop as you like. However, you need to note that this tool can lose details or distort the color of the image if you adjust it too high or too low.
Besides adjusting the brightness of the photo, in some cases, you need to remove noise in Photoshop to get a sharp, realistic photo.
2.5. Using the Exposure tool
The Exposure tool allows users to create bright areas in Photoshop by changing parameters such as Exposure, Offset, Gamma Correction,...
.jpg)
You can go to the menu Image => Adjustments => Exposure, then adjust these parameters to help brighten the dark areas, as well as keep the bright areas of the photo.
This tool helps you recreate the natural light of an image or create special effects for the photo.
3. Refer to some shortcuts to adjust brightness in Photoshop
In addition to using the tools in the Image => Adjustments menu, you can also use shortcuts to adjust the brightness of Photoshop. Here are some common shortcuts to help brighten dark areas in Photoshop:
Shortcut key combination Ctrl + L: Helps open the Levels tool
Shortcut key Ctrl + M: To open the Curves tool
Shortcut key combination Ctrl + U: To open the Hue/Saturation tool
Shortcut key combination Ctrl + B: To open the Color Balance tool
Shortcut key combination Ctrl + I: To invert the colors of an image
Shortcut key combination Ctrl + Alt + Shift + L: To automatically adjust Levels
Shortcut key combination Ctrl + Alt + Shift + M: To automatically adjust Curves
Shortcut key combination Ctrl + Alt + Shift + B: To automatically adjust Color Balance
Shortcut key combination Ctrl + Alt + Shift + U: To automatically adjust Hue/Saturation.
.jpg)
Using keyboard shortcuts helps your editing process become more professional and faster. This helps to significantly reduce your working time. Therefore, you should remember these shortcuts to apply in your editing process.
4. Instructions for creating light and dark areas in Photoshop
Creating a highlight and shadow area is one of the effective techniques to lighten dark areas in Photoshop. This method helps to create separate light and dark areas, thereby bringing unique, artistic effects to your photos.
You can do this technique by using the Gradient Map tool. How to use this tool is quite simple as follows: Go to the menu Image => Adjustments => Gradient Map. Then choose the color for the light area and the color for the dark area. In addition, you can also use the available Gradient Map templates or create your Gradient Map templates.
5. Instructions for reducing brightness in Photoshop
Not only can you adjust the brightness, you can also do the opposite, which is to reduce the brightness and increase the darkness of your photos in Photoshop. This method is suitable for photos with a dark, mysterious or horror atmosphere.
.jpg)
Use tools like Levels, Brightness/Contrast, Exposure, etc. to reduce the brightness of the image. You can also use blending modes like Multiply, Darken, Color Burn, etc. to help darken the image effectively.
It can be seen that the technique of darkening or brightening images is very useful and important for designers, especially for beginners. They help balance the light and dark ratio, increase contrast, improve vision, reproduce lost color details, ... effectively to help your photos become more impressive and harmonious.
Hopefully, with the above sharing on how to brighten dark areas in Photoshop, you can successfully apply it in editing. From there, you can create your own photos with artistic quality. If you need to install other useful editing tools in Photoshop or install copyrighted Photoshop, please contact Sadesign immediately for the best support!


