Best Selling Products
Create melting text effect in Photoshop SUPER EASY with SaDesign
Nội dung
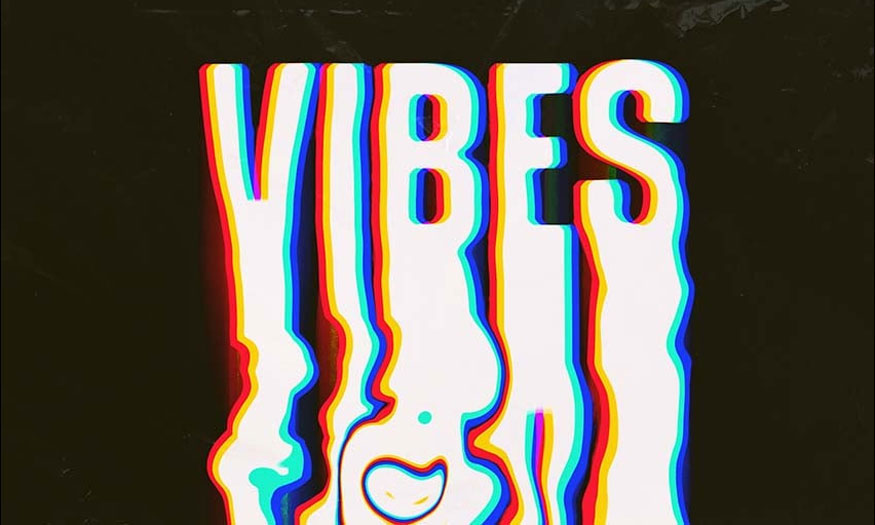
The letters that melt like liquid will make your design more impressive and unique. You can completely create your own melting text effect in Photoshop by combining many different tools. Let's refer to the detailed steps below with SaDesign.

1. Create a document to make the melting text effect in Photoshop
First we need to create a document in Photoshop - this is where we will proceed to make the melted text effect.
Step 1: Create a document in Photoshop with any size you want. Here we set the size to 3000 x 2000 px and the Background Contents is set to Black.
.jpg)
Step 2: We need to create a unique background layer, download Free Dust Texture to your computer. On the menu bar go to File => Place => Downloaded Free Dust Texture => click Place to place this texture layer above the Background layer and change the Opacity to about 45%
.jpg)
Step 3: Create a new layer, then use the Horizontal Type Tools to write your desired text in any font you want, and fill it with white.
.jpg)
Step 4: Create a duplicate of the layer by pressing Ctrl+J (or Right-click => Duplicate).
.jpg)
2. Create a melting effect for text
Once we have the text, we will move on to creating the melting effect.
Step 1: Select the copied text layer and go to Edit => Transform => Flip Vertical. Then move the layer down, as you can see on the screen.
.jpg)
Step 2: Select both layers while holding the Shift key and move them to the center for the best layout.
.jpg)
Step 3: Select the copied text layer and press Ctrl+T to activate the Free Transform Tool. Then drag the bottom and top anchor points of the Free Transform Tool, as shown below.
.jpg)
Step 4: Select the text layers while holding Shift and then Right-click => Rasterize Type. Then Right-click again and select Merge.
.jpg)
Step 5: Press Shift+Ctrl+X to open the Liquify tool, then select the Forward Warp Tool and set the Size to around 600 and the Pressure and Density to 100.
.jpg)
Step 6: In the Liquify dialog box start dragging the brush around the top half of the text to make it slightly "wavy".
.jpg)
Step 7: Now we can drag the bottom half of the text down until it looks like it's starting to melt. You can customize it later to your liking and then press OK.
.jpg)
Step 8: Make two copies of this layer by pressing Ctrl+J twice. Rename these layers to Red, Green and Blue.
.jpg)
Step 9: Double-click on the Red layer to open the Layer style, uncheck the Blue and Green channels to make them invisible and then click OK
(1).jpg)
Step 10: With the remaining 2 layers, do the same as the step above. Double-click on the Green layer to open Layer Style, then just tick Green. The Blue layer is similar.
.jpg)
Step 11: Move the Green layer to the right about 25 px and the Blue layer to the right about 50 px. This will create a glitch text effect as shown.
.jpg)
Step 12: Select all text layers and right-click => Convert to Smart Object. Then on the menu bar go to Filter => Noise => Median and set to 22.
.jpg)
Now we will get the result as shown below:
.jpg)
Step 13: Now we can add one more element to our melting text effect in Photoshop - this step is optional. Go to Liquify (Shift+Ctrl+X ) and select the Twirl Clockwise Tool with the following settings:
Size: 450
Pressure: 60
Density: 100
Rate: 100
.jpg)
Our effect will look like this when we apply the Twirl effect:
.jpg)
Step 14: Make a copy of this Smart Object. And then on the menu bar go to Filter => Blur => Motion Blur and set the Angle to 90 and Distance to 700.
.jpg)
Step 15: Now move the second Smart Object down 350 px. Change the Blend Mode of this layer to Color Dodge and the Opacity to 60%.
.jpg)
Step 16: Download the Plastic Wrap Overlay Texture. This is a plastic effect texture. Place plastic wrap texture #9 on top of all layers and change the Opacity to 25%.
.jpg)
3. Color Correction for Melting Text Effect in Photoshop
Basically we have created the melted text effect in Photoshop. However, to make it more impressive, let's adjust the color for it.
Step 1: On the menu bar go to Layer => New Adjustment Layer => Brightness/Contrast and use the following settings: Brightness: -37 and Contrast: 30.
.jpg)
Step 2: Create another adjustment layer, this time choose Hue/Saturation and set the Hue to -12 and the Saturation to +69.
.jpg)
Step 3: And finally, still on the menu bar, go to Layer => Adjustments again and select Curves, using the parameter settings shown below:
.jpg)
This is the melted text effect in Photoshop that SaDesign obtained after editing:
.jpg)
4. Create a Melting Text Effect in Photoshop with the Smudge Tool
In addition to the above method, you can also create a melting text effect in Photoshop with the Smudge tool through the following steps:
Step 1: We also need to create a document, then write the appropriate text. Rasterize it by pressing Ctrl+J twice to create 3 copies in total. Name the layers Red, Green, Blue. Then also open the Layer Style of each layer and tick the appropriate color channel for the layer as we did above.
.jpg)
Step 2: On the toolbar select Smudge and apply the following settings:
Size: 250
Hardness: 25%
Strength: 72%
.jpg)
Step 3: Select the Red layer and start dragging your smudge brush around each letter until you get a slight glitch effect.
.jpg)
Step 4: Repeat the same process with other layers.
.jpg)
Step 5: Then select the Red layer and start dragging your brush down the letter to give it a melted look.
.jpg)
Step 6: Continue to blur all the letters on the red layer in the same way. Now we will get the result as shown.
.jpg)
Step 7: In the same way, proceed to blur the remaining layers. The final result will be:
.jpg)
Step 8: Select all layers at once then press Ctrl+G to group all into a folder, then double click on this new group and add Color Overlay. Then set with the following parameters:
Blend Mode: Hard Light
Opacity: 25%
Color: Orange
.jpg)
Step 9: Right click on the group and select Convert to a Smart Object, then create a copy of this layer by pressing Ctrl+J.
.jpg)
Step 10: On the menu bar select Filter => Blur => Gaussian Blur with the Radius of the copy set to 25. Then double click to open the Layer Style to add a Color Overlay with the same settings we used before.
(1).jpg)
Step 11: Change the Blend Mode of the
Smart Object to Linear Dodge.
.jpg)
Step 12: Place plastic texture #9 on top and set the Opacity to 35%. Then drag it down behind the group.
.jpg)
And here are the results we got:
.jpg)
So you have completed the ways to create a melting text effect in Photoshop. The implementation is not difficult but requires combining many tools. Try doing it many times to get the best results.


