Best Selling Products
How to create fur text effect in Photoshop SUPER EASY
Nội dung
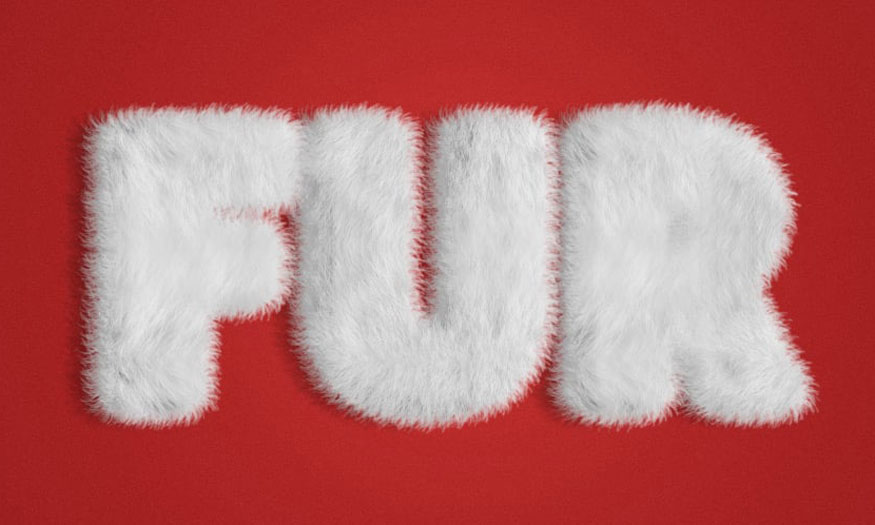
The fur effect text will make your design more unique. You can completely create this effect by combining many different tools in Photoshop. Join SaDesign to learn how to create fur text effects in Photoshop through the following shares.
.jpg)
1. How to create background and text for fur text effect in Photoshop
To create a background for the fur text effect in Photoshop, you need to download a suitable background image. Here I downloaded the background FurAction-BG.jpg to my computer.
Step 1: Open Photoshop, on the menu bar select File => select Open => select FurAction-BG.jpg => press OK to open the wallpaper.
Step 2: After having the background, we will create the text to create the fur text effect in Photoshop. On the toolbar, select the Horizontal Type Tool (T) and write any text. Here I write FUR. Select the Aller Display font, then go to Window => Character and set Size to 347 pt and Tracking to 50.
.jpg)
2. Fur Brush and Pattern Settings for Fur Text Effect in Photoshop
To set up the fur brush for the text, we will follow these steps:
Step 1: On the menu bar, go to Edit => Presets => Preset Manager... In Preset Type, select Brushes, click Load... , and select Brush (Fur Tutorial).abr. You can download Brush (Fur Tutorial).abr. here .
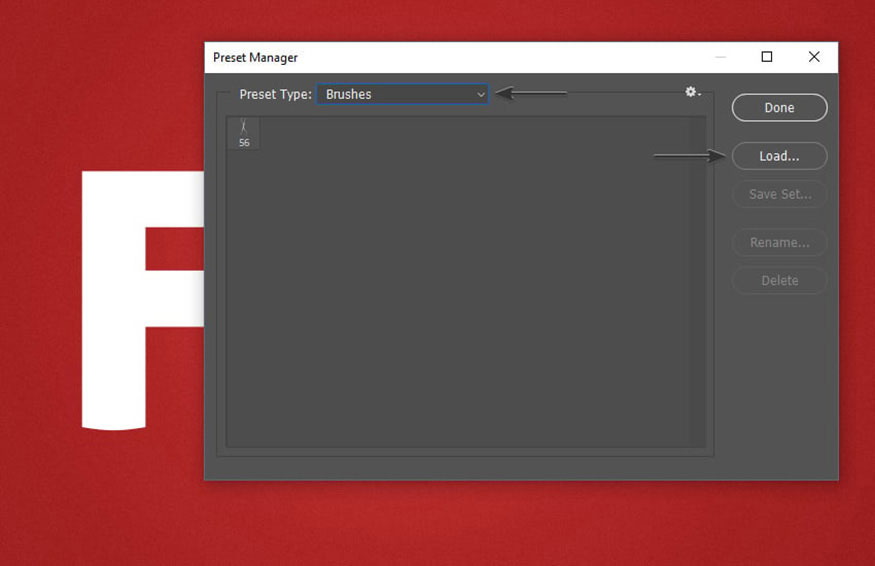
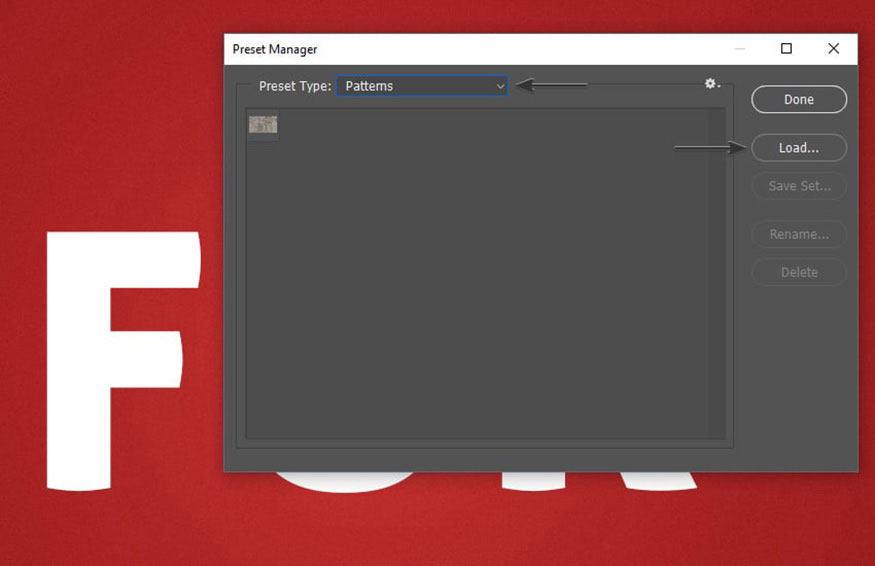
Step 2: On the menu bar, continue to select Edit => Presets => Preset Manager... In the Preset Type window, select Patterns, click load..., and select Pattern (Fur Tutorial).pat. You can download Pattern (Fur Tutorial).pat here.
3. How to create an Action for fur text effect in Photoshop
Creating an action will make it easier to create a fur text effect in Photoshop. You can follow these steps:
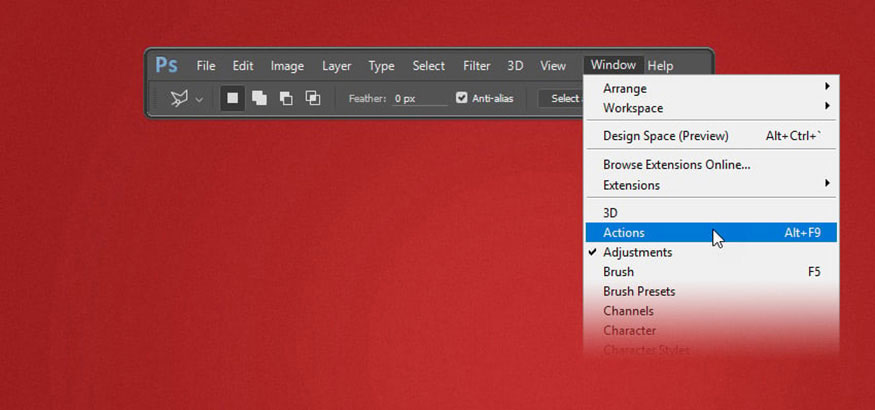
Step 1: To open the Actions panel, on the menu bar, select Window => Actions.
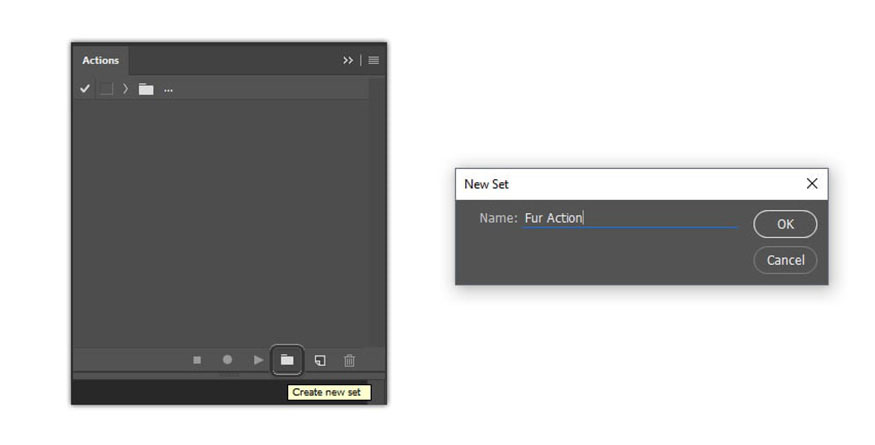
Step 2: Let's create a new action set. To do so, click the Create New Set icon, name it Fur Action and click OK.
Step 3: Click the Create New Action icon, name it Fur Text and click Record.
Everything you do will be recorded from now on, so keep an eye on the Actions panel. If you make a mistake, click the Stop Playing/Recording icon and remove the unnecessary step from the Fur Text action. Then click the Begin Recording icon to continue.
Step 4: With the text layer selected, go to Layer => Rename Layer... and rename it to Base Text 1.
.jpg)
Step 5: Select the Brush Tool (B). Choose the FUR Brush - Tutorial Brush, then set the Mode to Normal and the Opacity and Flow to 100%, and make sure the following icons are not selected.
.jpg)
Step 6: Now create a new layer. Go to Layer => New => Layer... , name it Fur-1 and click OK.
.jpg)
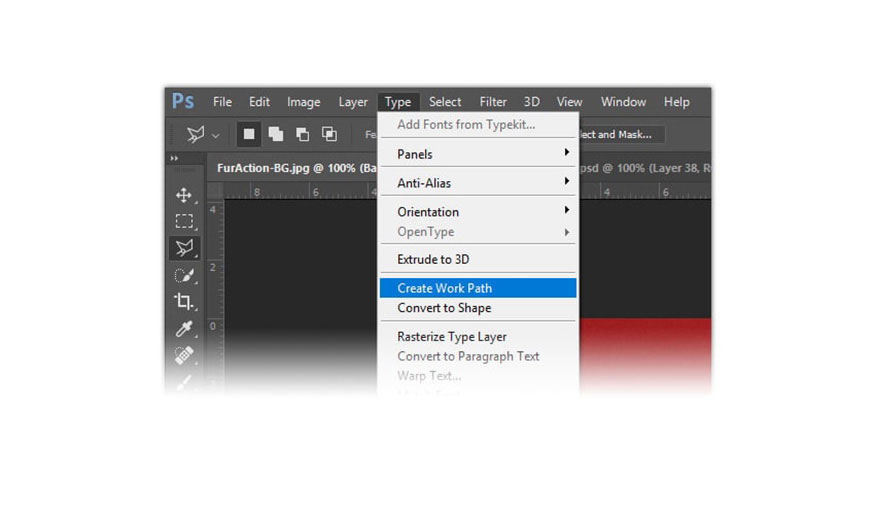
Step 7: Reselect the Base Text 1 layer and go to Type => Create Work Path.
Step 8: Now select the Fur-1 layer, open the Paths panel by going to Window => Paths, right-click on the Work Path and select Stroke Path... Select Brush from the drop-down menu, uncheck the Simulate Pressure option and click OK. Then, delete the Work Path from the Paths panel.
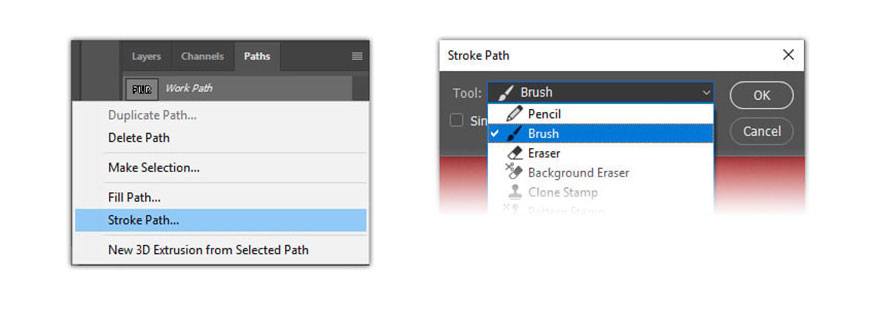
Step 9: Go back to the Layers panel. Now we're going to merge the text with the fur. To do this, select Fur-1 in the Layers panel, then hold down Shift and select Base Text 1.
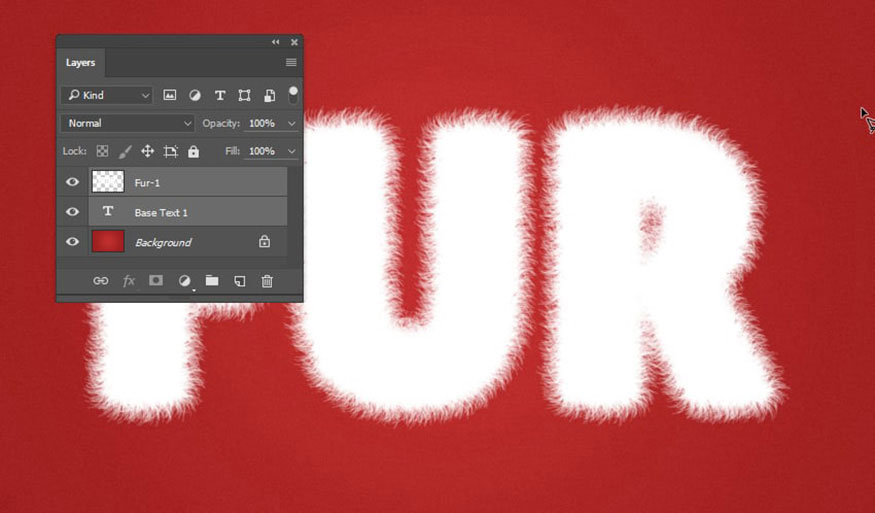
Now release the Shift key, right-click on Fur-1 and select Merge Layers.
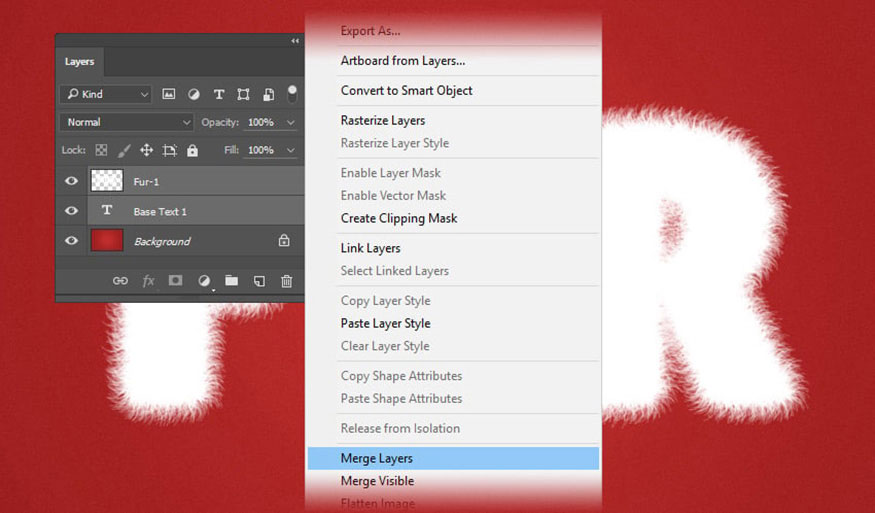
Step 10: Now we will create a Layer Style for the fur text effect in Photoshop. Double-click on the Fur-1 layer and set the following styles:
In the Layer Style panel, select Bevel & Emboss and set the following parameters:
- Style: Inner Bevel
- Technique: Smooth
- Depth: 63 %
- Direction: Up
- Size: 24 px
- Soften: 16 px
- Use Global Light: Uncheck
- Angle: 13º
- Altitude: 42º
- Gloss Contour: Gaussian
- Anti-aliased: True
- Highlight Mode: Soft
- Color of the Highlight mode: #ffffff
- Opacity of the Highlight: 65%
- Shadow Mode: Overlay
- Color of the Shadow Mode: #362a1a
- Opacity of the Shadow Mode: 26%
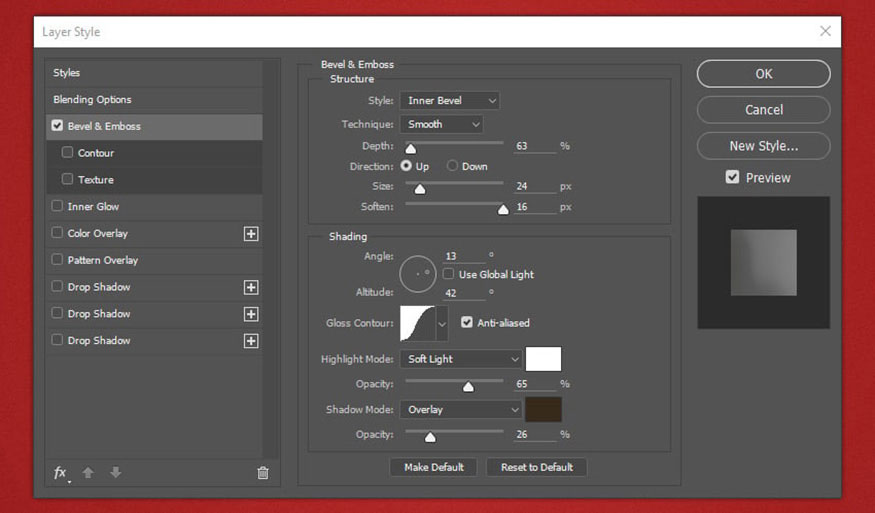
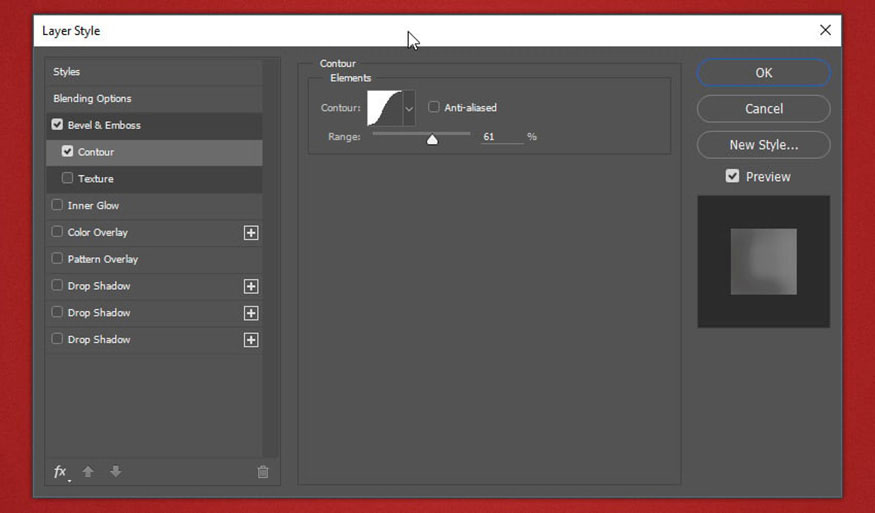
Step 11: In the Layer Style panel, select Contour to the Bevel & Emboss and set the following parameters:
- Contour: Gaussian
- Anti-aliased: Uncheck
- Range: 61%
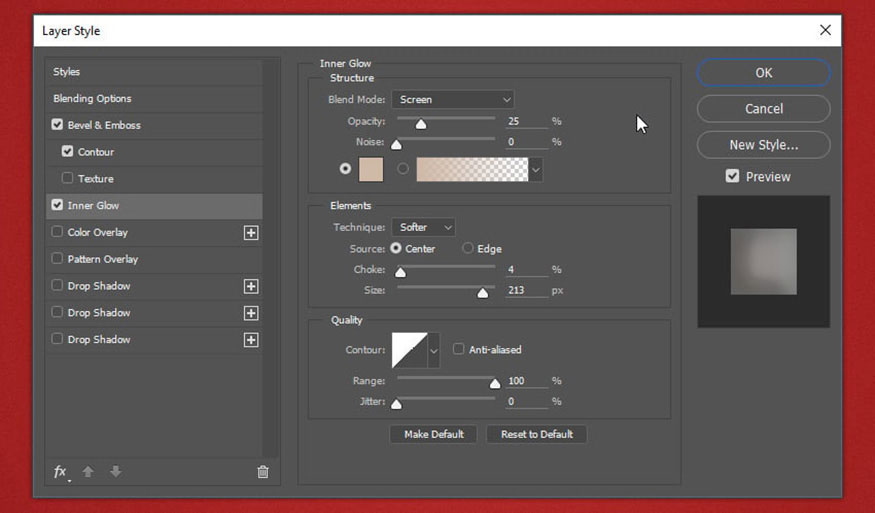
Step 12: Select Inner Glow and set the following parameters:
- Blend Mode: Screen
- Opacity: 25%
- Noise: 0%
- Color: #cfb9a6
- Technique: Softer
- Source: Center
- Choke: 4%
- Size: 213 px
- Contour: Linear
- Anti-aliased: Uncheck
- Range: 100%
- Jitter: 0%
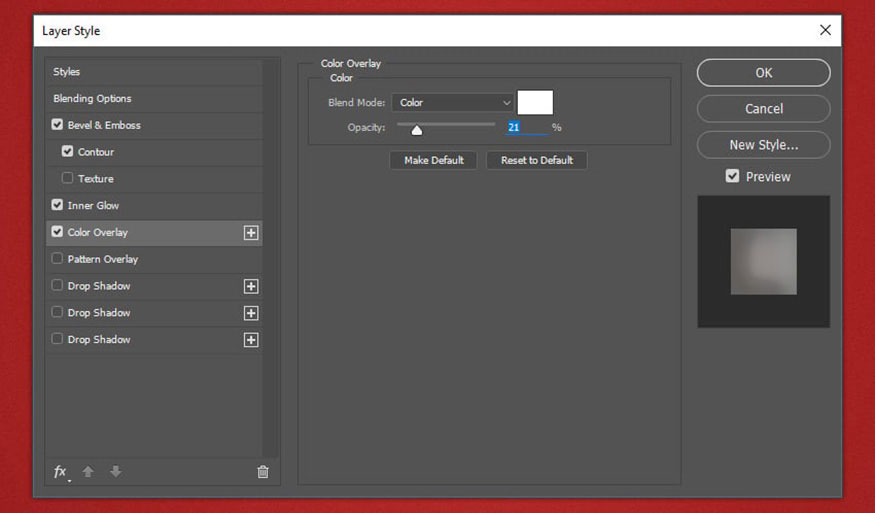
Step 13: In the Layer Style panel, select Color Overlay and set the following parameters:
- Blend Mode: Color
- Color: #ffffff
- Opacity: 21%
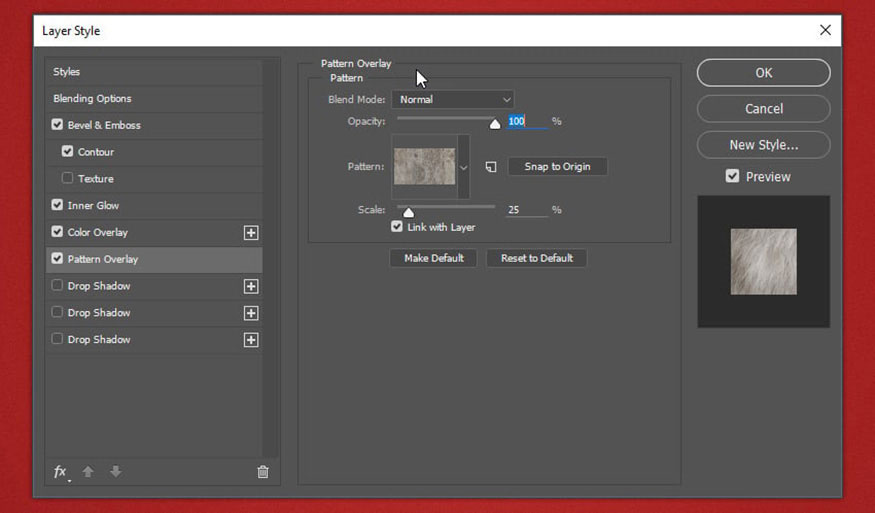
Step 14: Continue to select Pattern Overlay and set the following parameters:
- Blend Mode: Normal
- Opacity: 100%
- Pattern: Select the Pattern (Fur Tutorial).pat. you downloaded.
- Scale: 25%
- Link with Layer: Tick
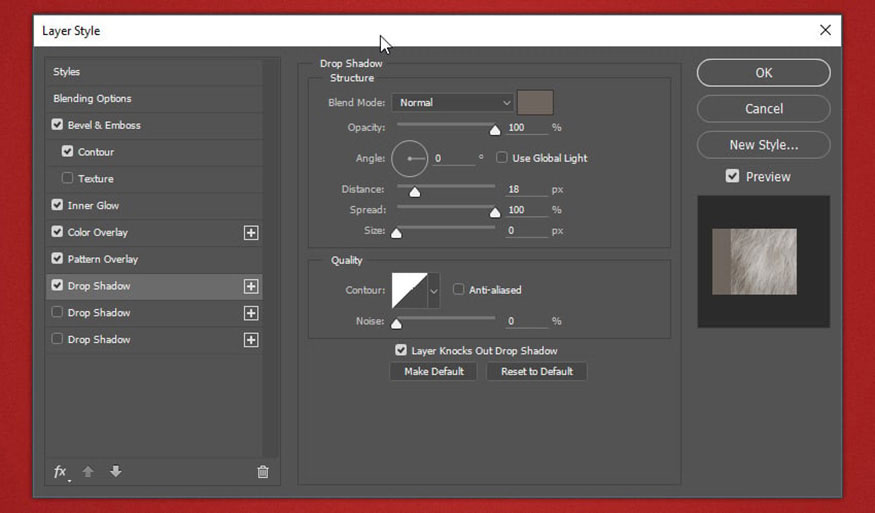
Step 15: Continue to select Drop Shadow and set the following parameters:
- Blend Mode: Normal
- Color: #6d655d
- Opacity: 100%
- Use Global Light: Uncheck
- Angle: 0º
- Distance: 18 px
- Spread: 100%
- Size: 0 px
- Contour: Linear
- Anti-aliased: Uncheck
- Noise: 0%
- Layer Knocks Out Drop Shadow: Tick chọn
Step 16: If you are not using Adobe Photoshop CC, then click OK and go to step 18. If you are using it, then continue.
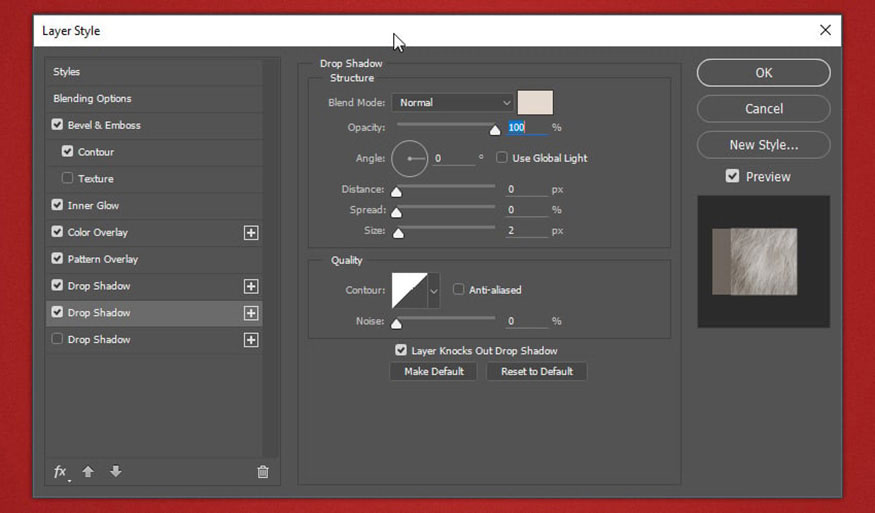
In the Layer Style panel add a Drop Shadow just below the first Drop Shadow then set the following parameters:
- Blend Mode: Normal
- Color: #e5dacf
- Opacity: 100%
- Use Global Light: Uncheck
- Angle: 0º
- Distance: 0 px
- Spread: 0%
- Size: 2 px
- Contour: Linear
- Anti-aliased: Uncheck
- Noise: 0%
- Layer Knocks Out Drop Shadow: Tick chọn
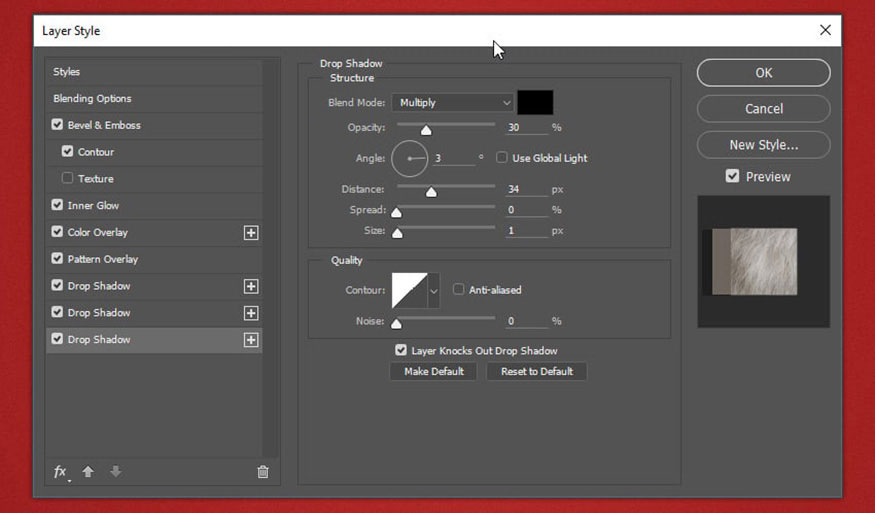
Step 17: Add a Drop Shadow just below the second Drop Shadow then set the following parameters:
- Blend Mode: Multiply
- Color: #000000
- Opacity: 30%
- Use Global Light: Uncheck
- Angle: 3º
- Distance: 34 px
- Spread: 0%
- Size: 1 px
- Contour: Linear
- Anti-aliased: Uncheck
- Noise: 0%
- Layer Knocks Out Drop Shadow: Tick chọn
- Then click OK.
Your image should now look like this:
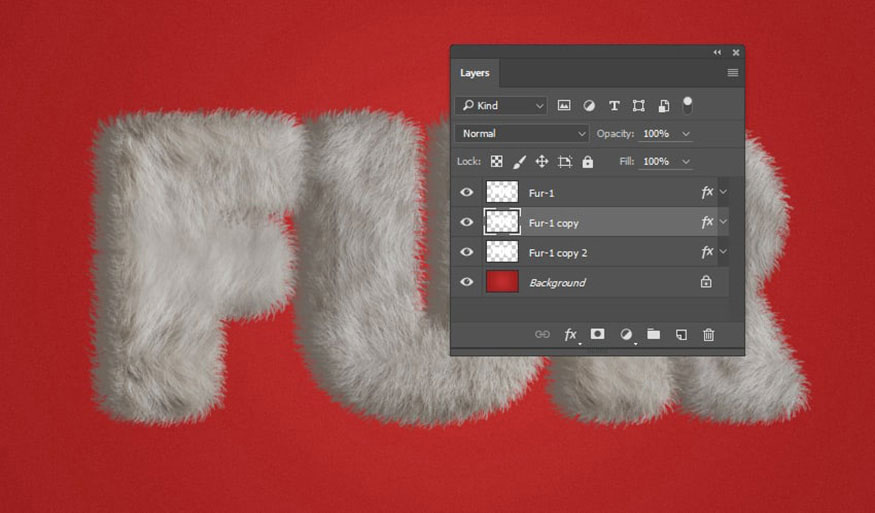
Or like this if you are using an older version of Adobe Photoshop:
Step 18: Skip to step 23 if you are using Adobe Photoshop CC.
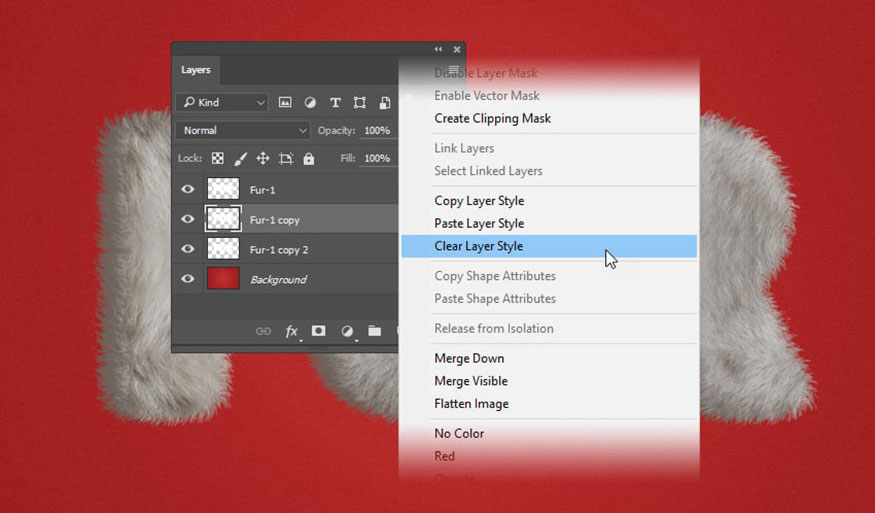
Press Ctrl+J twice to create two copies of the Fur-1 layer and place them below the original:
Step 19: Right-click on the first copy and select Clear Layer Style. Do the same for the second copy.
.jpg)
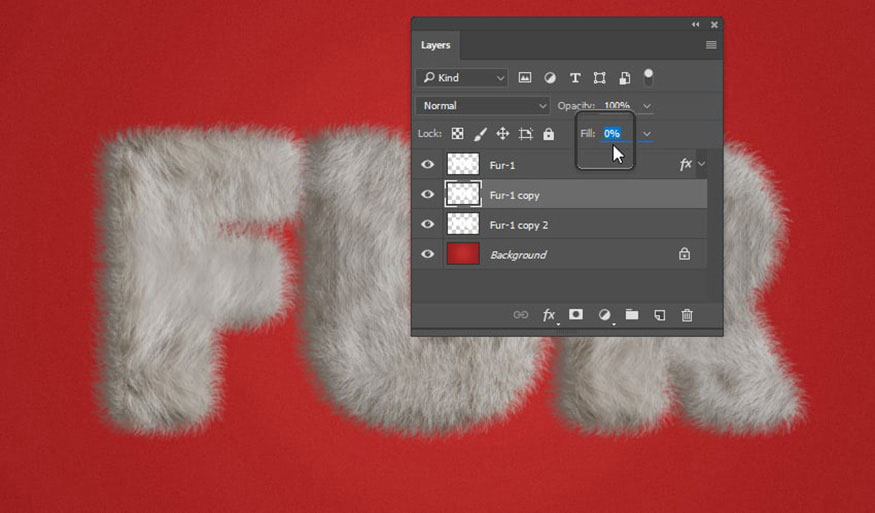
Step 20: Change the Fill of both copies to 0%.
.jpg)
Step 21: Double-click on the first copy layer to set the Layer Style. In the Layer Style window, select Drop Shadow then set the following parameters:
- Blend Mode: Normal
- Color: #e5dacf
- Opacity: 100%
- Use Global Light: Uncheck
- Angle: 0º
- Distance: 0 px
- Spread: 0%
- Size: 2 px
- Contour: Linear
- Anti-aliased: Uncheck
- Noise: 0%
- Layer Knocks Out Drop Shadow: Tick chọn
- Click OK.
.jpg)
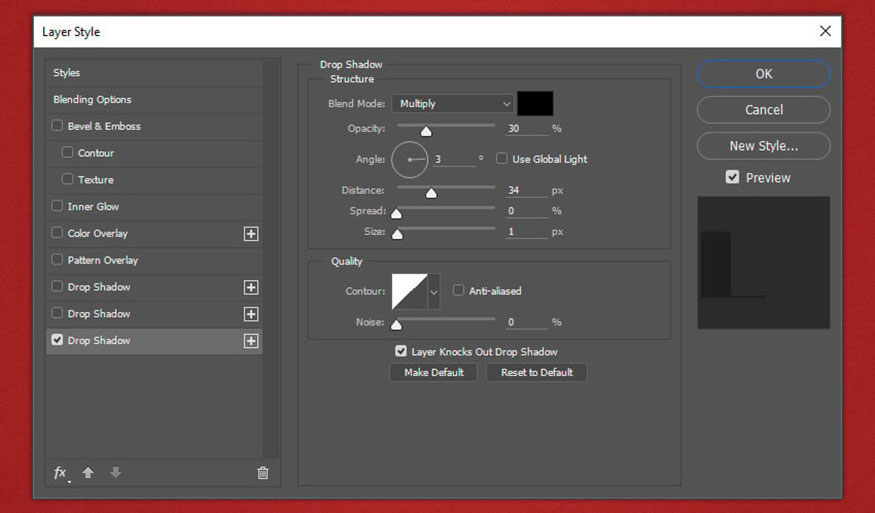
Step 22: Double-click on the second copy layer to set the Layer Style.
In the Layer Style window, select Drop Shadow then set the following parameters:
- Blend Mode: Multiply
- Color: #000000
- Opacity: 30%
- Use Global Light: Uncheck
- Angle: 3º
- Distance: 34 px
- Spread: 0%
- Size: 1 px
- Contour: Linear
- Anti-aliased: Uncheck
- Noise: 0%
- Layer Knocks Out Drop Shadow: Tick chọn
- Click OK.
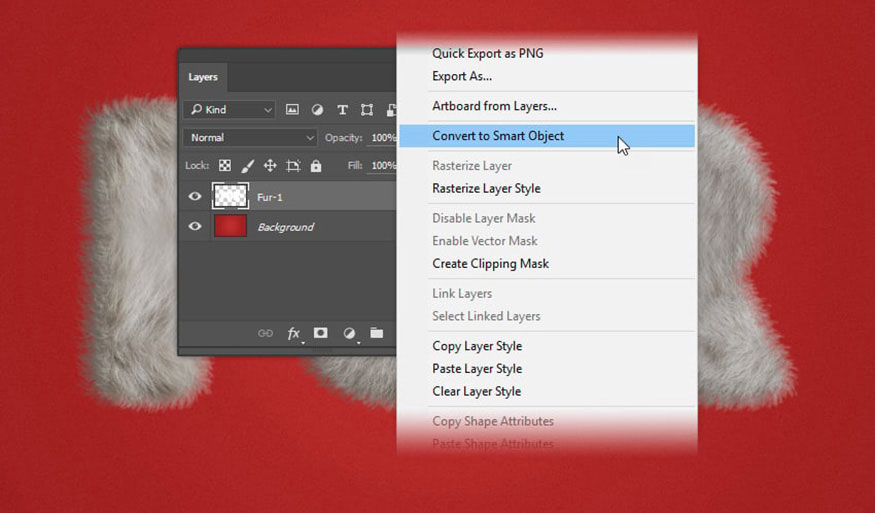
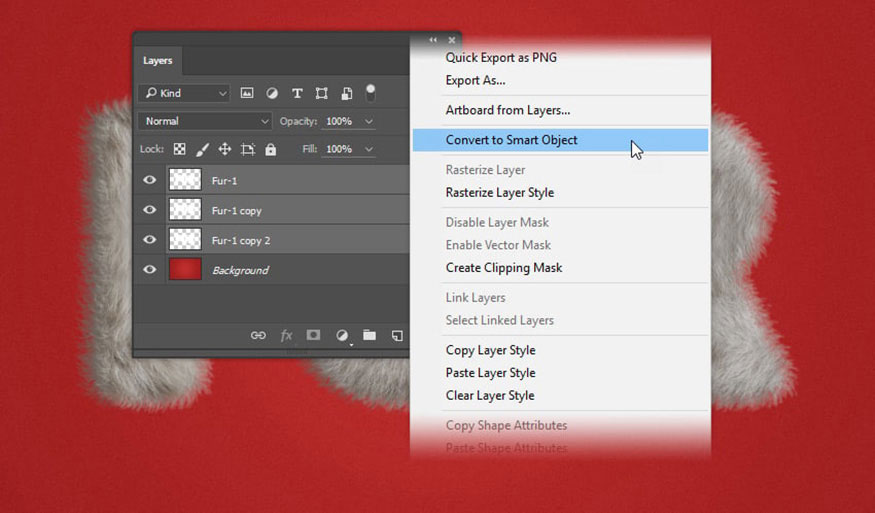
Step 23: Now we need to convert the Fur-1 layer into a Smart Object.
For Adobe Photoshop CC: Right-click on the Fur -1 layer and select Convert to Smart Object.
For older versions of Adobe Photoshop: Select the Fur-1 layer, hold down the Shift key, and click the Fur-1 copy layer 2. Release the Shift key, then right-click the Fur-1 layer and select Convert to Smart Object.
Step 24: Now let's change the color of the fur. We'll make it whiter. Go to the Adjustments panel and click on Gradient Map. If you don't see it, go to Window > Adjustments.
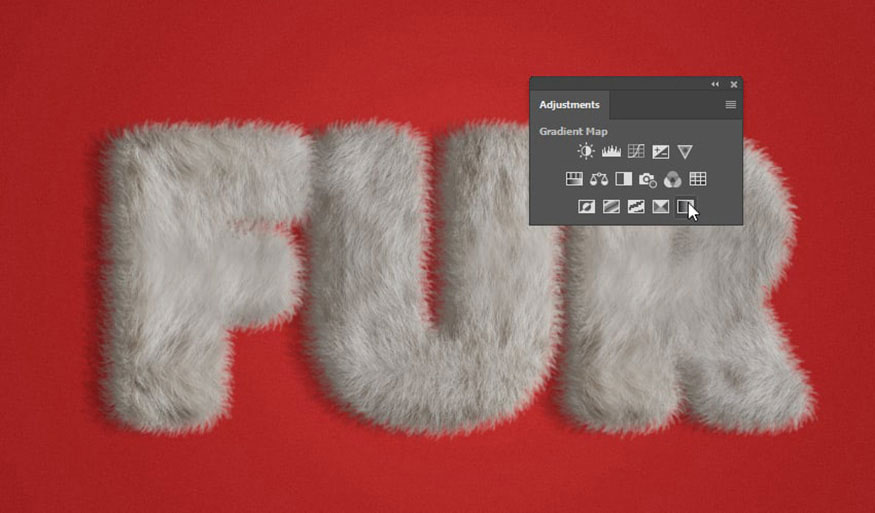
Step 25: Your entire image will look a bit strange but don’t worry. Rename the Gradient map 1 layer to Gradient Color.
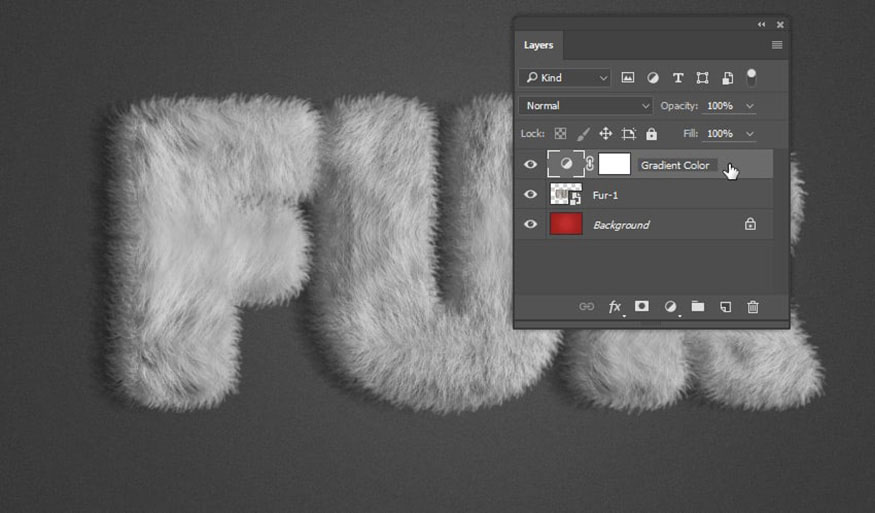
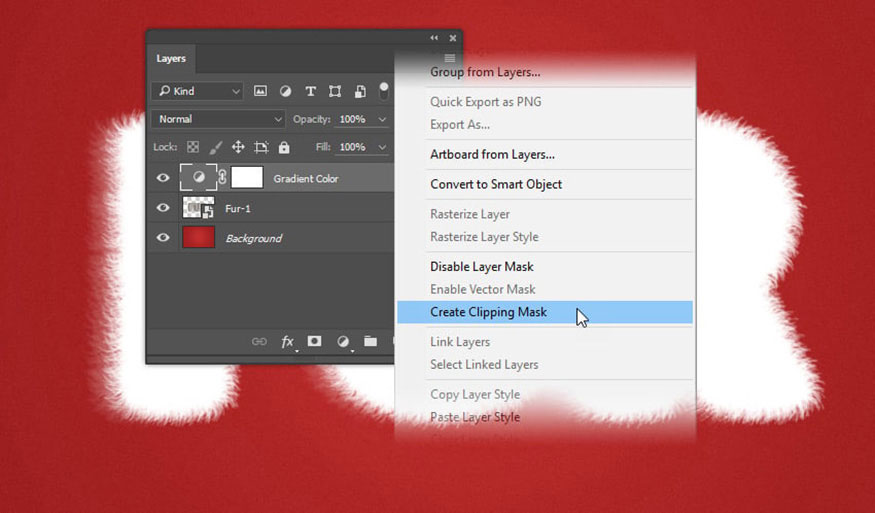
Step 26: Right-click on the Gradient Color layer and select Create Clipping Mask .
Step 27: Double-click on the gradient icon in the Gradient Color layer. The Properties panel will pop up.
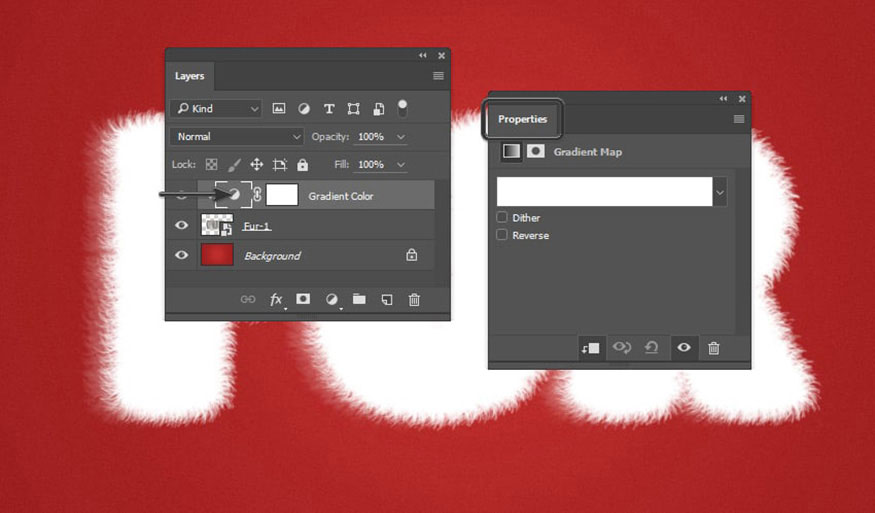
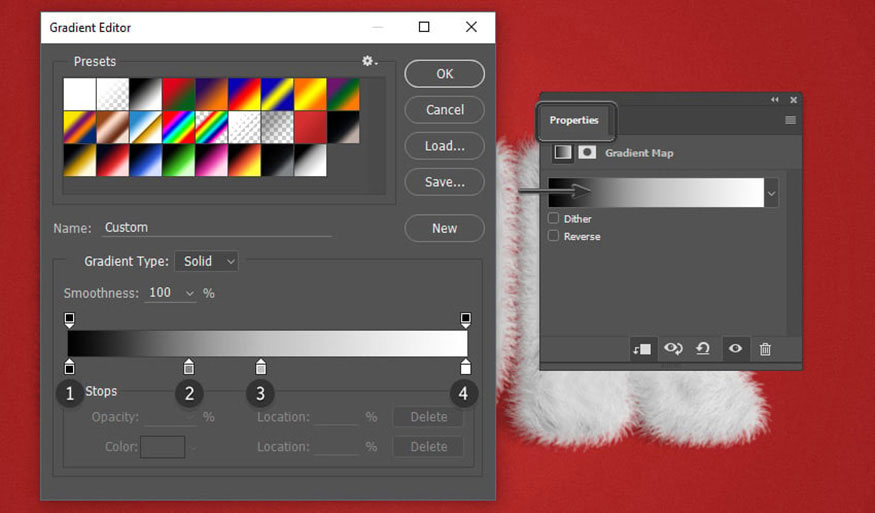
Step 28: Click on the Gradient bar in the Properties window to open the Gradient Editor.
- Then set according to the following parameters:
- First color point: #000000 and Location 0%
- Second color point: #848484 and Location 30%
- Third color point: #c0c0c0 and Location 48%
- Fourth color point: #ffffff and Location 100%
- Click OK.
Step 29: Rename the layer Fur-1 to Fur and then stop recording the Action.
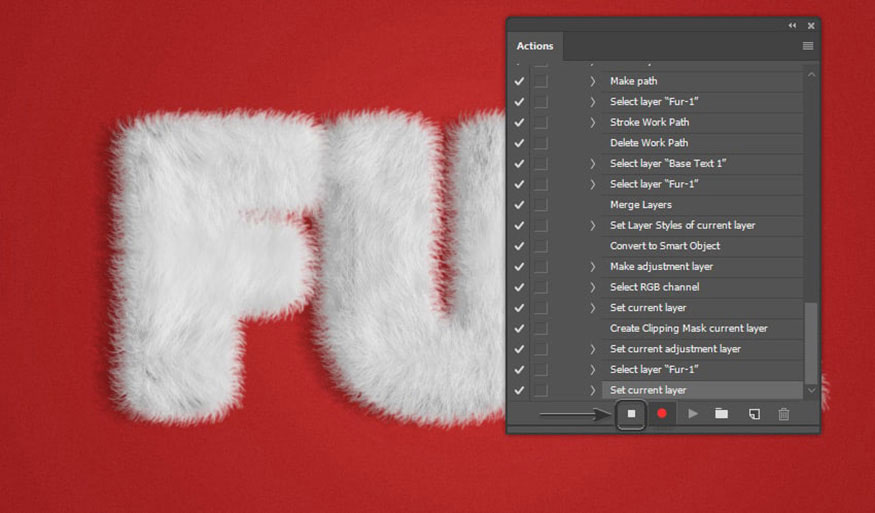
So you have created a furry text effect in Photoshop. The furry text looks very unique. Hopefully, the above sharing can help you have beautiful designs.
Installation and support contact information:
🏡 SADESIGN Software Company Limited
📨 Email: phamvansa@gmail.com
🌍 Website: https://sadesign.ai


.png)


