Best Selling Products

Windows 10 & 11 Pro Key
36 USD

Freepik Premium Account
59 USD

ChatGPT Plus Account (GPT-4)
16 USD

Autodesk All App Account Copyright
120 USD

Genuine Cheap Canva Pro
39 USD

MidJourney Account
29 USD

Upgrade Duolingo Super
29 USD

Capcut Pro 1 Year
39 USD

Upgrade Genuine Office 365
49 USD

Genuine Adobe Illustrator account
99 USD

Plugin Retouch4me
69 USD

Adobe Photoshop Copyright - Full App
120 USD

Upgrade genuine Capture One account
120 USD

Adobe Premiere Pro Account
99 USD

Copyright Adobe Lightroom Account
59 USD
Detailed Guide: Using Professional Apps to Effectively Adjust Facial Lighting
Nội dung
- 1. The Impact of Facial Lighting on the Aesthetics of a Portrait Photo
- 1.1 Creating a Visual Focal Point and Catching the Viewer's Eye
- 1.2 Compensating for Unwanted Shadow Areas on the Face
- 1.3 Shaping an Artistic Style and Conveying Professionalism
- 2. Standards for Choosing a High-Quality, Natural Facial Lighting App
- 2.1 3D Facial Recognition Algorithm Powered by AI
- 2.2 Flexible Light Source Simulation Tool (3D Light Relighting)
- 2.3 Preserving Pixel Detail and Original Skin Texture
- 3. The Process of Naturally Brightening the Face Using a Mobile App
- 3.1 Step 1: Initialize Data and Detect Facial Structure
- 3.2 Step 2: Fine-Tune the Light Range and Compensate for Lighting by Area
- 3.3 Step 3: Optimize Sharpness and Export a High-Quality Photo
- 4. The Website Appvip.ai Provides Automatic Image Processing and Face-Brightening Solutions
- 5. Popular Facial Lighting Techniques Used in Software
- 5.1 Frontal Lighting Technique for a Clear, Fresh Beauty (Beauty Light)
- 5.2 Angled Light-Shaping Technique (Rembrandt Light)
- 5.3 Background-Separating Rim Light Technique
- 6. Common Mistakes That Distort the Face After Lighting Adjustments
- 6.1 Overusing the Brightening Tool and Losing All Contour Definition
- 6.2 Mismatched Lighting Between the Face and Neck Area
- 6.3 Brightening That Doesn't Match the Background's Overall Light Source
- 7. Conclusion
Discover the most natural and professional facial lighting apps available today. Find a detailed guide on how to balance facial lighting, remove shadows, and enhance your radiance here.
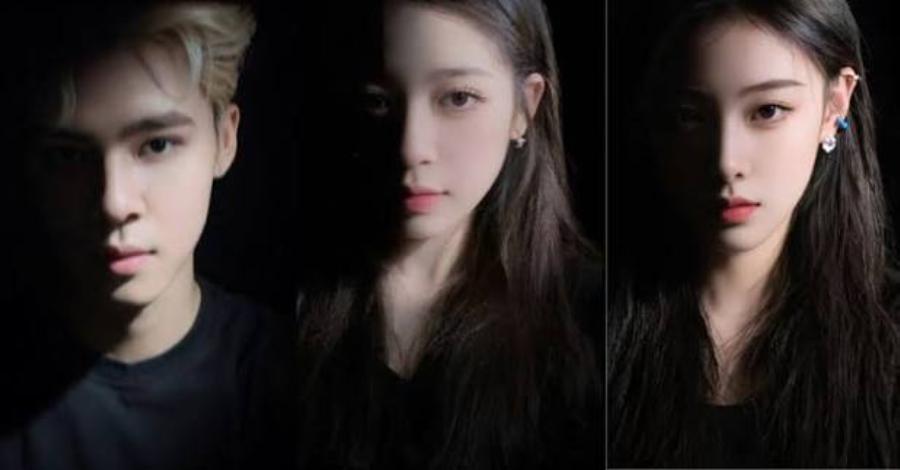
1. The Impact of Facial Lighting on the Aesthetics of a Portrait Photo
1.1 Creating a Visual Focal Point and Catching the Viewer's Eye
The face is always the first area that catches a viewer's attention when looking at a portrait photo. Properly focusing light on the facial area creates a strong visual effect, helping the subject stand out completely from the surrounding background. Well-balanced lighting distribution helps clarify the eyes and smile, keeping viewers engaged with your post for longer.
.jpg)
1.2 Compensating for Unwanted Shadow Areas on the Face
Harsh light coming from above or from an off-angle direction often creates unflattering shadow areas under the eyes, around the nose, and on the chin. These shadow bands can inadvertently make the face look tired, aged, and less balanced. Post-production facial lighting techniques gently soften these shadow areas, restoring a smooth, harmonious, and energetic appearance.
1.3 Shaping an Artistic Style and Conveying Professionalism
The quality of lighting on the face directly reflects the creator's serious investment in their visual work. A photo with a clear, well-lit face and true-to-life colors always conveys a sense of professionalism and credibility for an individual or business. Maintaining this consistent image quality helps build a solid personal brand identity in the public eye.
2. Standards for Choosing a High-Quality, Natural Facial Lighting App
2.1 3D Facial Recognition Algorithm Powered by AI
A top-tier app must have the ability to scan and construct a real-time three-dimensional model of the face. A smart algorithm automatically identifies precise light-catching points such as the forehead, nose bridge, cheekbones, and chin to adjust lighting individually. This feature prevents light from spilling onto the background, keeping the overall photo as realistic as possible.
.jpg)
2.2 Flexible Light Source Simulation Tool (3D Light Relighting)
The ability to change the lighting direction after the fact is a breakthrough feature of modern software. Users can freely move a virtual light source to different angles on the face to create angled lighting, frontal lighting, or soft light effects. This flexibility lets you actively shape the lighting space exactly according to your artistic intent.
2.3 Preserving Pixel Detail and Original Skin Texture
A common flaw in low-quality editing tools is over-smoothing and over-brightening, which causes the face to look flat and lose its natural pore detail. A professional facial lighting app must preserve the skin's natural surface texture, ensuring details like eyebrows and lip edges remain sharp even after brightness is enhanced.
3. The Process of Naturally Brightening the Face Using a Mobile App
.jpg)
3.1 Step 1: Initialize Data and Detect Facial Structure
The adjustment process should begin by importing the photo file into the system and analyzing the initial lighting range.
Upload the portrait photo: Open the app, select a photo with a clear facial angle from your device's library to begin.
Activate AI recognition: Turn on automatic facial recognition so the app can accurately outline the facial area to be processed.
3.2 Step 2: Fine-Tune the Light Range and Compensate for Lighting by Area
This stage requires careful attention to create a smooth, non-harsh light transition.
Increase Face Brightness: Gently nudge the face-brightening slider until the skin tone reaches a moderate level of radiance.
Eye Brightening: Increase the light range specifically for the eyes to create a clear, sharp, and lively expression.
Shadow Reduction: Gently pull the shadow-reduction tool to remove dark circles and shadows under the nose.
Skin Tone Balance: Adjust the warmth so the facial color tone blends fully with the overall lighting of the background.
3.3 Step 3: Optimize Sharpness and Export a High-Quality Photo
The final stage completes the piece with overall review steps and file saving.
Compare before and after: Turn on Before/After mode to assess how natural the face looks before and after editing.
Increase edge sharpness: Gently nudge the Sharpening slider so the lines of the eyes and lips become clearer.
Save in high resolution: Export the image in an uncompressed format to ensure colors remain accurate when shared on social media.
4. The Website Appvip.ai Provides Automatic Image Processing and Face-Brightening Solutions
The breakthrough progress of artificial intelligence technology is reshaping the entire graphic editing process, saving maximum time for digital users. The website Appvip.ai is a pioneering ecosystem that integrates advanced machine learning algorithms into facial processing tasks, automatically balancing lighting and optimizing appearance. Without requiring users to master complex post-production skills or spend hours studying cumbersome tools, the platform delivers an outstanding experience by automatically detecting facial angles, calculating light direction, and suggesting natural face-brightening solutions in just one click. This is considered the technological key that helps content creators, photographers, and businesses optimize their workflow efficiency, owning portrait photos with the perfect radiance to confidently stand out across every global media platform.
.jpg)
5. Popular Facial Lighting Techniques Used in Software
5.1 Frontal Lighting Technique for a Clear, Fresh Beauty (Beauty Light)
This is a lighting method applied from the front of the face, helping to evenly spread light across the entire face and eliminate most shadow areas. This technique makes the face appear smooth, rosy, and full of vitality. This style is very suitable for ID photos, personal profile pictures, or cosmetic advertising photos.
5.2 Angled Light-Shaping Technique (Rembrandt Light)
Inspired by classical painting styles, this technique creates a small triangle of light on the cheek of the shadowed side of the face. Applying lighting in this style gives the face artistic depth, accentuates the jawline, and creates a mysteriously alluring look. This is an ideal choice for fashion photos and artistic portraits.
5.3 Background-Separating Rim Light Technique
By adding a thin strip of light running along the edge of the hairline and jaw, the subject is completely separated from the dark background behind them. This rim-light technique makes the face stand out, creates a distinct three-dimensional sense of space, and elevates the overall class of the photo.
6. Common Mistakes That Distort the Face After Lighting Adjustments
6.1 Overusing the Brightening Tool and Losing All Contour Definition
Pushing the face-brightening slider to the maximum will flatten all of the face's natural contours. The nose, cheekbones, and chin blend together because there are no longer any shadow bands to define boundaries, making the face look very large and artificial. Always keep a slight shadow on both sides of the nose and jawline to preserve the geometric structure of the face.
6.2 Mismatched Lighting Between the Face and Neck Area
A lack of synchronization between the face and neck is a very common mistake among beginner editors. A photo with a brilliantly lit face but a pitch-dark neck creates a serious imbalance, making the viewer find it comical. When using a facial lighting app, remember to extend the adjustment area down to the neck and shoulders to create harmony.
6.3 Brightening That Doesn't Match the Background's Overall Light Source
An original photo taken in a dim, overcast dusk setting but with a face brightened as if standing under harsh sunlight is a physical absurdity. This mismatched tone makes the subject look awkwardly pasted onto the background. The amount of additional light applied to the face must always follow the color and intensity logic of the surrounding environment.
7. Conclusion
Mastering the technique of balancing facial lighting and flexibly applying professional facial lighting apps is the key that helps you confidently elevate the quality of every digital portrait photo. The combination of a keen aesthetic sense and the power of modern technological solutions will help you break through every limitation of your shooting space, confidently showing off a radiant glow. Start experimenting with unique lighting adjustment formulas today to create your own impressive visual works, affirming your position and personal appeal firmly on the global digital media map.





















VIP Products








Best Selling Products
Windows 10 & 11 Pro Key
36 USD
Freepik Premium Account
59 USD
ChatGPT Plus Account (GPT-4)
16 USD
Autodesk All App Account Copyright
120 USD
Genuine Cheap Canva Pro
39 USD
MidJourney Account
29 USD
Upgrade Duolingo Super
29 USD
Capcut Pro 1 Year
39 USD
Upgrade Genuine Office 365
49 USD
Genuine Adobe Illustrator account
99 USD
Plugin Retouch4me
69 USD
Adobe Photoshop Copyright - Full App
120 USD
Upgrade genuine Capture One account
120 USD
Adobe Premiere Pro Account
99 USD
Copyright Adobe Lightroom Account
59 USD