Best Selling Products

Upgrade genuine Capture One account
120 USD

ChatGPT Plus Account (GPT-4)
16 USD

Windows 10 & 11 Pro Key
36 USD

Adobe Premiere Pro Account
99 USD

Copyright Adobe Lightroom Account
59 USD

Autodesk All App Account Copyright
120 USD

Plugin Retouch4me
69 USD

Adobe Photoshop Copyright - Full App
120 USD

Freepik Premium Account
59 USD

Upgrade Duolingo Super
29 USD

Capcut Pro 1 Year
39 USD

Upgrade Genuine Office 365
49 USD

Genuine Adobe Illustrator account
99 USD

MidJourney Account
29 USD

Genuine Cheap Canva Pro
39 USD
Discover Focus Stacking - The Solution for Stunningly Detailed Landscape Photos
Nội dung
- 1. What is Focus Stacking?
- 2. Why Do You Need to Focus Your Full Attention on One Point of View?
- 3. When Should You Use Focus Stacking Technique?
- 4. How to Combine Focused Photos for Sharper Images
- 4.1 Step 1: Preparing for the Scene
- 4.2 Step 2: Record the Frames
- 5. Taking Photos with Multiple Focus Levels in the Camera
- 6. Combining Images During Post-Processing
- 6.1 Method 1: Image Merging with Focused Image in Adobe Photoshop
- 6.2 Method 2: Image Stitching with Focusing in Helicon Focus
- 7. Common Problems When Stacking Focus Points
- 7.1 Moving Foreground Elements
- 7.2 Changing the Lighting Between Frames
- 7.3 Poor Photoshop Image Blending Techniques
- 8. Conclusion
To create an image with a large depth of field while maintaining optical quality, focus stacking is the optimal choice. This article will guide you through the complete process along with helpful tips to save you time in post-processing.
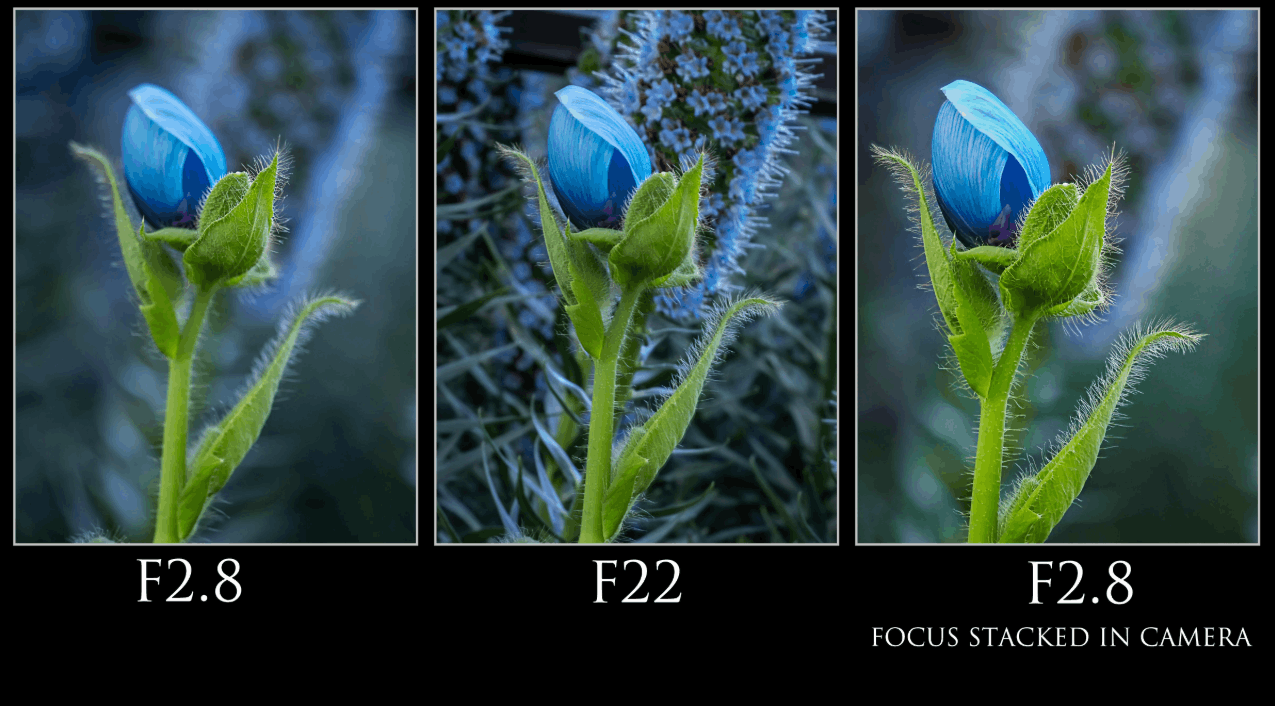
1. What is Focus Stacking?
Simply put, focus stacking is an intermediate-level technique that creates sharp images from the nearest foreground to the furthest background, regardless of the actual distance between them. This technique requires capturing two or more frames with different focus points, such as one frame focusing on the foreground and another on the background. After capturing, these frames are imported into post-processing software and combined. Only the sharpest areas from each frame are retained in the final composite, resulting in an image with consistent sharpness across the entire frame.
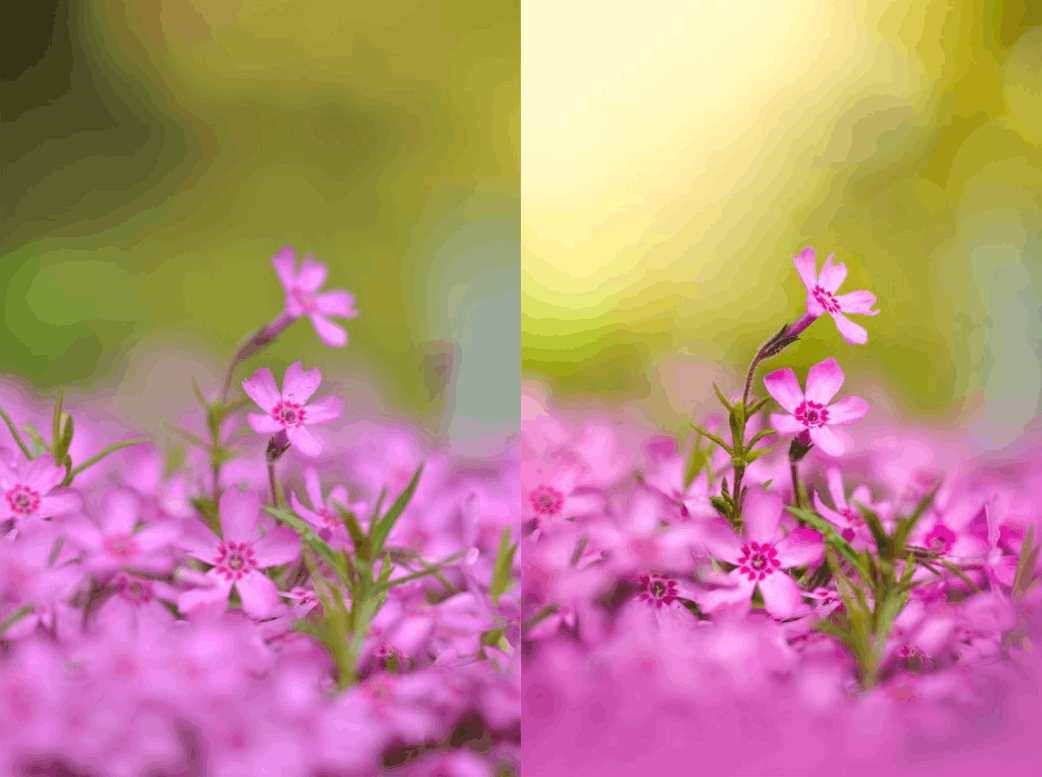
Focus stacking is a technique used in many different genres of photography, but it is most common in landscape and macro photography. Applying this technique to portrait or wildlife photography is significantly more difficult, as it requires the subject to remain completely still throughout the process of capturing multiple consecutive frames. To perform this technique, the photographer needs a camera along with specialized post-processing software, such as Adobe Photoshop or Helicon Focus.
2. Why Do You Need to Focus Your Full Attention on One Point of View?
Many photographers hesitate to learn intermediate-level techniques because they believe their current photos are good enough, or simply don't want to put in the extra effort for more complex processing. However, the reality is that focal stacking can create a very noticeable visual impact on certain photos, and once you understand when to apply it, the process becomes much more natural and faster.
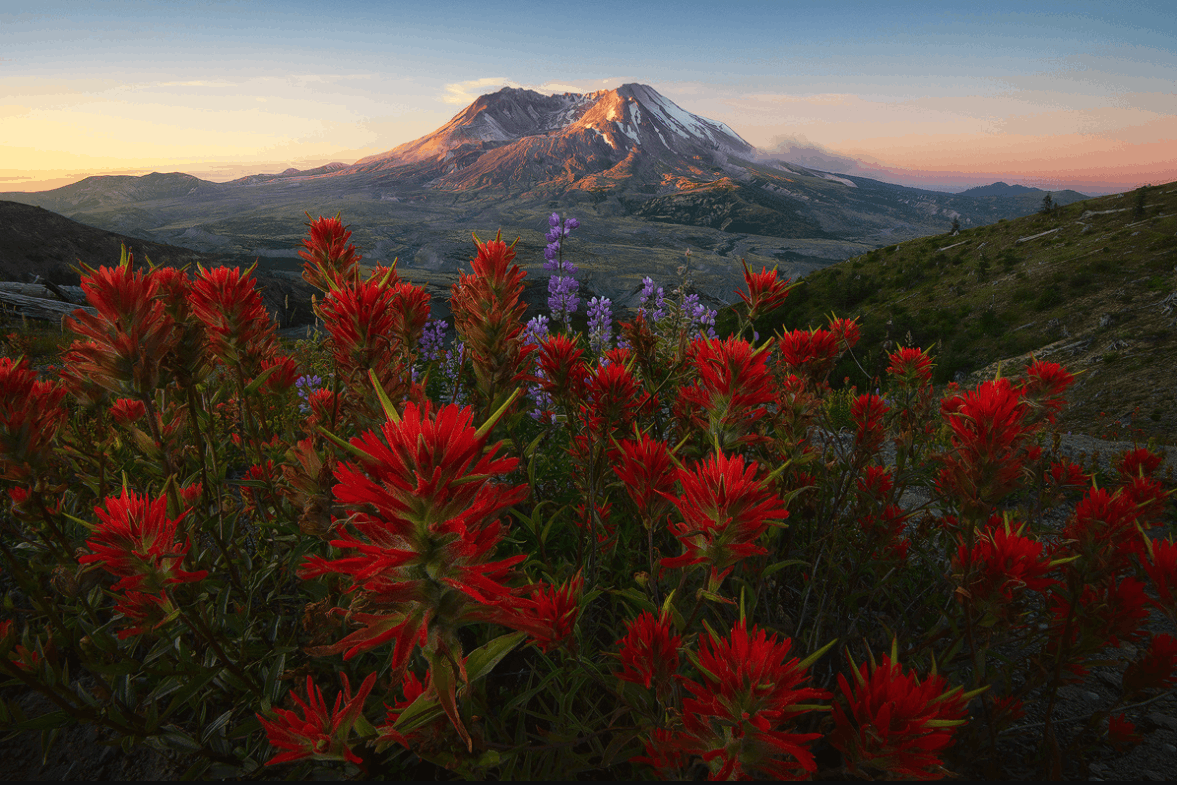
When the distance between the nearest foreground and the furthest background is too great, only a portion of the image will remain sharp at any aperture setting. For example, when focusing on the nearest flower at f10, the flowers in the background will immediately become out of focus. The only way to get the entire frame sharp in this situation is to take four frames with different focus points and then stitch them together. Macro photography is another prime example where focus stacking is almost indispensable. At close focusing distances, the depth of field becomes extremely shallow, making it nearly impossible to keep an entire flower or small object sharp within a single frame.
Differences in sharpness are sometimes not very noticeable when viewing photos on a small screen, but once you start printing them in large sizes, the lack of consistent sharpness from front to back becomes very noticeable, especially at larger print sizes.
3. When Should You Use Focus Stacking Technique?
Focus stacking is a useful technique, but not every landscape photograph needs it. The vast majority of your everyday landscape shots won't require this method. There are specific situations where it becomes necessary, including when there's a significant distance between a near foreground and a distant background, when using an ultra-wide-angle lens with the subject placed very close to the lens, when shooting small scenes or macro subjects where the depth of field is already shallow, and when the composition requires more overlap between focus planes than a single frame can provide.
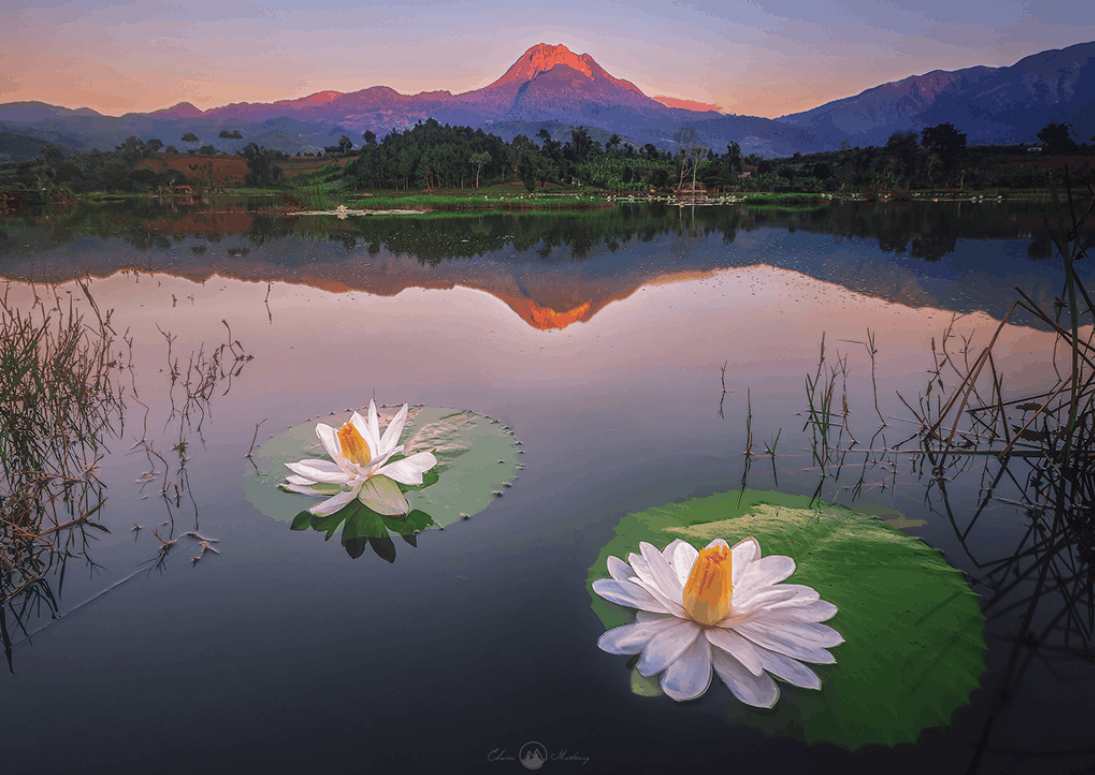
If you're unsure whether a scene needs focus stacking, take a test shot, zoom in on the preview to one hundred percent, and carefully examine both the near and far parts of the frame. If any areas appear unusually blurry, that's a sign you should consider using this technique.
4. How to Combine Focused Photos for Sharper Images
Focus stacking is a technique consisting of two distinct steps. The first step takes place on-site during the photograph, while the second step occurs during post-processing on a computer.
4.1 Step 1: Preparing for the Scene
Using a tripod is essential in this situation, as the camera needs to remain perfectly still throughout all frames. Even small movements caused by shifting the focus point can make subsequent image stitching much more difficult. Set up your composition as usual, in your familiar landscape shooting style. For most landscape shooting situations requiring focus stacking, an aperture of around f7.1 is usually a suitable choice, as this aperture level is still within the lens's sharpness range while providing sufficient depth of field for each frame to work smoothly. Shutter speed and ISO sensitivity should be adjusted as you normally would, depending on the actual lighting conditions.
Focus stacking should be done in fully manual mode, combined with a fixed white balance in Kelvin. Maintaining consistent exposure and white balance across frames will make the image stitching process much easier and avoid color discrepancies between frames in the same image sequence.
4.2 Step 2: Record the Frames
Start by focusing on the subject closest to the lens, ensuring the nearest foreground is in sharp focus. Capture one frame, then shift the focus point slightly further into the scene. Continue capturing another frame, and then shift the focus point again. Many photographers use the touch focus feature on the camera screen to move the focus point between frames, as this is both quick and precise. Continue this sequence from near to far until you have covered the entire depth of field.
In most landscape shooting situations, two to four frames are sufficient to ensure overall sharpness. If unsure, take one or two extra frames as backups, as having an extra frame is always much easier to handle than discovering a missing gap in the sequence when you're already sitting at your computer. A quick summary of the process includes setting up the tripod and framing, switching to manual mode with fixed white balance and aperture within a suitable range, focusing on the subject closest to the lens and taking a frame, shifting the focus point further into the scene and taking another frame, and repeating this process until the entire scene is covered from near to far.
5. Taking Photos with Multiple Focus Levels in the Camera
Most modern mirrorless cameras today are equipped with multi-level autofocus, completely automating the shooting process of focus stacking. Instead of manually adjusting the focus point after each frame, the photographer simply sets the desired number of frames and the degree of focus shift between frames, and the camera will automatically execute the entire sequence.
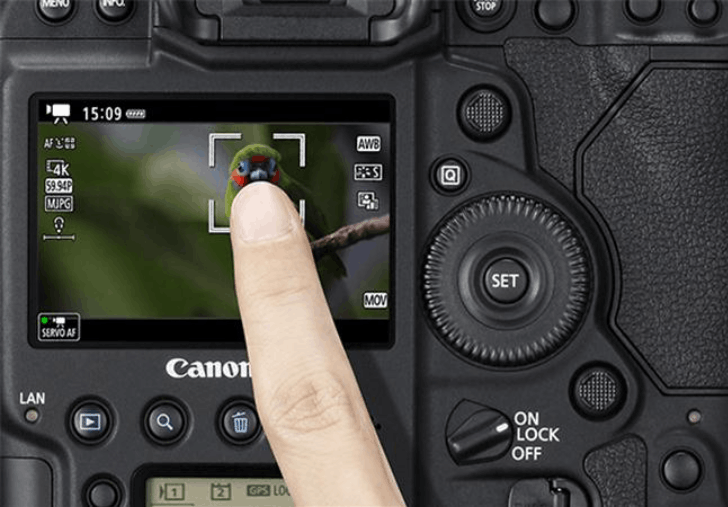
The operating process is generally quite similar across different camera manufacturers; users simply select the multi-level focus mode, set the desired frame rate and the magnitude of each focus shift, focus on the nearest subject, and let the camera handle the rest. The resulting original images are then processed in the same way as a manually captured sequence of images, whether in Photoshop, Helicon Focus, or any other software.
The multi-level autofocus feature in cameras is particularly useful for macro photography, where the depth of field is inherently very shallow and requires a large number of frames. For landscape photography requiring only three to four frames, many photographers still find that manually adjusting the focus offers faster speed and better control; however, for complex scenes or unfamiliar situations, the automatic method remains a useful and worthwhile option. You should consult your camera's user manual to find the exact location of this feature, as it often varies by manufacturer and is sometimes referred to as focus shift shooting instead of multi-level autofocus.
6. Combining Images During Post-Processing
After completing the series of photos taken in the field, the next step is to stitch these frames together during post-processing. There are two main methods commonly used: Adobe Photoshop and Helicon Focus.
6.1 Method 1: Image Merging with Focused Image in Adobe Photoshop
Photoshop is the most widely used software for focus stacking techniques. The process below combines Photoshop's built-in automatic layering feature with manual editing in areas where the automatic algorithm is inaccurate.
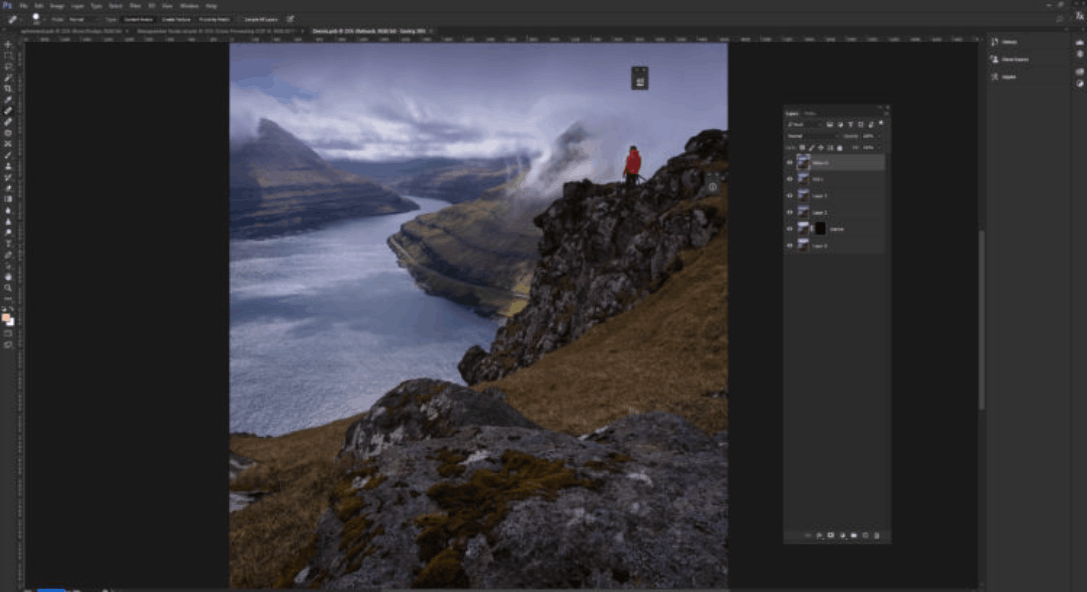
First, open the entire series of images as separate layers in Photoshop. If you're using Lightroom, simply select all the images and go to the editing section to open them as layers in Photoshop. Then select all the layers and perform automatic layer alignment to ensure the frames perfectly match each other in position. Next, duplicate all the selected layers using the corresponding keyboard shortcut on your computer. Select only the duplicated layer set and perform automatic layer merging, select the image stacking option, and check the box to maintain consistent tones and colors.
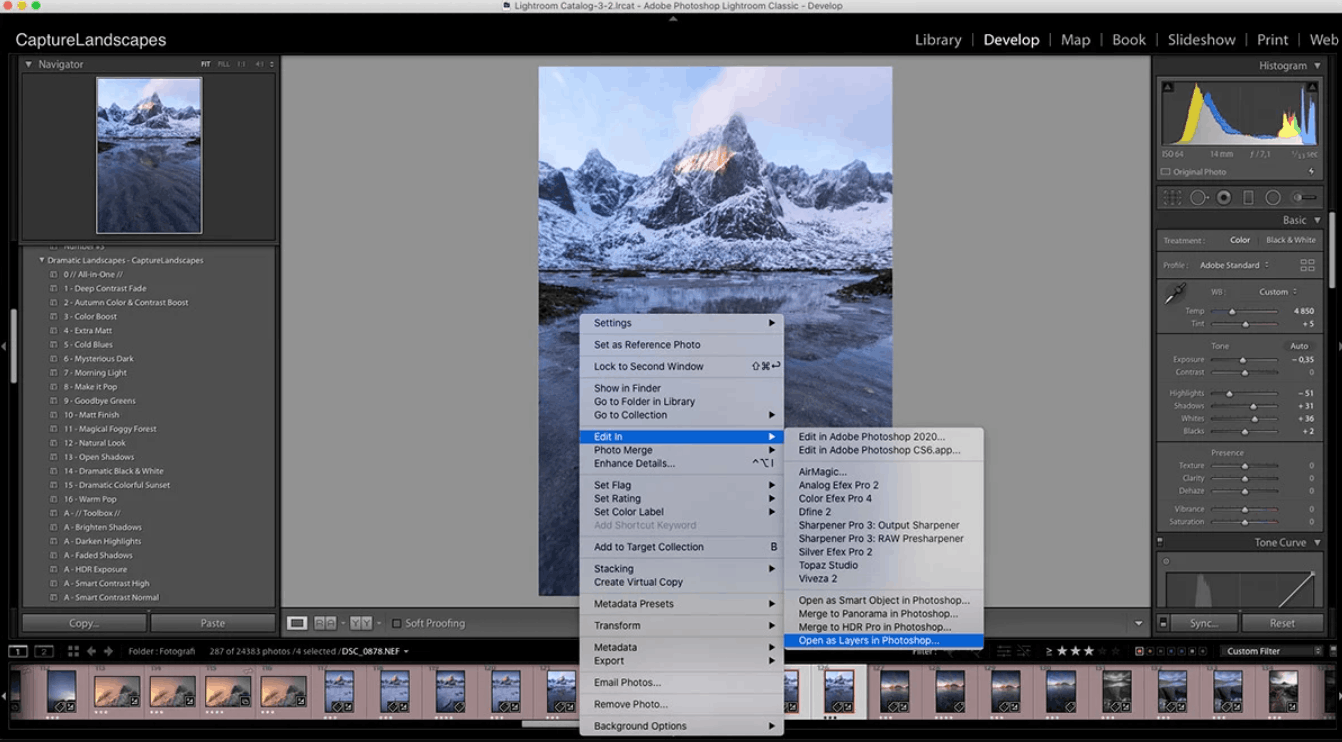
At this point, Photoshop will automatically analyze each pixel and select the sharpest areas from each frame using a mask. After the algorithm is complete, zoom in to one hundred percent and carefully examine the entire image to detect areas where the algorithm has not processed correctly. If you find any problems, create a new layer encompassing all the displayed content with a white layer mask, place the sharpest original layer below this layer, and then use a soft black brush to repaint the necessary sharp areas.
The reason for duplicating all layers before performing automatic merging is to retain a clean original image, ready for correction of any algorithmic errors. Photoshop's automatic layer merging feature usually works quite well in most situations, but it's not always perfect, especially with complex edges or areas with many fine details. Having the original, unmasked layers available will make manual editing much easier later on. Always remember to zoom in and carefully check the result before smoothing the layers together, as errors are much easier to correct when the layers are still intact.
6.2 Method 2: Image Stitching with Focusing in Helicon Focus
Helicon Focus is specialized software designed specifically for focus stacking techniques. Many professional landscape photographers frequently use this software for complex image sequences that Photoshop struggles to handle neatly.
The first step in Helicon Focus is to import image files into the software and then choose one of three different stacking methods provided. Because each algorithm operates using a rather complex technical mechanism, the developers usually recommend that users experiment with all three methods and choose the one that best suits each specific image. Of these, the first two methods usually yield the best results when applied to landscape photography.
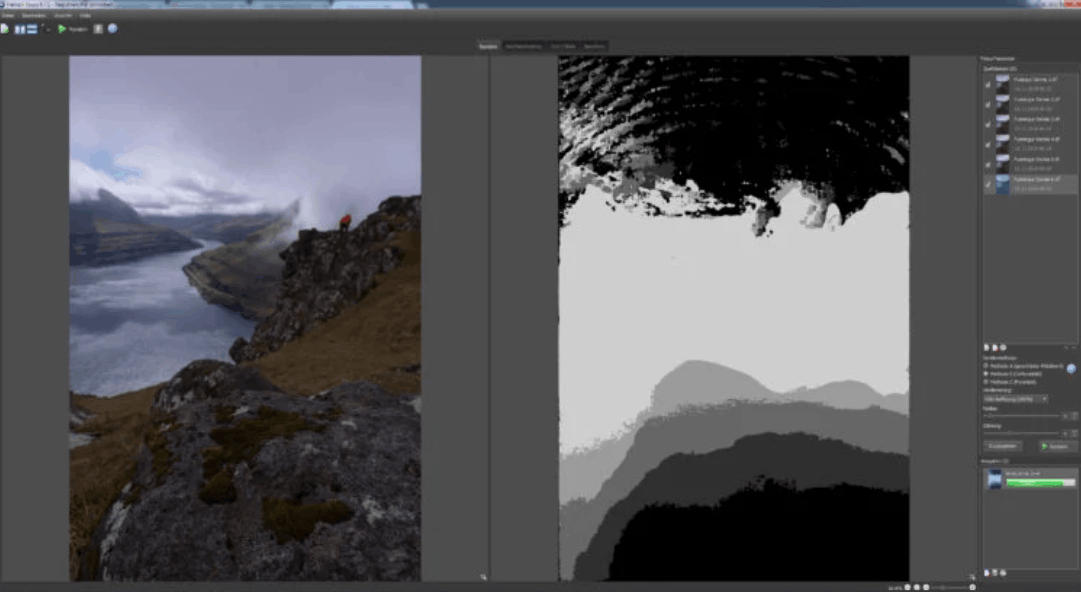
During the processing, users can observe the mask being gradually built on the screen, which is quite interesting because each algorithm creates a different mask. Helicon Focus's processing speed is significantly faster than Photoshop, even when processing large numbers of images in macro photography or product photography.
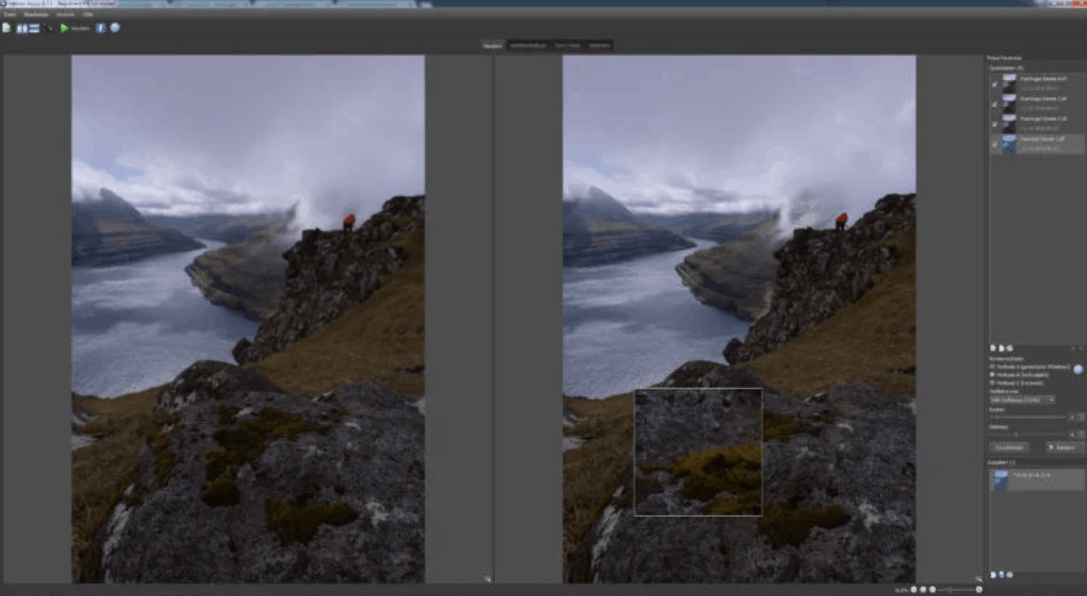
After the processing is complete, remember to zoom in to carefully check the quality of the result before exporting the file and continuing processing in Adobe Photoshop or other optional software. Besides Helicon Focus, the market also offers several other specialized software programs that are highly regarded by many photographers for complex collages, which are worth exploring if you want to expand your tool options.
7. Common Problems When Stacking Focus Points
Focus stacking techniques in landscape photography require working with conditions you can't completely control. Below are three of the most common problems and how to handle each one appropriately.
7.1 Moving Foreground Elements
Wind is the most common challenge in photography. If grass, flowers, or leaves move between frames, the image stitching algorithm will struggle to produce a clean result, and you may encounter ghosting or blurring in those areas. The best approach is to wait for a moment of stillness and shoot quickly. If the movement is only intermittent, take advantage of those quiet moments instead of trying to fight it—that is, shoot each frame when the foreground is as stable as possible, even if it means waiting a little longer between shots. In cases where movement is continuous and unavoidable, focus stacking may not be the right choice for that scene. Sometimes, a single well-focused frame at f11 will yield a much cleaner result than a flawed stitching.
7.2 Changing the Lighting Between Frames
At dawn or dusk, the light can change very rapidly between frames, causing noticeable tonal variations throughout the entire sequence. The longer the time between frames, the more noticeable this difference becomes. Shooting in fully manual mode with a fixed white balance will help minimize this problem, but it cannot completely eliminate it when the light is changing too quickly. Working quickly and limiting the number of frames to the minimum necessary is also a helpful way to reduce this effect. If you notice a clear exposure difference between frames, try adjusting the parameters in your raw image processing software before importing the image files into Photoshop, to ensure the starting point of each frame is as consistent as possible.
7.3 Poor Photoshop Image Blending Techniques
Photoshop's auto-layering feature works fairly well in simple situations, but it can still make mistakes. The most common problems include blurry patches along high-contrast edges, misaligned areas near the transition boundaries between focus planes, and the algorithm relying too heavily on a single frame when another frame would have produced a sharper result.
This is why duplicating all layers before running the auto-merging feature is always a necessary step. The duplicated layer will have its mask automatically applied by the algorithm, while the original layer remains clean and unmasked, ready for manual editing. When a problem area is detected, create a new layer that merges all the displayed content on top, place the original layer precisely below it, and then use a black paintbrush to repaint the necessary sharp areas. This process can be time-consuming when there are many errors to fix, but it is still the most reliable way to achieve clean and accurate results.
8. Conclusion
Focal stacking is one of the techniques that opens up a whole new range of compositional possibilities that no other method can offer. After practicing it a few times, the process will become quick enough that it no longer feels like a laborious task.
This isn't a technique you need to apply to every photo. Most of your typical landscape photos will still turn out well with a single frame at f8 or f11. But for scenes with a prominent foreground element requiring consistent sharpness from front to back, mastering the focal length stacking technique is what distinguishes a technically flawed photo from one you can confidently print in large format.





















VIP Products








Best Selling Products
Upgrade genuine Capture One account
120 USD
ChatGPT Plus Account (GPT-4)
16 USD
Windows 10 & 11 Pro Key
36 USD
Adobe Premiere Pro Account
99 USD
Copyright Adobe Lightroom Account
59 USD
Autodesk All App Account Copyright
120 USD
Plugin Retouch4me
69 USD
Adobe Photoshop Copyright - Full App
120 USD
Freepik Premium Account
59 USD
Upgrade Duolingo Super
29 USD
Capcut Pro 1 Year
39 USD
Upgrade Genuine Office 365
49 USD
Genuine Adobe Illustrator account
99 USD
MidJourney Account
29 USD
Genuine Cheap Canva Pro
39 USD