Best Selling Products

Adobe Premiere Pro Account
99 USD

Plugin Retouch4me
69 USD

Genuine Cheap Canva Pro
39 USD

Autodesk All App Account Copyright
120 USD

Upgrade Genuine Office 365
49 USD

Upgrade Duolingo Super
29 USD

Freepik Premium Account
59 USD

ChatGPT Plus Account (GPT-4)
16 USD

MidJourney Account
29 USD

Upgrade genuine Capture One account
120 USD

Copyright Adobe Lightroom Account
59 USD

Genuine Adobe Illustrator account
99 USD

Capcut Pro 1 Year
39 USD

Windows 10 & 11 Pro Key
36 USD

Adobe Photoshop Copyright - Full App
120 USD
Easy-to-understand Photoshop Guide to Increase Lip Color Intensity
Nội dung
- 1. Darken Lip Color in ID Photo on Photoshop: Reasons You Should Try It
- 2. Prepare the ID Photo on Photoshop
- 3. Select the Lip Area That Needs to Be Darkened
- 4. Adjust Lip Color Using Hue/Saturation
- 5. Use the Brush Tool to Make Lips Darker
- 6. Adjust Details and Refine Results
- 7. Save and Export Images
- 8. Conclusion
Detailed instructions on how to darken the lips of ID photos in Photoshop simply and effectively. Easy-to-follow steps help you create professional, sharp ID photos.
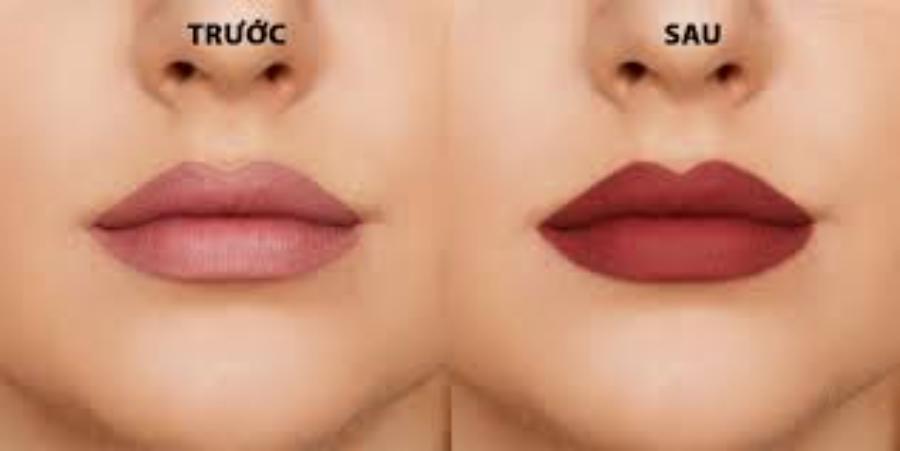
ID photos are one of the important types of photos, often used in personal records, administrative documents or identity cards. However, the lip color in the ID photo does not always achieve the desired sharpness and naturalness. This article sadesign will guide you on how to darken the lip color of the ID photo on Photoshop extremely simply, helping you improve the quality of the photo without having to be a photo editing expert.
1. Darken Lip Color in ID Photo on Photoshop: Reasons You Should Try It
Before you start editing, you need to understand that a beautiful and sharp ID photo is not only about brightening the face but also about highlighting details such as lip color. Especially in ID photos, lip color is often an important factor in enhancing the natural beauty of the person taking the photo.
.jpg)
In case your lip color is pale or uneven, Photoshop is a great tool to quickly and easily adjust it. With Photoshop's powerful editing tools, you can make your lip color darker and more prominent without affecting other details in the photo.
Darkening the lips in your ID photo with Photoshop not only improves your appearance but also gives you confidence and a better impression in important documents. This technique is especially useful when the lip color in the original photo is pale due to lighting or poor photo quality. With Photoshop, you can easily adjust the color in a subtle way, ensuring that the image remains natural and professional. This is a simple but effective solution, suitable for those who want to optimize their personal image without having to retake the photo. Applying this editing tool also shows meticulousness and attention to detail, helping you make a better impression in situations such as applying for a job, making a profile or other important documents.
2. Prepare the ID Photo on Photoshop
To prepare an ID photo in Photoshop, you need to follow these basic steps carefully and accurately. First, you need to prepare a good quality ID photo for the most effective editing!
Step 1 : Open the ID photo to be edited in Photoshop. Make sure the photo has been cropped to the correct ratio and has a large enough resolution. Usually 3x4 cm or 4x6 cm depending on the requirements.
Step 2 : Duplicate the original layer to avoid damaging the original photo during editing. You can do this by pressing Ctrl + J (Windows) or Cmd + J (Mac). Use editing tools like Levels or Curves to adjust the brightness, contrast, and color balance to make sure the face is clear and sharp. If needed, you can use the Healing Brush or Clone Stamp tool to remove small blemishes on the background or face.
Step 3: Finally, double-check and save the file in a high-quality format such as JPEG or PNG to ensure that the photo is sharp and has the correct color when printed. Following each step carefully will help you get a professional and standard ID photo.
3. Select the Lip Area That Needs to Be Darkened
To darken the lips area in Photoshop, you can follow these steps like a pro. After opening the image and duplicating the layer, you will need to identify and select the lips area to darken.
.jpg)
Step 1 : Use the Lasso Tool or Quick Selection Tool (depending on how precise you want it) to create a selection around your lips. Make sure to select close to the edge of your lips, avoiding any spills.
Step 2 : After selecting the lip area, you can add a Layer Mask to work with this selection without affecting the rest of the photo.
During the adjustment process, you should pay attention to the balance between color and brightness to ensure a natural and harmonious result. If necessary, use additional Masks to refine the transition area, making the lips look soft and not too separated from the surrounding areas. This will bring a professional and aesthetic effect to your photo.
4. Adjust Lip Color Using Hue/Saturation
Adjusting lip color with the Hue/Saturation tool is an effective and popular method in the field of image editing. By using this feature, you can subtly change the hue, saturation and brightness of the lip color, helping to create aesthetic effects that suit specific requirements. This is a useful tool not only for graphic design professionals but also for those who want to improve the quality of personal images professionally. Using Hue/Saturation requires skill and care to ensure natural, harmonious results that meet the user's wishes.
To naturally deepen your lip color, the Hue/Saturation tool in Photoshop is the best choice. This tool helps adjust the color without affecting too much of the other parts of the photo.
Step 1 : With the lips area selected, go to menu Image > Adjustments > Hue/Saturation . A new window will appear.
Step 2 : In the Hue/Saturation window , adjust the sliders:
Hue : Adjusts the overall color of your lips. You can change it a bit if you want to create a more natural lip color effect.
Saturation : Increases the intensity of the lip color. Move the slider to the right to make the lip color darker. However, you should not increase the Saturation too much because it will make the color look unnatural.
Lightness : Adjusts the brightness of the lips. You can reduce it a little if you want to make your lips darker without making them too bright.
Once you have adjusted the color to your liking, press OK to apply the changes.
5. Use the Brush Tool to Make Lips Darker
To darken your lips using the Brush Tool, you need to work carefully and meticulously to achieve the desired result. If you want to darken your lips in more detail, you can use the Brush Tool to redraw the lip color.
.jpg)
Step 1 : Select the Brush Tool (B) and adjust the softness of the brush accordingly. Make sure the brush color is set to the lip color you want to darken.
Step 2 : Create a new layer above the original layer and lightly draw on the lips in a natural shape. You can reduce the opacity of the brush so that the lip color is softer and not too obvious.
Step 3 : After drawing, change the layer's blending mode to Soft Light or Overlay to create a natural and gentle lip color effect.
Once you're done, you can use additional tools like the Blur Tool to soften the lines or reduce the opacity so the colors blend better with the original image. Using the Brush Tool professionally will help you create high-quality, impressive photos.
6. Adjust Details and Refine Results
Fine-tuning and refining the results is an important step to ensure accuracy, efficiency and fit for purpose. This process not only improves overall quality but also facilitates the optimization of resources while minimizing errors and risks during implementation. Achieving the best results requires careful analysis, comprehensive evaluation and the application of flexible approaches that are appropriate to each specific situation.
After you've darkened your lips, you'll want to check the entire photo to make sure it's balanced with the other parts. If your lips look too dark or unnatural, you can adjust the saturation or brightness of the lip color.
Use the Eraser Tool (E) to gently erase any excess color outside the lip area, making the lip contour sharper and more natural.
Use a light Gaussian Blur : If the lip color is too harsh or uneven, you can apply a little Gaussian Blur to slightly blur the edges, creating a more natural color transition.
7. Save and Export Images
To save and export photos effectively, you need to make sure that the image format and quality are suitable for your intended use. Choose from popular formats such as JPEG, PNG, or TIFF depending on your needs, and check the resolution to ensure that the image meets the desired standards. Once you are satisfied with the results, the final step is to save and export your ID photo. To avoid losing quality when sharing, you can save the file as a high-quality JPEG or PNG.
.jpg)
Step 1 : Go to File > Save As and select the format you want.
Step 2 : Adjust the image quality to suit and save.
Additionally, naming files clearly and organizing them into logically structured folders will make them easier to manage and retrieve when needed. If you use photo editing software, take advantage of the file export options to optimize file size and quality without losing important image details.
8. Conclusion
Darkening the lips in your ID photo is a simple yet effective way to create a sharper and more impressive photo. With Photoshop's powerful tools, you can easily edit your lip color without having to be an expert. Try the steps above to upgrade the quality of your ID photo and create perfect photos for any personal profile. With just a few steps, you will have a professional, vibrant ID photo.


VIP Products


Best Selling Products
Adobe Premiere Pro Account
99 USD
Plugin Retouch4me
69 USD
Genuine Cheap Canva Pro
39 USD
Autodesk All App Account Copyright
120 USD
Upgrade Genuine Office 365
49 USD
Upgrade Duolingo Super
29 USD
Freepik Premium Account
59 USD
ChatGPT Plus Account (GPT-4)
16 USD
MidJourney Account
29 USD
Upgrade genuine Capture One account
120 USD
Copyright Adobe Lightroom Account
59 USD
Genuine Adobe Illustrator account
99 USD
Capcut Pro 1 Year
39 USD
Windows 10 & 11 Pro Key
36 USD
Adobe Photoshop Copyright - Full App
120 USD