Best Selling Products

Autodesk All App Account Copyright
120 USD

Adobe Premiere Pro Account
99 USD

Freepik Premium Account
59 USD

Genuine Cheap Canva Pro
39 USD

Plugin Retouch4me
69 USD

Copyright Adobe Lightroom Account
59 USD

Capcut Pro 1 Year
39 USD

Upgrade genuine Capture One account
120 USD

Genuine Adobe Illustrator account
99 USD

ChatGPT Plus Account (GPT-4)
16 USD

Windows 10 & 11 Pro Key
36 USD

MidJourney Account
29 USD

Adobe Photoshop Copyright - Full App
120 USD

Upgrade Duolingo Super
29 USD

Upgrade Genuine Office 365
49 USD
Explore Low Poly - Minimalist 3D Design Is "On The Rise"
Nội dung
- 1. Basic information about Low poly
- 1.1. Definition of Low Poly
- 1.2. Advantages and disadvantages of Low Poly 3D
- 2. Steps to create a simple Low Poly design
- 3. How to create Low Poly models
- 3.1. Create Low Poly Model in SketchUp
- 3.2. Create simple Low-poly with Photoshop and Illustrator
- 3.3. Create your own low-poly model in Blender
Low Poly is a 3D design style that never goes out of style – simple but not monotonous, light but still beautiful, effective but no less artistic.
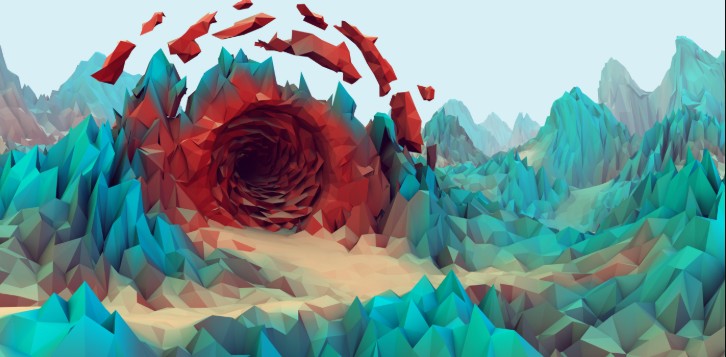
In an era where 3D graphics technology is developing strongly, choosing the right design style not only helps optimize project performance but also creates a unique visual impression. One of the prominent trends today is Low Poly , a minimalist but attractive style widely used in games, animation, UI design and many other creative fields. If you are a 3D designer or simply a person who loves creativity in three-dimensional space, this article will help you understand from A to Z about the 3D Low Poly model . Let's explore through the article below!
1. Basic information about Low poly
1.1. Definition of Low Poly
Low Poly is a technique that often appears in 3D graphic design with the purpose of building models with clear depth and relief and creating a feeling of 3D design. Designers often apply Low Poly in game design or staging 3D animation scenes. More specifically, this is a design in the form of a polygonal mesh; most commonly triangles to create 3D subjects.
Low Poly design products often appear with the characteristics of different shading and lightness, creating depth for the design, making it easier for viewers to imagine and visualize. The more detailed and densely distributed the number of polygons, the more realistic the effect on the design. However, to do this, the rendering time also increases accordingly. Therefore, when designers want to speed up the design process, they tend to reduce the number of polygons to the allowable level as well as the composition details. Thanks to that, the Low Poly model was born and became one of the graphic design styles loved by many designers.
.png)
The special feature of Low Poly is that it brings an attractive 3D feeling thanks to the combination of polygons that are simplified in a completely new way. Over time, thanks to its innovation, this style has become popular and used frequently in graphic design. Works in the 3D Low Poly model not only satisfy viewers visually but also bring an extremely interesting experience when they play games or watch 3D animated movies.
1.2. Advantages and disadvantages of Low Poly 3D
About the advantages
The Low Poly model has brought a breath of fresh air with many breakthrough ideas for designers. Some outstanding advantages that Low Poly 3D brings are:
The lines are simple but modern. The minimalism of Low Poly makes this design style more unique. You also don't need to worry about your design becoming outdated one day.
Low Poly is used by many designers to minimize rendering time.
In Low Poly, you don’t need to create complex textures. Instead, you can focus on the main objects in the design. At the same time, use your creativity to combine shapes to create impressive designs.
Easily link design structures to create depth in designs without losing their modern minimalist look.
.png)
About the disadvantages
Besides the outstanding advantages mentioned above, the Low Poly model also has some disadvantages such as:
The focus on minimalism can make Low Poly designs lack striking highlights.
To be able to convey messages and images well through Low Poly style requires designers to have solid expertise and good design skills. Otherwise, the design created will be quite confusing and abstract.
Low Poly designs often focus on lighting to create depth with impressive shadow effects. Therefore, they are rarely placed in night scenes with low light. At that time, all objects become blurred and difficult to recognize.
2. Steps to create a simple Low Poly design
With the rapid development of technology today, designers have countless choices of software to create Low Poly designs. You can use any software such as Maya, 3ds Max or Cinema 4D, etc. to complete your product in the most impressive and simple way. Below are the basic steps to help you create your own Low Poly design:
Step 1: Change the color of the photo to the desired color. In this step, you should change the contrast of the photo to a higher level so that your photo is clear.
Step 2: Use the Brush Tool to create blocks for the image.
Step 3: Transfer the block layer to Ai software and use the Line Segment Tool to draw connecting lines in the image.
Step 4: After completing the connection points, what you need to do is to process the Points at the top to overlap. You need to use the Direct Selection Tool and Align Vertical Horizontal Centers to connect these points.
.jpg)
Step 5: Use the Divide tool to create an array for the design.
Step 6: Transfer the photo you first colored in Photoshop to Illustrator and blend the colors between the photo and the drawing you just created.
Step 7: Use the Eyedropper Tool to complete the color injection for the array and your design is complete.
3. How to create Low Poly models
3.1. Create Low Poly Model in SketchUp
SketchUp is one of the 3D modeling software that you can use to create your own Low Poly models. With a simple, user-friendly interface, you can easily perform the necessary operations to convey your creative ideas into the design.
With SketchUp, you can easily design without using other software such as 3D Max, Maya or FormZ. SketchUp also allows you to simulate or adjust the sun angle and all times and cover all angles immediately. Thanks to that, designing Low Poly with this software also becomes simpler and easier.
The first step you need to do when you want to create a Low Poly model in SketchUp is to open the 3D model in this software. Then you need to add a plugin called Artisan – a tool that helps you create and manipulate organic shapes without any problems. You use the “reduce polygon” tool and the subdivide mesh to perform the operation of reducing or increasing the number of polygons as needed.
.png)
When you select the entire design and click “reduce polygons”, a window will immediately appear asking you to reduce the mesh percentage. And of course, the larger the percentage, the more clearly your Low Poly effect will be shown on the object. You just need to change the desired percentage to achieve the most satisfying final product. Instead of applying the tool more than twice to the same object, you should create a shape in a different and less recognizable direction, so you will have a more unique and innovative final product. With just a simple Ctrl Z or clicking on the “subdivide mesh tool”, you can return to the starting point with the same number of polygons.
3.2. Create simple Low-poly with Photoshop and Illustrator
In addition to using SketchUp to create your own Low Poly publications, you can also use popular software like Photoshop or Illustrator to express this design style.
The first thing you need to do is to have these two tools on your computer and start following the detailed steps below:
Step 1: Use the Brush tool (B) to create blocks in the image.
To make the photo clearer, you should increase the contrast of the photo by pressing Curves Ctrl + M). Then cut different parts of the photo from the blocks you just edited above.
.png)
Step 2: Transfer the block layer to AI software and use the Line Segment Tool to draw connecting lines.
You may notice that the connecting lines may have different vertices. To fix this, use the Direct Selection Tool (A) and select the Points then use Align Vertical/ Horizontal Center to connect these points together.
Step 3: Select Divide to create light and dark areas in the photo.
Step 4: Transfer the photo you have adjusted from Ps to Ai and adjust the color to blend the photo layer and your drawing layer. To do this, you can use the Eyedropper Tool (I) to adjust the color of each area as you like.
So with just 4 simple steps you can easily manipulate and complete Low Poly products with Illustrator and Photoshop. Designing is no longer difficult with these useful support tools.
3.3. Create your own low-poly model in Blender
For Blender users, the process is very similar, but the tools have different names. In fact, you will probably find it easier to apply the low-poly effect using the modifier.
.png)
Blender has an object mode and an edit mode and both have different uses. In this case, SaDesign is mainly working on the object mode.
First, select the object by right clicking and look for the modifiers menu, which has a small wrench icon. Now in the modifiers menu, click on ‘More Modifiers’ and select the ‘Decimate’ option. The Decimate modifier allows you to reduce the number of vertices and faces on the mesh using a slider control. This will give the object the less polymorphic look we are looking for.
Move the slider or enter a value to see how the shape of the object changes. When you are satisfied with the result, click the button above that says “Apply” to make the changes permanent. SaDesign recommends not using a value that is too low because, again, you will have a shape that is not recognizable. Perhaps a value of 0.5 to 0.1 will work.
Low Poly is a 3D design style that never goes out of style – simple but not monotonous, light but still beautiful, effective but no less artistic. Whether you are a beginner or experienced in the industry, mastering the Low Poly style will help you expand your creativity and optimize your workflow.


VIP Products


Best Selling Products
Autodesk All App Account Copyright
120 USD
Adobe Premiere Pro Account
99 USD
Freepik Premium Account
59 USD
Genuine Cheap Canva Pro
39 USD
Plugin Retouch4me
69 USD
Copyright Adobe Lightroom Account
59 USD
Capcut Pro 1 Year
39 USD
Upgrade genuine Capture One account
120 USD
Genuine Adobe Illustrator account
99 USD
ChatGPT Plus Account (GPT-4)
16 USD
Windows 10 & 11 Pro Key
36 USD
MidJourney Account
29 USD
Adobe Photoshop Copyright - Full App
120 USD
Upgrade Duolingo Super
29 USD
Upgrade Genuine Office 365
49 USD