Best Selling Products
Export images in Photoshop in JPG, PNG, PDF format
Nội dung
In fact, there are many image export features in Photoshop that not everyone knows. Each image export method produces image formats to suit each purpose of use. Let's refer to some of the image export methods used today with SaDesign.
1. What formats can Photoshop export images to?
Photoshop software can export images in many different formats, including:
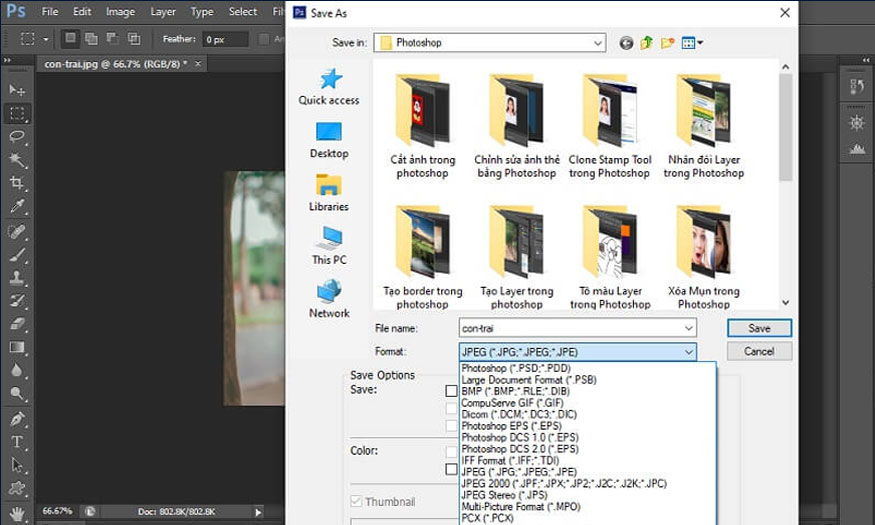
JPEG (Joint Photographic Experts Group): is a very popular format used to store images with adjustable compression levels. JPEG is suitable for high-quality, complex color images such as photos taken from cameras.
PNG (Portable Network Graphics): is a format that supports transparent images and does not lose image information when compressed. PNG is used for images with transparent backgrounds, charts, or images that require high quality and no loss of information.
GIF (Graphics Interchange Format): This format supports images with limited colors and only supports 256 colors. It is best optimized for animations or simple icons.
TIFF (Tagged Image File Format): This is an uncompressed format that allows you to save high-quality images without losing information. It is suitable for editing or printing high-quality photos.
PSD (Photoshop Document): This is the default file format for Photoshop, which stores all the layers, channels, and effects of a Photoshop document. PSDs preserve all the editing information, allowing you to go back and edit it again later.
BMP (Bitmap): is an uncompressed format that stores images as a matrix of pixels. This format is not popular and is rarely used in Photoshop.
Other formats: PDF, EPS, RAW,...
When exporting images in Photoshop, depending on the purpose of using the image, you can choose the appropriate format. Consider the requirements for quality, file size, compression options (if any) to choose the output type.
2. 3 ways to export images in Photoshop
There are many ways to export photos in Photoshop, but the most popular are the following 3 ways. Let's take a look below.
2.1. How to export images in Photoshop using Quick Export
Photoshop is programmed with many image export functions, but not everyone knows how to use them properly. Below is one of the Quick Export image export features.
When you want to export photos in Photoshop with Quick Export, follow these steps:
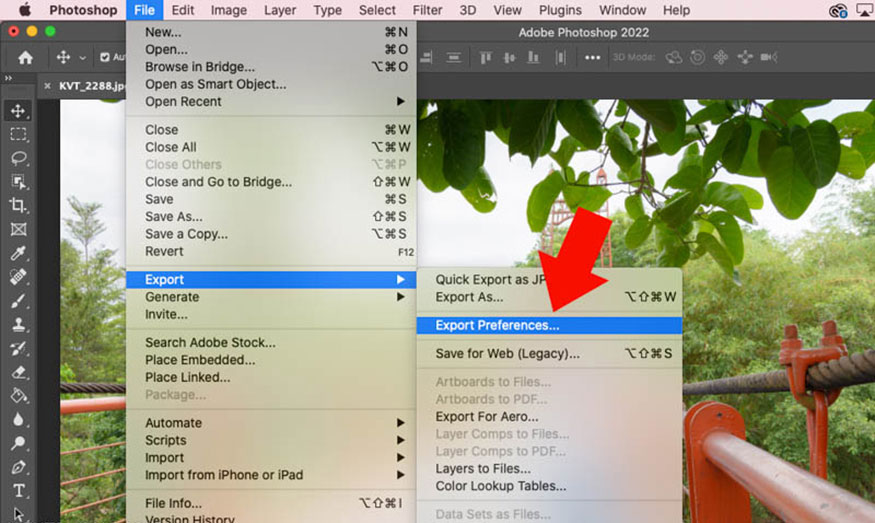
Step 1: First, on the menu bar, click File => Export => Export Preferences.
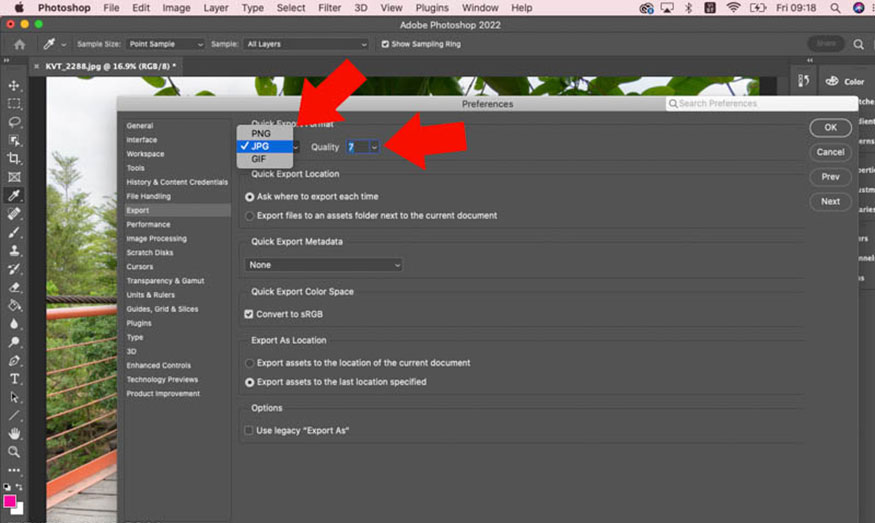
Step 2: In Quick Export, select the image format you want to export including JPG, PNG, GIF.
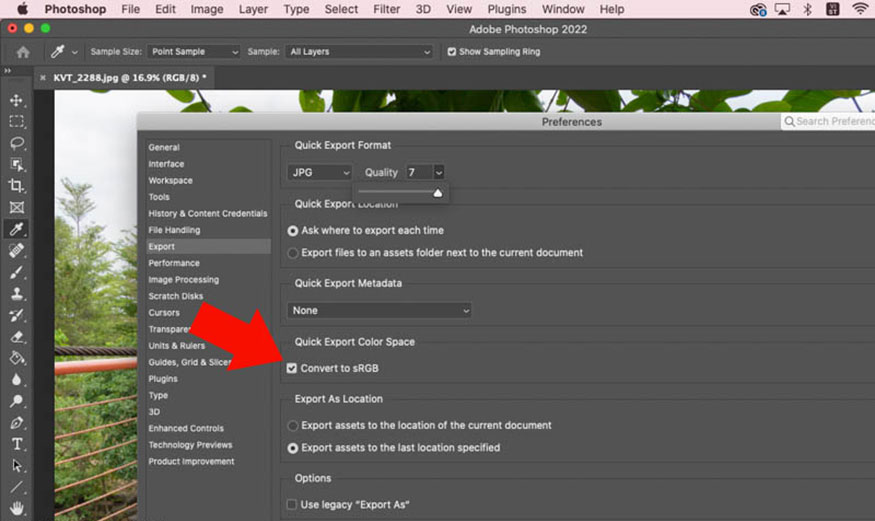
Step 3: If you export the photo to post online, check Convert to sRGB to avoid color distortion. Because the sRGB color space is the standard on devices capable of displaying color. Unless you use a specialized monitor that accurately displays Adobe RGB.
By default, Quick Export will save the image to the last location you used. If you want to save it with the original image file, select Export assets to the location of the current document. Now we have set the image format to JPG, with quality 7, sRGB color space.
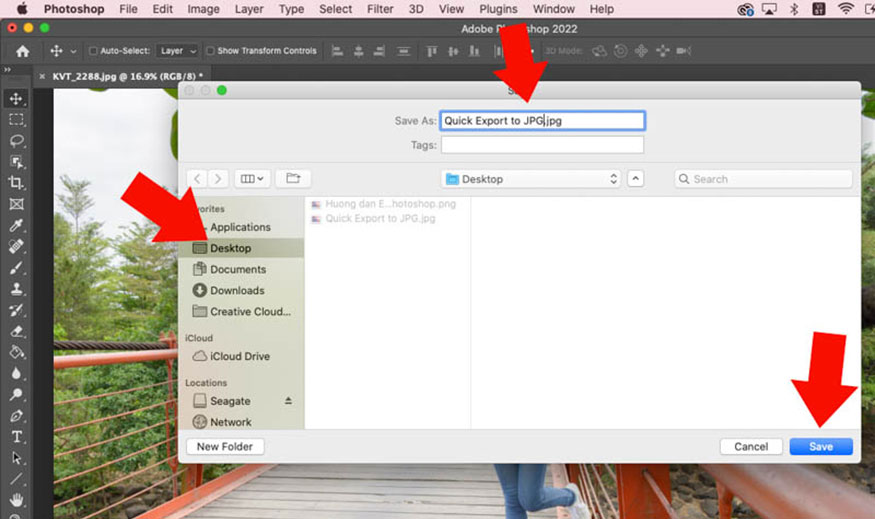
Step 4: Now, you just need to edit the photo to make it beautiful. Then click on File => Export => Quick Export to export the photo. At this point, you will see Quick Export as JPG, which means exporting the photo in the JPG format set up in the previous section. You will see Quick Export as PNG or GIF, if you choose these formats.
2.2. Export images in Photoshop using Export As
Another popular way to export images in Photoshop is Export As. It is done in the following steps:
Step 1: Edit the photo to make it beautiful, then click File => Export => Export As or use the shortcut key combination Option+Shift+Command+W.
.jpg)
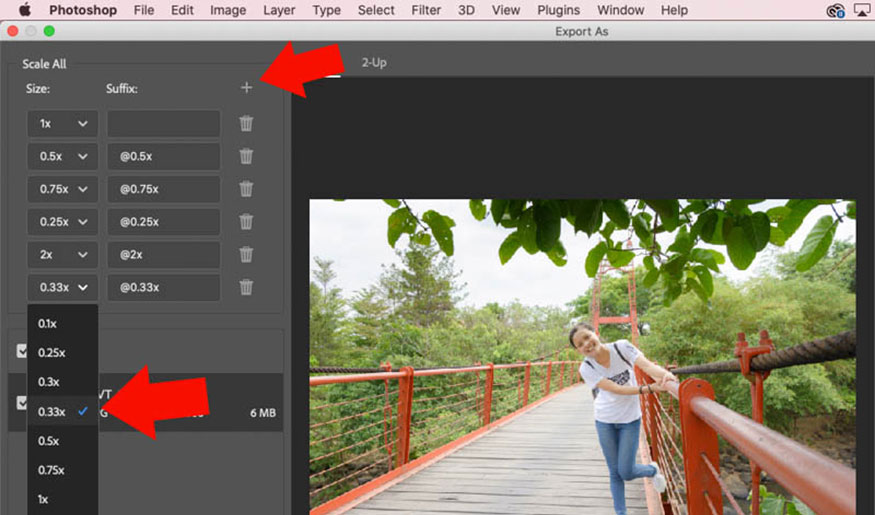
Step 2: By default, Photoshop will keep the original image size in Export As. However, you can also export multiple sizes at once.
For example, I want to export the image for printing and posting on the Blog in different sizes. Then, click on the + sign in the upper right corner and select the available settings. If the image is exported smaller than half, choose 0.5x. Of course, you can also choose to enlarge the original image 1.25x in Export As. You can also click on the trash can to delete these options.
As we can see, the biggest difference between Export As and Quick Export is that Export As can export batches of images with different sizes.
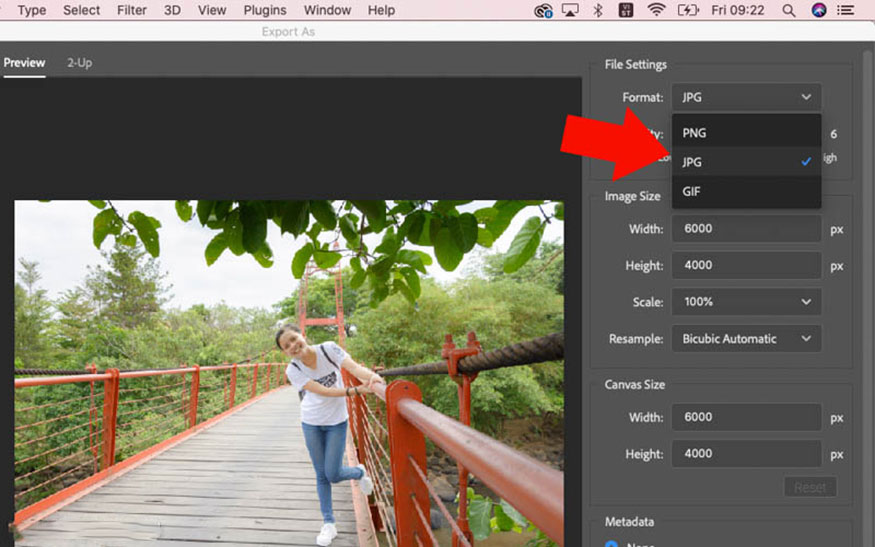
Step 3: Next, click on Format and select JPG, PNG, GIF image format. Depending on your needs, choose the appropriate format.
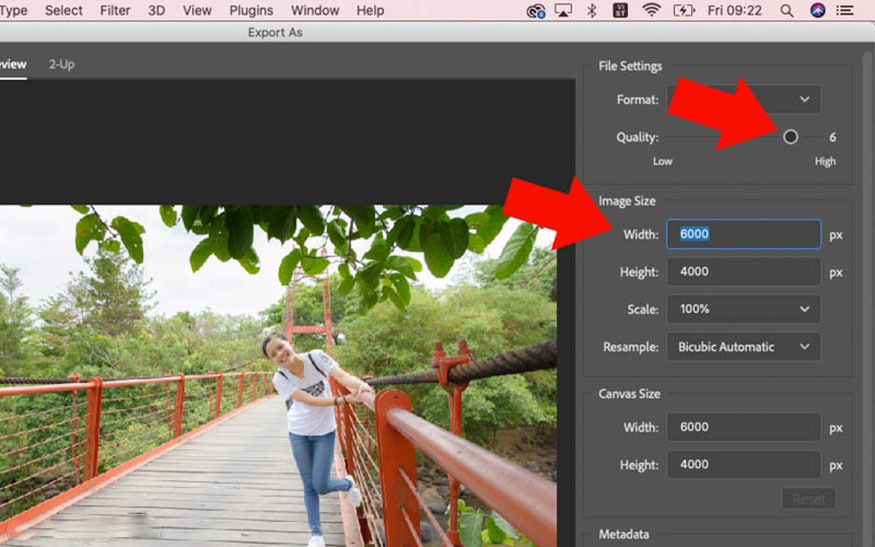
Step 4: Drag the Quality slider to set the JPG image quality. Using the highest level will retain more details than the original image. Then we click Image Size, set the width and height. In addition, you can choose Scale to choose the magnification level.
Step 5: The export function combines the layers into one image. This process will lose details from the original image. Therefore, you can control how Photoshop samples in Resample.
Photoshop uses Bicubic Automatic to reduce export time and maintain good image quality. But if you want to keep the highest image quality, select Preserve Details, then go to the Color Space setting, select Convert to sRGB.
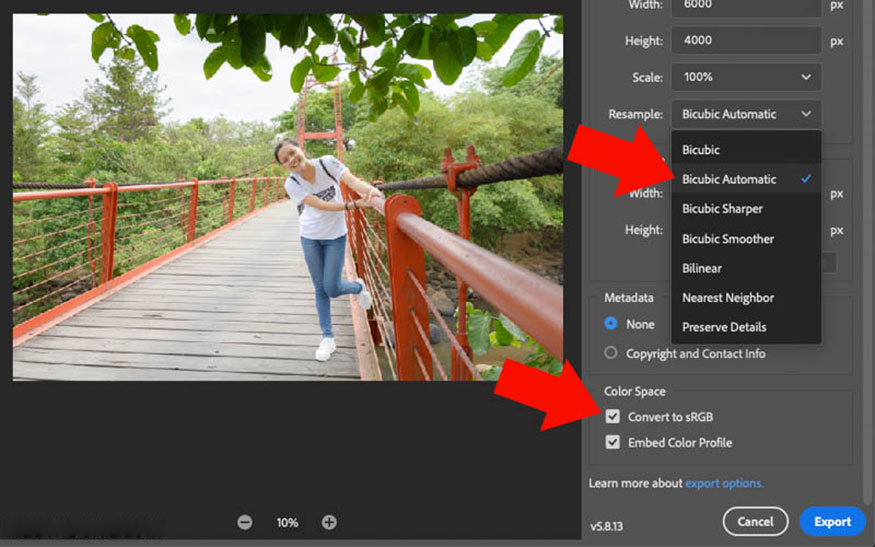
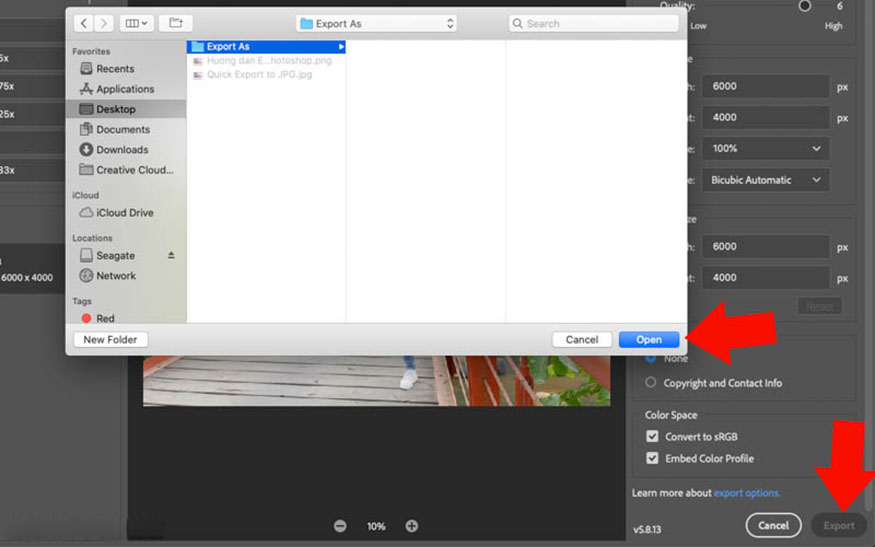
Step 6: Click Export to export the photo. Then select the folder to save the photo and click Open.
2.3. Export images in Photoshop using Save for Web
One way to export photos in Photoshop that we want to share with you is Save for Web. This feature is specialized for exporting photos to the web.
Step 1: We select the photo then click File => Export => Save for Web or use the shortcut key combination Option + Shift + Command + S.
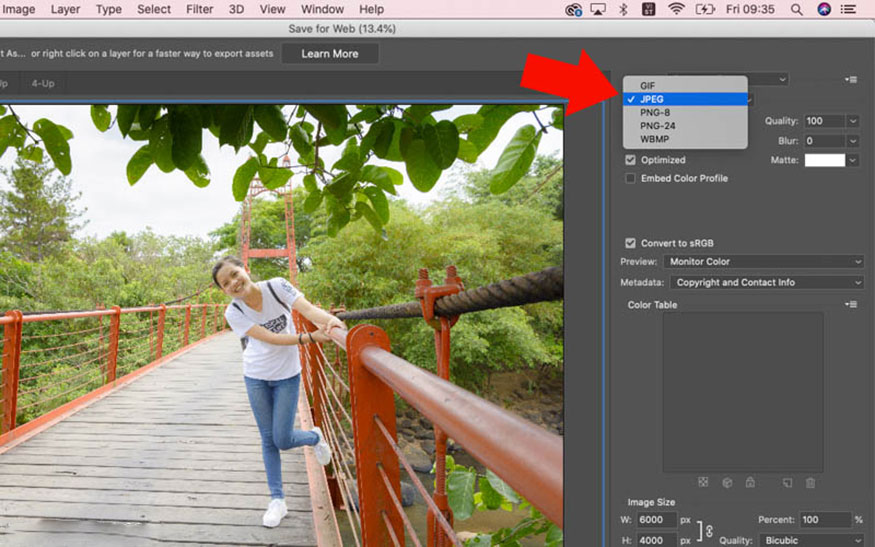
Then select Format to choose the appropriate JPG, PNG, GIF image format.
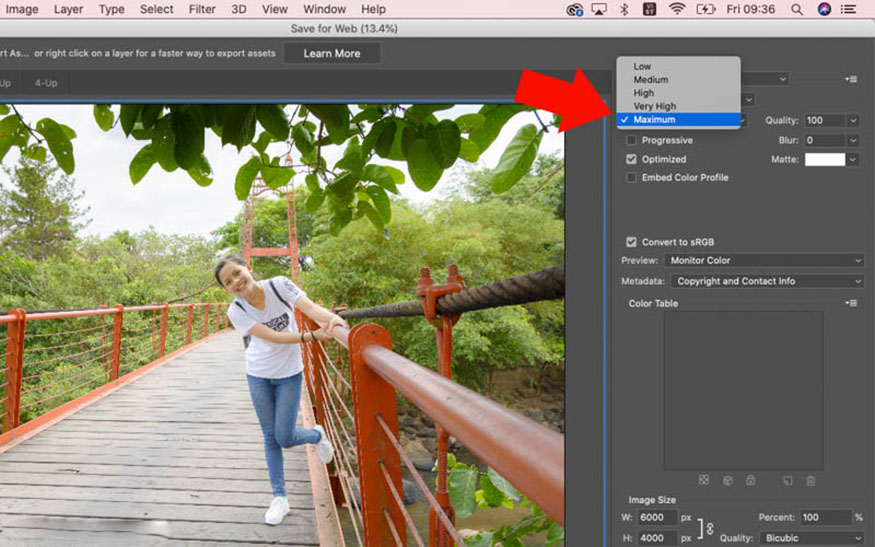
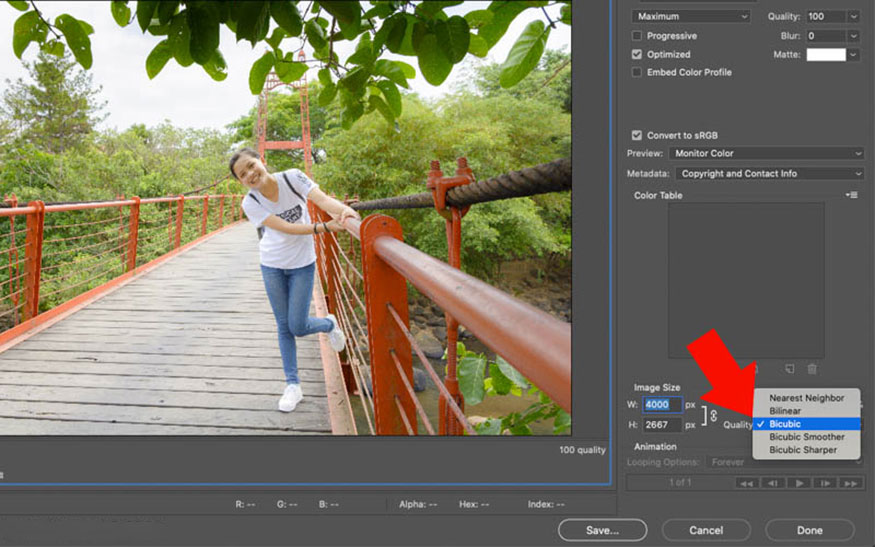
Step 2: The Save for Web image export function in Photoshop also has presets, called Presets. You just need to choose Low, Medium, High, Maximum, Very High. For example, if you want to keep the image quality at the highest level, choose Maximum. Photoshop will set the image quality to 100% in Quality.
Step 3: To continue, check Convert to sRGB, so that the image does not have color errors on other devices. Then move to Image Size, set the width and height. You can click on the chain icon to adjust the width independently of the height.
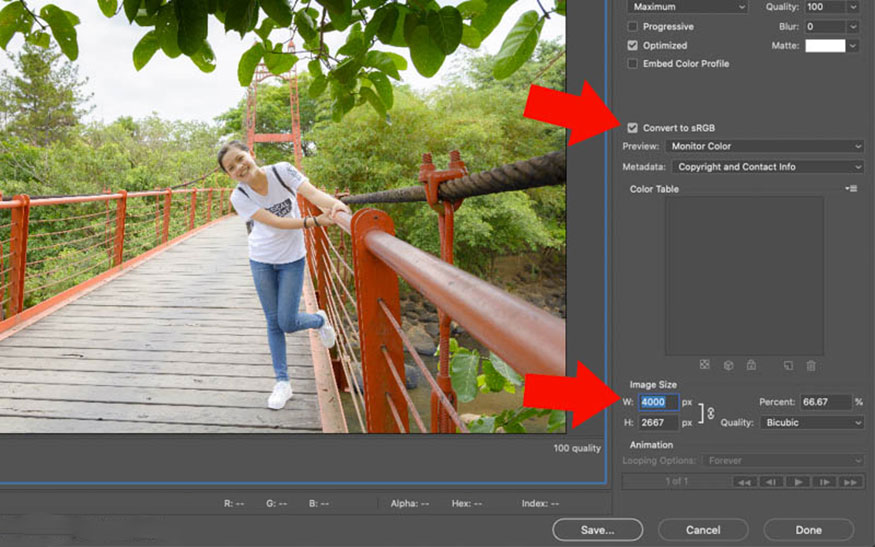
Step 4: Photoshop uses Bicubi sampling settings, but you can choose other settings to get the best image quality. After installation is complete, click Save, choose where to save the image. Thus, you have completed the process of exporting images in Photoshop using Save for Web.
3. How to batch export photos in Photoshop
Instead of exporting photos one by one, you can export photos in batches at once in Photoshop.
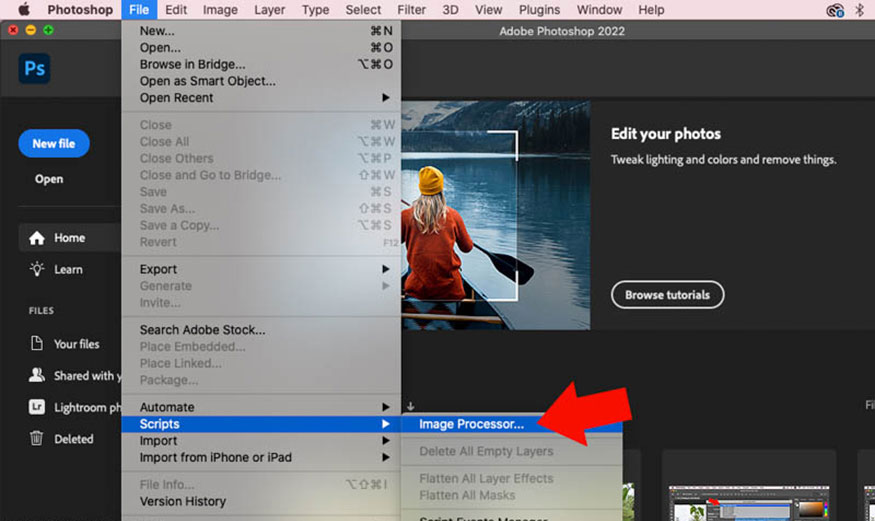
Step 1: On the menu bar, click File => Scripts => select Image Processor.
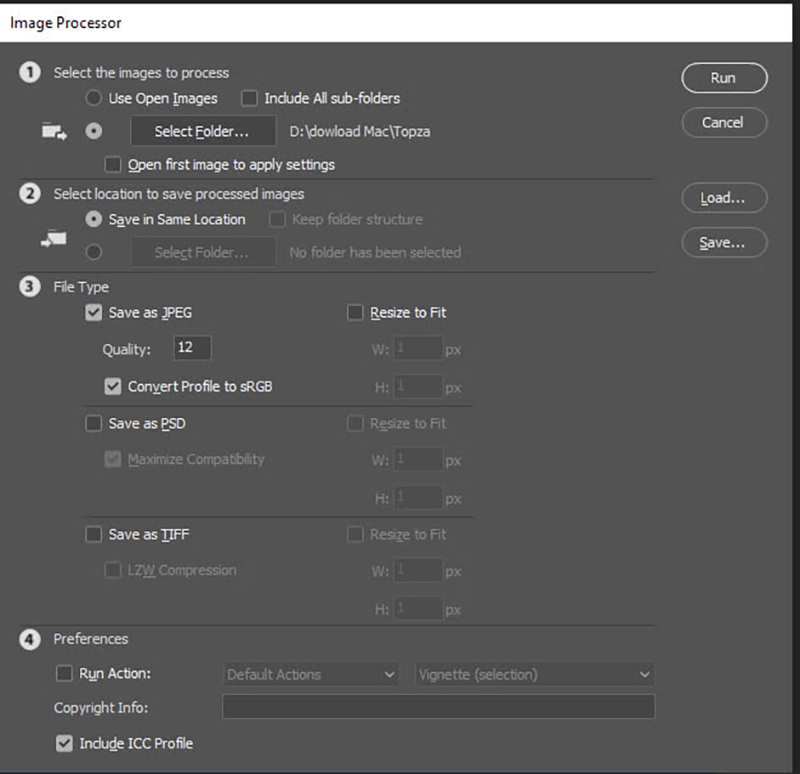
Step 2: Click Select Folder (1) to select the original image folder. You can tick Include All Subfolder, Photoshop will search for images in the main folder and subfolders. Then, click Select Folder (2) to select the folder where the image will be saved after exporting.
To continue, select File Type (3) select JPG image format, set image quality in Quality, image size in Resize to Fit. Don't forget to tick Convert Profile to sRGB so that the image does not have color errors when displayed on other devices. Then click Run to run the image export process.
Above is a summary of information on how to export photos in Photoshop. Depending on your photo needs, choose the appropriate export method.
Installation and support contact information:
🏡 SADESIGN Software Company Limited
📨 Email: phamvansa@gmail.com
🌍 Website: https://sadesign.ai


.png)


