Best Selling Products
Extract complex photo background in Photoshop
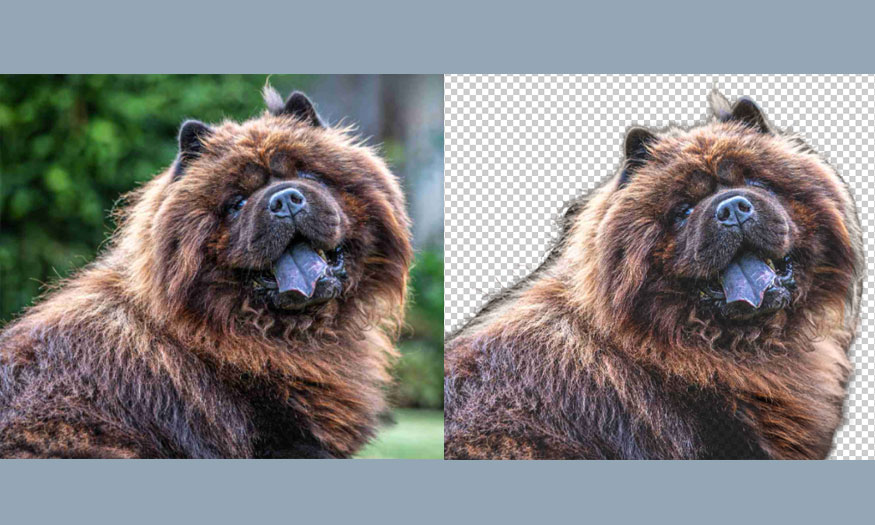
In Photoshop, there are many methods to separate the background. The most popular is to use tools with the function of creating selection areas such as Pen Tool, Selection tool group. However, these tools are only suitable for separating the background for simple (smooth) subjects such as people, objects, ... but for complex subjects such as animals with a lot of fur such as dogs, cats, trees, ... you should not use it because it is very time-consuming and the outline of the object after separation is jagged. So how to separate the background of a photo with complex details in Photoshop? Let's refer to the implementation method below with Sadesign .

1. Steps to separate the background of a photo with complex details in Photoshop
Objects with small details such as trees, furry animals, etc. will be very difficult to separate the background in Photoshop. When using conventional tools, the outline of the object after separation will become "jagged" with jagged lines that are not smooth. Details that are too small will be lost and cannot be separated. To separate the background of a photo with complex details in Photoshop, we will use the Channel tool. Let's refer to the implementation below.
Step 1: First, we need to open the photo with complex details that we want to separate the background of in Photoshop. To open that photo in Photoshop, select File on the menu bar => select Open => select the photo to open => click Open. Or you can press the key combination Ctrl + O.
.jpg)
Step 2: In the right corner of the screen, we select Channel. Now we will see 4 color channels appear: RGB, Red, Green and Blue.
.jpg)
Now we click on the Red channel. You will see the remaining 3 channels will be turned off, the dog image in the working frame turns black and white.
.jpg)
Drag the Red channel down to Create new channel at the bottom of the channels panel to create a copy of the Red channel.
.jpg)
Step 3: Now we will perform operations on this Red copy channel. On the toolbar, select Burn Tool.
.jpg)
On the Options bar at the top, set the Range to Shadows and set the Exposure to 15%.
.jpg)
Now we will use the Burn Tool to paint close to the dog's fur. Paint around to separate the dog from the surrounding background.
.jpg)
Note to paint lightly, do not paint over and over again, it will erase the small hairs that we need to separate. After painting, we will get the result as shown.
.jpg)
However, you can see that the dog's chest, at the bottom of the photo, is lighter, so we cannot apply the Burn Tool with Shadow mode on it. Now let's use the Lasso Tool, then circle the white background fur area as shown.
.jpg)
Then press the shortcut key Ctrl + I to invert the selection. Then continue using the Burn Tool to separate the fur from the background as in the steps above. Then press Ctrl + D to remove the selection.
.jpg)
Now we have a black and white dog image separated from the background in a basic way as shown.
.jpg)
Step 4: On the toolbar, select the Lasso Tool, then select the background area outside the dog.
.jpg)
Set Foreground color to black. Then press Alt+Backspace. The background will turn black as shown. Then press Ctrl+D to deselect.
.jpg)
Step 5: On the toolbar, select the Dodge Tool. Then on the Option bar, set Range to Highlights and leave Exposure at 16%.
.jpg)
Then gently paint around the dog's fur border.
.jpg)
Step 6: On the menu bar, select Image => select Adjustment => select Level.
.jpg)
In the Levels dialog box that appears, adjust the top and middle anchor points to make the dog a little darker, making it easier to separate the background of complex images in Photoshop. Then click OK.
.jpg)
Continue to select the Burn Tool, then lightly paint on the parts where the hairs are not too clear.
.jpg)
Step 7: On the toolbar, select the Lasso Tool, select the dog, leaving the white fur outside the selected area. Select the area as shown.
.jpg)
Now press the shortcut key Ctrl + Backspace. Now the selected area inside turns white.
.jpg)
Step 8: On the toolbar, select Brush, then press X to Set Foreground color to white. Then proceed to paint the dark areas on the white dog's body, so that the dog becomes a uniform white block. You can zoom in to paint carefully, so that you can get all the fur of the object. And the result will be.
.jpg)
Step 9: Press Ctrl+Click on the red copy thumbnail channel to create a selection of the dog.
.jpg)
Then go back to the Layers panel right next to it. Then give this layer a mask by selecting Add layer mask at the bottom of the layers panel.
.jpg)
Step 10: At the bottom of the layers panel, select Create new fill or adjustment layer - the split circle icon. Then select Solid color…
.jpg)
In the Color picker that appears, select the color code #404040.
.jpg)
Drag the color fill layer to the bottom.
.jpg)
In the Background layer, create a new layer by clicking Create a new layer at the bottom of the layers panel.
.jpg)
In the newly created layer, press Ctrl+Alt+G to point the link of the new layer to the background layer.
.jpg)
On the toolbar, select the Brush Tool, then hover over the dog's fur and press Alt. You will see a color selection circle as shown. Then move the mouse outside the edge of the hairs that are not the same color to color them evenly. Depending on the area, take different sample colors.
.jpg)
Then set the blending mode for this layer to Color.
.jpg)
Use the Brush tool and paint around the edges of the dog's fur so that the fine hairs are shown most clearly.
Step 11: We can see that the front chest at the bottom of the photo of the dog is not clear with hair, right? We will fix it by using the Lasso Tool to select an area with clear hair near that location.
.jpg)
Now press Ctrl+Shift+C to copy the selection. Then press Ctrl+V to paste the selection. Now a layer containing the cut selection will be created. Press Ctrl+Alt+G to point the link of this layer down.
.jpg)
On the toolbar, use the Move Tool to drag the cut fur to the dog's fur border, press Ctrl+T and adjust to match.
.jpg)
Step 12: Create a mask for this layer by selecting Add layer mask at the bottom of the Layer panel. Press Ctrl+I to turn the mask black. Then use the Brush to lightly paint the dog's fur to get the most realistic image.
.jpg)
So you have finished separating the background of a photo with complex details in Photoshop. Don't forget to save the image as PSD or PNG. Now you can use this separated image to combine into many different images.
.jpg)
2. Conclusion
Above are detailed steps on how to separate the background of a photo with complex details in Photoshop. The implementation is quite complicated, requiring a combination of many different tools, requiring meticulous care to separate the object most beautifully. Hopefully, our sharing above can help you separate complex photos such as furry animals, leaves, ... Try it now.
Sadesign Co., Ltd. provides the world's No. 1 warehouse of cheap copyrighted software with quality: Panel Retouch, Adobe Photoshop Full App, Premiere, Illustrator, CorelDraw, Chat GPT, Capcut Pro, Canva Pro, Windows Copyright Key, Office 365 , Spotify, Duolingo, Udemy, Zoom Pro...
Contact information
SADESIGN software Company Limited


