Best Selling Products
How to center in Photoshop extremely STANDARD
Nội dung
- 1. How to center in Photoshop
- 1.1. Using the Move tool to align 2 sides in Photoshop
- 1.2. Center with vertical and horizontal alignment tools in photoshop
- 1.3. Center text with Photoshop
- 1.4. How to align margins in Photoshop with the Marquee Tool
- 1.5. Learn the shortcuts used in centering in photoshop
- 2. Notes when centering in Photoshop
- 2.1. Using Grids and Guides
- 2.2. Use the appropriate alignment tool
- 2.3. Use precision alignment features
- 2.4. Check and adjust the technique before saving.
- 3. Answers to frequently asked questions about centering in Photoshop
- 3.1. Why are the align buttons grayed out in the Move tool?
- 3.2. Is it possible to center multiple layers and layer groups at the same time?
If you want to align a certain detail to the center of the image in Photoshop, use the built-in tool instead of spending time estimating where to place it. Refer to the instructions on how to center in Photoshop that Sadesign brings in the following article to save time, as well as ensure the most accurate results!

1. How to center in Photoshop
There are many ways to align photos in Photoshop that you can apply. Below, Sadesign will introduce to you 4 basic ways that are easy to perform and are most commonly used today such as:
1.1. Using the Move tool to align 2 sides in Photoshop
To align both sides with the Move tool, we follow these simple steps:
- Step 1: Use the Move tool located in the toolbox on the left side of the screen to align the image in Photoshop. The icon of this task looks like a mouse pointer with a cross next to it. Alternatively, you can use the shortcut key by pressing the V key to select this action.
.jpg)
- Step 2: Click on Align Vertical Centers located on the toolbar on the left side of the screen. This will center the selected layer vertically. You can monitor the alignment parameters if they are displayed as 0.00 in total, which will be correct.
.jpg)
1.2. Center with vertical and horizontal alignment tools in photoshop
If you have multiple layers and want to align all of them to the center of the background, follow these instructions:
- Step 1: Press and hold Ctrl then select the layers you want to align.
.jpg)
- Step 2: Use the Align Horizontal Centers operation, this option has the effect of aligning a selected layer horizontally in the middle.
.jpg)
With just these 2 steps you can effectively center in photoshop.
1.3. Center text with Photoshop
To center text in Photoshop, follow these basic steps:
- Step 1: Select Layer => write text and select Center Text to align the text in Photoshop. Immediately after that, the text will appear in the center of the text box but not in the center of the working frame.
.jpg)
- Step 2: Press and hold Ctrl to select the text layer and the background layer at the same time to create the main frame.
- Step 3: Use the Align Horizontal Centers operation to align a selected layer horizontally in the middle.
.jpg)
With these 3 simple steps, we have completed the process of effectively centering text with Photoshop.
1.4. How to align margins in Photoshop with the Marquee Tool
The way to do centering in photoshop that you should not ignore is to use the Marquee Tool. The steps are as follows:
Step 1: Copy the image to be edited to a new file of the Photoshop application by opening the Photoshop application => go to File => select New => use the Ctrl + C and Ctrl + V commands to cut and paste the image as usual.
.jpg)
Step 2: Unlock the background layer by clicking the closed padlock icon in the panel. Convert the background to a smart object so that it won't be distorted when working on the background layer.
Step 3: Resize the image to make sure the image to be edited is smaller or equal to the background size. You can use the shortcut CTRL + T (for Windows) or CMD + T (for MacOS) to do this. Once you have finished resizing, click the check mark on the options bar to finish editing.
.jpg)
Step 4: Go to the toolbar and select the Marquee Tool function, then press and hold the left mouse button to drag a rectangle around the image you want to center.
.jpg)
Step 5: Click on the selected object and press "Open" to open the control panel. Go to "Layer" and the object you just created the selection.
Step 6: Go to the toolbar to select the move tool (Plus icon with arrows at 4 ends) => select Move Tool => select Align Horizontal Centers to perform horizontal alignment. Click the Align Vertical Centers icon to perform vertical alignment.
.jpg)
Step 7: To finish the centering process, press Ctrl + D (Windows) or CMD + D (Mac) to finish the operation.
1.5. Learn the shortcuts used in centering in photoshop
To increase speed and accuracy when centering in Photoshop, use the following shortcuts:
- The shortcut key combination to vertically center for Windows operating system is “Alt + Ctrl + 1”, and for MacOS it is “Alt + Cmd + 1”.
- The shortcut key combination to center horizontally for Windows operating system is “Alt + Shift + 1", and for MacOS it is “Shift + Cmd + 1”.
2. Notes when centering in Photoshop
To ensure the centering process in Photoshop is most effective, you should keep in mind the following important notes:
2.1. Using Grids and Guides
To make the margins even on both sides in Photoshop, as well as to help the layout align more evenly and beautifully, you first need to create a grid and a guide. Specifically, the process will take place as follows:
How to create a grid:
Step 1: Right on the Photoshop toolbar, go to View => select Show => select Grid or press the shortcut key Ctrl + ' to help perform operations faster.
.jpg)
Step 2: To make the grid interface easier to see, you need to go to the toolbar and select Edit => select "Preferences" => select "General" (Ctrl + K).
.jpg)
Step 3: When the Preferences interface appears, you need to select "Guides, Grid & Slices".
.jpg)
Step 4: Right in the Grid section, adjust the parameters related to the grid lines such as:
Color: To change the color of the grid border.
Gridline Every: Is the distance between grid lines. Do not select the unit of measurement in the optional box next to it. For optional units of measurement, Pixels, Inch, Cm, Percent (%),...
Subdivisions: Number of sub-lines in the grid.
(1).jpg)
Step 5: Once you have customized the parameters, click “OK” to complete.
How to create a guide line:
Create a guide line with a ruler:
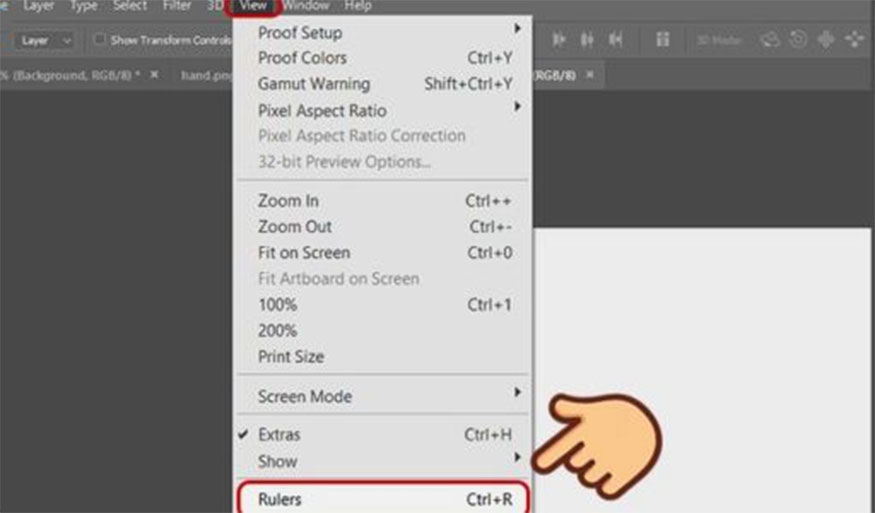
Step 1: Go to the toolbar in photoshop => select View => select Rule (Ctrl + R).
.jpg)
Step 2: When the ruler is displayed, left-click on the horizontal ruler bar and then move the mouse down to create a vertical guide line. If creating a horizontal guide line, go to the vertical ruler bar and move the mouse from left to right.
.jpg)
Note :
To delete a guide line, left-click on the end of the guide line and then drag it back to the ruler.
To move the guide line, use the Selection Tool (shortcut key V), and click on the guide line, move the mouse to the position where you want to place the guide line.
To hide all the guides you just created, you need to press the key combination Ctrl + H.
In addition to using a ruler, we can also create more accurate guide lines by setting up guide line parameters. Specifically, the implementation is as follows:
Step 1: Go to the toolbar and select View => New Guide to set the parameters of the guide line you just created. You need to pay special attention to the following parameters:
Horizontal: Sets the horizontal line.
Vertical: Sets the vertical line.
Position: The position of the reference line starts from the left edge (or top edge) of the measuring ruler.
.jpg)
Step 2: Once you have selected the options to create the guide line, click OK to complete.
Note: You can create multiple guides at the same time in Photoshop by going to View and selecting "New Guide Layout". Next, customize the parameters in the table and click "OK" to complete.
2.2. Use the appropriate alignment tool
With the 4 ways to center in Photoshop that we introduced above, you can see that each method will have its own features to ensure it is suitable for its own purpose. To ensure optimal alignment efficiency, you should pay attention to choosing the appropriate alignment tools for yourself, as well as the most familiar to you.
Practicing many times will help you perform operations faster and more accurately.
2.3. Use precision alignment features
With alignment details, it is necessary to ensure high accuracy. To do this, you should use additional alignment support features such as: Ruler set, Grid system, Guides system,... these features help your alignment achieve absolute accuracy.

2.4. Check and adjust the technique before saving.
If you find an error in the editing process after saving the image, you will need to redo the edits from the beginning, which is very time-consuming. Therefore, be careful and meticulous in every editing detail, and review your image carefully before saving.
3. Answers to frequently asked questions about centering in Photoshop
There are many questions related to centering in photoshop. Here are some frequently asked questions in the process of centering in photoshop for your reference.
3.1. Why are the align buttons grayed out in the Move tool?
The image editing process on photoshop helps you to fine-tune the image with many different layers. Before editing the image on photoshop, you should pay attention to selecting the image layer for the image layer you want to center. If you skip the layer to create a selection for the image you want to center, the alignment buttons will be grayed out.
3.2. Is it possible to center multiple layers and layer groups at the same time?
We can absolutely center multiple layers and group layers at the same time using the multiple layers (layers) at the same time or group option in the Layers panel.
Next, go to the Move tool to select the Align Horizontal Centers and Align Vertical Centers icons. Then press Ctrl + D (Windows) or CMD + D (Mac) to finish the operation.
Hopefully, with the above instructions on how to center in photoshop, it will help readers to align accurately and effectively.


