Best Selling Products
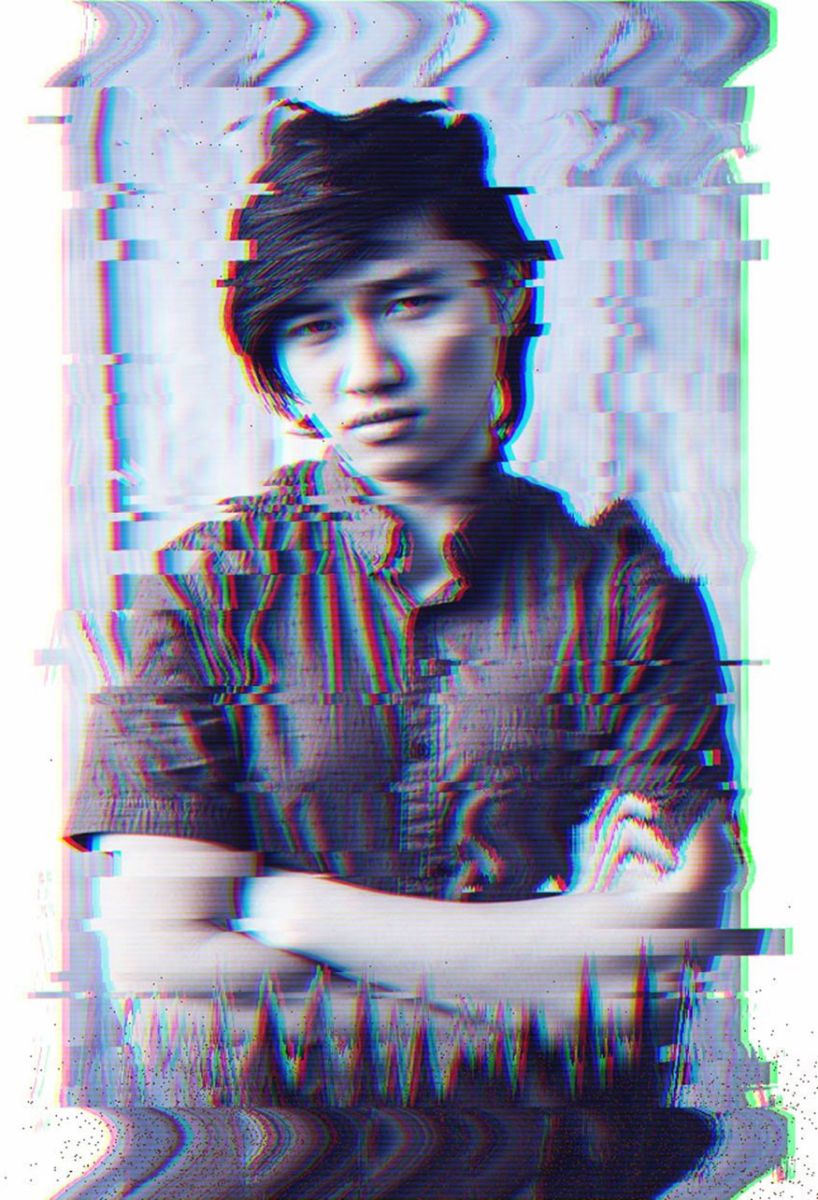
Extremely interesting Glitch effect in photoshop
Nội dung
- Glitch is essentially a digital noise effect, error effect, or glitch. When using this effect, your image will appear with horizontal or vertical lines that are skewed and inconsistent, as if there is a loss of signal.
- 2. Desaturate photos to create a cool Glitch effect in Photoshop
- To desaturate an image to create an interesting Glitch effect in Photoshop, you can follow these steps:
- 3. How to create a linear Glitch effect for photos
- The next part of this glitchy, glitchy Glitch effect is to recreate the irregular rectangular distortion that makes it look as if parts of the image are out of place.
- The next part of this distortion effect is to create a ripple glitch overlay. These Glitch effects make the image appear to be moving in a liquid.
- 5. Create 3D effects for extremely interesting Glitch effects in Photoshop
- Now the Glitch effect with 3D colors is prominent blue red pink. It makes the design more impressive.
Glitch is an extremely "magical" digital error effect. It will appear lines or color changes in your design, creating uniqueness. You can completely perform this effect in Adobe Photoshop through a combination of many tools. Join SaDesign to refer to the steps to create extremely interesting Glitch effects in Photoshop right after this.

1. How to set up a super cool Glitch effect in Photoshop
Glitch is essentially a digital noise effect, error effect, or glitch. When using this effect, your image will appear with horizontal or vertical lines that are skewed and inconsistent, as if there is a loss of signal.
This glitch effect is inspired by TV screens with static and choppy audio. Glitch effect will give your design a unique, ghostly, attractive and mysterious look.
With this effect, the first thing we need to do is set up the Glitch effect for the photo you want. Follow these steps.
Step 1: Upload the photo you want to create a cool Glitch effect in Photoshop. To open the photo, on the menu bar, select File => select Open => select the photo you want to create a Glitch effect and press OK. Or you can also use the shortcut key Ctrl + O and select the necessary photo.
Note, for this, how to do Glitch effect, it will be helpful if you choose a photo where the subject has a clear outline because we will need to extract it from the background.
(1).jpg)
Then double click on the Background layer to make it layer 0. Here I named it Stock. Create a new layer by pressing Ctrl+Shift+N then drag it to the bottom. Set the Foreground Color to white and fill this layer with the Paint Bucket Tool (G).
.jpg)
Step 2: Select the Magnetic Lasso Tool (L) from the toolbar. Use this tool to create a complete selection around the object. When you're done, right-click and select Layer via Copy to create a quick copy and name it Model.
.jpg)
Step 3: Select the original Stock layer. Use the Free Transform Tool (Ctrl+T) to highlight the edges of the background to expose some white on the left and right sides.
.jpg)
Alternatively, if your image doesn't have a background, you can simply add a rectangle using the Rectangle Tool (U) as shown in the example below.
.jpg)
2. Desaturate photos to create a cool Glitch effect in Photoshop
To desaturate an image to create an interesting Glitch effect in Photoshop, you can follow these steps:
Step 1: In this step, desaturate the photo to get a more monochromatic color palette. Select the model layer and go to Image => Adjustments => Hue & Saturation. Reduce the Saturation to -95 to remove most of the color from the photo.
.jpg)
Step 2: You can further adjust the main image using Levels. Reselect the extracted model layer and go to Image => Adjustments => Levels. Adjust the Levels for the RGB Channel using the following settings:
Shadow Input Level: 0
Midtone Input Level: 0.92
Highlight Input Level: 255
Output Levels: 17, 255
The final result is very subtle and it lightens the model a bit.
.jpg)
3. How to create a linear Glitch effect for photos
The next part of this glitchy, glitchy Glitch effect is to recreate the irregular rectangular distortion that makes it look as if parts of the image are out of place.
Step 1: To do this, first select the Stock and Model layers and Merge them together. Select both layers and press Ctrl+E.
.jpg)
Step 2: Now select the Rectangular Marquee Tool (M). Make two small selections on the image layer. First, make a selection at the bottom, then hold down the Shift key to add another selection at the top. Do as shown below.
.jpg)
Press the V key on your keyboard to switch to the Move Tool. Use the left arrow key to move the selection to the left. You may have to press it multiple times or hold it for a while to get the result you want.
.jpg)
Step 3: You could continue this process on a single layer, but you might end up with some open white spaces that don’t look very nice. So to avoid this, duplicate the Model layer and use the copy to create the distortion.
Again, use the Rectangular Marquee Tool (M) to create more selections, moving them in different directions using the left and right arrow keys. Here I created two more and moved them a little to the right.
.jpg)
Note that since there is a copy of the image behind this layer, the result shows the layer behind it instead of the white background.
Step 4: Create more rectangular selections of different sizes to create a more natural effect.
.jpg)
In the area near the face, try not to distort it too much. Do each Glitch effect individually to see what works. This section is mostly about experimentation, so if you need to go back a step or two, just hit Ctrl+Z to undo.
.jpg)
Once you're done with all the linear Glitches, the effect should look something like this:
.jpg)
4. Create a wave distortion Glitch effect
The next part of this distortion effect is to create a ripple glitch overlay. These Glitch effects make the image appear to be moving in a liquid.
Step 1: To do this, we will need the Wave Filter. First, Merge the original Stock layer with the copy that has all the Glitch effects. Then Ctrl+J to create a copy to create the wavy distortion.
.jpg)
Step 2: With the copy selected, create several larger selections using the Rectangular Marquee Tool (M) just like before. Remember that I'm trying to frame the subject's face, so don't select the area in the middle.
.jpg)
Now on the menu bar go to Filter => Distort => Wave, adjust the settings as follows to create a ripple effect only on the selected areas.
.jpg)
Step 3: With this particular glitch effect, the above settings may or may not work for your photo, so it’s important to experiment and tweak the settings yourself to achieve the look you want.
Continue making these selections before applying the Wave Filter. You will need to change the settings each time to change the effect on the photo.
.jpg)
Here are the results after a small test.
.jpg)
Step 4: Complete this effect by focusing on the top and bottom of the image. First, select the bottom part of the image using the Rectangular Marquee Tool (M) and apply a Wave Filter with the following settings.
.jpg)
Now apply to the top section. Repeat the process, this time changing the settings to the following.
.jpg)
Here is the complete Glitch effect image with all the linear and ripple Glitch effects. Let's move on to the finishing step!
.jpg)
5. Create 3D effects for extremely interesting Glitch effects in Photoshop
Now the Glitch effect with 3D colors is prominent blue red pink. It makes the design more impressive.
Step 1: Just like before, start by merging the Glitch layers, removing the white background so that there are only two layers left. Then press Ctrl+J to create two more copies of the merged image layer.
.jpg)
Step 2: Hide the visibility of the top two layers by clicking the eye icon next to the layer. Then right-click on the first merged image layer and go to Blending Options. Uncheck the G or Green Channel box, located under Advanced Blending.
.jpg)
Now unhide the visibility of the top layers and repeat the process. This time deselect the Red channel for the merged copy and both the Red and Green Channels for the merged copy 2.
.jpg)
Step 3: Now we can start moving each layer to create an impressive 3D effect on the image with the Glitch effect. Select the Move Tool (V) and then select the merged copy layer, use the left arrow key to move the layer to the left. Next, select the top layer, the merged copy 2, use the left arrow key to move the layer to the left. Now we will get the result as shown:
.jpg)
Step 4: Next we will add the appearance of screen lines to this effect. Select the top layer, “merged copy 2” and right click to go to Blending Options. Add a quick Pattern Overlay using the Horizontal Line Pattern and set the rest of the settings as follows:
.jpg)
Because this layer is blue and the Blend Mode is set to Soft Light, this will also give your image a nice blue tint.
.jpg)
Step 5: To finish off this fun glitch effect, we just need to do one last step. Add a new layer and set the Blend Mode to Dissolve. In this step, we’ll use the Brush Tool (B) to paint red #5e220a towards the bottom of the image to create small particles as part of the final digital glitch effect. Adjust the layer’s Opacity if you need to; here I lowered mine to 8%.
.jpg)
After completing all the steps, we get an image with an extremely interesting Glitch effect in Photoshop as below. The image is very unique and interesting, right?
.jpg)
Above is a summary of the steps to create extremely interesting Glitch effects in Photoshop. In fact, to create this effect we need to go through many steps. Be patient, try again many times to achieve the desired results. Hopefully, the above sharing from SaDesign can help you have impressive designs.
Sadesign Co., Ltd. provides the world's No. 1 warehouse of cheap copyrighted software with quality: Panel Retouch, Adobe Photoshop Full App, Premiere, Illustrator, CorelDraw, Chat GPT, Capcut Pro, Canva Pro, Windows Copyright Key, Office 365 , Spotify, Duolingo, Udemy, Zoom Pro...
Contact information
SADESIGN software Company Limited


