Best Selling Products
How to convert photo to painting using Photoshop
Nội dung
- 1. How to convert a photo into a pencil drawing in Photoshop
- 2. Convert photo into color painting in Photoshop
- 3. Convert photo to painting in Photoshop using Style Transfer
- 4. Frequently Asked Questions
- 4.1. Is it difficult to convert a photo to a pencil drawing using Photoshop?
- 4.2. The simplest way to convert a photo into a color painting in Photoshop?
Photos can look very “artistic” when converted into paintings. You can completely convert photos into paintings using Photoshop. Currently, this design software has many tools to help you convert photos into paintings with just a few steps. Let's refer to some simple ways to convert photos into paintings using Photoshop below.
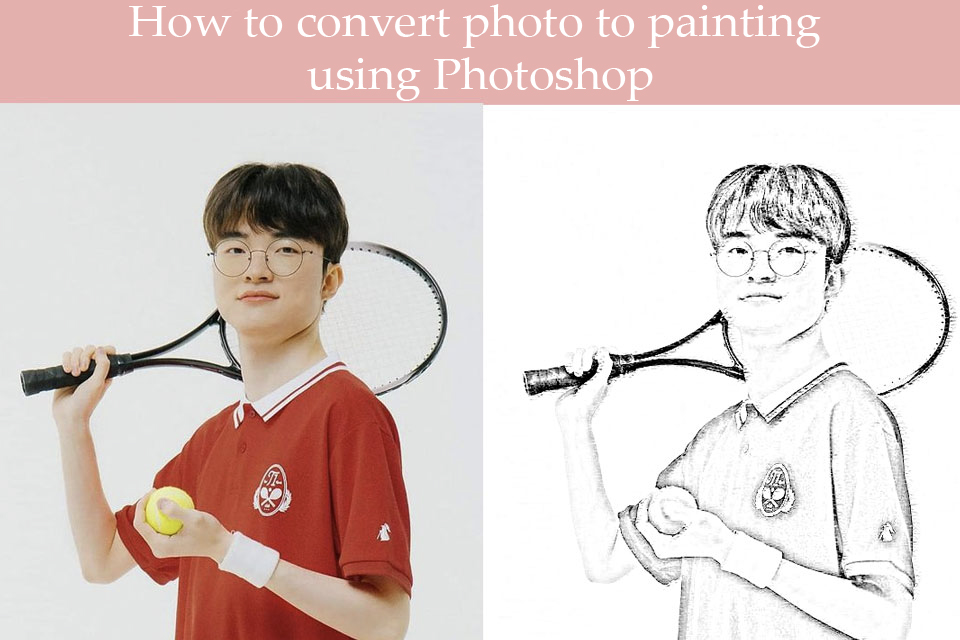
1. How to convert a photo into a pencil drawing in Photoshop
If you want to convert a photo to a black and white pencil drawing using Photoshop, you can refer to the following steps:
Step 1: Open Photoshop then upload the photo you want to convert to a painting using Photoshop. Press Ctrl+J to duplicate the Layer.
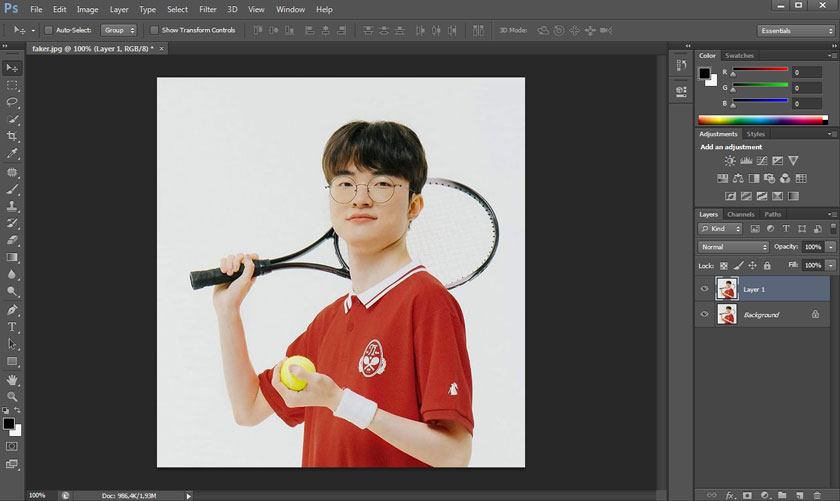
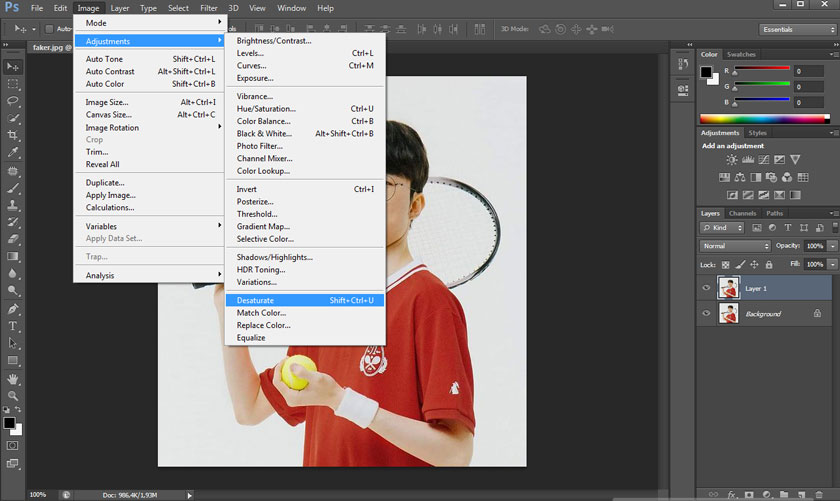
Step 2: Select the new duplicate layer, on the menu bar select Image => Adjustments => Desaturate. Or use the shortcut key Shift + Ctrl + U to remove color saturation. The photo will now turn black and white.
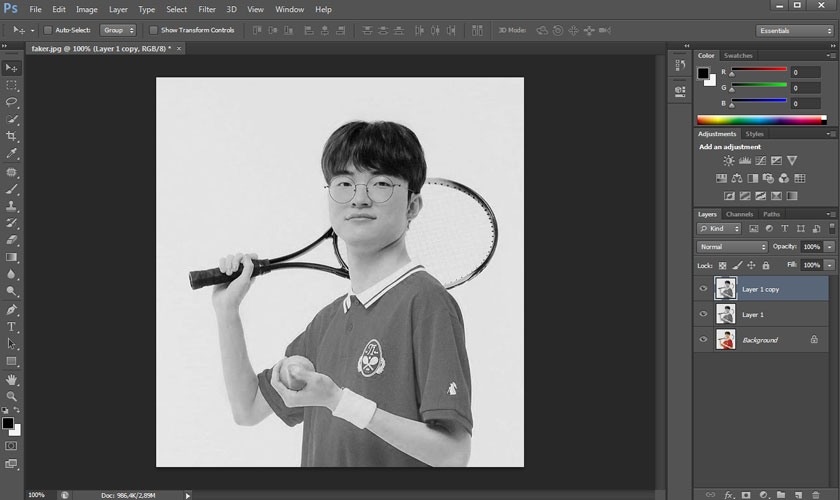
Step 3: In the new layer, press Ctrl + J to duplicate the Layer again. Now we have a total of 3 Layers.
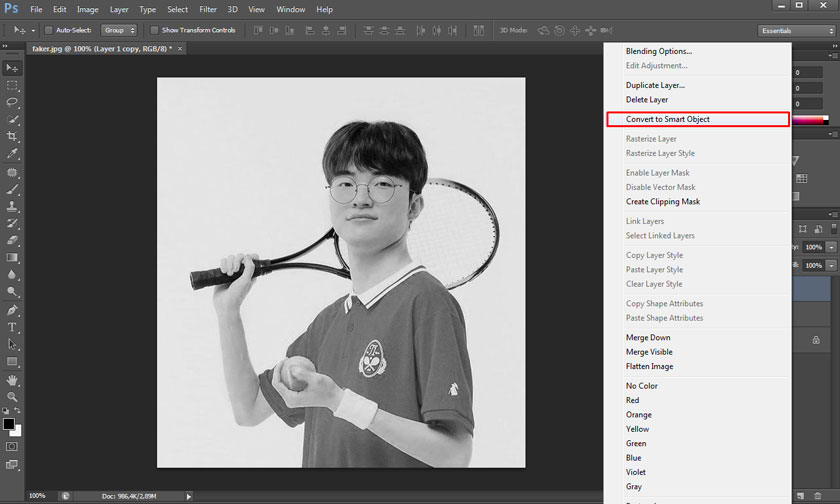
Step 4: At the 3rd layer, we right-click, then select Convert to Smart Object. This operation will be shown through the Filter located below that Layer when converting to Smart Object for editing. You can easily adjust it at any time.
Step 5: Then, in the menu bar, select Image => Adjustments => select Invert. Or select the shortcut key combination (Ctrl + I).
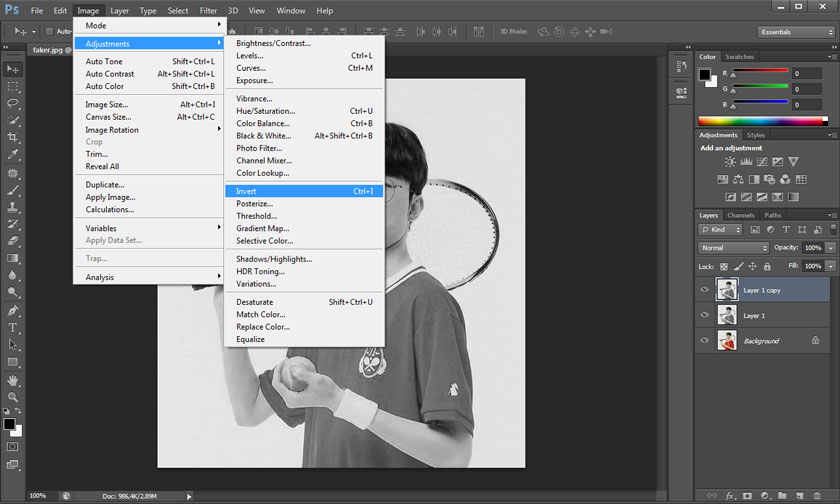
You should now see a layer that looks like a negative. To continue, click on Blending Mode. Then select Color Dodge. You should see the screen turn white.
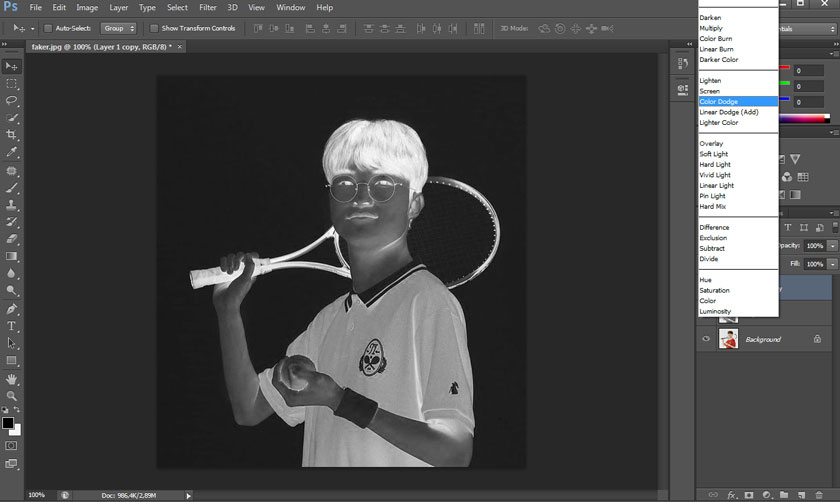
Step 6: To continue, click on Filter => Blur => select Gaussian Blur.
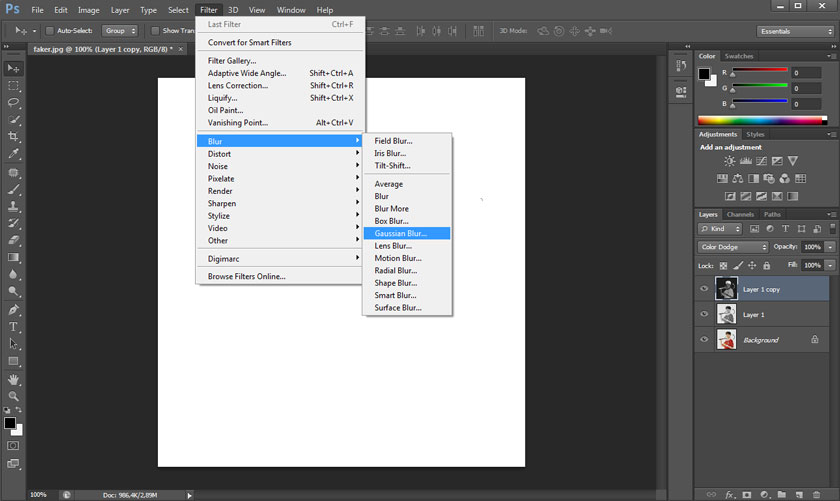
Then drag the Gaussian Blur slider to the right. You will see the image turn into a pencil drawing. The further you drag it to the right, the sharper and more detailed the pencil lines will be.
Step 7: We can't control all the details with Gaussian Blur. So, click on Adjustments => select Levels.
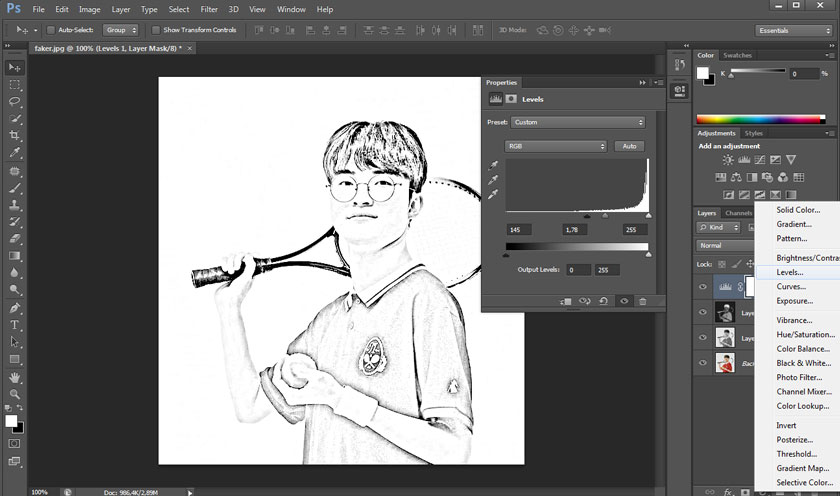
In Levels, we will see 3 points corresponding to the highlights, midtones and shadows of the image. Now, drag the midtone point to the right, to increase the stroke and contrast.
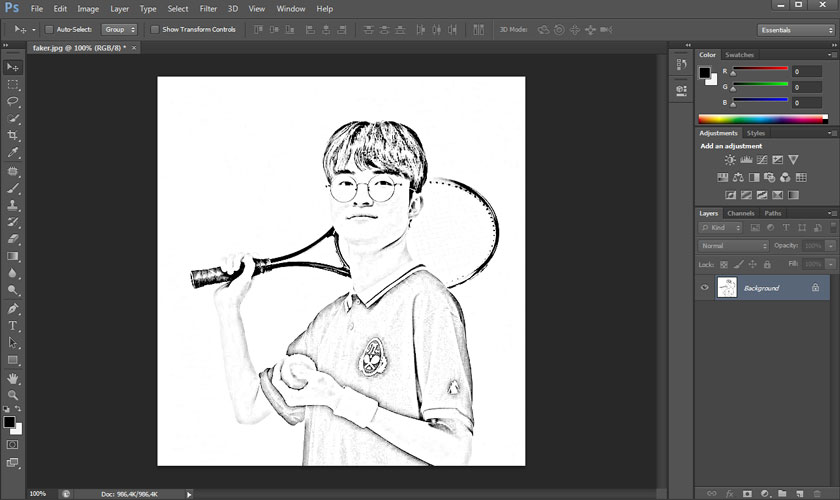
Then press the shortcut key Ctrl+Shift+E to merge all the edits on the Layer below into one layer for easier editing.
Step 8: At the merged layer, select Filter => select Filter Gallery.
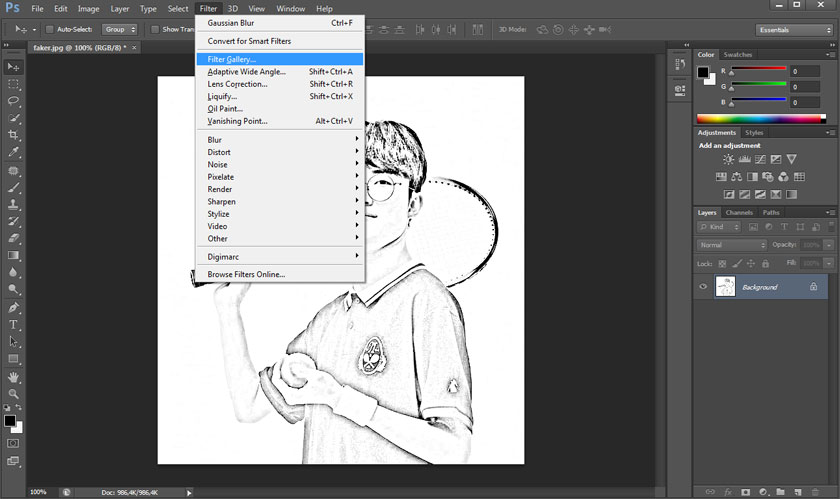
Then click on Artistic => select Rough Pastels and observe the details on the image. You will see that these details are more like pencil drawings.
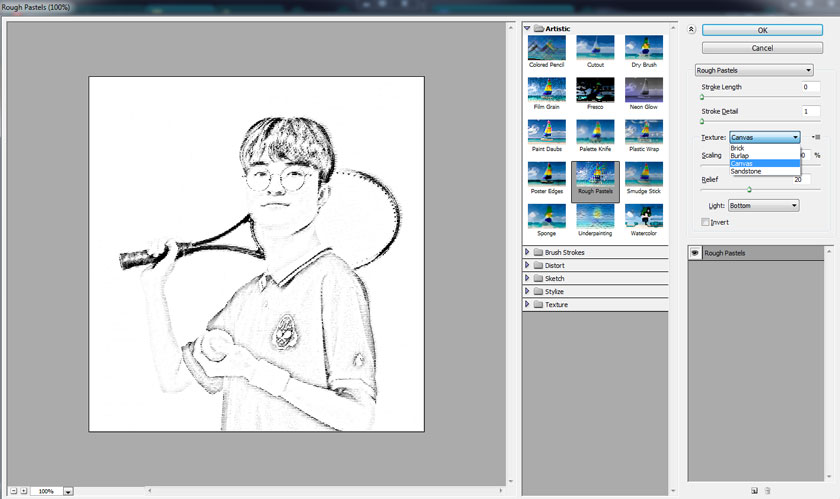
In Rough Pastels, drag the Stroke Length slider to control the length of your strokes. The further you drag to the right, the longer your strokes will be, and vice versa. Then, click Stroke Details and drag the slider to the right for more detailed strokes.
Still in Rough Pastels, click on Texture and choose the materials to bring a more realistic feeling. You should also click on Light to control the light on the strokes. You can choose the types of light on the left, right, top and bottom so that the photo looks like a painting.
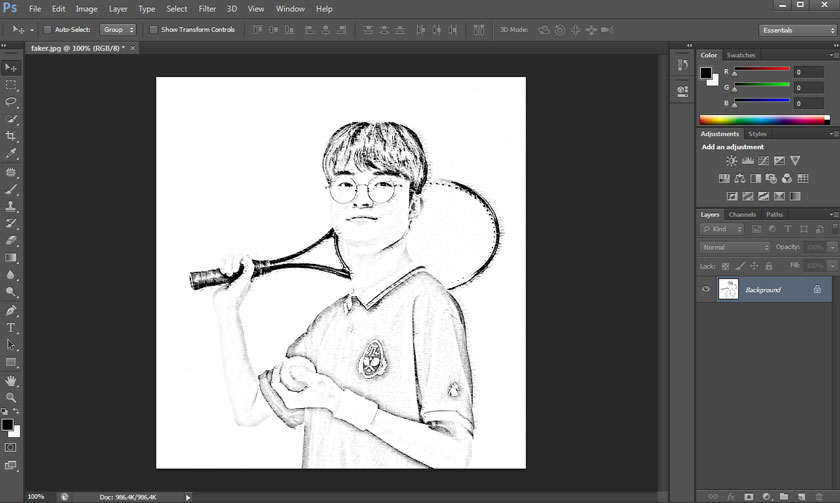
So you have converted a photo to a drawing using Photoshop very simply.
2. Convert photo into color painting in Photoshop
Besides how to convert photos to pencil drawings in Photoshop, you can also convert photos to color drawings. Let's refer to the following steps.
Step 1: Open Photoshop then upload the photo you want to convert to a painting using Photoshop.
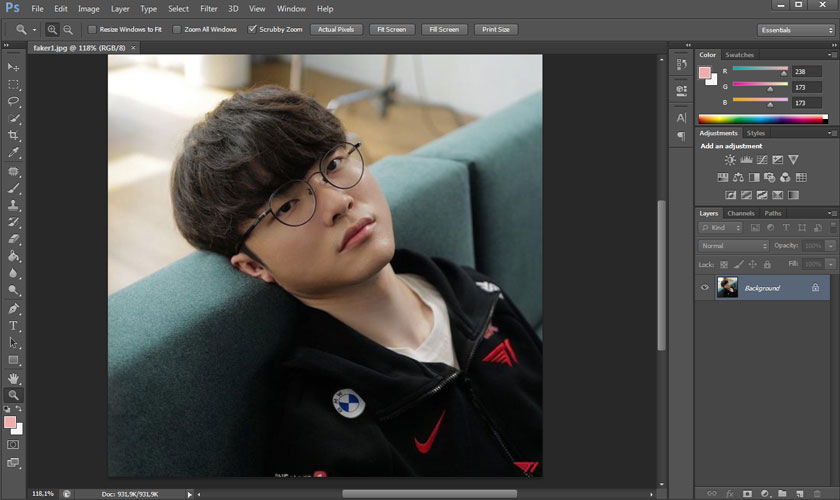
Step 2: On the menu bar, select Filter => Oil Paint. This feature converts the photo into an oil painting in the simplest way. In some cases, the Oil Paint feature will turn gray. The cause may be an incompatible graphics card. You need to buy a new card or update the driver.
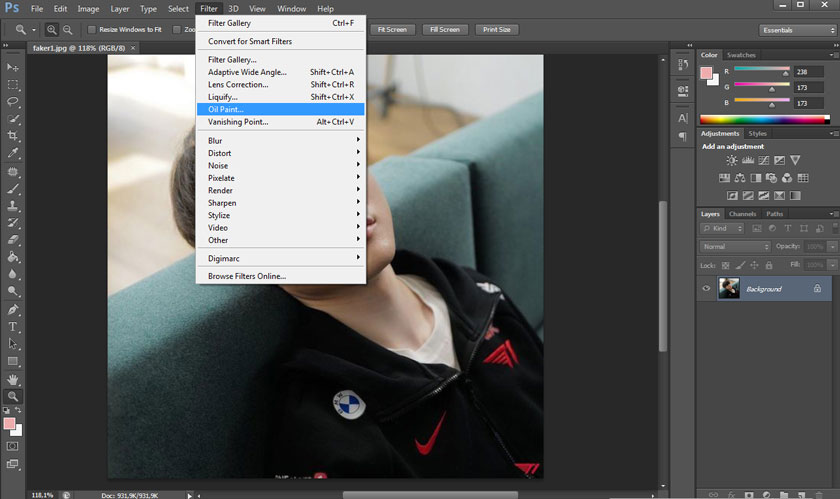
Step 3: Drag the Stylization slider, you will see the image appear with color patches like an oil painting on canvas. Next, we drag the Cleanliness slider to make the pixels fade, like an artist's brush. The more you increase Cleanliness, the more detailed and softer the strokes will be.
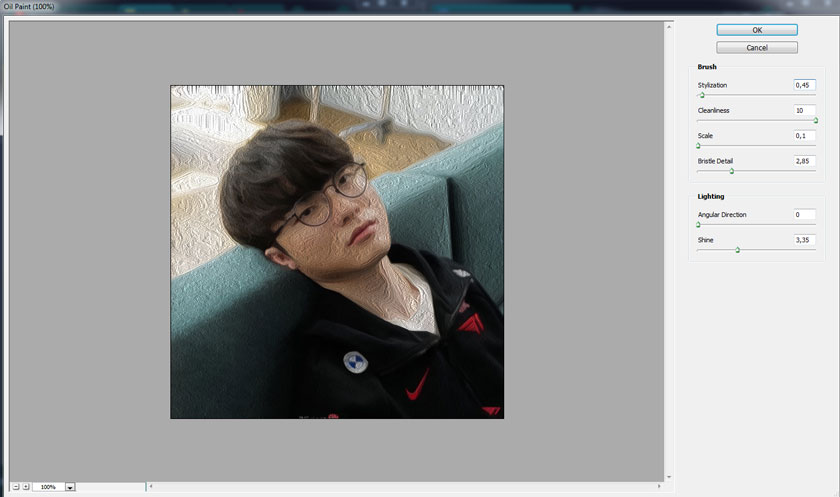
Next, drag the Scale slider to select the brush size. Finally, we select Lighting to control the lighting for the painting.
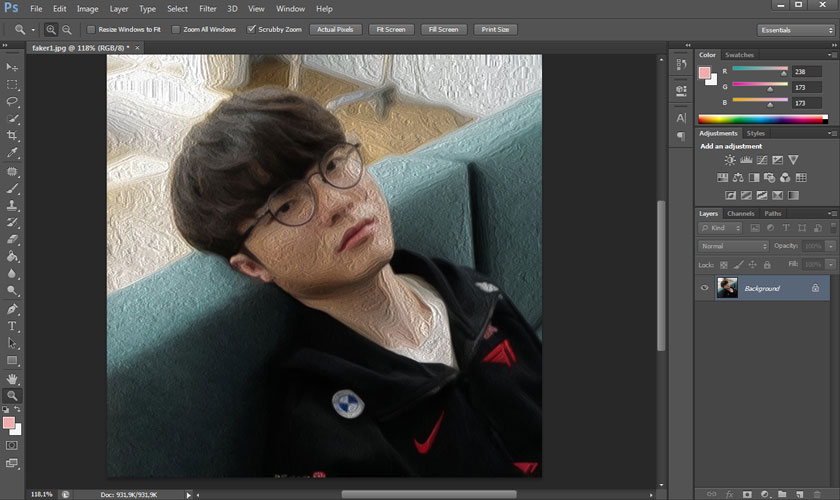
So you have successfully converted a photo to a drawing using Photoshop.
3. Convert photo to painting in Photoshop using Style Transfer
One of the simplest ways to convert photos to paintings using Photoshop is to use the Neural Filters feature. However, this feature is only available in new versions of Photoshop, so update to the latest version of Photoshop to convert photos to paintings using Photoshop as simply as possible.
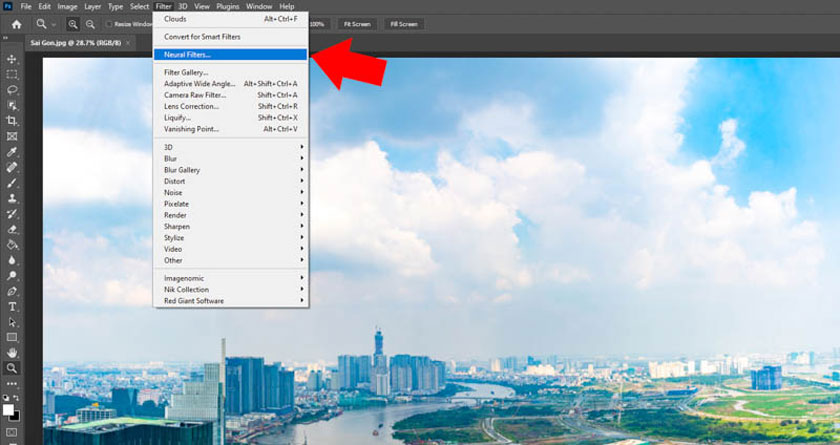
Step 1: In the new Photoshop version, open the photo you want to convert to a drawing using Photoshop, then click Filter => select Neural Filters.
Step 2: Click on Creative => select to download Style Transfer. This feature will help convert photos into paintings, in the style of famous artists with Artist Style.
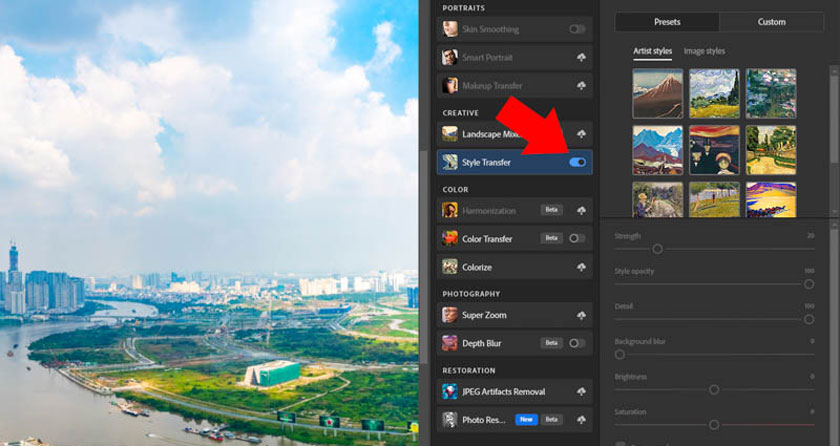
Simply select the appropriate style displayed in Artist Style. Your photo will be converted to an identical painting in that style.
Step 3: If you don't want to use Artist Style. Then click on Image Style. Here will display the image in different styles. You want to change to any style, just click on it.
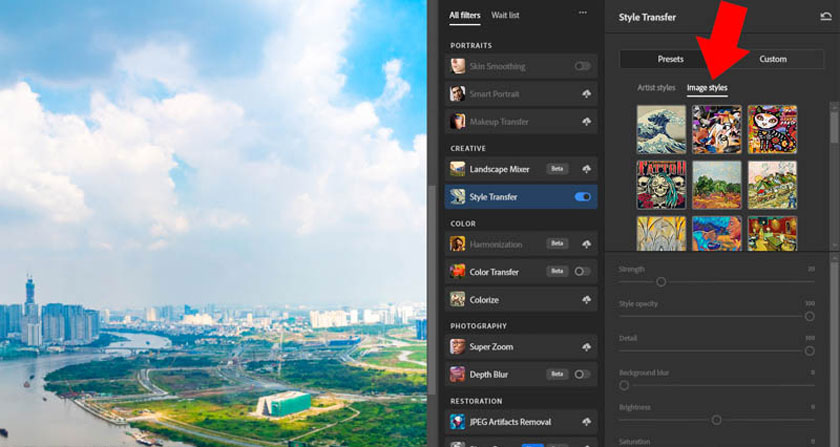
Alternatively, you can choose Custom => Select an Image to choose a sample image. You will select any picture on your computer and Photoshop will analyze and transform your photo into that style.
Step 4: Go back to Artist Style. Let's drag the Strength slider to control the impact. The further to the right, the greater the impact.
You can also drag the Style Opacity slider, to control the effects of the Artist Style. It defaults to 100%, but you can reduce it to see more of the original image.
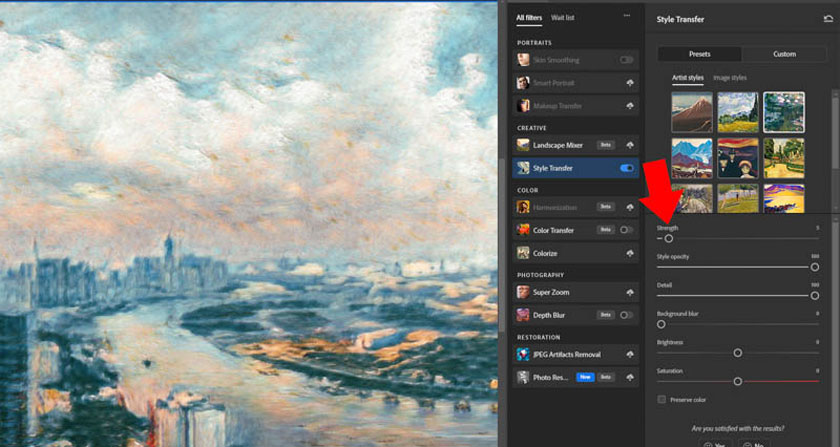
Similarly, you can adjust the Details, Brightness, Saturation sliders and observe the changes to get the most painterly photo.
If you want to keep the original color of the photo, check the Preserve Color box. This option means that you want to apply the selected style but without changing the color of the original photo.
So you have quickly converted a photo to a drawing using Photoshop using Style Transfer.
4. Frequently Asked Questions
There are many people wondering about converting photos to paintings using Photoshop, specifically as follows:
4.1. Is it difficult to convert a photo to a pencil drawing using Photoshop?
In fact, converting photos to pencil drawings using Photoshop is not difficult. As we have instructed above, you can completely convert photos to pencil drawings with just a few simple steps. This feature is available in Photoshop, you just need to follow the instructions without the support of any other Plugin.
4.2. The simplest way to convert a photo into a color painting in Photoshop?
As SaDesign shared above, there are many ways to convert photos into color paintings in Photoshop, but the simplest is to use the Style Transfer tool in Neural Filters in new versions of Photoshop. Currently, this feature is not available in old versions of Photoshop, but must be from Photoshop 2021 and above.
Above is a summary of some ways to convert photos to drawings using Photoshop. These methods are not too complicated, you can do them easily. To optimize the steps, download the latest version of Photoshop to experience the most modern tools.
---------------------------
Installation and support contact information:
🏡 SADESIGN Software Company Limited
📨 Email: phamvansa@gmail.com
🌍 Website: https://sadesign.ai


