Best Selling Products

Windows 10 & 11 Pro Key
36 USD

Upgrade genuine Capture One account
120 USD

Copyright Adobe Lightroom Account
59 USD

ChatGPT Plus Account (GPT-4)
16 USD

Genuine Adobe Illustrator account
99 USD

MidJourney Account
29 USD

Adobe Premiere Pro Account
99 USD

Plugin Retouch4me
69 USD

Adobe Photoshop Copyright - Full App
120 USD

Autodesk All App Account Copyright
120 USD

Upgrade Genuine Office 365
49 USD

Genuine Cheap Canva Pro
39 USD

Freepik Premium Account
59 USD

Capcut Pro 1 Year
39 USD

Upgrade Duolingo Super
29 USD
How to Create a Beautiful, Professional Watermark Logo on Photos in Just a Few Minutes
Nội dung
- 1. Why should you create a watermark logo on photos?
- 1.1 Benefits of adding a watermark logo to photos
- 1.2 Notes when creating a watermark logo
- 2. How to insert a logo into a photo online using Canva
- 3. How to insert a logo into a photo on a computer in Photoshop
- 4. How to merge a logo into a photo using the PicsArt app
- 5. How to merge a logo into a photo using the Lightroom app
- 6. Tips for creating a beautiful and professional watermark logo
- 7. Conclusion
In today''''s era of rapidly growing digital content, creating a watermark logo on photos has become an important step for individuals, businesses, photographers, and content creators. A watermark logo not only helps affirm your brand but also limits unauthorized copying of images when shared on social media or websites. Nowadays, you don''''t need to be a professional designer to do this.

1. Why should you create a watermark logo on photos?
A watermark logo is an image or symbol placed onto a photo with a moderate level of transparency. The purpose of a watermark logo is not to diminish the beauty of the photo, but to help viewers recognize the owner at first glance. This is a solution widely used by photographers, online shops, businesses, and KOLs. Besides the brand recognition factor, creating a watermark logo on photos also helps increase professionalism when posting images on Facebook, Instagram, TikTok, or a website. A photo with a properly placed logo creates a sense of neatness and trustworthiness, and contributes to building long-term brand image.
1.1 Benefits of adding a watermark logo to photos
Adding a logo to photos brings many practical benefits such as:
- Protecting image copyright.
- Increasing brand recognition.
- Helping customers remember the business name more easily.
- Limiting unauthorized use of images by others.
- Creating a professional look for posts.
In addition, a watermark logo also helps promote the brand naturally. When an image is widely shared, the logo also appears in more places, helping increase reach to customers without additional advertising costs.
1.2 Notes when creating a watermark logo
A beautiful watermark logo needs to be harmonious with the overall photo. You should set the opacity to around 20–50% so that the logo is easy to see but does not distract from the main content. In addition, you should prioritize using a PNG logo with a transparent background to make the insertion more professional. The commonly chosen position is the bottom right corner, the left corner, or the center, depending on the purpose of use.
.jpg)
2. How to insert a logo into a photo online using Canva
Canva is a very popular online design tool thanks to its intuitive interface and ease of use. You can completely create a watermark logo on a photo in just a few minutes without needing to install any software. Canva's strength is that it supports both computers and phones, and it also offers thousands of beautiful design templates that make editing simple even for beginners.
Upload the photo to be edited to Canva: First, log in to Canva and select "Create a design" or open the photo you want to edit directly. Then upload the photo from your computer or phone to Canva. Within seconds, the image will appear on the working interface and be ready for editing.
Upload the logo to Canva: Next, select "Upload content" and upload your logo. Canva supports many formats such as PNG, JPG, and SVG. However, a PNG logo with a transparent background will give the most beautiful and professional result when placed on a photo.
Turn the logo into a watermark: Drag the logo to the desired position on the photo. Then select the logo and reduce the "Transparency" to about 20–40%. You can also resize or rotate the logo to fit the composition of the photo.
Export the photo: Once finished, select "Share" → "Download." Canva allows you to export high-quality images in PNG or JPG format while keeping the watermark you just created.
.png)
3. How to insert a logo into a photo on a computer in Photoshop
Photoshop is a professional photo editing software widely used in the design field. If you need to create a watermark logo on a photo with high quality or process a large batch of images, this is a very worthwhile option to consider. Although the interface is somewhat more complex than Canva, Photoshop offers nearly unlimited customization capability.
Open the photo and add the logo: Launch Photoshop and open the photo you want to edit. Next, drag the PNG logo file directly into the working window or select "File" → "Place Embedded" to add the logo.
Adjust position and size: Use the "Move Tool" to move the logo to the appropriate position. You can press Ctrl + T to resize the logo so it is proportionate to the overall photo without reducing quality.
Reduce Opacity to create a watermark: In the Layers panel, select the logo layer. Reduce the "Opacity" setting to about 15–40% to create a natural watermark effect. This is an important step to help the logo not obscure the photo's content.
Save the photo: Once finished, select "File" → "Export" → "Export As." Save the image in JPG or PNG format at high quality for use on a website or social media.
.jpg)
4. How to merge a logo into a photo using the PicsArt app
PicsArt is a well-known photo editing app on Android and iPhone. With a user-friendly interface, users can create a watermark logo on a photo right on their phone without needing to use a computer. The app also supports many filters, effects, and editing tools that help make images more eye-catching before sharing.
Add the photo and logo: Open PicsArt and select the "+" icon to create a new project. Select the photo you want to edit, then go to "Add Photo" to add a PNG logo from your phone's library.
Adjust the logo: Move the logo to the desired position. You can enlarge, shrink, rotate the logo, or change its tilt angle to fit the composition of the photo.
Reduce the opacity: Select the "Opacity" icon and drag the slider down to about 30%. This is a suitable level for turning the logo into a watermark while still ensuring aesthetic quality.
Save the photo: Once finished, tap "Save." PicsArt allows you to save images in high resolution and share directly to Facebook, Instagram, or TikTok.
.jpg)
5. How to merge a logo into a photo using the Lightroom app
Lightroom is not only famous for its color-editing capabilities but also effectively supports inserting watermarks. This is a familiar choice for many photographers and content creators. If you frequently edit photos before posting, you can combine color correction and creating a watermark logo on the photo in the same workflow.
Edit the photo before adding the logo: Open Lightroom and import the photo you want to process. Adjust the brightness, color, and contrast to achieve the best quality photo before adding the watermark.
Add the logo: For Lightroom Mobile, you can use the share feature with a watermark if you have already set one up. On Lightroom Classic, go to the "Export" section and enable the "Watermark" option to insert your logo or brand signature.
Set up the watermark: Select the PNG logo and adjust settings such as size, transparency, distance from the photo's edge, and display position. This way, the watermark will be consistent across the entire batch of photos you export.
Export the photo: Once set up, select "Export." Lightroom will automatically insert the watermark into all exported photos, saving a great deal of time when processing large quantities.
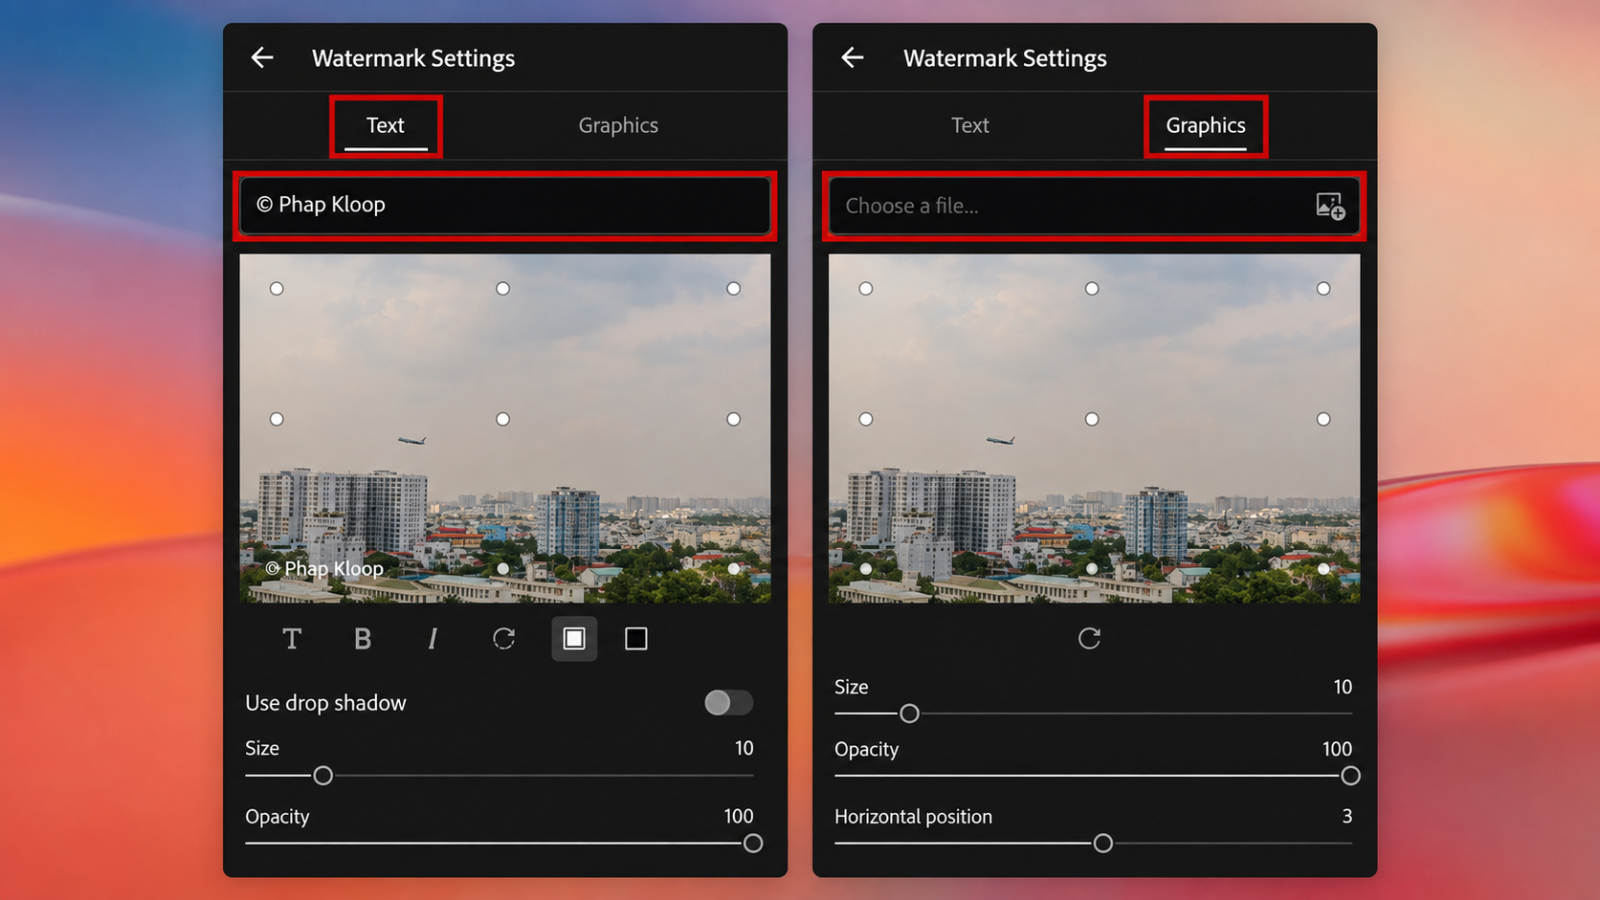
6. Tips for creating a beautiful and professional watermark logo
To create a watermark logo on photos that is both beautiful and effective for brand recognition, you shouldn't simply place a logo on a photo and save it. A professional watermark needs to be positioned correctly, sized proportionately, and set to an appropriate transparency level so as not to affect the quality of the image. In addition, choosing the logo format, color, and layout also plays an important role in creating a harmonious overall look. Below are some tips to help you create a watermark logo that is beautiful, refined, and increases copyright protection for every photo.
Prioritize using a PNG logo with a transparent background: The PNG format helps the logo display sharply, without a white background surrounding it, and blends easily with any type of image.
Adjust the transparency to 20–35%: This is the ideal opacity level for the logo to remain easily recognizable without obscuring the main content of the photo.
Place the logo in an appropriate position: You can place the logo in the bottom right corner, bottom left corner, or top right corner to ensure both aesthetics and avoid affecting the subject. For images that need higher copyright protection, the logo can be placed in the center with greater opacity.
Don't make the logo too large or too small: A logo that is too large will make the photo unbalanced, while a logo that is too small will be hard to recognize and won't achieve effective brand building.
Choose a logo color that contrasts with the photo's background: If the photo has a dark background, use a light-colored logo, and vice versa, so the watermark always stays clear while remaining harmonious with the overall image.
Keep the logo's position consistent across all images: Placing the logo in the same position on every photo creates a professional look and helps customers easily remember and recognize your brand.
Use a high-quality logo: A logo with high resolution will always remain sharp when exported at various sizes, avoiding pixelation or blurriness when shared on websites and social media.
Double-check before exporting the photo: Preview the overall result to make sure the logo doesn't cover important details, doesn't create visual clutter, and still preserves the natural beauty of the photo.
7. Conclusion
Creating a watermark logo on photos is no longer as complicated a task as before. With just a few minutes and the help of Canva, Photoshop, PicsArt, or Lightroom, you can protect image copyright, enhance professionalism, and build your brand identity across every platform. Choose the tool that fits your needs, prepare a high-quality PNG logo in advance, and apply the tips shared in this article. A properly designed watermark not only makes images more beautiful but also helps promote your brand effectively every time the photo is shared on the internet.





















VIP Products








Best Selling Products
Windows 10 & 11 Pro Key
36 USD
Upgrade genuine Capture One account
120 USD
Copyright Adobe Lightroom Account
59 USD
ChatGPT Plus Account (GPT-4)
16 USD
Genuine Adobe Illustrator account
99 USD
MidJourney Account
29 USD
Adobe Premiere Pro Account
99 USD
Plugin Retouch4me
69 USD
Adobe Photoshop Copyright - Full App
120 USD
Autodesk All App Account Copyright
120 USD
Upgrade Genuine Office 365
49 USD
Genuine Cheap Canva Pro
39 USD
Freepik Premium Account
59 USD
Capcut Pro 1 Year
39 USD
Upgrade Duolingo Super
29 USD