Best Selling Products

Copyright Adobe Lightroom Account
59 USD

Genuine Adobe Illustrator account
99 USD

MidJourney Account
29 USD

Adobe Premiere Pro Account
99 USD

Adobe Photoshop Copyright - Full App
120 USD

ChatGPT Plus Account (GPT-4)
16 USD

Upgrade Duolingo Super
29 USD

Genuine Cheap Canva Pro
39 USD

Autodesk All App Account Copyright
120 USD

Upgrade genuine Capture One account
120 USD

Upgrade Genuine Office 365
49 USD

Windows 10 & 11 Pro Key
36 USD

Freepik Premium Account
59 USD

Capcut Pro 1 Year
39 USD

Plugin Retouch4me
69 USD
How to Use 5 Very Useful Video Time-lapse Software for Beginners
Nội dung
Learn how to use 5 video fast-forward software. Detailed instructions for beginners with the most basic steps.
Fast forwarding is a popular technique in video editing, which helps to speed up or change the playback speed of video clips. For beginners, getting familiar with professional video editing software can be a challenge. However, with application software, you can easily perform fast forwarding operations effectively. In this article, Sadesign will provide detailed instructions on how to use software to fast forward videos, helping you improve your video editing skills and create content smoothly.
1. Introduction to fast-forwarding videos and its benefits
In the field of video editing, time-lapse (also known as time-lapse) is an important technique that helps filmmakers or video creators shorten the display time of a long video, bringing a powerful effect in showing change or a process that takes place over time. This technique is very useful in video genres such as documentaries, commercials, or vlogs.
.jpg)
With the rapid development of professional video editing tools such as DaVinci Resolve, using video fast-forward software has become easier and more effective than ever. DaVinci Resolve is not only a powerful video editing software but also a tool that helps you create beautiful fast-forward videos, suitable for many different purposes.
2. How to Use 5 Video Fast Forward Software for Beginners
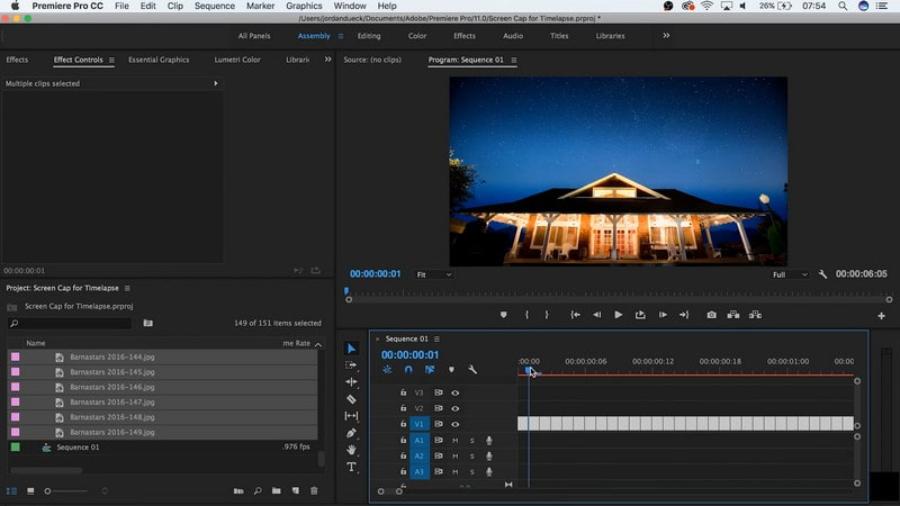
2.1. Adobe Premiere Pro
Adobe Premiere Pro is one of the professional video editing software widely used by editors and filmmakers. With the fast-forward video feature, Adobe Premiere Pro provides a flexible working environment, helping you quickly change the playback speed of the video without losing image quality.
Create and edit a project in Adobe Premiere Pro
To get started with the time-lapse feature in Adobe Premiere Pro, you’ll need to create a new project and import the video you want to edit. Once you have the video in your project, the first thing you need to do is select the portion of the video you want to fast-forward. You can easily do this by dragging the video into the timeline and selecting the portion you want to edit.
.jpg)
Using the Speed/Duration feature in Premiere Pro
One of the simplest and most effective ways to fast forward a video is to use Adobe Premiere Pro's Speed/Duration feature. To do this, all you need to do is:
Select a video clip: On the timeline, select the video clip whose speed you want to change.
Open the Speed/Duration dialog box: Right-click on the video and select "Speed/Duration".
Adjust speed: In the dialog box that appears, you'll see a slider to change the speed of the video. Speeding it up will make the video fast-forward, while slowing it down will create a slow-motion effect.
Confirm changes: After adjusting the speed, simply press OK to finish.
How to Use Time Interpolation in Premiere Pro
If you want to create a smoother fast-forward effect, you can use Time Interpolation. This is a feature that improves the quality of the video when changing the playback speed, especially when you speed up the video a lot. To use Time Interpolation, follow these steps:
Select a video clip in the timeline.
Go to "Speed/Duration" and select "Time Interpolation".
Select "Optical Flow" mode for a smoother fast-forward effect.
Benefits of using Adobe Premiere Pro to fast forward videos
High Quality: Adobe Premiere Pro allows you to change the speed of your video without losing image quality.
Flexible adjustment: You can easily change the speed of the video as you like, from gentle fast forward to extremely fast speed.
Powerful features: Advanced features like Time Interpolation help create smooth, time-lapse videos that easily captivate viewers.
2.2. Final Cut Pro
Final Cut Pro is Apple's professional video editing software, loved by many editors and filmmakers for its intuitive interface and powerful features. Final Cut Pro also offers fast-forward video capabilities, allowing you to create videos with flexible speed changes.
Create and edit projects in Final Cut Pro
Before you can start fast-forwarding video in Final Cut Pro, you'll need to create a new project and import your video into the software. Once you've imported your video into your timeline, you can start editing by selecting the section of video you want to fast-forward.
.jpg)
Using the Retime feature in Final Cut Pro
One of the easiest features to use in Final Cut Pro is Retime. To use this feature, follow these steps:
Select a video clip: Drag the video into the timeline and select the clip you want to edit.
Select the Retime tool: Click the "Modify" menu and select "Retime" or use the keyboard shortcut Command + R.
Speed Up: When the Retime tool is active, you'll see a slider over the video. Drag the slider to the right to speed up the video. Final Cut Pro will automatically adjust the video to create a fast-forward effect.
Speed Tweak: You can fine-tune the speed by changing the keyframe points in the timeline for smoother speed changes.
How to Use the "Speed Ramping" Feature in Final Cut Pro
Speed Ramping is a great technique for creating dynamic time-lapse effects in Final Cut Pro. To apply Speed Ramping:
Select the video clip in the timeline and choose "Retime" from the menu.
Add keyframe points: Right click on the video and select "Add Speed Point" to create speed control points in the video.
Adjust speed: Once you've added keyframe points, you can drag them to adjust the speed of your video, creating a smooth and impressive fast-forward effect.
Benefits of using Final Cut Pro to fast forward videos
Easy to use interface: Final Cut Pro has a very intuitive user interface, making it easy for beginners to get acquainted and operate.
Powerful Features: Retime and Speed Ramping features allow you to adjust video speed easily and flexibly.
Fast processing speed: Final Cut Pro optimizes performance, helping you work with high-resolution videos without experiencing lag.
2.3. Proshow Producer
Proshow Producer is a popular, professional and easy-to-use video editing software for beginners in the field of video editing. It provides a variety of useful tools for creating time-lapse videos, helping you easily optimize time and create impressive video products.
Outstanding features of Proshow Producer
Simple Video Fast Forward
Proshow Producer allows you to fast forward your video in just a few simple steps. You can easily edit the video speed to create a fast forward effect without losing image quality. This is especially useful when you want to reduce the time of a long video without losing its appeal.
Easy-to-use interface
For beginners, Proshow Producer's interface is extremely friendly and accessible. With clear toolbars and intuitive menus, you can quickly get acquainted and start editing videos right away.
Supports multiple video formats
This software supports various video formats, making it easy to fast forward videos from various sources without any compatibility issues.
Instructions for using Proshow Producer to fast forward videos
To get started, you need to open Proshow Producer and load the video you want to edit. Then, follow these steps:
Step 1 : Select the video you want to fast forward.
Step 2 : Use the "Speed" tool in the "Effect" section to adjust the video speed. You can drag the slider to increase the video playback speed many times compared to the original speed.
Step 3 : Preview the video to make sure the fast forward effect is as required.
Step 4 : Save the edited video and export it in high quality.
Thanks to this ease of use, Proshow Producer becomes an ideal tool for those looking for a simple yet effective video fast-forward software.
2.4. Camtasia Studio
Camtasia Studio is another professional video editing software that is widely used not only by filmmakers but also by beginners. Camtasia Studio is especially powerful in helping users create attractive videos with fast-forward effects easily, and its interface is also very intuitive.
.jpg)
Outstanding features of Camtasia Studio
Easy-to-use Fast Forward Tool
Camtasia Studio provides a powerful video fast forward tool that helps you edit video speed precisely. You can speed up or slow down the video according to your needs. This helps you create special effects for your video without affecting the image quality.
Edit Video and Audio Simultaneously
Camtasia not only supports fast-forwarding video, but also offers simultaneous audio editing. You can synchronize audio with video to ensure that the fast-forward video remains coherent and engaging.
Rich Resource Library
Camtasia Studio provides users with a rich resource library, including video templates, transition effects, sounds and background music. You can easily add fast-forward effects to your videos and create professional videos from scratch.
How to use Camtasia Studio to fast forward video
To use Camtasia Studio to fast forward videos, follow these steps:
Step 1 : Open Camtasia Studio and load the video you want to edit.
Step 2 : Drag the video into the timeline and select the video to edit.
Step 3 : Use the "Speed" tool in the menu to adjust the video speed. You can choose to increase the speed many times or decrease the speed depending on your purpose.
Step 4 : Preview the video to check the fast forward effect.
Step 5 : Save and export the video after editing is complete.
Camtasia Studio is also ideal for beginners thanks to its powerful video editing tools and easy-to-use interface.
2.5. DaVinci Resolve - High-end video editing software
DaVinci Resolve is a powerful, professional video editing software, widely used in the film and television industry. It provides a full range of tools needed for video editing, from color correction, cutting to special effects. In particular, DaVinci Resolve also supports creating time-lapse videos easily and quickly.
DaVinci Resolve Highlights
DaVinci Resolve offers a wide range of outstanding features that enable users to create professional, high-quality videos. One of the notable features of this software is the ability to create and edit time-lapse videos. Here are some of the important features of DaVinci Resolve:
In-depth color correction : DaVinci Resolve features an extremely powerful color correction system. You can easily adjust parameters such as brightness, contrast, saturation, etc., helping to create unique time-lapse effects.
Create special effects : This software supports a wide range of special effects, allowing you to highlight elements in the video, thereby creating eye-catching time-lapse footage.
Easy-to-use user interface : Despite being a professional software, DaVinci Resolve still has an intuitive and easy-to-use user interface. You will quickly become familiar with the software's editing tools.
Multi-platform support : DaVinci Resolve can run on Windows, macOS, and Linux operating systems, allowing you to work easily on a variety of devices.
Powerful audio editing tools : In addition to video, DaVinci Resolve also offers audio editing tools, helping you create complete videos with the right sound.
DaVinci Resolve and Fast Forwarding Video
Fast forwarding video is more than just changing the speed of your video. With DaVinci Resolve, you can do so much more, from smooth speed edits to using time-lapse effects to create dramatic footage.
.jpg)
How to use DaVinci Resolve to fast forward video
To help you get started with using DaVinci Resolve for time-lapse effects, here are the detailed steps.
Step 1: Download and install DaVinci Resolve
First of all, you need to download DaVinci Resolve software from the official Blackmagic Design website. DaVinci Resolve has both a free and a paid version. The free version has all the basic features and can meet the video editing needs of beginners.
Step 2: Create a new project and import videos
Once you have installed the software, open DaVinci Resolve and create a new project. Next, you will need to import the video you want to edit into the software’s library. To do this, simply drag and drop the video into DaVinci Resolve’s media management area.
Step 3: Add video to timeline
Once the video has been imported into DaVinci Resolve, you simply drag the video from the library into the timeline to start editing. The timeline is where you can perform all of your editing operations such as trimming, splicing, speed adjustments, etc.
Step 4: Change the video speed to create a fast-forward effect
To create a fast forward effect, you need to change the playback speed of the video. To do this, follow these steps:
Select the video segment in the timeline that you want to fast forward.
Right click and select "Change Clip Speed".
In the new window, adjust the video speed ratio (Speed) as desired. For example, if you want the video to run twice as fast, simply change the ratio to 200%.
You can also experiment with other options like "Reverse" or "Freeze Frame" to create interesting timelapse effects.
Step 5: Check and adjust the video
After changing the video speed, you can preview the video to check the fast-forward effect. If necessary, you can adjust the speed or other effects accordingly.
Step 6: Export video
Once you're done editing, export your video by selecting "Deliver" in the bottom corner of the DaVinci Resolve interface. You can choose the video format and quality that suits your needs.
Notes when using DaVinci Resolve to fast forward video
Video Speed : When creating a time-lapse video, the playback speed of the video is the most important factor. You need to make sure that the video speed is changed smoothly so that the image quality is not lost.
Color Effects : DaVinci Resolve allows you to edit colors to highlight important parts of your video. This adds an aesthetic to your time-lapse videos.
Video Quality : Make sure that the exported video is of good quality. Exporting the video in high resolution will help you get a quality final product.
3. Conclusion
With the detailed instructions above, hopefully you have a clearer view of how to use video editing software and use these tools to create your own unique videos. At the same time, learn how to buy genuine copyrighted software at super preferential prices at Sadesign to have the best experience!


VIP Products


Best Selling Products
Copyright Adobe Lightroom Account
59 USD
Genuine Adobe Illustrator account
99 USD
MidJourney Account
29 USD
Adobe Premiere Pro Account
99 USD
Adobe Photoshop Copyright - Full App
120 USD
ChatGPT Plus Account (GPT-4)
16 USD
Upgrade Duolingo Super
29 USD
Genuine Cheap Canva Pro
39 USD
Autodesk All App Account Copyright
120 USD
Upgrade genuine Capture One account
120 USD
Upgrade Genuine Office 365
49 USD
Windows 10 & 11 Pro Key
36 USD
Freepik Premium Account
59 USD
Capcut Pro 1 Year
39 USD
Plugin Retouch4me
69 USD