Best Selling Products
How to improve memory performance in Photoshop CC, CS6
Nội dung

To use Photoshop more smoothly, making settings to improve memory performance is considered as an optimal option. Here are some ways to improve memory performance in Photoshop:
 improve memory performance in Photoshop
- Optimize your computer's hardware.
- Customize performance options in Photoshop image editing software.
Hardware
The faster you are using and the more random access memory (RAM) you have installed on your computer, the faster and smoother Photoshop is sure to run.
If upgrading your computer is not your option, you can find out how you can help Photoshop run more efficiently through software settings.
Operating Performance Options
When updating Photoshop software to a new version or your computer, adjusting the Photoshop Performance Options should be your top priority. Here are two important settings that you should consider adjusting:
Use of memory effectively
Photoshop really likes RAM and will use the most spare memory for the installation. The 32-bit versions of Photoshop on both Windows and Mac have certain limits on how much RAM the system will allow the program to use (between 1.7 and 3.2 GB depending on the OS version. and PS). Conversely, the 64-bit version will take up as much RAM as possible. Use of memory effectively
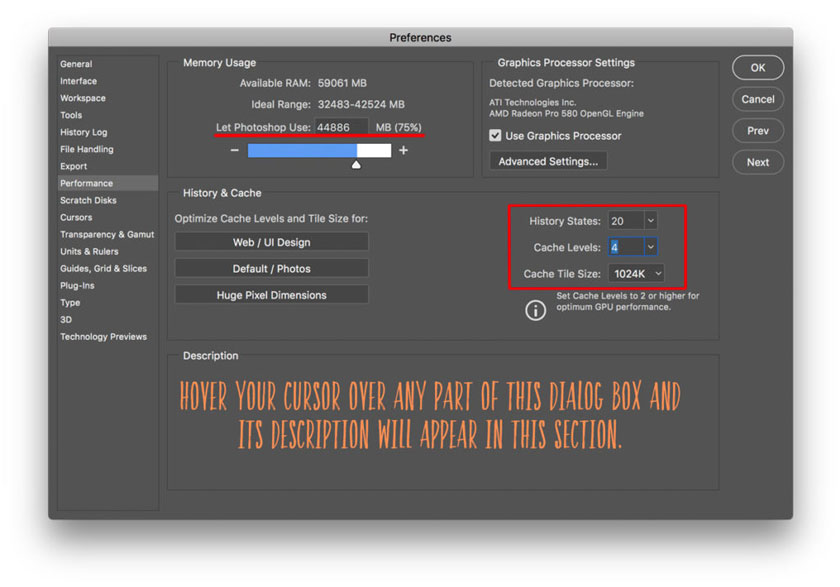
The best way to control it is that you optimize Memory Usage settings through Edit => Preferences => Performance on Windows and Photoshop => Preferences => Performance on Apple computers.
Recommended settings for efficient memory usage
- PC - 50-55% of all available RAM
- Mac - 70-75% of all available RAM
Be careful to keep the number of History states as low as possible (20 is the default step). You should not completely destroy all past and reversible modifications, so you do not need to rely on historical states.
Keep the Cache Levels at the default 6. Increase the Cache Level to speed up the rendering, especially effective when working with "heavy" high-resolution images. Alternatively, try working in the default state and only increase the amount as needed.
Use the Purge command as needed: Edit => Purge => (option). It will get rid of excess image data eating up your RAM. Remember that clearing History will delete all your current history status, and you won't be able to undo your newest actions.
Photoshop CC does not increase memory usage compared to Photoshop CS6. Its memory behavior is similar to Photoshop CS6 (and CS5, CS4, ...). If Photoshop takes more than 20 seconds to load, your system has an error. Normal launch times are under 7 seconds and with SSDs is under 2 seconds.
If the memory usage is set higher, your computer's Operating System (OS) will start to compete with Photoshop for the rest of the RAM. As a result, it will slow down the entire computer – It is not good. Photoshop works, but your computer may freeze.
Once your Storage usage limit is set, check the efficiency status in the Dashboard Efficiency reading section or in the bottom left corner of any of your open PSD files.
If the value is below 100%, it indicates that if you allocate more RAM to Photoshop, the operations will perform faster. You can close other applications running in the background as well as images which you are inactive for increasing efficiency.
Photoshop allocates memory up to the limit you set in memory usage preferences, then uses that memory again. It will not free up memory until you exit Photoshop.
If you are having any issues with your Photoshop CC performance, it is possible that the problem is caused by external factors such as broken fonts, third-party plugins or extensions. Try cleaning or reinstalling your plugins, extensions and fonts, some of them can significantly slow down your PS.
The purge command for Mac users
Mac OS X users is quite good at memory management, but it's not perfect. Sometimes RAM can be kept in an unnecessarily "inactive" state even though the content is no longer in use. If you need to free up some RAM to speed up your computer's performance, you can force Mac OS X to clear the inactive memory.
Launch Terminal, once you have found it in Applications / Utilities and enter the delete command. With a Mac, it takes a minute or two to finish the Clear History and Undo process, making more RAM available immediately. However, those unused history states are automatically transferred from RAM to scratch as you work. So, deleting History and Undo is only useful in a limited number of cases.
Used hard drive space
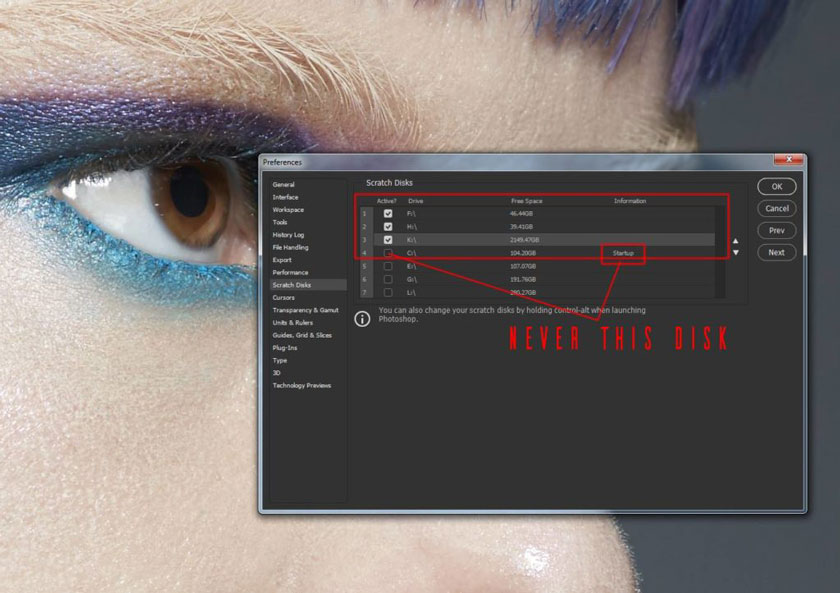
The hard drive space on your computer is used by Photoshop as a temporary "swap" space or virtual memory. When your system does not have enough RAM to perform an operation, this "virtual memory" is accessed. The Photoshop installation disc is your internal hard drive or any external hard drive that is plugged in. The installation disc acts as extra memory resource.
There is a lot of free space on Scratch Disks for Photoshop to use, but accessing information in RAM is still much faster than accessing information on Scratch Disk. Hence, Photoshop is fastest as it can handle all or most of the image information in RAM.
Customizations that enhance memory performance in Photoshop
To go one step further in achieving maximum efficiency in Photoshop, you need to know that it is dependent on the configuration of the disk to avoid performance bottlenecks.
 Customizations that enhance memory performance
As for the RAM on the computer, the more capacity is better, but in addition, if you should combine it with a high-speed SSD to improve the working ability of the whole system.
- A dedicated drive that PS is installed, separate from C: or the drive on which the operating system boots, 256 gig should be sufficient. Lightroom, Capture One ect are installed on this drive.
- A working drive where you save and open your PS documents while you're working on them, 128 gig should be sufficient.
- A dedicated scratch disk is absolutely kept clean, 64 gig is enough. This will be the main installation disc, if a large number of documents are opened at the same time, about 128 or 256 gig in size would be suitable.
- Storage drive to store completed jobs, in which using a standard HDD is good enough. If possible, the SSD is still the best.
Above is sharing about how to improve memory performance in Photoshop, SaDesign Retouching hopes to help you grasp useful information. If you see a good article and want to share it with everyone around, don't forget to click the Like and Share buttons.
See more How to treat with fluff in Photoshop


