Best Selling Products
Separate hair in Photoshop with SaDesign
Nội dung
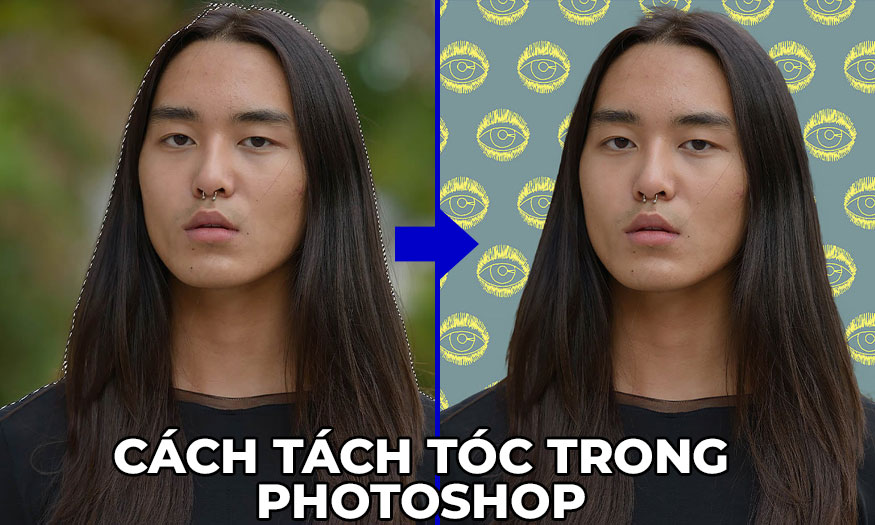
You have beautiful photos but the background is too bad so you want to change to another background. However, separating hair from the background in the most natural way has never been simple. If you are also having difficulty in this step, let's learn how to separate hair in Photoshop with SaDesign right after this.

1. How to separate hair in Photoshop
Depending on the complexity of each hairstyle, we will have different ways to separate hair in Photoshop. First, we will try a character with long, straight hair, not too complicated.
Step 1: Open the photo you want to extract hair from in Photoshop. Then use Select Subject to create a rough selection of the subject’s hair. This will give us a quick selection of the subject’s hair.
(1).jpg)
Step 2: Next, select the add layer mask icon at the bottom of the layers panel to add a Layer Mask to the subject. Now, the mask will take the shape of the selection.
(1).jpg)
Step 3: With the layer mask active, go to Select and Mask. You can also find Select and Mask in the Options bar above for the auto-selection tools or in the Properties panel when the mask is active.
(1).jpg)
Step 4: When in the Select and Mask panel, first select the Refine Hair button in the toolbar above. This button will automatically refine the hair.
(1).jpg)
Step 5: Now select the Refine Edge brush and set the settings.
First, in Edge Detection, enable Smart Radius. Next, I want to set the Radius to 2 px for straight hair.
You may also need to change the View Mode to see your selection better. The Overlay, Black, and White Background options work well for a variety of themes, so use whichever option makes it easier for you to see.
(1).jpg)
Step 6: With the settings perfected, we can drag the Refine Edge brush across the straight edge of the subject's hair. This will pick up any stray hairs that have fallen outside.
If you find too much hair is selected and covered, you can hold Alt to clear the mask and bring the hair areas back. You can change the size of the Refine Edge brush with the [ and ] keys.
(1).jpg)
Step 7: You can use Global Refinements to adjust the selection if you want straight, smooth hair without flyaway strands.
For the straight hair, I set the settings to: Smooth 100, Contrast 20%, and Edge Shift -20. This will smooth the hair and bring the edges of the selection inward to remove any straight hairs while keeping the edges more natural.
(1).jpg)
Step 8: Next, we can check the Decontaminant Color box, set it to between 70% and 100%, to remove any remaining color from the background of the image. This step is optional.
If you choose to use Decontaminate Color, a new copy of the layer and mask will be created. This is because this is a destructive setting that permanently changes the pixels of your image. So be careful and make sure it is set to Create Copy.
(1).jpg)
So you have completed the process of separating hair in Photoshop with a simple, straight hairstyle. Now you can freely combine beautiful backgrounds with subjects with extremely natural hair.
2. How to separate short hair in Photoshop
Short hair often has more complicated “jagged” points than long straight hair. Separating hair in Photoshop will therefore be more difficult. To separate short hair from the background in the most natural way, we will do it through the following steps:
Step 1: Upload a photo of a short-haired girl whose hair needs to be separated in Photoshop. Regardless of hair type or color, all hair types will go through the same initial steps. So first, create a rough selection of the hair. You can use Select Subject, Magnetic Lasso, or Quick Select to create the selection.
(1).jpg)
Step 2: Add a Layer Mask. If you need to roughly cover any large patches of hair, use a hard brush set to white.
(1).jpg)
Step 3: Once you have your rough mask, make sure the layer mask is active and go to Select and Mask via the Properties panel.
Click the Refine Hair button on the top toolbar. Refine Hair is a great option for short hair.
(1).jpg)
Step 4: Next, select the Refine Edge brush located on the left side of the screen if you still need to select that brush.
Under Edge Detection, select Smart Radius and set the Radius to 3 px.
Drag the Refine Edge cursor along the edge of the hair. If there is too much inner hair or background being captured, hold Alt to remove it from the selection.
(2).jpg)
Step 5: I don't recommend applying any Global Adjustments if the hair is short and spiky. Instead, finish by selecting Decontaminate Color, set to 70%.
(1).jpg)
So you have completed the steps to separate hair in Photoshop for short hairstyles. The character is now separated from the background with a very natural hairstyle. You can insert the appropriate background parts.
3. How to separate wavy hair in Photoshop
Wavy hair can be the most difficult to separate because it has lots of large curls and ringlets, along with small, loose strands. To separate them from the background in the most natural way, follow these steps:
Step 1: Upload the photo you want to separate hair from in Photoshop. For wavy hair, using Subject Select will work best to create a selection.
(1).jpg)
Step 2: Add a layer mask to your subject. If any parts of the hair are not selected or some parts of the background are selected, you can mask them out by using a hard black and white brush and painting over the mask.
(1).jpg)
Step 3: After creating the mask, select the layer mask and go to Select and Mask via the Properties panel or the Quick Select Options bar above.
Click the Refine Hair button in the Select and Mask toolbar above. Refine Hair works well with wavy hair, but will often wipe out too many highlights. It will also struggle anywhere with lots of curls and a small amount of background sticking out.
(1).jpg)
Step 4: Select the Refine Edge brush located on the left side of the screen. Under Edge Detection, select Smart Radius and set the Radius to 5 px.
Hold Alt and drag the Refine Edge brush along the inner edge of the hair. This will bring back the edges of the hair and any highlights that were accidentally hidden.
(1).jpg)
Step 5: On the toolbar, select the Brush tool to manually cover larger areas that the automatic tool cannot handle.
(1).jpg)
Step 6: We can add -10% to Shift Edge to slightly bring the edge of the mask inward, removing some of the excess hair and remaining background. We can also enable Decontaminate Color and set it to 50%.
(1).jpg)
4. Afro Hair Separation Tutorial in Photoshop
Afro hair is a natural curly hairstyle of black people. It is characterized by small curls, creating fluffy hair - a beautiful symbol of black people. However, it is also very difficult to separate the background, please follow the following steps.
Step 1: As with the above hairstyles, let’s create a selection for the hair. The Afro hairstyle is best achieved with the Select Subject tool. Once you have a selection, add a layer mask.
(2).jpg)
Step 2: However, because of the curly hairstyle, we will be left with a lot of fringed hair. So, in Select and Mask, we will first press the Refine Hair button in the Options bar above.
(1).jpg)
Step 3: Next, we will enable Decontaminate Colors and set it to 75%.
(1).jpg)
Step 4: Now select the Refine Edge brush and enable Smart Radius, set the Radius to 4 px. Zoom in and add to the mask by clicking around the edge of the hair or hold down the Alt key to delete from the mask.
The auto-masking tools will mistake some of the highlights on the curls for the background, so you need to pay close attention. Create as many curls as possible without losing the highlights on the inner hair.
I don't recommend using Global Refinements on tight curls as it often leaves hair looking brittle, thin and sparse.(1).jpg)
So we have completed separating hair in Photoshop with curly hair style.
5. How to separate hair in Photoshop as braided hair
Step 1: Braids can be separated from the background by combining an afro with a cropped haircut. Make sure the entire braid is picked up and still secure while still retaining some loose hair and texture.
Click Select Subject in the Quick Select Options bar above.
(1).jpg)
Step 2: With braids, you will likely need to erase the selection from any background gaps created by the overlapping curls.
I usually use the Object Select tool, hold Alt then draw a selection around the area we want to remove. This is a rough selection so don't spend too much time on it.
(1).jpg)
Step 3: Add a layer mask to the subject.
(1).jpg)
Step 4: Enter Select and Mask using the Quick Select Options bar or the Properties panel.
For braids, I don't recommend using Refine Hair because it will often select too much hair. However, you can try it yourself. If it selects too much, use Control+Z to Undo.
Step 5: However, we still want to select the Refine Edge Brush and enter Edge Detection settings. Enable Smart Radius and set the Radius to 3 px.
Zoom in and run the Refine Edge brush along the edge of each braid. Try to keep the outer edge intact so you don't select too much of the inner hair.
(1).jpg)
Step 6: I usually don't use any Global Adjustments with the braids. You can try adding a little Shift Edge, but here I don't, just adding 70% Decontaminate Colors.
(2).jpg)
So you have completed how to separate hair in Photoshop with braided hair. Now we can change the background for the subject to best suit.
Above is a summary of some ways to separate hair in Photoshop. Each hairstyle will have different ways of doing it, so please study carefully.


