Best Selling Products

Autodesk All App Account Copyright
120 USD

Freepik Premium Account
59 USD

Genuine Cheap Canva Pro
39 USD

Windows 10 & 11 Pro Key
36 USD

Plugin Retouch4me
69 USD

Capcut Pro 1 Year
39 USD

Upgrade Genuine Office 365
49 USD

ChatGPT Plus Account (GPT-4)
16 USD

Adobe Photoshop Copyright - Full App
120 USD

Genuine Adobe Illustrator account
99 USD

Upgrade genuine Capture One account
120 USD

MidJourney Account
29 USD

Adobe Premiere Pro Account
99 USD

Copyright Adobe Lightroom Account
59 USD

Upgrade Duolingo Super
29 USD
Skin Transformation: Basic Steps to Smooth Skin with Photoshop CS6
Nội dung
- 1.Why should you use Photoshop CS6 to smooth skin?
- 2. Steps to smooth skin with Photoshop CS6
- 2.1 Step 1: Open the image and duplicate the layer
- 2.2 Step 2: Remove skin blemishes
- 2.3 Step 3: Apply skin smoothing filter
- 2.4 Step 4: Create a mask (layer mask)
- 2.5 Step 5: Adjust the transparency of the layer
- 2.6 Step 6: Save the image
- 3. Conclusion
Discover impressive brand identity changes in 2025. The article summarizes outstanding brands and how they refreshed their images to attract customers and increase brand value.
Do you want to have smooth, flawless skin like the stars in magazines? Don't worry, with Photoshop CS6, you can completely transform your skin to perfection with just a few simple steps. This article sadesign will guide you in detail through the basic steps to smooth your skin with Photoshop CS6, helping you feel more confident with your appearance.
1.Why should you use Photoshop CS6 to smooth skin?
Photoshop CS6 is a professional photo editing software with many powerful tools, allowing you to edit photos flexibly and effectively. In particular, Photoshop CS6 provides specialized tools and filters to smooth skin naturally, without causing artificial effects or losing skin details.
![]()
Brand identity is the representative image of a business, reflecting the core values, mission and vision of the company. Especially in 2025, changes in brand identity become more urgent as companies need to adjust to changes in consumer tastes and trends.
Changing your brand identity can help your company:
Reaffirm your identity and values.
Differentiate yourself from your competitors.
Market development and expansion.
Strengthen emotional connections with customers.
2. Steps to smooth skin with Photoshop CS6
Before you start editing, it is important to prepare your photo. Make sure the photo you want to edit is high resolution so that the details are not blurred when editing. If you are working with a portrait, make sure the lighting in the photo is good, helping to highlight the skin and details that need to be edited.
Here are the basic steps to smooth skin using Photoshop CS6 that you can apply:
2.1 Step 1: Open the image and duplicate the layer
The first thing you need to do is open your image in Photoshop CS6 and duplicate the original image layer so you can easily go back if something goes wrong. This will help you avoid editing directly on the original image and allow you to try different techniques without losing your original data.
Start Photoshop CS6 software : Search for the Photoshop CS6 icon on your computer and double-click to start the software.
Open the photo you want to edit :
On the menu bar, select File > Open .
Browse to the folder containing your photos and select the photo you want to edit.
Click the Open button to open the image in Photoshop CS6.
Duplicate layer :
In the Layers panel (usually located in the lower right corner of the screen), you'll see the Background layer (or the name of the image's original layer).
Right click on the Background layer and select Duplicate Layer .
A new layer named Background copy (or similar) will be created. This allows you to easily go back to the previous step if needed without affecting the original image.
![]()
2.2 Step 2: Remove skin blemishes
To smooth skin with Photoshop CS6 and remove skin blemishes, you need to follow these steps carefully and accurately. Follow these steps:
Select tool :
Spot Healing Brush Tool (J) : This tool has a circular icon with a dot in the middle.
Patch Tool (J) : This tool has a patch icon.
Remove defects :
Spot Healing Brush Tool : Select the tool, adjust the brush size to match the size of the blemish, then click directly on the skin areas with blemishes such as acne, dark spots, small wrinkles... Photoshop will automatically "patch" the blemish using the surrounding skin areas.
Patch Tool : Select the tool, select the blemish area by clicking and dragging around the blemish area. Then, click and drag the selection to another healthy area to replace the blemish area.
Finally, adjust the brightness, contrast and color to achieve a natural and harmonious result. Following these steps correctly will help you get the perfect photo with smooth and beautiful skin.
Note :
Use the tool gently and carefully to avoid damaging the natural texture of the leather.
You can zoom in on the photo to see the flaws more clearly and edit more precisely.
2.3 Step 3: Apply skin smoothing filter
To effectively smooth skin with Photoshop CS6, you can apply the steps to use the skin smoothing filter. Specifically, the steps include:
Select the duplicated layer : Make sure you have the Background copy layer (or duplicated layer) selected in the Layers panel .
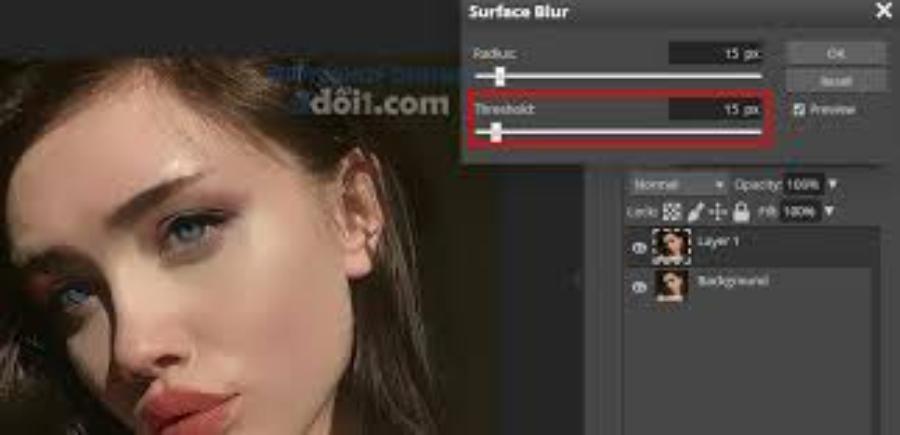
Apply Surface Blur filter :
On the menu bar, select Filter > Blur > Surface Blur .
The Surface Blur dialog box appears.
Adjust parameters :
Radius : Controls the width of the area affected by the filter. The higher the value, the greater the smoothness.
Threshold : Controls the difference in brightness between pixels so that the filter does not lose skin detail. The higher the value, the less the filter affects areas with large differences in brightness (e.g. eyes, lips, hair...).
You can preview the results by ticking the Preview box .
Finally, adjust the opacity of the smoothing layer to achieve the most natural and harmonious result.
Click OK : After adjusting the parameters to your liking, click OK to apply the filter.
These steps not only help improve the skin in the photo but also ensure that the natural beauty and authenticity of the photo is preserved.
.jpg)
2.4 Step 4: Create a mask (layer mask)
To smooth skin with Photoshop CS6, after performing basic editing steps, the next step is to create a layer mask. This is an important tool that helps you control the details of the skin area that needs to be smoothed without affecting other areas of the image.
Add mask :
In the Layers panel , click the Add layer mask icon (a rectangle with a circle in the middle) at the bottom of the layers panel. A white mask will be added to the Background copy layer .
Select the Brush Tool :
Select the Brush Tool (B) on the toolbar.
Choose black for the brush.
Apply to areas of skin you do not want to smooth :
Use a black brush to paint over areas of the skin you don't want smoothed (e.g. eyes, lips, hair, eyebrows...). Areas painted black won't be affected by the Surface Blur filter .
Note :
You can change the size and hardness of the brush for more precise painting.
If you make a mistake, you can change the brush color to white to erase the painted mask.
2.5 Step 5: Adjust the transparency of the layer
Reduce transparency :
If you feel the skin is too smooth, reduce the transparency of the edited layer by dragging the Opacity bar in the Layers panel down.
Adjust the Opacity until you get the desired result.
![]()
2.6 Step 6: Save the image
Save image :
Once you've completed the editing steps, you can save your image by going to File > Save As .
Choose JPEG or PNG format depending on your needs.
Select the folder to save the image and name the image.
Click the Save button to save the image.
Adobe Photoshop Cheap License
3. Conclusion
With the above basic steps, you can effectively smooth skin with Photoshop CS6. Practice regularly to get familiar with the tools and get the beautiful photos you want.


VIP Products


Best Selling Products
Autodesk All App Account Copyright
120 USD
Freepik Premium Account
59 USD
Genuine Cheap Canva Pro
39 USD
Windows 10 & 11 Pro Key
36 USD
Plugin Retouch4me
69 USD
Capcut Pro 1 Year
39 USD
Upgrade Genuine Office 365
49 USD
ChatGPT Plus Account (GPT-4)
16 USD
Adobe Photoshop Copyright - Full App
120 USD
Genuine Adobe Illustrator account
99 USD
Upgrade genuine Capture One account
120 USD
MidJourney Account
29 USD
Adobe Premiere Pro Account
99 USD
Copyright Adobe Lightroom Account
59 USD
Upgrade Duolingo Super
29 USD