Best Selling Products

Genuine Adobe Illustrator account
99 USD

Copyright Adobe Lightroom Account
59 USD

Adobe Photoshop Copyright - Full App
120 USD

Autodesk All App Account Copyright
120 USD

Upgrade Genuine Office 365
49 USD

Upgrade genuine Capture One account
120 USD

Genuine Cheap Canva Pro
39 USD

ChatGPT Plus Account (GPT-4)
16 USD

Windows 10 & 11 Pro Key
36 USD

Adobe Premiere Pro Account
99 USD

Freepik Premium Account
59 USD

Capcut Pro 1 Year
39 USD

Plugin Retouch4me
69 USD

Upgrade Duolingo Super
29 USD

MidJourney Account
29 USD
Top Photo Cropping Secrets in Photoshop for Beginners
Nội dung
- 1. Overview of photo cropping tools in Photoshop
- 1.1. Crop Tool
- 1.2. Background separation
- 1.3. Other support tools
- 2. The simplest way to crop photos in photoshop
- 2.1. Steps to crop photos in photoshop using the Crop tool
- 2.2. Steps to separate the subject background using the Quick Selection Tool
- 2.3. Steps to separate the subject background using the Pentool
- 3. Tips and notes when cropping images in Photoshop
- 3.1. Retain image resolution and quality
- 3.2. Use History and Layers to protect original data
- 3.3. Testing and comparison of cutting methods
- 3.4. Useful shortcuts to remember
- 4. FAQ – Frequently Asked Questions
Discover the basic yet incredibly effective tips to help you master the art of cropping photos in Photoshop. This article shares the first steps to help beginners confidently turn each photo into a more professional one.
Photoshop is not only a common image processing software but also a "creative sandbox" for those who are passionate about design, photography and graphics. With the ability to edit, crop and process diverse images, Photoshop has become an indispensable tool in every creative workflow. However, for beginners, getting familiar with the interface and tools can be quite difficult. Therefore, mastering the technique of cropping photos - an important step in image processing will help you be more confident in the creative process.
Cropping a photo is not just about removing unnecessary parts, but also contributes to creating a balanced layout, highlighting the subject and bringing high aesthetic quality to the design product. A meticulously cropped image will help you convey a stronger message, while saving unwanted editing time. In this article, we will go through basic photo cropping methods to help you easily create impressive images with just a few simple steps.
1. Overview of photo cropping tools in Photoshop
To start, let's explore the main cropping tools that Photoshop offers. Each tool has its own advantages, giving you flexibility in the editing process.
1.1. Crop Tool
Crop Tool is the main tool used to crop and resize an image. When you select this tool, the Photoshop interface will display contour lines that allow you to easily drag and resize the crop area. The outstanding features of Crop Tool include:
Set fixed ratio: You can choose popular ratios such as 1:1, 4:3, 16:9 right on the Options bar to easily apply for purposes such as social media, printing or website.
.png)
Image rotation options: If the image needs to be aligned or rotated in the right direction, the Crop Tool offers a “straighten” function that helps you make quick adjustments.
Alignment Grid: A support grid displayed on your image helps you easily locate the main subject and create a harmonious composition.
Thanks to its intuitive interface and diverse features, Crop Tool is the ideal "companion" for those who are new to Photoshop.
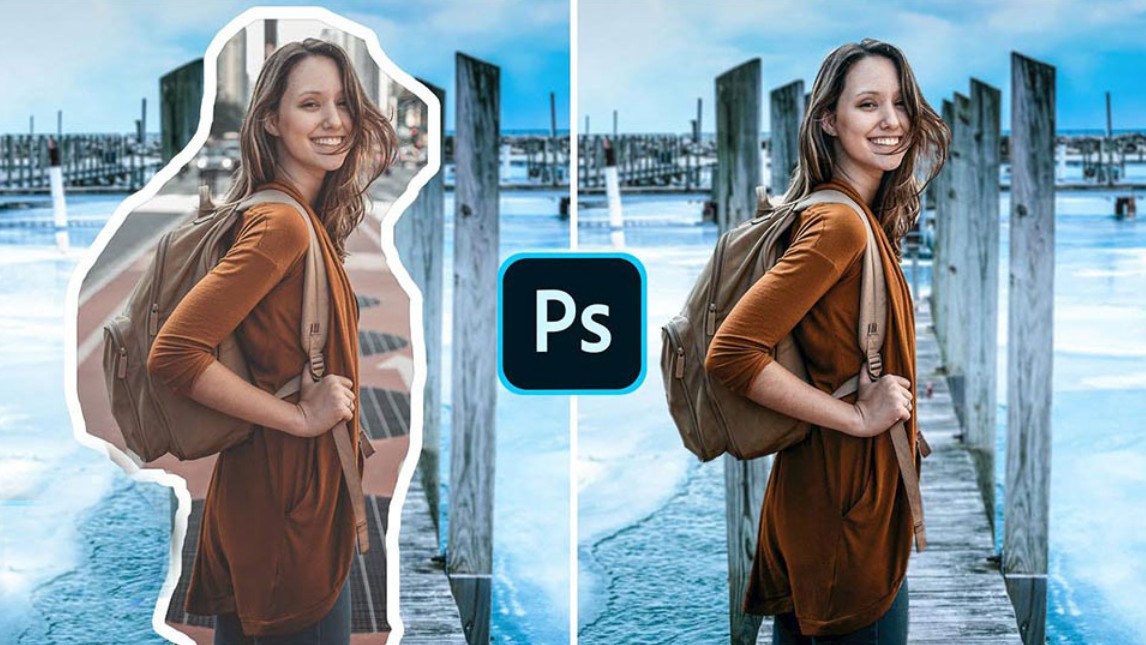
1.2. Background separation
Basically, background separation is cropping but at a much higher level. In a photo, there will be the main object (people, objects, animals, etc.) and the background. When designing, the background will not be necessary. However, using shapes to cut will not completely remove this background. This is when we need special tools to help create a selection area according to the edge of the image subject. You can use tools that automatically hug the edge of the subject. However, with images where the background is not separated, the tool will have difficulty creating a standard selection area and will require manual tools. Manual background separation will take a lot of your time, but the quality of the separated image will be extremely good and high quality.
.png)
1.3. Other support tools
In addition to Crop Tool, Photoshop also provides users with a number of other tools to support the image cropping process:
Marquee Tool: The Marquee Tool allows you to select an area to be cropped in a rectangular or elliptical shape. Once you have selected the area you want, you can use the Crop feature to cut out the excess. This is a useful option for photos with fixed layouts.
Slice Tool: In case you need to divide an image into many small parts, especially with web interface design projects, Slice Tool will be a great assistant. This tool helps to divide the image into small "pieces" to optimize page loading or create special effects.
Lasso Tool: When you need to select an asymmetrical crop area, the Lasso Tool gives you the freedom to draw the crop area as you wish. Although it requires more precision, this tool is very useful when editing objects with complex shapes.
2. The simplest way to crop photos in photoshop
With both cropping and background removal, you will have separate tools with almost similar operations.
2.1. Steps to crop photos in photoshop using the Crop tool
The first thing when you want to crop a photo in photoshop, you need to choose the right photos. The photos used for cropping should be of high quality to avoid the difference in sharpness after being combined into the design. After having the photo, you follow these steps:
(1).png)
Step 1: Open the tool and select File, click Open. The file selection window will open. Select the image file saved to your computer and click Open.
Step 2: On the left side of the screen, there will be a Photoshop toolbar. Select the Crop tool (shortcut key C), your mouse pointer will change to a Crop icon. You can right-click on the Crop tool to select the shape of the selection area. The default of the tool will be a rectangular selection area.
Step 3: Next, drag the crop frame to cover the area you want to crop. If the crop slips, you can press Ctrl Z to undo. After selecting the crop area, press Enter and the photo will be cropped as you want.
Step 4: You can save the cropped image using the key combination Ctrl S or switch to the Move tool (shortcut V) to drag the image directly to the open design.
2.2. Steps to separate the subject background using the Quick Selection Tool
Quick Selection Tool is a tool that helps you create quick selections with images where the subject is clearly separated from the background. The steps include:
.png)
Step 1: Open the image file as above
Step 2: Next, select the Quick Selection Tool (shortcut key W) on the toolbar.
Step 3: Point your mouse at the object you want to separate the background from, click on it and move your mouse near the edge of the object, the tool will automatically select for you.
Step 4: After selecting the object, save the image with the background removed as in the Crop image operation.
2.3. Steps to separate the subject background using the Pentool
The Pentool will help you create a contour around an object manually. This is the best method you can use for objects with an unclear background. The steps include:
.png)
Step 1: Open the file like the photo cropping step
Step 2: You select the Pentool tool, with each click you will create a point and the second point will connect the previous point into a straight line. In case the subject has a curve, after clicking on the next point, do not release the mouse immediately but hold the mouse and drag the tangent line to create a curve. You continue to do so until you have completely covered the subject. The Pentool tool only recognizes that you have enclosed the shape when the last point is connected to the first point, so if you still see the tool does not stop, connect the last point to the first point.
Step 3: To confirm the selection, press Ctrl Enter.
Step 4: Save the image you just cropped similar to the steps above.
3. Tips and notes when cropping images in Photoshop
To get the best results when cropping photos, there are some tips and notes to keep in mind. These experiences are summarized from the actual work process of design experts and photographers.
3.1. Retain image resolution and quality
One of the main concerns when cropping an image is to ensure that the image quality is not reduced.
Before you begin cropping, consider how you intend to use your image. For print, high resolution is a good idea; for the web, standard or medium resolution may be sufficient. Choosing the original size will help you avoid losing data when cropping.
.png)
In some cases, when cropping an image, the edges of the image can become unbalanced. Photoshop's Content-Aware Fill feature intelligently fills in the gaps, resulting in a more harmonious result.
3.2. Use History and Layers to protect original data
No one wants to lose the original version of a photo after making multiple edits, so make sure you always work on a copy of the layer or via the History tool.
Duplicate Layer: Before you start editing, right-click on the image layer and select “Duplicate Layer”. This makes it easy to go back if something goes wrong while cropping the image.
Use the History Panel: Photoshop's History Panel allows you to keep track of all your changes. If your cropping doesn't turn out the way you wanted, you can go back a step without losing all your work.
3.3. Testing and comparison of cutting methods
Every photo has its own characteristics and requirements. So don't be afraid to experiment with different cropping methods to find the best one for each specific case.
After cropping your photo using different methods (fixed ratio, free-form, or using actions), visually compare the results. You can save multiple versions of the same photo and then choose the one that looks the most balanced and aesthetically pleasing.
.png)
3.4. Useful shortcuts to remember
Using shortcut keys not only helps you work faster but also saves a significant amount of time during your work.
“C” Key for Crop Tool: As mentioned, this is one of the most used shortcuts when cropping photos.
Enter/Return key to confirm operation: After adjusting the crop area, pressing Enter immediately applies all changes.
Other Photoshop shortcuts: Learn and apply other shortcuts like “Ctrl+J” (Cmd+J on Mac) to quickly duplicate a layer, “Ctrl+Z” (Cmd+Z) to undo an action, etc. This will significantly increase your work efficiency.
4. FAQ – Frequently Asked Questions
Does Photoshop software support automatic image cropping?
Yes, you can use plugins or automated actions to crop images according to pre-set patterns. However, keep in mind that manual review of the results is always necessary to ensure quality.
Can I re-edit the photo after cropping?
Of course, you can absolutely use other Photoshop editing tools like adjusting color, contrast, and filtering effects for the photo after cropping.
Is there a way to crop an image without losing quality?
By using the resolution optimization options and working on a layer copy instead of the original image, you can preserve the image quality after cropping.
How to apply fixed aspect ratio when cropping an image?
In the Crop Tool Options bar, enter a fixed ratio (e.g. 1:1, 4:3, 16:9) and drag the crop to the size you want. This helps ensure that all elements in the image are balanced and consistent with the intended composition.
Accurate and effective cropping not only enhances the aesthetic value of the design product but also contributes to conveying the message clearly and professionally. Through this article, we hope you have grasped the basic knowledge and some useful tips to apply in the process of using Photoshop.


VIP Products


Best Selling Products
Genuine Adobe Illustrator account
99 USD
Copyright Adobe Lightroom Account
59 USD
Adobe Photoshop Copyright - Full App
120 USD
Autodesk All App Account Copyright
120 USD
Upgrade Genuine Office 365
49 USD
Upgrade genuine Capture One account
120 USD
Genuine Cheap Canva Pro
39 USD
ChatGPT Plus Account (GPT-4)
16 USD
Windows 10 & 11 Pro Key
36 USD
Adobe Premiere Pro Account
99 USD
Freepik Premium Account
59 USD
Capcut Pro 1 Year
39 USD
Plugin Retouch4me
69 USD
Upgrade Duolingo Super
29 USD
MidJourney Account
29 USD