Best Selling Products

Adobe Photoshop Copyright - Full App
120 USD

ChatGPT Plus Account (GPT-4)
16 USD

Freepik Premium Account
59 USD

Capcut Pro 1 Year
39 USD

Upgrade genuine Capture One account
120 USD

Upgrade Duolingo Super
29 USD

Copyright Adobe Lightroom Account
59 USD

MidJourney Account
29 USD

Autodesk All App Account Copyright
120 USD

Genuine Cheap Canva Pro
39 USD

Windows 10 & 11 Pro Key
36 USD

Genuine Adobe Illustrator account
99 USD

Plugin Retouch4me
69 USD

Adobe Premiere Pro Account
99 USD

Upgrade Genuine Office 365
49 USD
What Are Blending Modes in Photoshop? A Complete A–Z Guide for Beginners
Nội dung
- 1. What are blending modes in Photoshop?
- 2. What are blending modes used for?
- 2.1 Creating lighting and shadow effects
- 2.2 Increasing contrast and vibrancy
- 2.3 Editing colors and tones
- 2.4 Creating special design effects
- 3. Factors that affect blending modes
- 4. Classification of blending modes in Photoshop
- 4.1 Normal – The default blending mode
- 4.2 Darken – The darkening mode group
- 4.3 Lighten – The lightening mode group
- 4.4 Contrast – The contrast enhancement group
- 4.5 Comparative – The comparison and pixel checking group
- 4.6 Component – The color component group
- 5. Guide to Using Blend Mode from A to Z
- 5.1 Step 1: Launch Photoshop and Open the Image You Want to Edit
- 5.2 Step 2: Create a New Blending Layer
- 5.3 Step 3: Choose the Appropriate Blending Mode
- 5.4 Step 4: Adjust Opacity to Refine the Effect
- 6. Common Errors and How to Fix Them When Using Blend Mode
- 6.1 Effects Are Too Strong or Too Weak
- 6.2 Colors Look Incorrect or Unnatural
- 6.3 No Visible Effect or Effect Appears in the Wrong Position
- 7. Conclusion
Do you want to learn about blending modes in Photoshop but feel “overwhelmed” by the long list of terms and complex effects? In reality, Blend Mode is one of the most important tools that helps designers create depth, lighting, color, and emotion for every graphic project.
1. What are blending modes in Photoshop?
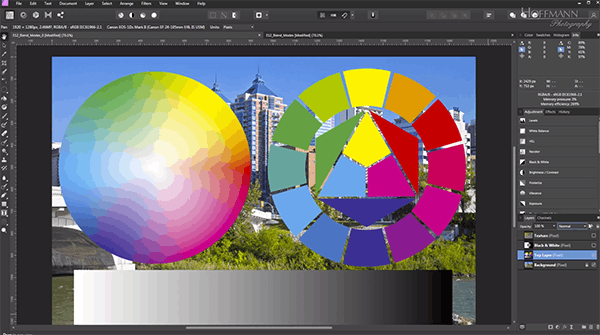
Blending modes in Photoshop (Blend Mode) are tools that allow layers to “interact” with one another through color and light, creating entirely new visual effects. Instead of simply stacking image layers on top of each other, Blend Mode allows Photoshop to calculate and combine the colors of the top layer with those below it, altering brightness, contrast, and overall tonal value. As a result, edited images gain more depth, liveliness, and emotion compared to the original.
The special strength of blending modes lies in their incredible flexibility across various design situations, from portrait retouching and light adjustments to artistic effects. Photoshop offers a wide variety of Blend Modes so users can easily experiment and select the most suitable effect for their purpose. With simple, accessible, and completely free operation, blending modes are not only for professional designers but also useful tools for anyone wanting to improve image quality quickly and effectively.
.jpg)
2. What are blending modes used for?
Blending modes in Photoshop (Blend Mode) are used to combine layers to create diverse and flexible visual effects. Instead of editing images manually, Blend Mode allows users to control lighting, color, and contrast quickly, improving image quality and boosting design creativity.
2.1 Creating lighting and shadow effects
Blend Mode helps simulate lighting and shadows naturally, making the subject stand out and adding depth to images. When applied correctly, the image appears more dimensional instead of flat and dull. This technique is commonly used in portrait editing, product photography, and poster design.
- Highlight bright areas and emphasize focal points
- Create realistic object shadows
- Add depth and emotional richness to images
2.2 Increasing contrast and vibrancy
Blending modes in Photoshop enhance contrast by strengthening the difference between bright and dark areas. This makes image details sharper, colors more vivid, and visuals instantly eye-catching.
- Clarify small image details
- Make colors vibrant while remaining natural
- Create strong visual effects ideal for advertising images and banners
2.3 Editing colors and tones
Blend Mode allows you to change image colors and tones without destroying original details. Depending on the selected blending mode, you can preserve brightness and contrast while changing only color, or vice versa. This is a fast, efficient color correction method highly favored by designers.
- Change colors without damaging texture
- Easily create multiple color variations
- Maintain realism and overall harmony
2.4 Creating special design effects
Beyond basic functions, Photoshop blending modes also create many artistic special effects. These are commonly used in creative designs, artistic photography, or projects requiring unique visual styles.
- Noise effects for vintage or artistic feel
- Color inversion effects for striking visuals
- Cinematic retro film color effects
.jpg)
3. Factors that affect blending modes
To fully unlock the power of blending modes in Photoshop, you cannot randomly choose a Blend Mode—you must understand the factors that directly affect the final image result. Even small changes in color, brightness, or layer transparency can produce completely different effects. Mastering these elements helps you control color, light, and image mood more professionally.
- Layer color, brightness, and contrast: Different values between background and blend layers produce different results. Brighter or more saturated layers make Blend Mode effects more visible.
- Selected blending mode type: Each Blend Mode has its own calculation principle, directly influencing pixel interaction.
- Layer Opacity value: Opacity controls effect intensity. Lower opacity creates subtle effects, while higher opacity produces stronger impact.
4. Classification of blending modes in Photoshop
One of Photoshop’s biggest strengths is the diversity of blending effects, allowing users to manipulate images in many different ways. Based on operating principles and effects on color/light, Blend Modes are divided into 6 main groups.
4.1 Normal – The default blending mode
Normal is Photoshop’s most basic blending mode and the most commonly used when no special effect is applied.
- Normal: The top layer fully covers pixels below, with no color interaction.
- Dissolve: Creates random pixel scattering, often used for artistic transitions.
4.2 Darken – The darkening mode group
Darken modes retain darker pixels between layers, making images richer and deeper.
- Darken: Keeps darker pixels
- Multiply: Removes bright areas for stronger depth
- Color Burn: Darkens intensely and boosts saturation
- Linear Burn: Lowers brightness without excessive contrast
Darker Color: Compares channel values and keeps darker color
(1).jpg)
4.3 Lighten – The lightening mode group
Opposite to Darken, these modes retain brighter pixels to brighten images naturally.
- Lighten: Keeps brighter pixels
- Screen: Brightens more effectively than Lighten
- Color Dodge: Creates strong glowing highlights
- Linear Dodge (Add): Increases brightness while preserving detail
- Lighter Color: Selects brighter colors by channel value
4.4 Contrast – The contrast enhancement group
These combine brightening and darkening to increase contrast.
- Overlay: Balanced combination of Multiply and Screen
- Soft Light: Gentle contrast enhancement
- Hard Light, Vivid Light, Hard Mix: Strong, dramatic contrast-
- Linear Light: Sharp lighting effect
- Pin Light: Unique light blending
4.5 Comparative – The comparison and pixel checking group
Often used for technical image analysis.
- Difference: Inverts colors based on differences
- Exclusion: Softer Difference effect
- Subtract: Darkens by subtracting values
- Divide: Brightens by dividing values
4.6 Component – The color component group
Controls separate color elements like hue, saturation, and luminosity.
- Hue: Keeps brightness/saturation, changes hue
- Saturation: Adjusts saturation only
- Color: Replaces hue and saturation
- Luminosity: Changes brightness only
(1).jpg)
5. Guide to Using Blend Mode from A to Z
To use blending modes in Photoshop effectively, you need to master the basic steps before diving deeper into each specific Blend Mode type. The process below consists of 4 simple steps that help you quickly get familiar with blending layers, controlling colors, and creating more professional image effects. Keep in mind that to truly master each blending mode, you should practice regularly and experiment with many different types of images.
5.1 Step 1: Launch Photoshop and Open the Image You Want to Edit
First, open Photoshop and upload the image you want to apply blending modes to. You can open an image by selecting File → Open or simply dragging and dropping it directly into the workspace. Choosing the right image will make it easier to clearly observe changes when applying Blend Mode.
Once the image is opened, check the Layers panel to ensure it is displayed correctly on its own separate layer. This will act as the background layer, playing an important role in the blending process since every Blend Mode effect is based on the interaction between this layer and the layers above it.
.jpg)
5.2 Step 2: Create a New Blending Layer
Next, you need to create a new layer to act as the blending layer. This layer can be a color fill, another image, or an Adjustment Layer depending on your editing purpose. To create a new layer, simply click the Create New Layer icon in the Layers panel or use the shortcut Ctrl + Shift + N.
After creating the layer, you can paint on it using the Brush tool, fill it with color, or insert another image into it. This is the layer that will interact with the background through blending modes, so its color and content will directly affect the final result of the image.
.jpg)
5.3 Step 3: Choose the Appropriate Blending Mode
In the Layers panel, just above the Opacity bar, you will see the Blend Mode option set to Normal by default. Click the dropdown arrow and try different blending modes such as Multiply, Overlay, Screen, Soft Light… to observe how the image changes.
Each Blend Mode produces a different effect depending on the color and brightness of the two blended layers. So don’t hesitate to test multiple modes to find the one that best suits your editing goal. This is a crucial step for understanding how Blend Mode impacts an image.
.jpg)
5.4 Step 4: Adjust Opacity to Refine the Effect
Once you have selected your preferred blending mode, the final step is to fine-tune the Opacity value to control the strength of the effect. Lowering Opacity makes the effect softer and more natural, while higher Opacity creates a stronger and more noticeable impact.
You should adjust Opacity gradually and carefully observe changes to achieve the most balanced result. This step helps the image look professional and prevents it from appearing “overdone” when using Blend Mode. By combining blending modes flexibly with Opacity adjustments, you can create visually appealing effects that align perfectly with your design intent.
.jpg)
6. Common Errors and How to Fix Them When Using Blend Mode
Although blending modes in Photoshop deliver powerful editing and creative effects, improper use can easily make the final product look less appealing. Each Blend Mode has its own working principle, so overusing effects or lacking control can make an image lose its natural balance and harmony. Below are some common mistakes users often make when using Blend Mode and effective solutions to help designs look more professional.
6.1 Effects Are Too Strong or Too Weak
This is the most common issue when using brightening, darkening, or contrast-enhancing blending modes. Effects that are too strong can make the image harsh and lose detail, while effects that are too weak fail to create noticeable differences from the original image. This usually happens because the wrong Blend Mode is selected or the Opacity level is not suitable.
To fix this, try several blending modes within the same effect group to find the best option. Then adjust the Opacity to a moderate level so the blended layer affects the image enough while still preserving a natural overall appearance.
6.2 Colors Look Incorrect or Unnatural
Edited colors that look “fake,” off-tone, or inconsistent with the overall composition are common issues when the two layers have incompatible colors. When the blending layer’s colors differ too much from the base layer, Blend Mode can create difficult-to-control color effects that make the image feel unbalanced.
An effective solution is to adjust the blending layer’s colors so they are more similar to or complementary with the base layer. Additionally, try modes in the Component group such as Color, Hue, or Luminosity to separately control color properties and make the image look more harmonious and natural.
6.3 No Visible Effect or Effect Appears in the Wrong Position
In some cases, you may select a Blend Mode but see no visible change, or the effect appears in the wrong area. This usually happens because the blending layer lacks suitable color or content, or it is placed incorrectly in the Layers panel order.
To fix this issue, make sure the blending layer is positioned above the background layer and contains visible colors or effects for the Blend Mode to work with. Also, check and remove unnecessary layers placed between the two blending layers to prevent the effect from being interrupted.
7. Conclusion
Blending modes in Photoshop are not just effects—they are the “key” to elevating design work from basic to professional. Once you understand how each Blend Mode group works, you can easily control color, light, contrast, and emotional tone without complicated editing. For beginners, mastering blending modes takes practice, but with consistent experimentation and real project application, you will quickly discover their incredible power. Appvip believes that once you fully understand Blend Mode in Photoshop, you will be able to create impressive, creative graphic products with a strong personal signature.





















VIP Products








Best Selling Products
Adobe Photoshop Copyright - Full App
120 USD
ChatGPT Plus Account (GPT-4)
16 USD
Freepik Premium Account
59 USD
Capcut Pro 1 Year
39 USD
Upgrade genuine Capture One account
120 USD
Upgrade Duolingo Super
29 USD
Copyright Adobe Lightroom Account
59 USD
MidJourney Account
29 USD
Autodesk All App Account Copyright
120 USD
Genuine Cheap Canva Pro
39 USD
Windows 10 & 11 Pro Key
36 USD
Genuine Adobe Illustrator account
99 USD
Plugin Retouch4me
69 USD
Adobe Premiere Pro Account
99 USD
Upgrade Genuine Office 365
49 USD