Best Selling Products

Freepik Premium Account
59 USD

Plugin Retouch4me
69 USD

Upgrade Duolingo Super
29 USD
Capcut Pro 1 Year
39 USD
Adobe Photoshop Copyright - Full App
120 USD

MidJourney Account
29 USD
Copyright Adobe Lightroom Account
59 USD
Windows 10 & 11 Pro Key
36 USD
Genuine Cheap Canva Pro
39 USD
Upgrade genuine Capture One account
120 USD
Genuine Adobe Illustrator account
99 USD

Upgrade Genuine Office 365
49 USD
Autodesk All App Account Copyright
120 USD
Adobe Premiere Pro Account
99 USD

ChatGPT Plus Account (GPT-4)
16 USD
What is image cropping? Discover beautiful and professional image cropping techniques from A-Z.
Nội dung
- 1. What is image cropping?
- 2. Benefits of Cropping Images
- 3. When should you crop an image?
- 4. Differentiating between cropping and editing images.
- 5. Some photo cropping techniques you should know
- 5.1. Crop to remove excess detail
- 5.2. Crop according to aspect ratio
- 5.3. Crop according to the rule of thirds.
- 5.4. Crop to highlight the subject.
- 6. Detailed instructions on cropping images in Photoshop
- 6.1. Step 1: Open the image and select the Crop Tool
- 6.2. Step 2: Set the image cropping ratio
- 6.3. Step 3: Crop and save the image
- 7. Common mistakes when cropping images and how to fix them.
- 8. Tips for cropping photos beautifully and professionally.
- 9. Conclusion
Have you ever encountered a situation where a photo has beautiful colors and a striking subject, but the overall effect isn''t truly captivating? Sometimes the reason isn''t the image quality but rather the composition. This is where cropping comes in handy. By simply removing unnecessary details, you can transform an ordinary frame into a cleaner, more balanced, and professional-looking one. So, what is cropping, what are the different cropping techniques, and how do you do it correctly? Let''s explore the details in this article from Sadesign!

1. What is image cropping?
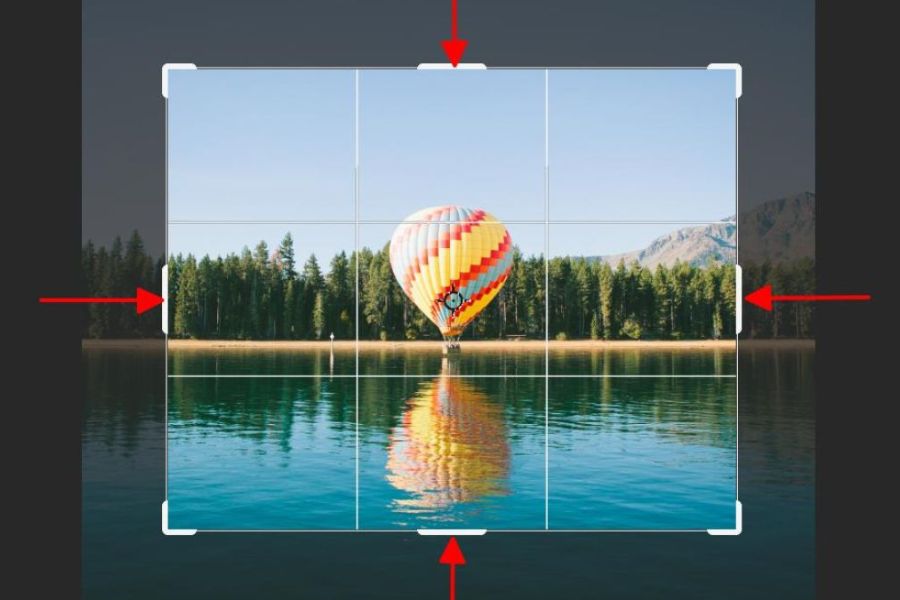
Image cropping, also known as image trimming, is the process of removing a portion of an image while retaining the desired area. Simply put, it's a method of adjusting the display area of an image without altering the entire content. Instead of displaying irrelevant details, the editor can select a suitable area to highlight the main subject. Image cropping is commonly used in photography, graphic design, image editing, and social media content creation.
Here are some basic characteristics of the image cropping operation:
-
Remove unnecessary areas from the image: This helps create a cleaner frame and reduces distracting details.
-
Change the composition: Adjust the position of the subject to make the photo feel more harmonious.
-
Customize size and aspect ratio: Meet display requirements for websites, Facebook, Instagram, or other platforms.
-
Retain the essential content: Focus the viewer's attention on the most valuable areas.
2. Benefits of Cropping Images
Cropping images isn't simply about removing unwanted parts. When done correctly, this technique can improve composition and enhance the message conveyed by the image. Key benefits of cropping images include:
-
Highlight the subject: Eliminate unnecessary details so that the viewer can easily focus on the main character or object.
-
Improve composition: Adjust the position and space around the subject to make the photo more balanced.
-
Optimize aspect ratio: Adjust images to the appropriate size for each platform or intended use.
-
Enhanced aesthetics: A well-cropped frame creates a neat, professional feel and easily attracts attention.
-
Utilize imperfect photos: Rescue photos with poor composition by removing distracting backgrounds or details.
-
Content design support: Helps to better suit images for advertising banners, profile pictures, thumbnails, and marketing materials.
3. When should you crop an image?
Not every photo needs cropping, as excessive cropping can cause the image to lose important details. However, in some cases, it's a simple solution that can significantly improve the composition. You should consider cropping your photos when:
-
The image has too many unnecessary details: The background features irrelevant objects, making it difficult for the viewer to focus.
-
The composition is unbalanced: The subject is too far from the center or there is unnecessary empty space.
-
To emphasize a detail: For example, a face, a product, a dish, or a prominent object.
-
When posting photos to social media: Each platform has different aspect ratios, so cropping images helps make the content more suitable.
-
The image is misaligned or not properly centered: You can combine cropping and adjusting the rotation angle to create a harmonious frame.
-
Designing advertising materials requires selecting image areas that complement the text placement and graphic elements.
4. Differentiating between cropping and editing images.
Cropping and editing images are both familiar operations in image processing. However, these two concepts have different purposes and methods. Understanding the difference will help you choose the appropriate method instead of performing too many unnecessary editing steps.
5. Some photo cropping techniques you should know
To create a beautiful photograph, you shouldn't crop the frame randomly. Instead, choose a technique that suits the subject and purpose. Below are some common cropping techniques that even beginners can apply.
5.1. Crop to remove excess detail
This is the most basic technique, often used when a photo has too many distracting elements. You simply identify the important area, then remove the unnecessary background elements.
For example, when photographing a handbag surrounded by clutter, you can crop closer so the bag becomes the main focal point. This technique is especially useful when editing product photos, portraits, and promotional images.
5.2. Crop according to aspect ratio
Cropping proportionally helps images fit the display size on each platform. Instead of freehand cropping, you can choose a fixed aspect ratio to ensure the layout doesn't change unintentionally.
Some common crop ratios:
-
1:1: Suitable for profile pictures, product photos, and square-shaped posts.
-
4:5: Suitable for vertical Instagram posts.
-
16:9: Commonly used for video thumbnails, cover images, and slideshow content.
-
9:16: Suitable for vertical videos or images on TikTok and Instagram Reels.
-
3:2: Commonly found in photography and camera equipment.
5.3. Crop according to the rule of thirds.
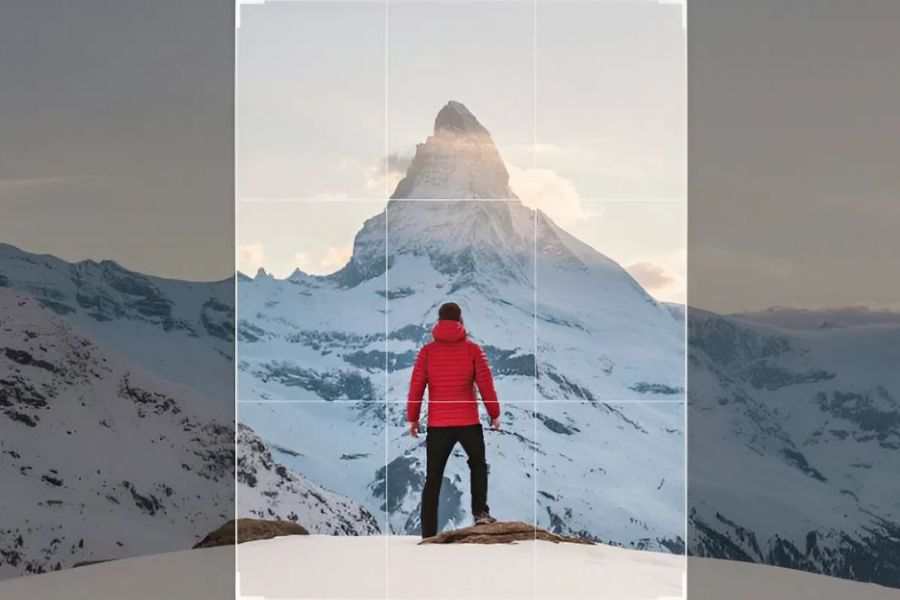
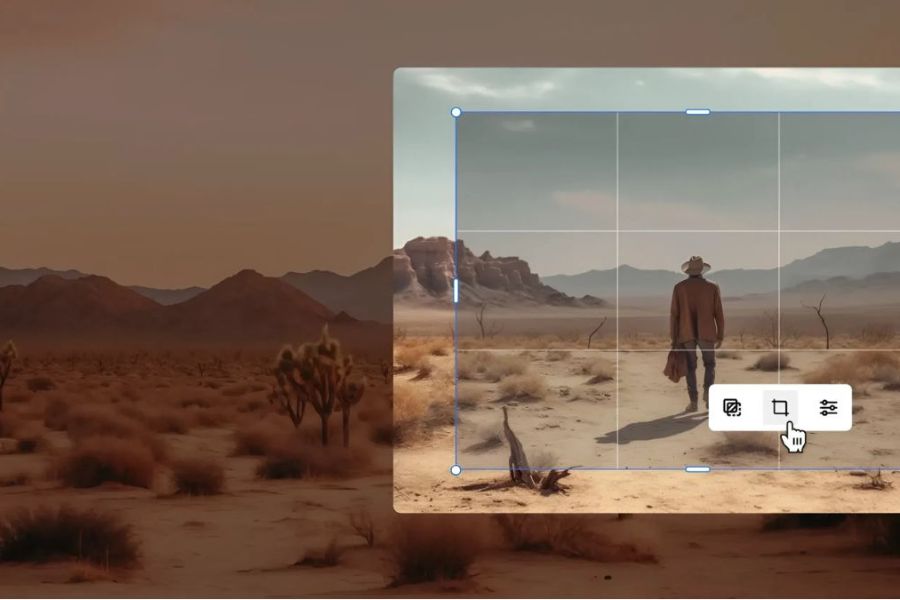
The rule of thirds is a familiar composition technique in photography. According to this rule, the frame is divided into nine equal parts by two horizontal and two vertical lines. You can place the subject at the intersections or along these dividing lines to create a balanced and natural feel.
When cropping an image, enable grid support if the software provides it. Then, adjust the cropping frame so that the subject is positioned appropriately instead of always placing it in the center.
5.4. Crop to highlight the subject.
This technique focuses on narrowing the frame to highlight a key part or detail. For example, instead of keeping the entire body in a portrait, you can crop from the chest up to emphasize the facial expression. However , avoid cropping too close to sensitive areas in the composition such as the joints, knees, or neck. A sufficient amount of space will make the photo look more natural.
6. Detailed instructions on cropping images in Photoshop
Photoshop is a familiar image editing software that provides a Crop Tool to help users quickly and accurately crop images. If you're new to the software, you can follow these three simple steps.
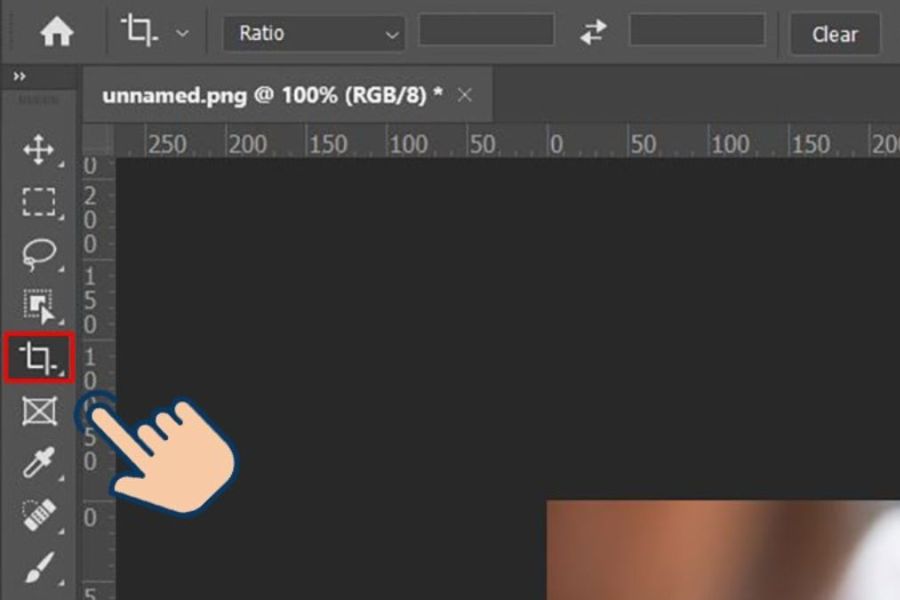
6.1. Step 1: Open the image and select the Crop Tool
First, launch Photoshop and open the image you want to edit by selecting File > Open. Once the image appears in the workspace, do the following:
-
Find the toolbar located on the left side of the screen.
-
Click the Crop Tool icon to activate the image cropping tool.
-
Alternatively, you can press the C shortcut key on your keyboard for faster operation.
At this point, a cropping frame will appear around the image, allowing you to adjust the area you want to keep.
6.2. Step 2: Set the image cropping ratio
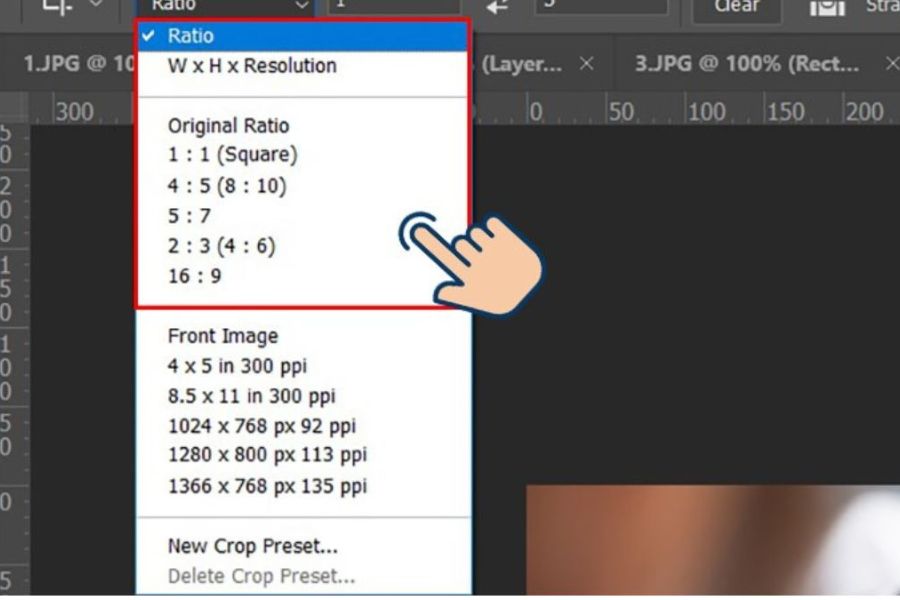
After selecting the Crop Tool, you can set the aspect ratio using the options bar at the top of the interface. Photoshop offers various modes to meet different editing needs.
Some common options include:
-
Ratio: Crop the image to your chosen width and height ratio.
-
W x H x Resolution: Set the desired width, height, and resolution.
-
Original Ratio: Maintains the original aspect ratio.
-
1:1: Crop the image to a square ratio.
Unless otherwise specified, you can select Original Ratio to minimize changes to the original image's aspect ratio.
6.3. Step 3: Crop and save the image
This is the final step in completing the image cropping process. Observe the frame and adjust the edges so that the retained area has a suitable composition.
-
Hold down the left mouse button and drag the corners or edges of the crop frame to select the image area.
-
Move the cropping frame to align the subject's position.
-
Double-check the layout before confirming.
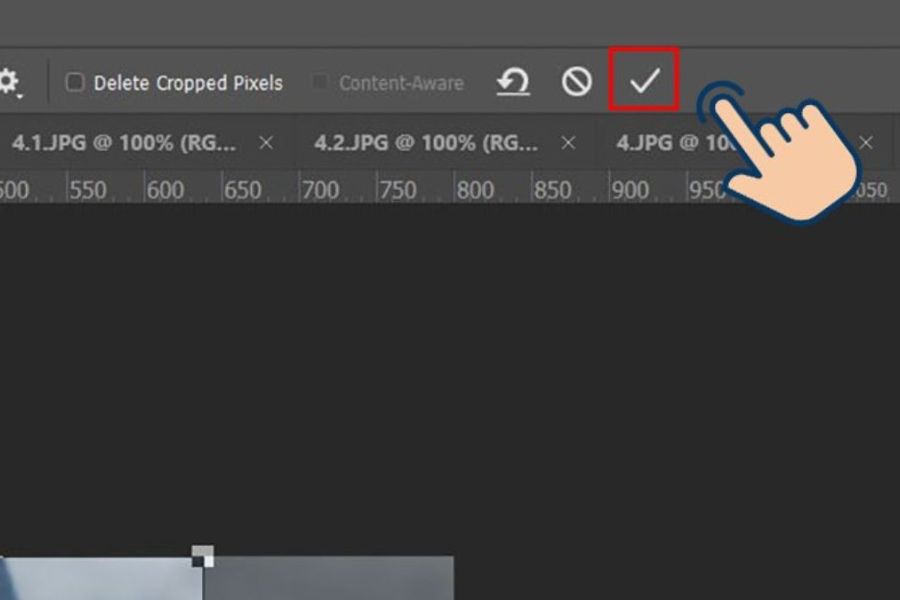
-
Press Enter or select the checkmark icon in the options bar to complete.
After cropping, select File > Save As to save the result. If you want to keep the original image, you should save it as a new file instead of overwriting the original file.
7. Common mistakes when cropping images and how to fix them.
Although cropping images is quite simple, beginners may still encounter some problems that result in unsatisfactory final products. Below are some common mistakes and effective solutions:
-
Image distortion after cropping: This is usually caused by stretching or resizing in an inappropriate ratio. You should use aspect ratio preservation mode to minimize this problem.
-
Image quality is reduced: Excessive cropping leaves insufficient pixels for sharp display. Prioritize high-resolution original images and avoid excessive enlargement after cropping.
-
Missing important details: This error often occurs when the subject and composition are not clearly defined. Observe the entire frame before taking the shot.
-
Unbalanced composition: Placing the subject too close to the edge or leaving unsuitable space can make the photo look unnatural. You should use the 1/3 grid for alignment.
-
Choosing the wrong aspect ratio: Images may be cropped when uploaded to social media. Check the required size and aspect ratio before exporting your images.
8. Tips for cropping photos beautifully and professionally.
To crop photos beautifully, you need not only to know how to use the tools but also to understand how to arrange the composition. The following tips will help you create harmonious and more impactful images:
-
Identify the subject before cutting: Always know what the most important content is to avoid accidentally removing the wrong details.
-
Avoid cropping too tightly: Leaving a reasonable amount of space gives the image depth and prevents it from feeling cramped.
-
Pay attention to the subject's gaze: For portraits, leave some space in front of the subject whose eyes are looking or moving.
-
Choose the appropriate ratio: Consider the intended use before setting up the cutting frame.
-
Check resolution: Ensure that the cropped image still meets display or printing requirements.
-
Observe the overall picture before saving: Don't just focus on the cropped area, but check the harmony of the entire layout.
9. Conclusion
Hopefully, through the above sharing, you have clearly understood what image cropping is, its outstanding benefits, and the techniques for cropping images beautifully and professionally. This is a simple operation but can make a significant difference in the composition and aesthetics of an image. Whether using Photoshop or other editing tools, you just need to identify the correct subject, choose the appropriate ratio, and avoid cutting out important details to create more impressive frames.

















VIP Products

Best Selling Products
Freepik Premium Account
59 USD
Plugin Retouch4me
69 USD
Upgrade Duolingo Super
29 USD
Capcut Pro 1 Year
39 USD
Adobe Photoshop Copyright - Full App
120 USD
MidJourney Account
29 USD
Copyright Adobe Lightroom Account
59 USD
Windows 10 & 11 Pro Key
36 USD
Genuine Cheap Canva Pro
39 USD
Upgrade genuine Capture One account
120 USD
Genuine Adobe Illustrator account
99 USD
Upgrade Genuine Office 365
49 USD
Autodesk All App Account Copyright
120 USD
Adobe Premiere Pro Account
99 USD
ChatGPT Plus Account (GPT-4)
16 USD