Best Selling Products

Capcut Pro 1 Year
39 USD

Plugin Retouch4me
69 USD

Upgrade Genuine Office 365
49 USD

Adobe Photoshop Copyright - Full App
120 USD

MidJourney Account
29 USD

ChatGPT Plus Account (GPT-4)
16 USD

Genuine Adobe Illustrator account
99 USD

Upgrade Duolingo Super
29 USD

Genuine Cheap Canva Pro
39 USD

Copyright Adobe Lightroom Account
59 USD

Autodesk All App Account Copyright
120 USD

Freepik Premium Account
59 USD

Upgrade genuine Capture One account
120 USD

Windows 10 & 11 Pro Key
36 USD

Adobe Premiere Pro Account
99 USD
What Is the Pen Tool? How to Use the Pen Tool in Photoshop Like a Professional Designer
Nội dung
- 1. What Is the Pen Tool in Photoshop?
- 2. Exploring the Modes of the Pen Tool
- 2.1 Path Mode
- 2.2 Shape Mode
- 2.3 Pixel Mode
- 3. Step-by-Step Guide to Using the Pen Tool in Photoshop in Path Mode
- 3.1 Step 1: Create an Anchor Point
- 3.2 Step 2: Draw Straight Segments
- 3.3 Step 3: Draw Curves
- 3.4 Step 4: Adjust the Drawn Curves
- 3.5 Step 5: Complete and Close the Path
- 4. Turn Paths into Selections, Masks, and Shapes in Photoshop
- 4.1 How to Create a Selection from a Path
- 4.2 How to Create a Vector Mask from a Path
- 4.3 How to Create a Shape from a Path
- 5. Common Mistakes When Using the Pen Tool in Photoshop
- 5.1 Broken Curves, Lack of Smoothness
- 5.2 Difficulty Adjusting Handles
- 5.3 Creating Anchor Points in the Wrong Position
- 5.4 Path Misalignment with the Object
- 5.5 Difficulty Closing a Path
- 5.6 Forgetting to Switch Between Supporting Tools
- 6. Conclusion
The Pen Tool is one of the most important tools in Photoshop, helping designers control lines with precision and flexibility. Although it often intimidates beginners because it seems difficult to use, once you understand how anchor points and curves work, the Pen Tool becomes very logical and easy to get familiar with.
1. What Is the Pen Tool in Photoshop?
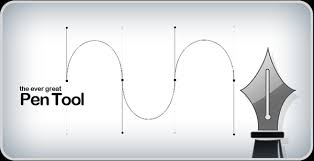
The Pen Tool in Photoshop is a specialized tool used to create lines and shapes with high precision, trusted by most professional designers. Instead of drawing freely like the Brush or Pencil tools, the Pen Tool works based on a system of anchor points and curves, allowing users to control even the smallest details. Thanks to this, the outlines created are always sharp, clean, and suitable for various design purposes.
The Pen Tool is not only for drawing but also serves as a powerful assistant when creating complex selections or removing backgrounds from difficult objects. Paths created with the Pen Tool can easily be converted into selections, shapes, or masks while maintaining smoothness and accuracy. This flexibility makes the Pen Tool indispensable for tasks such as logo design, product photo editing, or advanced image processing.
Using the Pen Tool is not too complicated once you understand its principles. Simply select the Pen Tool with the shortcut P, click to create anchor points, and drag to adjust the curve. In addition, options like adding points, deleting points, or converting anchor points help refine paths more flexibly. Once familiar, the Pen Tool will help you work faster and achieve noticeably professional design results.
.jpg)
2. Exploring the Modes of the Pen Tool
Before diving deeper into how to use the Pen Tool in Photoshop, understanding its working modes is an essential foundation. Each mode is designed for different purposes, from drawing precise lines and creating sharp vector shapes to working directly on pixels. Choosing the correct mode helps you work more efficiently and maintain design quality from the very first steps.
2.1 Path Mode
Path Mode is the core mode and the reason why the Pen Tool is highly valued in Photoshop. When using this mode, you create vector paths with near-perfect precision, unaffected by image resolution. Paths are built from anchor points and handles, allowing flexible editing, curving, and detailed adjustments.
Path Mode is especially suitable for drawing complex outlines, cutting out difficult objects, or creating precise selections. You can save paths for later use or quickly convert them into selections, masks, or shapes. This makes cutting, editing, and effect creation much cleaner, more accurate, and more professional.
2.2 Shape Mode
Shape Mode allows the Pen Tool to create complete vector shapes with fill and stroke colors applied instantly. Unlike regular paths, shapes created in this mode exist as independent objects that can be resized without losing quality. This makes them easy to edit, arrange, and reuse across different projects.
Thanks to flexible control over anchor points and curves, Shape Mode is ideal for designing logos, icons, buttons, or graphic elements requiring high sharpness. Whether for web interfaces or print materials, this mode ensures visuals remain crisp, refined, and professionally durable.
.jpg)
2.3 Pixel Mode
Pixel Mode allows you to draw directly onto an image as raster graphics, creating colored shapes directly on individual pixels. Unlike vector modes, objects created in Pixel Mode are tied to image resolution and cannot be scaled infinitely without quality loss.
Pixel Mode is suitable for quick visual effects or pixel-art-style designs. Users can adjust color, opacity, and blending modes to create emphasis within compositions. When used correctly, Pixel Mode speeds up workflow and adds a more spontaneous and dynamic creative feel to graphic products.
3. Step-by-Step Guide to Using the Pen Tool in Photoshop in Path Mode
The detailed guide below will help you gradually get familiar with creating anchor points, drawing straight lines and curves, and refining paths smoothly and naturally. By practicing the correct sequence, you can master the Pen Tool even as a beginner.
Upgrade Licensed Adobe Photoshop
3.1 Step 1: Create an Anchor Point
First, make sure Path Mode is selected on the top options bar in Photoshop. Then select the Pen Tool or press the shortcut P to begin drawing. Click once on the workspace to create your first anchor point, which serves as the starting point for your path.
Each anchor point acts as a guidepost defining the direction and overall shape of the path. Placing points correctly from the start makes later segments easier to control and reduces the need for complex adjustments.
.jpg)
3.2 Step 2: Draw Straight Segments
To create straight lines, continue clicking at desired positions on the canvas. Each click creates a new anchor point, and Photoshop automatically connects them with sharp straight segments.
Think of it like constructing a technical blueprint where every line must be clear and accurate. Proper anchor placement ensures your straight segments fit the overall layout.
.jpg)
3.3 Step 3: Draw Curves
Curves are the greatest strength of the Pen Tool and often the most confusing part for beginners. In Photoshop, curves can be created in different ways such as Curvature or Freeform, depending on your preferred workflow.
With Curvature, simply place anchor points and Photoshop automatically creates smooth curves passing through them. Note that with only two points, the path remains straight — you need a third point to define curvature.
Freeform allows you to draw naturally like sketching with a pen on paper. Hold and drag the mouse along the desired curve, and Photoshop automatically creates suitable anchor points.
.jpg)
3.4 Step 4: Adjust the Drawn Curves
After drawing the basic path, refinement helps make it smoother and more accurate. Select the Direct Selection Tool with shortcut A to access anchor points and handles. Drag anchor points to reposition them, or rotate and extend handles to adjust curvature.
The Convert Point Tool is especially useful for switching between corner and curve points. It lets you control bends between path segments without affecting other parts, creating a more natural and seamless appearance.
(1).jpg)
3.5 Step 5: Complete and Close the Path
Once your desired shape is complete, close the path by moving the cursor back to the first anchor point. When a small circle appears beside the cursor, click to close the path.
If you want an open path instead, press Ctrl on Windows or Cmd on Mac and click outside the drawing area. This ends drawing while preserving the path for further editing or conversion.
(1).jpg)
4. Turn Paths into Selections, Masks, and Shapes in Photoshop
Once you know how to use the Pen Tool to draw paths, the next step is converting them into practical editing tools.
4.1 How to Create a Selection from a Path
Step 1: Use the Pen Tool (P) in Path Mode and draw around the object or area you want to select.
Step 2: Right-click the completed path and choose Make Selection.
Step 3: Adjust the Feather setting to soften selection edges, then click OK.
You now have a precise selection ready for editing or effects.
.jpg)
4.2 How to Create a Vector Mask from a Path
Step 1: Create a path with the Pen Tool.
Step 2: Select the target layer and click the Layer Mask icon in the Layers panel.
Step 3: Use the Direct Selection Tool to edit anchor points as needed. Changes update the vector mask instantly.
.jpg)
4.3 How to Create a Shape from a Path
Step 1: Draw a complete path.
Step 2: Right-click the path and choose Define Custom Shape, then name it.
Step 3: Select the Custom Shape Tool (U), switch to Shape Mode, and find your saved shape to use anywhere.
.jpg)
5. Common Mistakes When Using the Pen Tool in Photoshop
Even after understanding how to use the Pen Tool, many users still encounter familiar errors. Identifying them early saves time and improves workflow accuracy.
5.1 Broken Curves, Lack of Smoothness
This usually happens because too many anchor points are placed or handles are uneven.
Fix it by reducing anchor points and placing them only at critical curve transitions.
5.2 Difficulty Adjusting Handles
Incorrect handle angles can distort paths.
Practice drawing circles, waves, and ellipses. Use Alt to separate handles and Ctrl/Cmd for temporary editing.
5.3 Creating Anchor Points in the Wrong Position
Too many unnecessary points make paths hard to control.
Use Direct Selection Tool to reposition or delete excess points.
5.4 Path Misalignment with the Object
This often results from inaccurate anchor placement.
Zoom in frequently and refine with Direct Selection Tool.
5.5 Difficulty Closing a Path
Beginners often accidentally create unwanted points.
Move the cursor precisely over the first anchor point until the circle icon appears before clicking.
5.6 Forgetting to Switch Between Supporting Tools
Failing to switch between Pen Tool and Direct Selection Tool slows workflow.
Memorize shortcuts:
P for Pen Tool
A for Direct Selection Tool
Switching fluidly improves speed and accuracy.
6. Conclusion
Mastering the Pen Tool is an important milestone for elevating your Photoshop skills. Once you become comfortable placing points and controlling curves, you will work faster, more accurately, and more confidently on any design project. The Pen Tool is not just another tool — it is a foundation for creating high-quality, lasting design work. Appvip believes that with proper practice, you can use the Pen Tool confidently and professionally in any situation.





















VIP Products








Best Selling Products
Capcut Pro 1 Year
39 USD
Plugin Retouch4me
69 USD
Upgrade Genuine Office 365
49 USD
Adobe Photoshop Copyright - Full App
120 USD
MidJourney Account
29 USD
ChatGPT Plus Account (GPT-4)
16 USD
Genuine Adobe Illustrator account
99 USD
Upgrade Duolingo Super
29 USD
Genuine Cheap Canva Pro
39 USD
Copyright Adobe Lightroom Account
59 USD
Autodesk All App Account Copyright
120 USD
Freepik Premium Account
59 USD
Upgrade genuine Capture One account
120 USD
Windows 10 & 11 Pro Key
36 USD
Adobe Premiere Pro Account
99 USD