Best Selling Products
2 Simplest Ways to Smooth Skin in Lightroom
Nội dung
- 1. Why should you use Lightroom to smooth skin?
- 2. Smooth skin with tools in Lightroom
- 2.1 Step 1: Import photos into Lightroom
- 2.2 Step 2: Select the Develop tab to start editing photos
- 2.3 Step 3: Using the Spot Removal tool
- 2.4 Step 4: Hover the mouse over the affected skin area
- 2.5 Step 5: Left click to replace the bad skin area
- 2.6 Step 6: Smooth the skin with the Adjustment Brush tool
- 2.7 Step 7: Show mask overlay to control editing area
- 3. Smooth skin with portraiture plugin in Lightroom
- 3.1 Step 1: Download the Portraiture plugin to your computer
- 3.2 Step 2: Install the plugin
- 3.3 Step 3: Open Lightroom
- 3.4 Step 4: Save a copy and make edits
- 3.5 Step 5: Use the Smooth panel to smooth the skin
- 4. Other tools to help smooth skin
- 4.1 Photoshop
- 4.2 Capture One
- 4.3 Affinity Photo
- 4.4 Snapseed
- 5. Conclusion
In the digital age, having perfect photos to express yourself on social networks has become an essential need. Especially during holidays, birthdays, parties and outings, everyone wants to have beautiful, attention-grabbing photos. One of the important factors to create those photos is smooth, healthy skin. To meet this need, photo editing software like Lightroom has become an indispensable companion, helping you easily improve your skin and create impressive photos.
In the digital age, having perfect photos to express yourself on social networks has become an essential need. Especially during holidays, birthdays, parties and outings, everyone wants to have beautiful, attention-grabbing photos. One of the important factors to create those photos is smooth, healthy skin. To meet this need, photo editing software like Lightroom has become an indispensable companion, helping you easily improve your skin and create impressive photos. Let's explore with Sadesign the simple way to smooth your skin right after this.
1. Why should you use Lightroom to smooth skin?
When it comes to photo editing, Lightroom stands out as an indispensable tool for those who want to create perfect photos. Especially in today's social context, where images play an important role in self-expression, having smooth, radiant skin has become the desire of many people. Lightroom not only provides simple editing capabilities but also possesses many powerful features that help you beautify your skin effectively. With specialized tools, users can easily remove blemishes and create impressive photos that attract all eyes.
One of the reasons why Lightroom is the top choice for skin smoothing is its versatility and customization. With tools like the Adjustment Brush and HSL, you can tweak every little detail in your photo, from brightness, contrast, to skin tone. This allows you to create natural-looking smoothing effects without losing the authenticity of your photos. Thanks to this flexibility, you can create photos that suit every occasion, from fancy parties to relaxing getaways.
Furthermore, Lightroom also has the ability to batch process photos, helping you save time in editing. Instead of editing each photo manually, you can apply presets or saved settings to multiple photos at once. This not only saves you time but also ensures consistency in your photo collection. With the support of Lightroom, creating photos with smooth, radiant skin has never been easier. Let Lightroom help you shine in every moment!

2. Smooth skin with tools in Lightroom
2.1 Step 1: Import photos into Lightroom
First, you need to open Lightroom on your computer. In the lower left corner of the screen, click the "+" icon to open the photo import dialog. Here, you will be asked to select the photo you want to edit. Navigate to the folder containing your photo, select the photo you want to edit, and click Import again to complete the import process. Once complete, the photo will appear in your library, ready to edit.
2.2 Step 2: Select the Develop tab to start editing photos
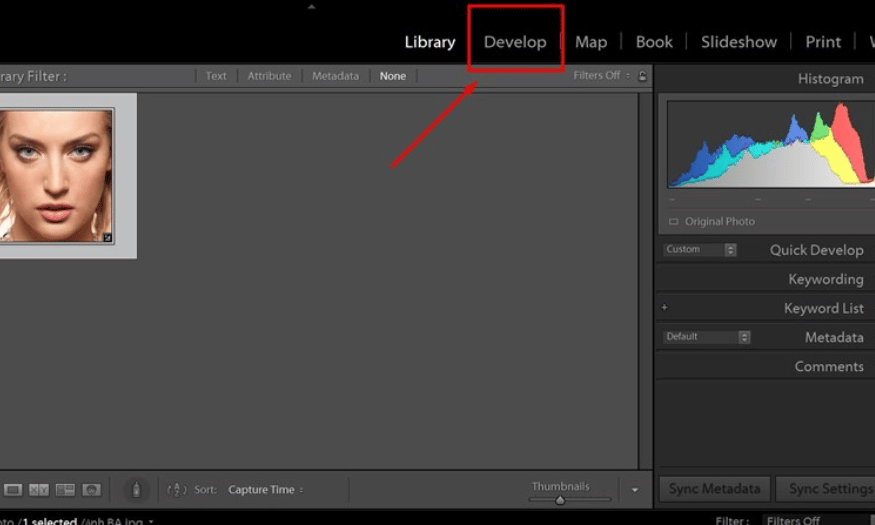
Once you have imported your photo, you will need to select the Develop tab at the top of the interface. This is where you will perform all of your photo editing, including skin smoothing. Once you are in the Develop tab, you will see tools on the right side that contain options for adjusting the brightness, color, and other details of your photo. Make sure you have selected the correct photo that you want to edit.
2.3 Step 3: Using the Spot Removal tool
To start smoothing the skin, you will use the Spot Removal tool . You can activate this tool by pressing the Q shortcut on your keyboard. In the tool window, select the Heal mode . The brush size can be adjusted using the parameters bar below, making it easy to work on small areas of skin. In this case, you do not need to change the remaining parameters because they are already set to clean up blemishes.
2.4 Step 4: Hover the mouse over the affected skin area
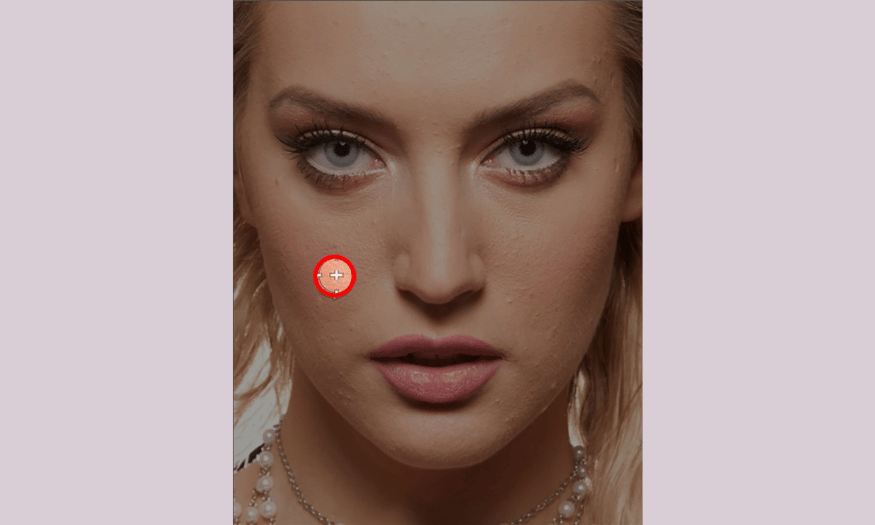
Next, hover over the area of skin that has the blemish you want to remove. As you move your mouse over this area, Lightroom will display a red area to indicate the area you are selecting. This is an important step to ensure that you are working with the correct areas.
2.5 Step 5: Left click to replace the bad skin area
Once you have selected the bad skin, left-click to have Lightroom automatically replace it with the better skin. You can hold the mouse button to paint over a larger area if needed. Lightroom will select another area of skin (area 2) to replace the bad skin (red). If you are not satisfied with the selected area, you can move area 2 to any other area you want. Continue doing this until you are satisfied with the result.
2.6 Step 6: Smooth the skin with the Adjustment Brush tool
Once you've removed any blemishes, switch to the Adjustment Brush tool to smooth out the skin. First, select the tool from the toolbar on the right. Adjust the settings as follows:
Clarity: -100 (reduces sharpness to smooth skin)
Sharpness: -30 (reduces overall sharpness)
Noise: +50 (increases smoothness of the image)
In this example, since the model's skin tone is dark, you should adjust the Exposure to around 0.05 to smooth out the skin and give it a more natural light tone. Note that the skin tone should not deviate too much from the original skin tone to maintain a natural look.
You should also adjust the Brush Feather parameter . If you choose 0, the brush stroke will be very sharp, while 100 will be very blurry. Here, you should leave the Feather around 75 to create a smoother transition between skin areas.
2.7 Step 7: Show mask overlay to control editing area
Finally, to easily see the skin you've painted, select Show Selected Mask Overlay by pressing the O key . This will display a red mask over the image, making it easier to see the areas that have been edited. Paint over the areas you want to smooth and whiten, then press Done to complete the editing process.
If you find yourself painting outside the lines, simply hold down the Alt (Windows) or Option (Mac) key and paint over the areas to erase them. This will give you the best possible editing results.

3. Smooth skin with portraiture plugin in Lightroom
3.1 Step 1: Download the Portraiture plugin to your computer
First, you’ll need to download the Portraiture plugin to your computer. Search for the download section and select the version that matches your operating system. The download should be quick, and you’ll have an installation file ready for the next step.
3.2 Step 2: Install the plugin
After downloading, open the installation file. The installation interface will appear, asking you to perform a few simple steps. Click Next , then select I Agree to agree to the terms of use. Next, click Install to start the installation process. When the installation is complete, you will see a Finish message . Click it to finish and return to the main screen.
3.3 Step 3: Open Lightroom
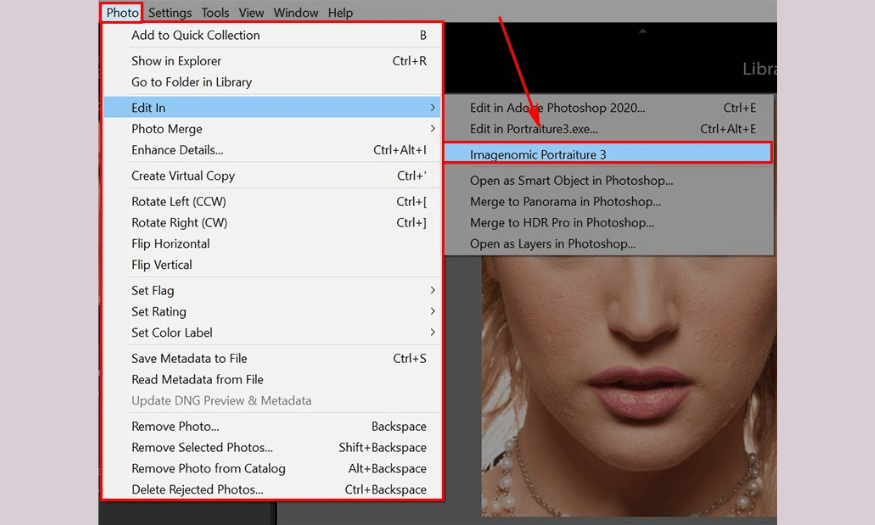
Once the installation is complete, open Lightroom. Note that the Portraiture plugin will automatically update and integrate into the software. To access the plugin, simply go to the Photo menu , then select Edit In and search for Imagenomic Portraiture 3 . This will take you to the plugin's editing interface.
3.4 Step 4: Save a copy and make edits
When the plugin interface appears, you should select the Edit a Copy with Lightroom Adjustments option . This option allows you to create a copy of the photo with the edits from Lightroom, allowing you to keep the original so you can reuse it when needed. This is important, especially when you want to experiment with different styles without losing the original photo.
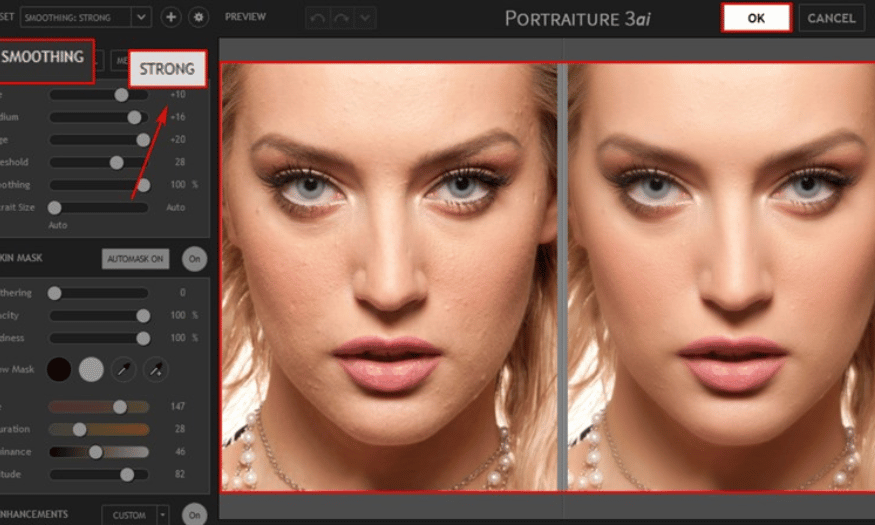
3.5 Step 5: Use the Smooth panel to smooth the skin
In the plugin interface, you will see the Smooth panel . Here, select the Strong level so that the software can perform the most optimal editing. The special thing about the Portraiture plugin is that it works automatically, so you don't need to adjust complicated parameters. Just click OK to complete the skin smoothing process. The plugin will automatically apply the effects, making your skin smoother and more natural.
4. Other tools to help smooth skin
In addition, there are many other tools and software that can help you smooth skin effectively during photo editing. Below are some outstanding tools that you can refer to to improve your photos.
4.1 Photoshop
Photoshop is one of the most powerful photo editing software available today. With tools like the Healing Brush and Clone Stamp , you can easily remove skin imperfections like acne or blemishes. In particular, the Frequency Separation technique allows you to separate the details and colors of the skin, thereby editing while still maintaining its natural look. Combined with filters like Gaussian Blur , you can smooth the skin without losing its natural texture.
4.2 Capture One
Capture One is not only a professional photo editing software but also provides many useful tools for smoothing skin. The Skin Tone tool allows you to easily adjust the color of the skin, helping to create a uniform and natural look. Additionally, the Layers feature in Capture One allows you to apply adjustments to only a certain area of the photo, helping you smooth the skin without affecting other parts.
4.3 Affinity Photo
Affinity Photo is a great choice for those looking for a photo editing software at a reasonable price. The Inpainting Brush tool in Affinity Photo makes it easy to remove skin blemishes. You can also use filters like Smooth to smooth out skin. With a user-friendly and powerful interface, Affinity Photo is a great alternative to Photoshop.
4.4 Snapseed
If you are looking for a mobile photo editing app, Snapseed is one of the top choices. This app offers a Healing tool that helps you quickly remove skin blemishes. Additionally, the Portrait feature allows you to smooth skin and adjust lighting automatically, giving you beautiful photos in just a few clicks.
5. Conclusion
Skin smoothing is not just about removing blemishes, but also about creating a radiant, natural-looking complexion in a photo. With a variety of tools and software such as Photoshop, Capture One, Affinity Photo, Snapseed and Lightroom, you can easily find the method that works best for you. Experiment with these tools to explore and improve your photo editing skills, helping you create impressive and eye-catching photos.


