Best Selling Products

Windows 10 & 11 Pro Key
36 USD

Genuine Adobe Illustrator account
99 USD

MidJourney Account
29 USD

Adobe Photoshop Copyright - Full App
120 USD

Upgrade Genuine Office 365
49 USD

Freepik Premium Account
59 USD

Plugin Retouch4me
69 USD

Genuine Cheap Canva Pro
39 USD

Capcut Pro 1 Year
39 USD

Upgrade Duolingo Super
29 USD

Copyright Adobe Lightroom Account
59 USD

ChatGPT Plus Account (GPT-4)
16 USD

Adobe Premiere Pro Account
99 USD

Upgrade genuine Capture One account
120 USD

Autodesk All App Account Copyright
120 USD
7 Common Post-Production Mistakes Beginners Make and How to Fix Them
Nội dung
- 1. Abusing Corrections
- 2. Skip Noise Reduction and Sharpening
- 3. Unintended Editing
- 4. Relying on Presets Without Understanding Them
- 5. Apply Global Adjustments Only
- 6. Buying Too Many Tools Too Soon
- 7. Forgetting the Final Cleaning Step
- 7.1 Dust spots
- 7.2 Factors Causing Dispersion
- 7.3 Horizon and Vertical Lines
- 7.4 Controlling the image frame border
- 7.5 Chromatic Aberration
- 7.6 Bright fringes and other image noise phenomena
- 8. Conclusion
Most post-processing mistakes made by beginners follow a few familiar patterns. These aren''t random errors, but rather predictable problems, and once you know how to identify them, they are entirely fixable. This article will review seven of the most common mistakes in landscape photography post-processing.
1. Abusing Corrections
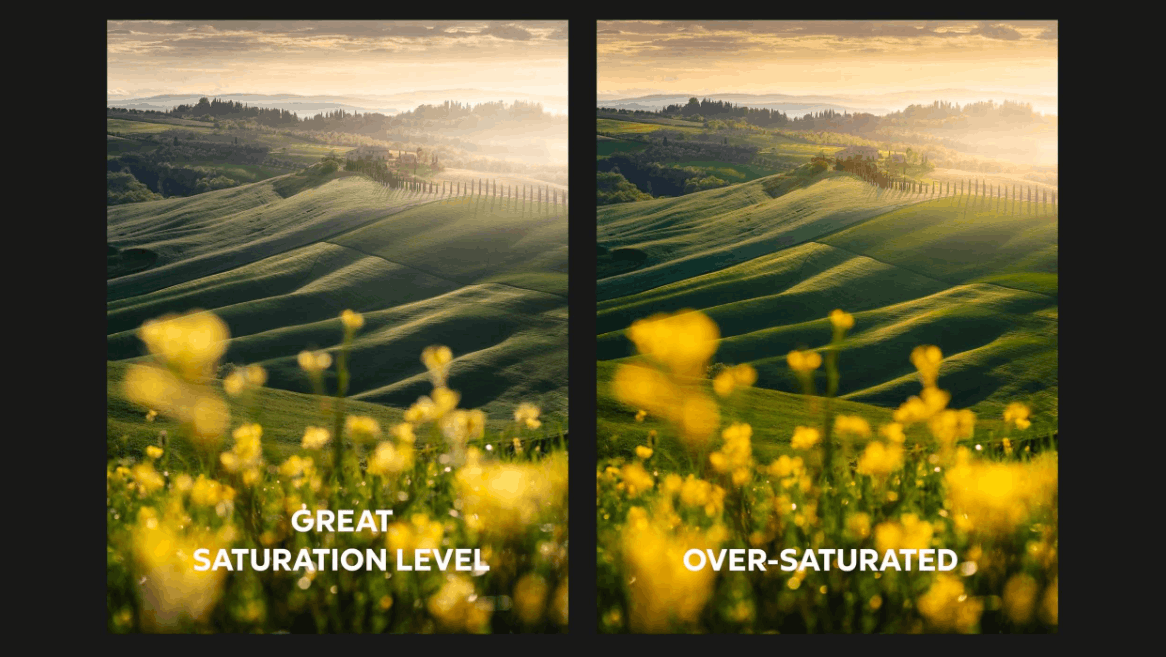
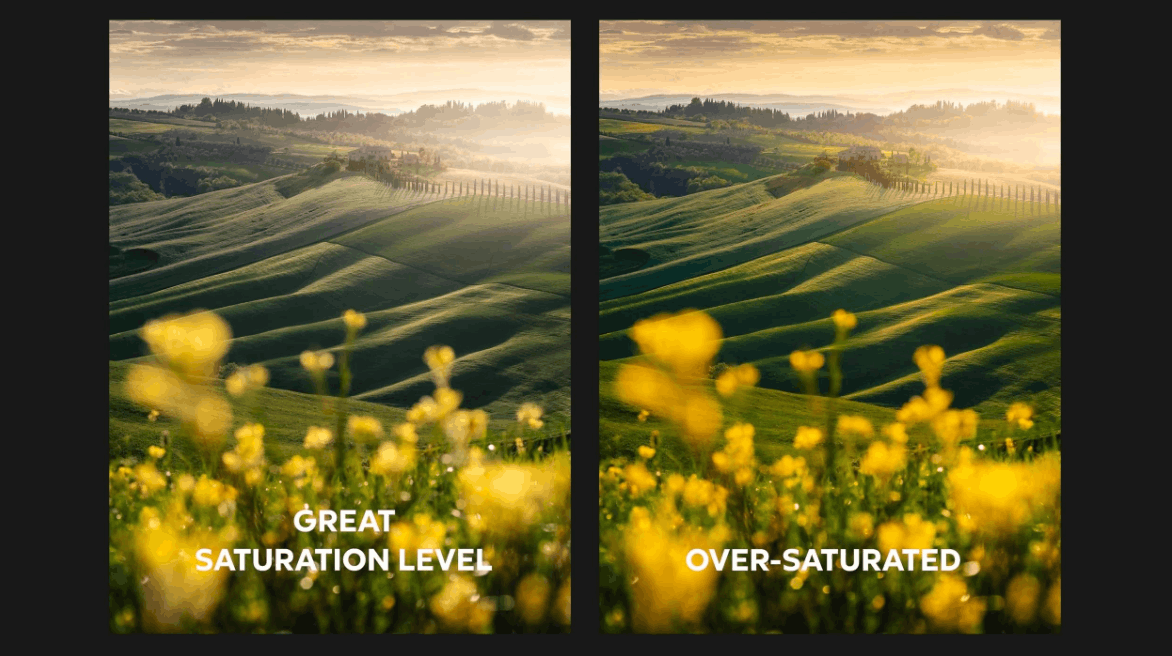
This is the most common error and also appears in many different forms. Color saturation is pushed too high, clarity is drastically reduced to the point where the image looks like a rough painting, noise reduction is applied so heavily that all small details disappear, or contrast is turned up so high that dark areas are completely black while bright areas are overexposed.
The reason for this mistake is quite understandable. When first learning post-processing, photo editors often want to maximize every detail in an image, extracting as much color and detail as possible, and the feeling that the sliders in the software have almost unlimited power leads to overuse. However, there is a huge difference between highlighting what is already present in the image and replacing it with something artificial.
A simple way to check is that if you can tell at a glance that a photo has been edited, it's likely that the adjustments have been overdone. A well-edited photo should feel closer to what the viewer sees with their own eyes, not farther from it; the colors should be natural yet vibrant; the contrast should create depth without breaking the tonal range; and the sharpness should reveal the original details, not create artificial ones.
A helpful habit to develop from the start is to leave the screen for a few minutes and then return to look at the image with a more open mind. Many times, upon returning, the photo editor will realize the image looks somewhat exaggerated compared to what they initially intended.
2. Skip Noise Reduction and Sharpening
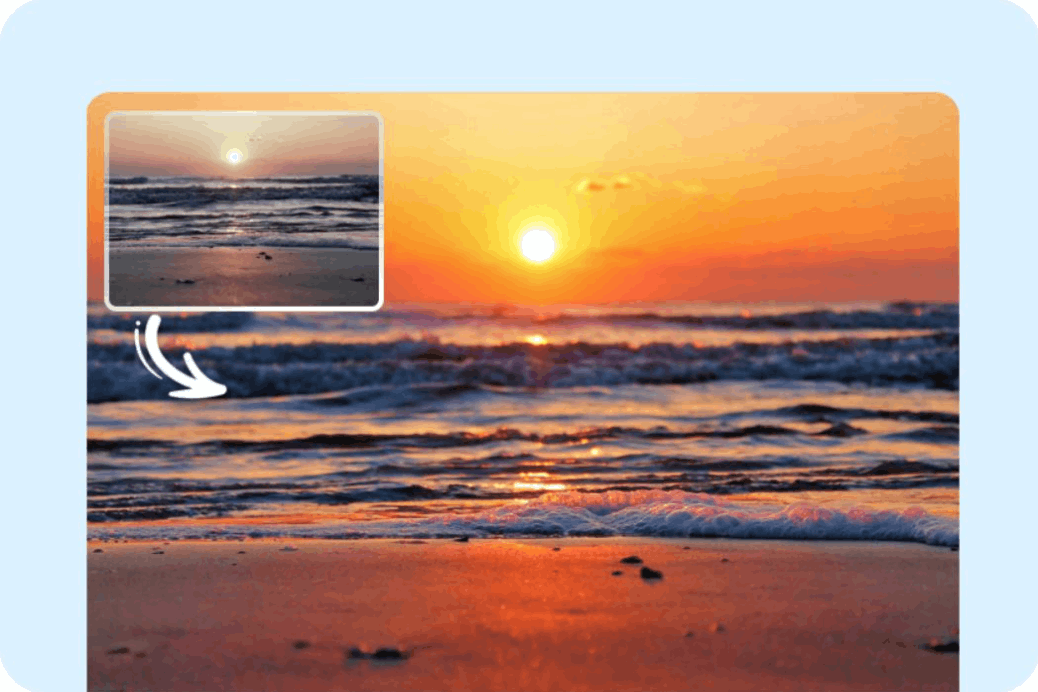
The opposite of overusing image correction is that it completely fails to address noise and sharpness. This is especially common in photos taken at high ISO, where noise is clearly visible and, if left uncorrected, can detract from the value of an otherwise excellent image.
Effective noise reduction is a matter of balance. The goal is to eliminate distracting noise while retaining fine details that make the image look realistic. Current AI-powered noise reduction tools, whether built-in in popular editing software or specialized programs, deliver impressive results and are a good starting point for most photos, especially RAW files shot at night or at high ISO.
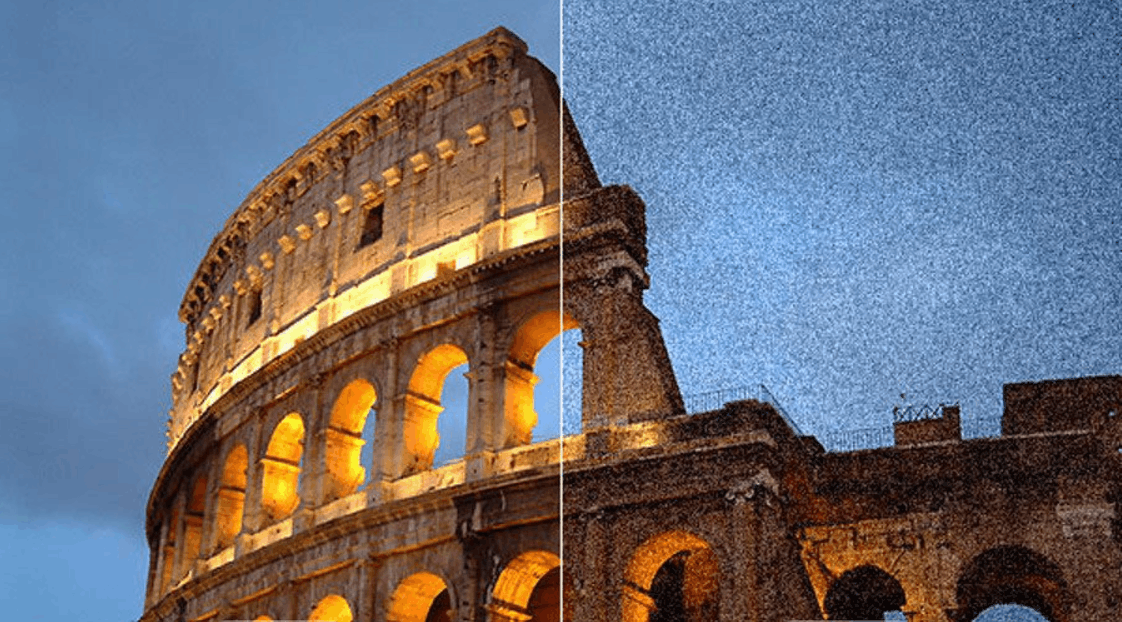
It's important to note that the default settings of many automatic noise reduction tools tend to overdo it. Often, the default settings remove so much noise that the image becomes soft and unnatural, resembling a digital painting more than a photograph. Regardless of the tool used, the general principle is to start with a level lighter than initially felt necessary, then gradually increase it if needed. Always zoom in to 100 percent to check details before exporting the image.
Sharpening follows a similar logic. A moderate amount of sharpening, applied correctly, will enhance the image's clarity and presence. However, over-sharpening will create unusual bright edges along contrasting points, amplify noise, and give the image a obviously manipulated look that is difficult to correct later. Therefore, selective sharpening should be applied only where necessary, and masks should be used to eliminate smooth areas like the sky or water, where sharpening does more harm than good.
3. Unintended Editing
This is the most difficult mistake to spot, because it doesn't lie in any specific adjustment but in the lack of a clear plan from the outset.
Unintentional editing means opening an image and starting to drag sliders without a clear vision of the destination. Increasing exposure because the image is a bit dark, increasing saturation because the colors are too pale, increasing contrast because the image needs a bit more. The end result is an image that has been adjusted but not truly edited, a collection of disparate changes that don't resonate into a well-directed whole.
Intentional editing means that before touching any sliders, the editor needs to determine beforehand the emotion they want the photo to convey. Is it a warm, vibrant atmosphere or a cold, dramatic one? Should the mood of the photo be gentle and tranquil or heavy and visually impactful? Once a clear direction has been determined, all subsequent adjustments serve that direction. The editor is no longer reacting to the photo based on immediate feelings, but is actively building it according to a specific idea.
If you find yourself constantly applying one adjustment after another without really understanding why you're doing it, this is very likely the most worthwhile area to practice in your entire post-production process.
4. Relying on Presets Without Understanding Them
Presets are indeed useful tools. They can provide a good starting point, show the possibilities achievable with a given combination of adjustments, and significantly speed up the workflow. The problem isn't with using presets, but with applying them and then stopping there.
A preset applied with just one click can affect the entire image without any knowledge of the image's specific characteristics, the lighting conditions at the time of shooting, or the mood the editor is aiming for. The result might look good on the sample image the preset is based on, but when applied to your image, under your lighting conditions and with your subject, it can be completely inaccurate, the colors may not match the scene, the contrast may flatten the tonal range, or the overall look may be completely unrelated to what you actually wanted.
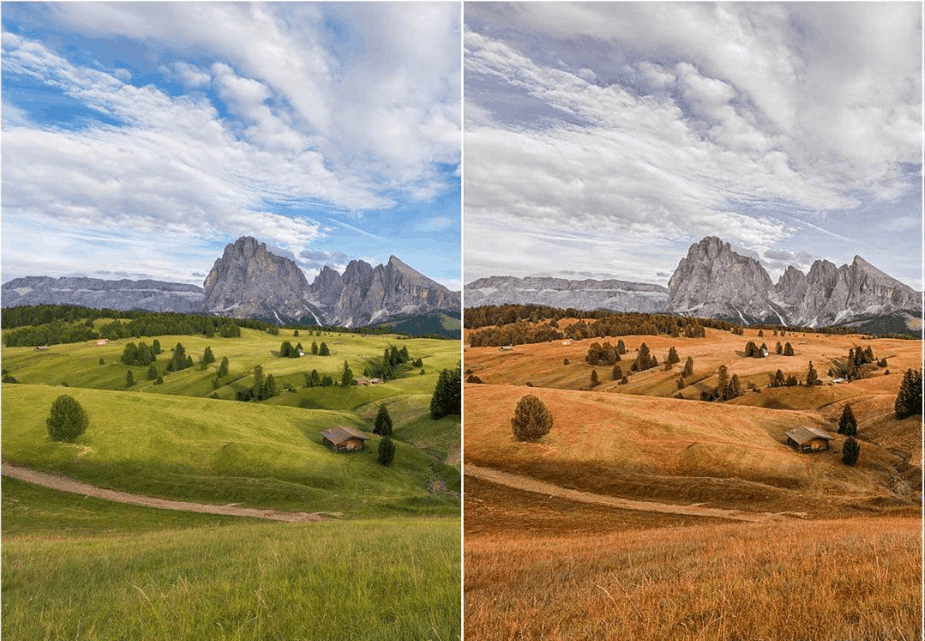
The correct way to use a preset is to view it as a starting point, not the final result. After applying the preset, review each adjustment it makes and ask yourself if that adjustment is truly suitable for this particular photo. Reduce what is too strong, add what is missing, and adjust to match the actual lighting conditions at the time of shooting. When used in this way, presets become a learning tool, a time-saving shortcut, helping the photo editor gradually understand why certain combinations of adjustments work.
5. Apply Global Adjustments Only
If you've been post-processing for a while but your photos still look flat or unbalanced even though the technical specifications are correct, this is often the cause.
Global exposure adjustment affects the entire image uniformly. When you drag the exposure slider, every area of the image brightens to the same level—sky, shadows, mid-tones, foreground—everything changes equally. With many photos, this is precisely what shouldn't happen. Perhaps the sky needs to be dimmed while the foreground needs brightening, or the rocks in the foreground need more contrast while the calm water doesn't.
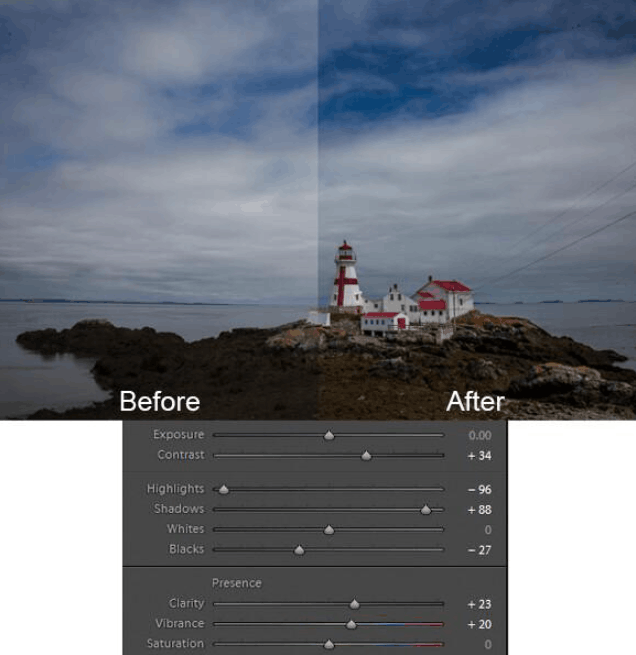
This is where local corrections come into play. Area selection masking tools in modern editing software, such as sky selection, linear gradient, or brightness range selection, allow you to apply any correction to a specific area without affecting the rest of the image. In more advanced editing software, layer corrections combined with layer masks provide even greater precision.
Learning to work locally rather than globally is one of the biggest strides a photo editor can make. It's the line between simply adjusting a photo and truly editing it in a controlled manner.
6. Buying Too Many Tools Too Soon
This is an extremely common mistake, largely driven by the relentless marketing frenzy of the photography software market. New tools are constantly being released, each promising to completely transform image quality, and beginners easily convince themselves that the reason their photos aren't as good as they'd hoped is simply because they don't have the right software.
The reality is that the most important post-production skills, including understanding lighting and tone, working with color intentionally, making selective corrections, and building a consistent workflow, are all skills honed through deep engagement with one or two tools, not from owning dozens of different software programs.
If you're just starting out, the simple advice is to pick a reliable RAW editing software and learn it thoroughly before investing in anything else. Understand histograms, grasp how the tone curve works, and build a solid workflow. Only when you've reached the limits of what the current tool can offer should you consider whether a dedicated denoising tool or a creative plugin suite truly provides value for your specific needs.
Most professional landscape photographers use a small, stable set of tools that they understand deeply. Not because they can't afford more, but because depth of understanding is always more important than the quantity of software they own.
7. Forgetting the Final Cleaning Step
You spend hours adjusting the colors, tones, and atmosphere to your liking. The photo looks exactly as you envisioned it. Then, when you export the image, you notice a speck of dust in the middle of the sky, a tourist in the bottom left corner, or a slightly tilted horizon.
The cleanup phase is easily overlooked when the focus is on the creative aspects of post-production, but it's something viewers shouldn't notice, meaning it's also the first thing they'll realize if you miss it. Below is a checklist to follow at the end of each post-production run.
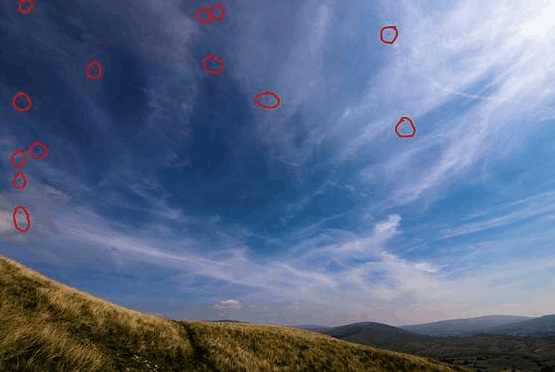
7.1 Dust spots
Examine the sky and any flat, uniform areas of the image at one hundred percent magnification. Dust on the sensor often appears as faint, dark dots, and frequently reappears in the same location across multiple photos taken during the same session.
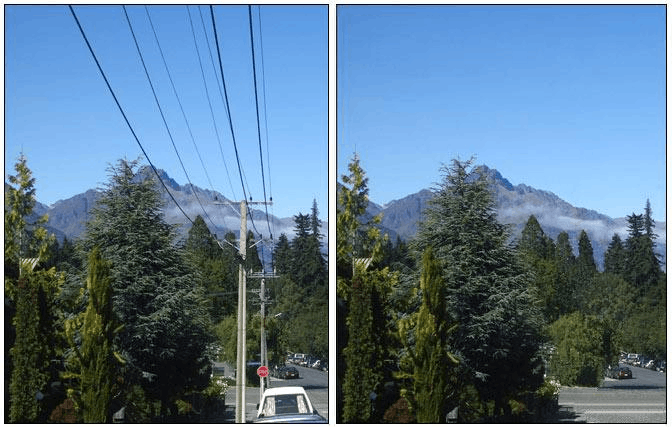
7.2 Factors Causing Dispersion
Pedestrians, road signs, litter, a single tree branch drawing unwanted attention—anything that distracts the viewer's gaze from the main subject needs to be addressed. Object removal tools in modern editing software handle most of these cases quite quickly.
7.3 Horizon and Vertical Lines
A slightly tilted horizon is easily overlooked during editing but becomes incredibly clear once the photo is published. This needs careful checking, especially with seascapes or open landscapes, where the horizon acts as a strong visual line.

7.4 Controlling the image frame border
It's necessary to review all four corners and edges of the frame to detect anything that shouldn't be there, such as a rock only partially fitting into the corner of the shot, or an unwanted detail along the edge of the frame, or any compositional elements that compete with the main subject without adding any value to the overall picture. If a detail doesn't contribute anything positive, it's best to remove it.
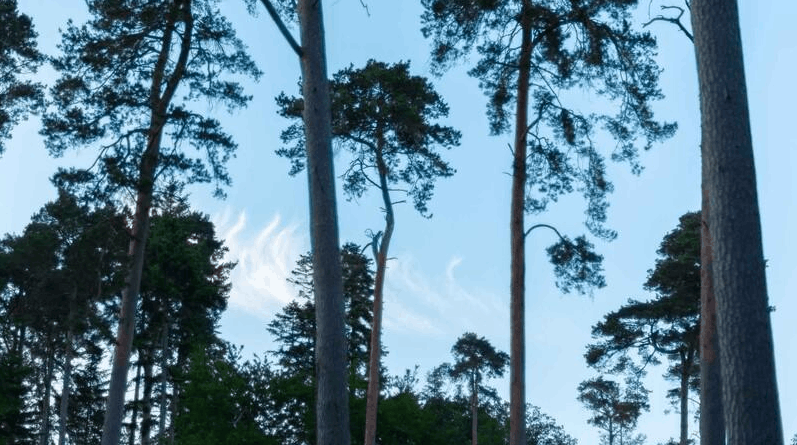
7.5 Chromatic Aberration
This is an unusual color fringing phenomenon that appears along high-contrast edges, especially at the corners of the image. The lens adjustment panel in most current editing software can automatically remove most of this phenomenon; however, for complex frames, manual adjustment may still be necessary.
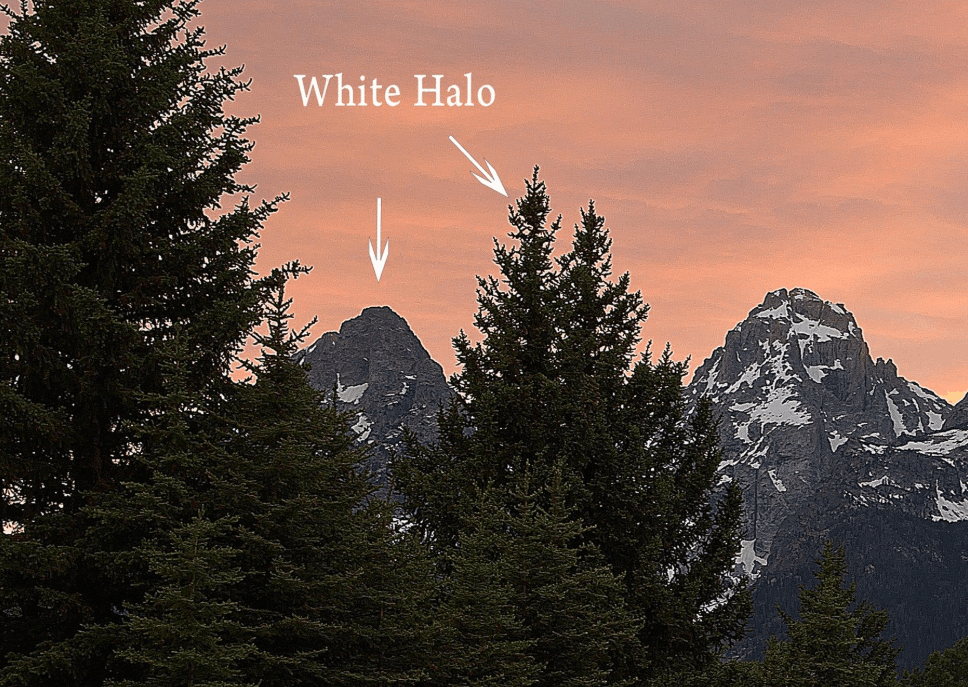
7.6 Bright fringes and other image noise phenomena
Carefully examine the edges of any areas where masks have been applied, areas that have been locally brightened or darkened, and anywhere that has been heavily sharpened or de-sharpened. Inaccuracies and over-processing leave easily overlooked traces when viewed at normal size but become clearly visible when printed or viewed at full resolution.
8. Conclusion
The good news about beginner post-processing mistakes is that they are all fixable. Most of them stem from the same root cause: making adjustments without a clear plan for the overall direction of the image.
Establish a consistent workflow, hone your ability to recognize when a photo looks artificial rather than natural, thoroughly learn the existing tools before considering adding more, and before exporting any image, take the time to carefully examine it from every angle.
Post-processing is a skill, and like any skill, it only improves through deliberate practice. The sooner you identify these common mistakes in your own process, the more you can bridge the gap between what you see in reality and what ultimately appears in the finished photograph.





















VIP Products








Best Selling Products
Windows 10 & 11 Pro Key
36 USD
Genuine Adobe Illustrator account
99 USD
MidJourney Account
29 USD
Adobe Photoshop Copyright - Full App
120 USD
Upgrade Genuine Office 365
49 USD
Freepik Premium Account
59 USD
Plugin Retouch4me
69 USD
Genuine Cheap Canva Pro
39 USD
Capcut Pro 1 Year
39 USD
Upgrade Duolingo Super
29 USD
Copyright Adobe Lightroom Account
59 USD
ChatGPT Plus Account (GPT-4)
16 USD
Adobe Premiere Pro Account
99 USD
Upgrade genuine Capture One account
120 USD
Autodesk All App Account Copyright
120 USD