Best Selling Products

Autodesk All App Account Copyright
120 USD

Windows 10 & 11 Pro Key
36 USD

Upgrade genuine Capture One account
120 USD

Upgrade Genuine Office 365
49 USD

Upgrade Duolingo Super
29 USD

Copyright Adobe Lightroom Account
59 USD

Adobe Premiere Pro Account
99 USD

Plugin Retouch4me
69 USD

Genuine Cheap Canva Pro
39 USD

ChatGPT Plus Account (GPT-4)
16 USD

MidJourney Account
29 USD

Freepik Premium Account
59 USD

Capcut Pro 1 Year
39 USD

Adobe Photoshop Copyright - Full App
120 USD

Genuine Adobe Illustrator account
99 USD
How to adjust backlit photos in Photoshop
Nội dung
Everyone has taken backlit photos that make the model dark. Don't worry, the following ways to adjust backlit photos in Photoshop will help you balance the light between the model and the background to get a beautiful photo.

Everyone has taken backlit photos that make the model dark. Don't worry, the following ways to adjust backlit photos in Photoshop will help you balance the light between the model and the background to get a beautiful photo.

1. Adjust backlit photos with Photoshop CS6
Photoshop CS6 version is quite old and has not been updated with many modern features. Therefore, one of the most commonly used ways to adjust backlit images in Photoshop CS6 is Brightness / Contrast. Brightness / Contrast is a simple, extremely effective lighting adjustment tool in case your overall image is too dark. The Brightness function will mainly aim to correct the average tone of the image, removing the darkest color points without affecting the brightest color points.
You can proceed to adjust backlit images in Photoshop CS6 version by following the following steps:
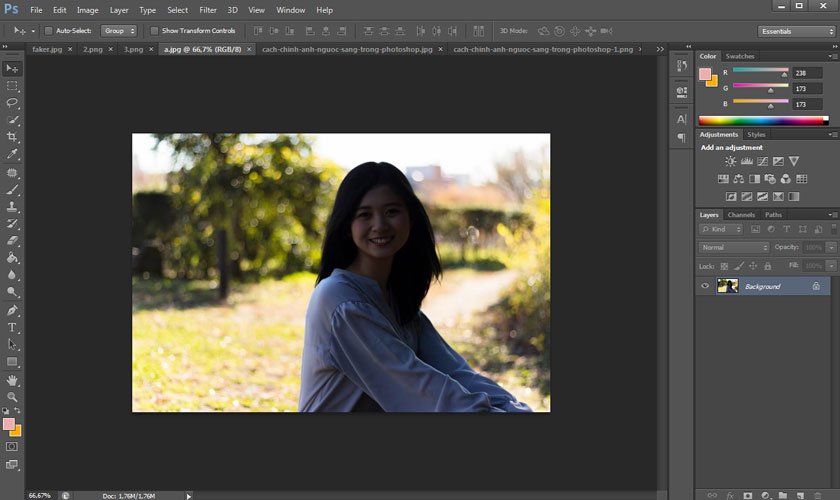
Step 1: Open the photo that needs to be adjusted backlit in Photoshop CS6.
Step 2: On the toolbar, select Image => Adjustments => Brightness / Contrast.
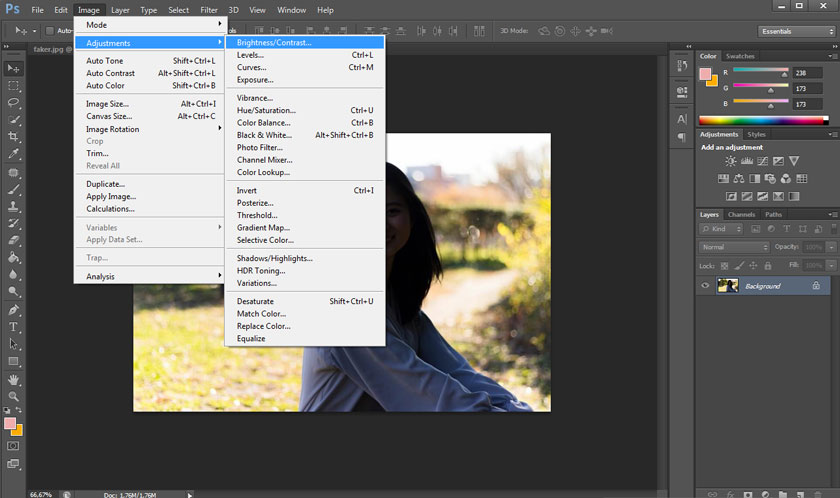
Step 3: In the Brightness / Contrast dialog box, adjust the two sliders Brightness and Contrast, so that the photo reaches the most satisfactory brightness.
● Brightness: Adjust the brightness for neutral color points on the photo, slide to the left to darken and slide to the right to brighten the photo.
● Contrast: Adjust the contrast for image details, slide right to increase and slide left to decrease contrast.
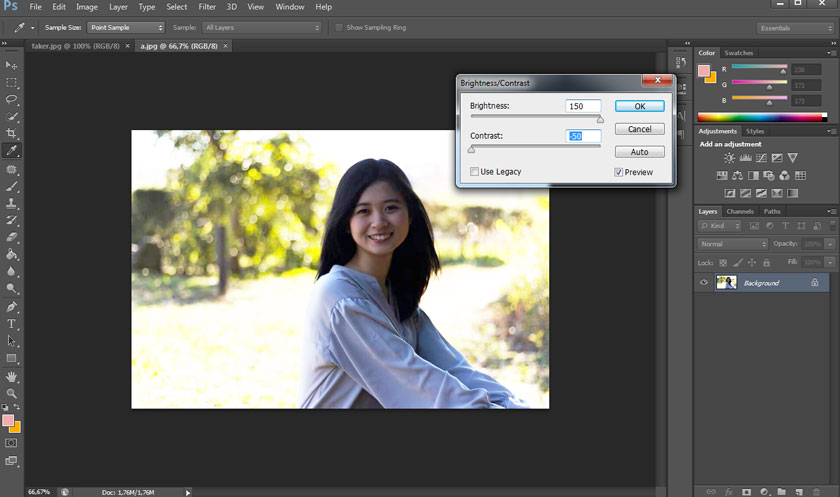
You can also choose Auto so that the software can automatically adjust the brightness. Finally, SaDesign click OK to finish adjusting backlit images in Photoshop CS6.
2. How to adjust backlit photos in Photoshop using Camera Raw
If your Photoshop is a higher version, you can use the Camera Raw tool to adjust backlit photos in Photoshop. Camera Raw is available from Photoshop CC 2013, so if your software doesn't have this application, upgrade now.
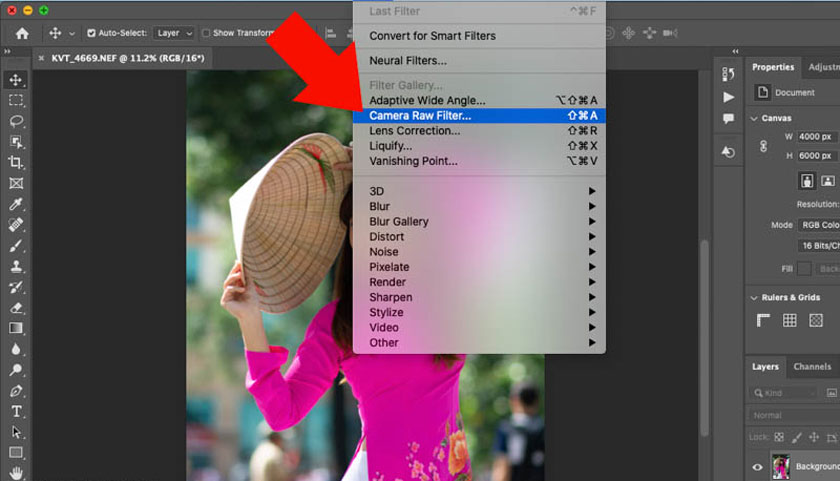
Step 1: Open the photo that needs backlight correction in Photoshop. You should use a Raw image because it will have more information than a JPG image.
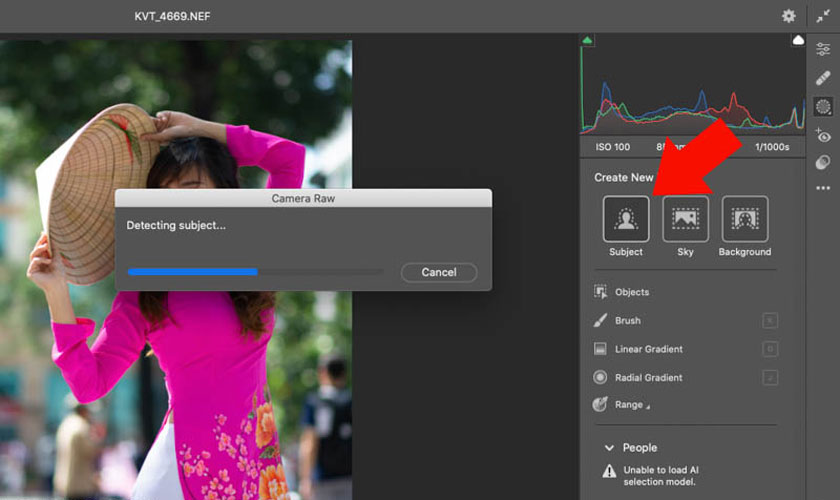
Step 2: On the menu bar, select Filter => select Camera Raw Filter or use the keyboard shortcut Ctrl+Shift+A.
Step 3: Click Masking or the shortcut M. Then click Subject to create a selection around the model. This feature works well for both animals and objects.
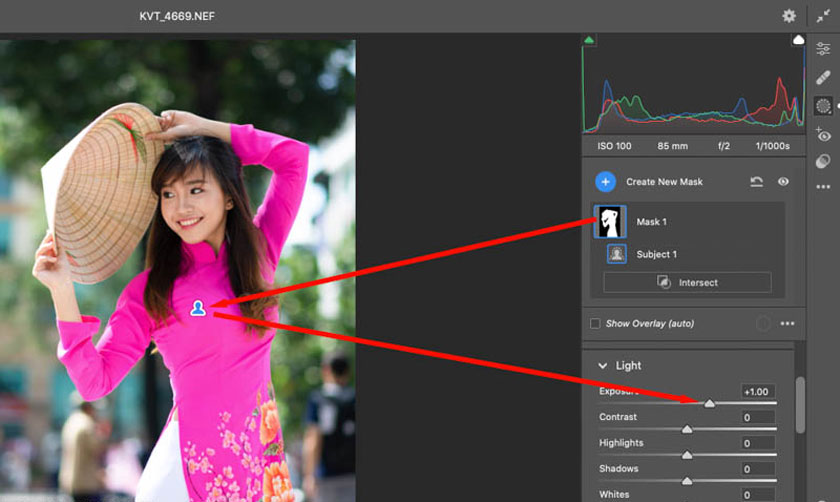
As you can see, Photoshop has created a precise selection around the model. Let's click on the Mask surrounding the model, then check Show Overlay to see the Mask's selection. Then, press Light => increase Exposure, you will see the object brighter. Note, do not increase too much, you should reduce the background brightness a bit.
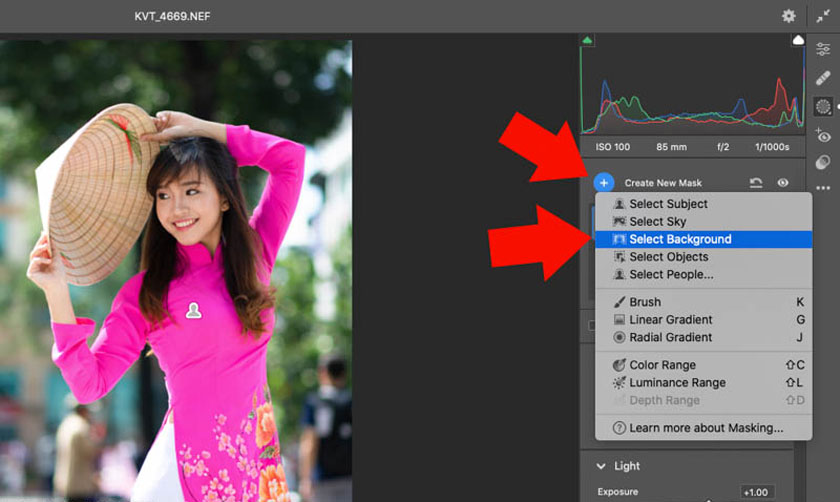
Step 4: Click Create New Mask => select Select Background. Photoshop will now create a selection above the background. You just need to wait until it is completed.
Photoshop will create a background selection marked in red. If you don't see the red area, check Show Overlay.
Then, click on the background selection icon (corresponding to Mask 2). Then click Light => reduce Exposure. At this point, the background will be darker, making the model stand out more.
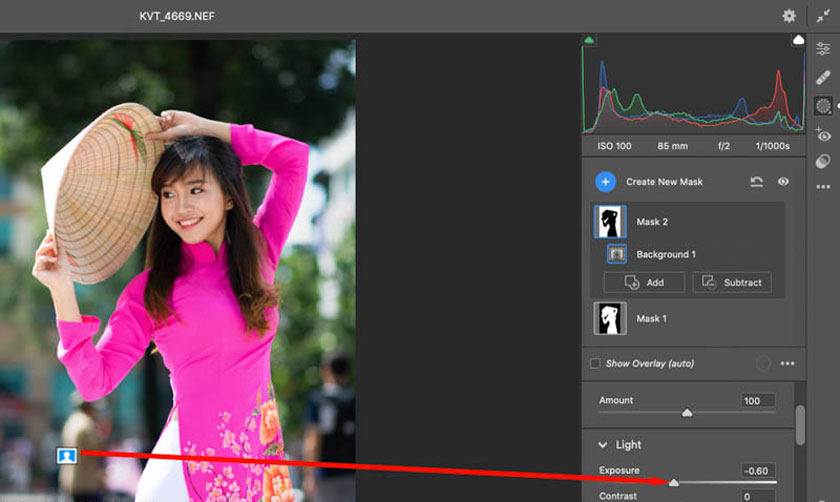
So, you have finished editing backlit photos in Photoshop.
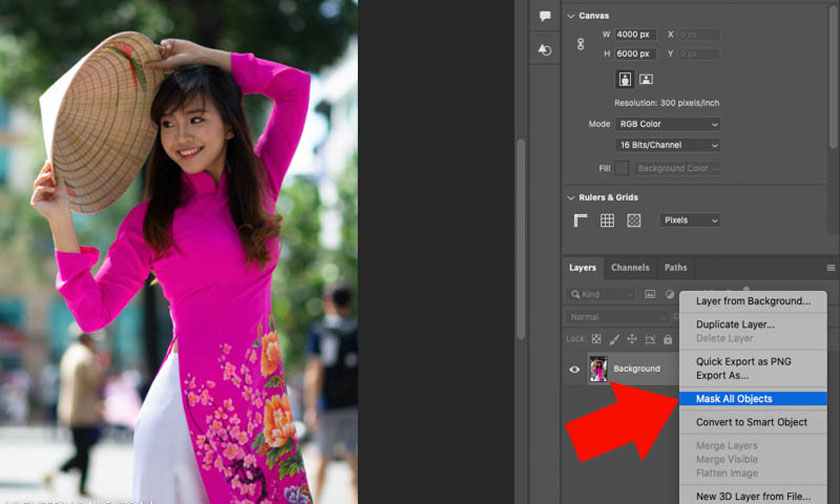
3. Adjust backlit images with Mask All Objects
In addition to the two ways to adjust backlit images in Photoshop as mentioned above, you can also refer to how to adjust backlit images in Photoshop using Mask All Objects. This tool is also available in the new version of Photoshop, so if your software doesn't have it, please update Photoshop to the latest version. See how to adjust backlit photos using Mask All Objects through the following basic steps.
Step 1: Open the photo that needs backlight correction in Photoshop. You should also use Raw images for the best quality.
At the Background layer, right-click and select Mask All Objects. Photoshop will find and create a selection of subjects in the image. Helps you adjust the model's brightness independently of the background.
Step 2: Photoshop will automatically create a selection of the subject and then divide it into groups. Please select the group corresponding to the model you want to brighten.
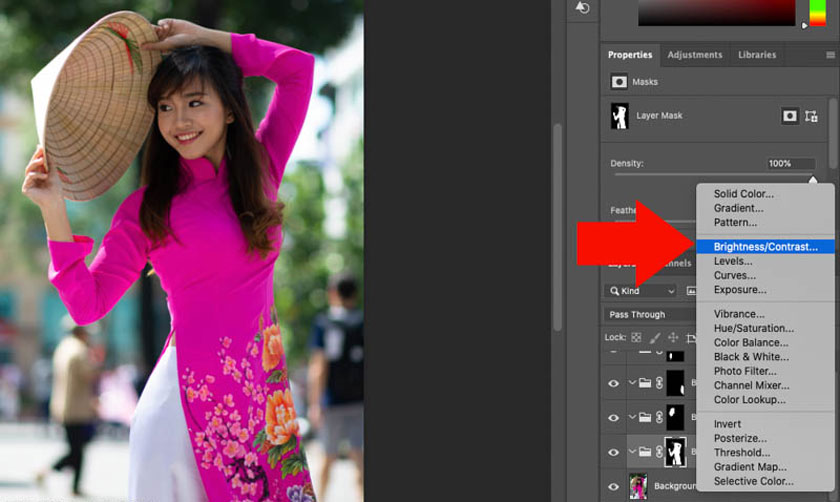
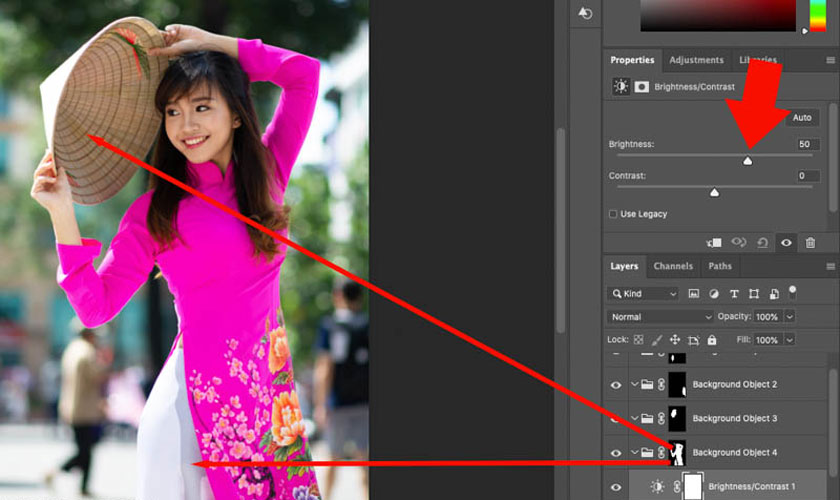
If you want the model to be brighter, right-click on the corresponding group then select Brightness and Contrast. Drag the Brightness and Contrast sliders to adjust the brightness between the model and the background.
Step 3: The Mask All Objects tool sometimes creates incorrect selections, some areas are still dark. Now you choose the Layer Mask corresponding to the model. Then choose a white Brush to paint over these areas. Wherever this white brush goes, that area will be brighter. If you do it wrong, just use a black Brush to readjust it.
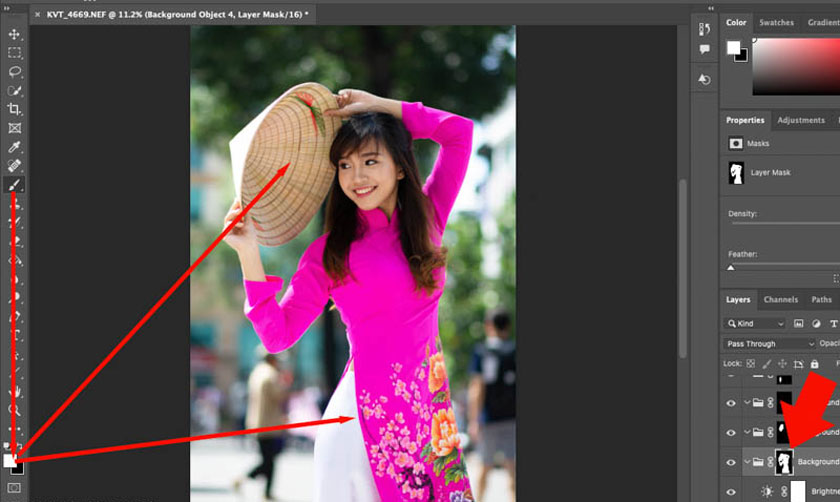
So you have completed how to edit backlit photos in Photoshop using Mask All Objects.
4. Frequently asked questions
4.1. Can I edit backlit JPG images?
In fact, JPG images can also be backlit, but the effect is not as effective as Raw images.
4.2. Which version of Photoshop should I use to edit backlit photos?
All versions of Photoshop can adjust backlit images in different ways. But the best option is still the latest version of Photoshop. Because the new Photoshop gives the ability to create selections faster and more accurately. This helps you balance the brightness in areas of the image effectively and saves much more time.
Above is a summary of some ways to adjust backlit photos in Photoshop. Although there are many different ways to adjust backlit photos, please upgrade Photoshop to the latest version for optimal and fastest results.


VIP Products


Best Selling Products
Autodesk All App Account Copyright
120 USD
Windows 10 & 11 Pro Key
36 USD
Upgrade genuine Capture One account
120 USD
Upgrade Genuine Office 365
49 USD
Upgrade Duolingo Super
29 USD
Copyright Adobe Lightroom Account
59 USD
Adobe Premiere Pro Account
99 USD
Plugin Retouch4me
69 USD
Genuine Cheap Canva Pro
39 USD
ChatGPT Plus Account (GPT-4)
16 USD
MidJourney Account
29 USD
Freepik Premium Account
59 USD
Capcut Pro 1 Year
39 USD
Adobe Photoshop Copyright - Full App
120 USD
Genuine Adobe Illustrator account
99 USD