Best Selling Products

Plugin Retouch4me
69 USD

ChatGPT Plus Account (GPT-4)
16 USD

Windows 10 & 11 Pro Key
36 USD

Autodesk All App Account Copyright
120 USD

Capcut Pro 1 Year
39 USD

Genuine Cheap Canva Pro
39 USD

MidJourney Account
29 USD

Genuine Adobe Illustrator account
99 USD

Upgrade genuine Capture One account
120 USD

Upgrade Genuine Office 365
49 USD

Upgrade Duolingo Super
29 USD

Adobe Premiere Pro Account
99 USD

Copyright Adobe Lightroom Account
59 USD

Adobe Photoshop Copyright - Full App
120 USD

Freepik Premium Account
59 USD
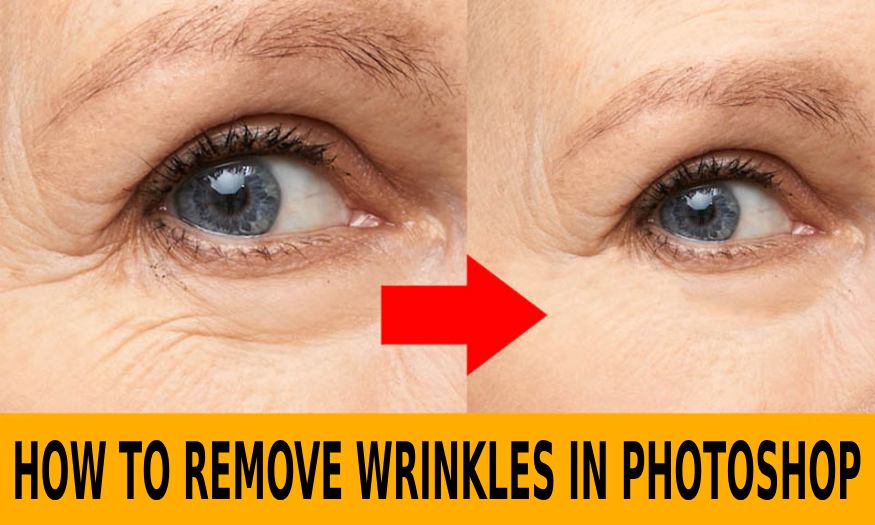
How to remove wrinkles in Photoshop
Nội dung
Removing wrinkles from objects in photos is an indispensable photo editing step in Photoshop. To optimize this step, Photoshop has many different tools. Join us in reviewing simple ways to remove wrinkles in Photoshop through the shares below.
Removing wrinkles from objects in photos is an indispensable photo editing step in Photoshop. To optimize this step, Photoshop has many different tools. Join us in reviewing simple ways to remove wrinkles in Photoshop through the shares below.

1. Use the Healing Brush Tool to remove wrinkles in Photoshop
One of the simplest ways to remove wrinkles in Photoshop is to use the Healing Brush Tool. You can proceed to remove wrinkles with the following basic steps:
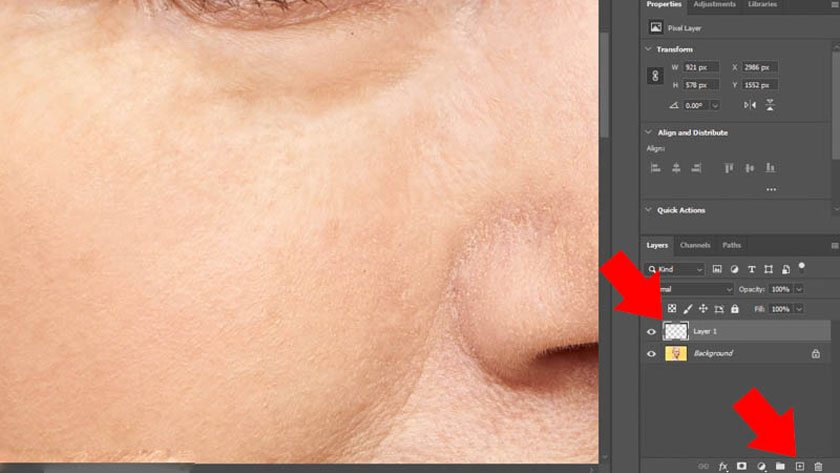
Step 1: Open the photo with the object that needs to be removed in Photoshop. Click on Create a New Layer in the bottom right corner of the screen. You will have an additional Layer 1, located above the Layer Background. We need to create a new layer so that editing is only on this layer. During the process of removing wrinkles, if you don't like it or want to try another way, just delete this layer and you're done, without having to go back many steps in History.
Step 2: On the toolbar, click Healing Brush Tool. Or use the keyboard shortcut Shift+M.
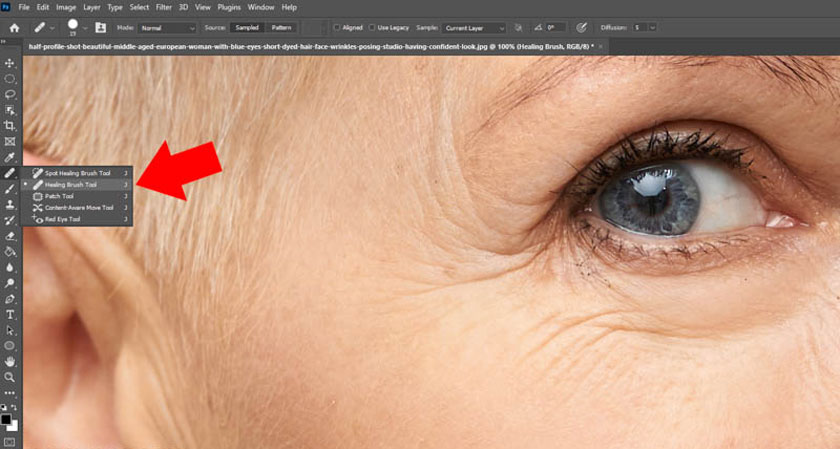
Step 3: Next, we click on the arrow in the left corner, adjust the size of the Healing Brush a little larger than the wrinkles. You can also press the keyboard shortcut [ ] to change the size of the Healing Brush.
![press the keyboard shortcut [ ] to change the size of the Healing Brush](/pictures/picfullsizes/2023/10/27/xoa-nep-nhan-trong-photoshop-3.jpg)
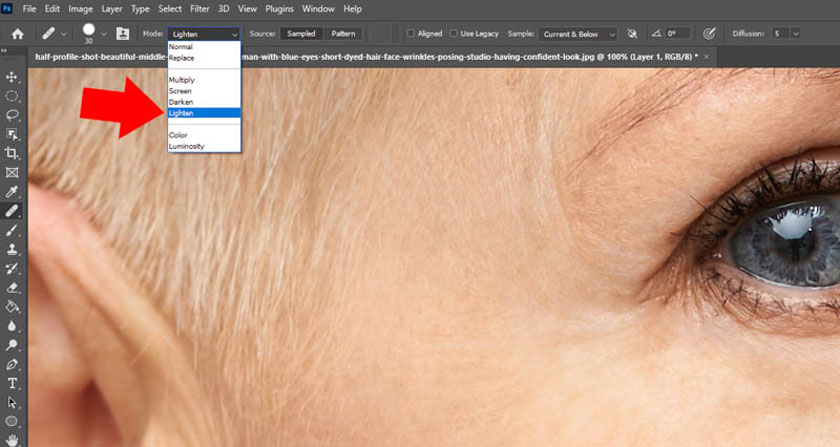
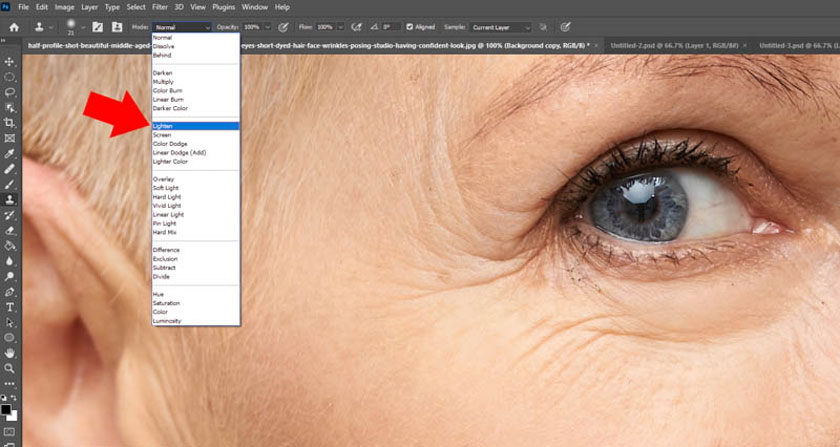
Step 4: Continue, in the Mode section, select Lighten. This mode will help make the photo more natural than Normal.
Step 5: Next, click Sample, then select Current & Below.
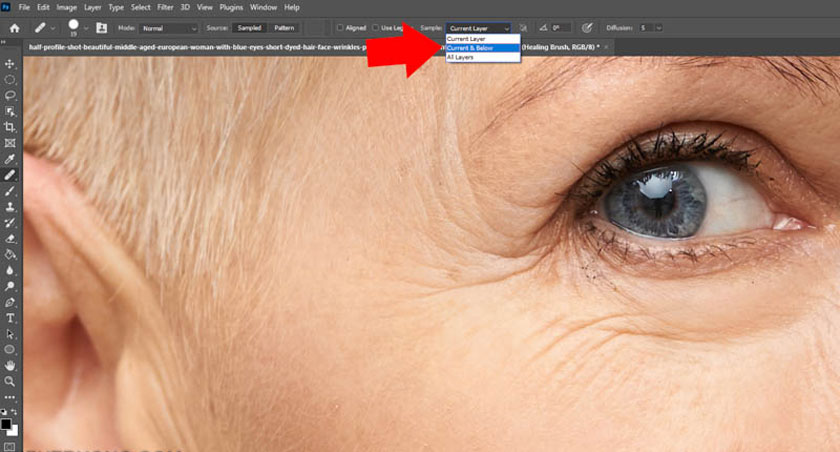
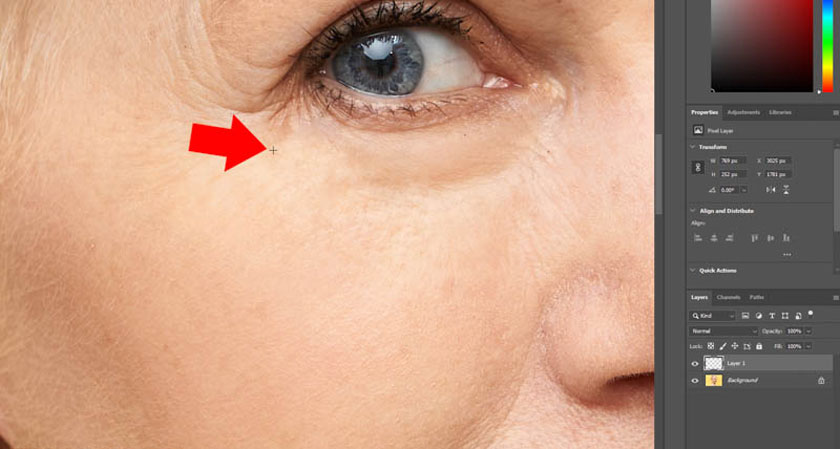
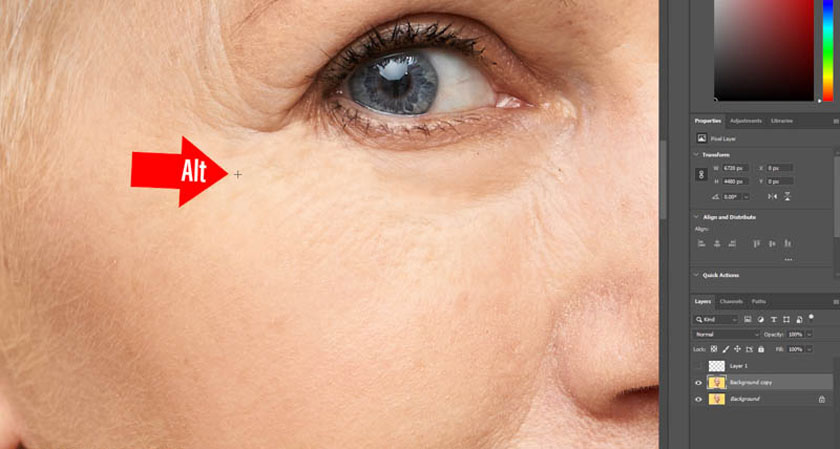
Hold down the Alt key to sample unwrinkled skin. Then release the Alt key, then click on the wrinkle area on the model's face. You will see Photoshop automatically remove wrinkles, then replace them with a more beautiful area of skin.
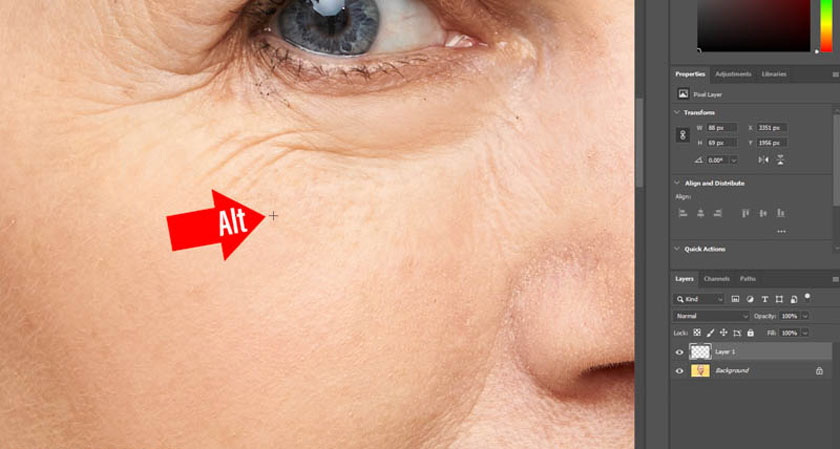
Take a sample close to the wrinkle, for a more similar and natural skin color.
This is currently the simplest and most natural way to remove wrinkles in Photoshop, and is used by many people.
2. Remove wrinkles with Photoshop Clone Stamp Tool
Besides removing wrinkles in Photoshop with the Healing Brush Tool, you can also use the Clone Stamp Tool. The steps to remove wrinkles with this tool are not complicated, it can be done through the following steps:
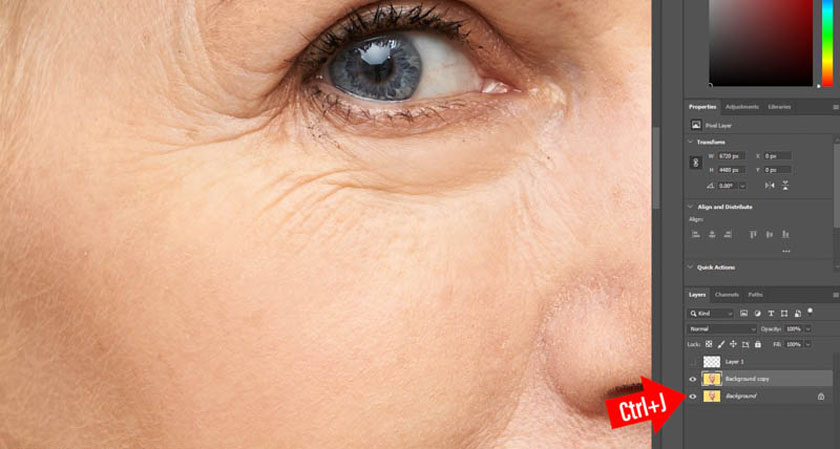
Step 1: Open the photo with the object to remove wrinkles in Photoshop. Then press Ctrl+J to duplicate the layer. We will proceed to remove wrinkles at the Layer Background Copy.
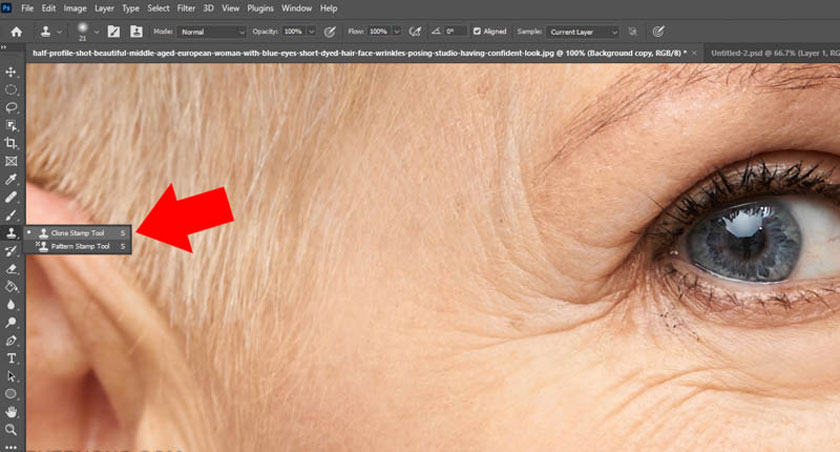
Step 2: On the toolbar, click Clone Stamp Tool or press the shortcut key (S). The Clone Stamp Tool differs from the Healing Brush Tool in that the Clone Stamp Tool copies the original sampled area and replaces it with the area to be deleted without blending the color or brightness of these two areas.
Let's resize the Clone Stamp a little larger than the wrinkle. Additionally, you can press the shortcut keys [ ] to increase or decrease the size.
Step 3: Do Clone Stamp will copy the original sampled area and replace it with the area to be deleted. Therefore, we need to use Lighten mode to make the photo more natural. If you set it to Normal, the photo won't look good.
Step 4: Hold down the Alt key to sample the unwrinkled skin area. Then release Alt, click on the wrinkles on the model's face. With each click, Photoshop will sample the selected area and replace it with that wrinkle. You can press the Alt key frequently to change the sampling positions, making the image after wrinkle removal look more natural. Take skin samples as close to the wrinkles as possible.
So you have finished removing wrinkles in Photoshop using the Clone Stamp Tool.
3. Frequently asked questions
Many people wonder about the process of removing wrinkles in Photoshop as follows:
3.1. How to remove wrinkles in clothes
Similar to removing wrinkles on the face, you can use the Healing Brush or Spot Healing Brush tool to remove wrinkles in clothes in Photoshop. Remember, the closer you get the foundation to the wrinkle area, the more natural the color will be.
3.2. How to remove fabric wrinkles in Photoshop
In fact, removing wrinkles on skin, on clothes, on fabric or different materials are all similar. You can remove these wrinkles with the Healing Brush or Clone Stamp tool found in Photoshop. Remember, sampling near the crease and changing the blending mode to Lighten will bring the best results.
3.3. Why is removing wrinkles in Photoshop not naturally beautiful?
Some people wonder why removing wrinkles in Photoshop doesn't look natural. The reason may be because you have not switched the Mode to Lighten, this mode helps the erased area look more natural. Furthermore, if you take the sample too far from the wrinkle area that needs to be removed, it may cause the background to be out of tone and uneven, thereby making it unnatural. Or the size of the Healing Brush or Clone Stamp is too small, smaller than the wrinkles, causing them to blur and overlap each other.
Please adjust accordingly so that the wrinkle removal areas appear naturally. Above is some general information on how to remove wrinkles in Photoshop. SaDesign hopefully the above sharing can help you edit the most satisfactory photo.


VIP Products


Best Selling Products
Plugin Retouch4me
69 USD
ChatGPT Plus Account (GPT-4)
16 USD
Windows 10 & 11 Pro Key
36 USD
Autodesk All App Account Copyright
120 USD
Capcut Pro 1 Year
39 USD
Genuine Cheap Canva Pro
39 USD
MidJourney Account
29 USD
Genuine Adobe Illustrator account
99 USD
Upgrade genuine Capture One account
120 USD
Upgrade Genuine Office 365
49 USD
Upgrade Duolingo Super
29 USD
Adobe Premiere Pro Account
99 USD
Copyright Adobe Lightroom Account
59 USD
Adobe Photoshop Copyright - Full App
120 USD
Freepik Premium Account
59 USD