Best Selling Products
Create caricatures in Photoshop SUPER EASY with SaDesign
Nội dung
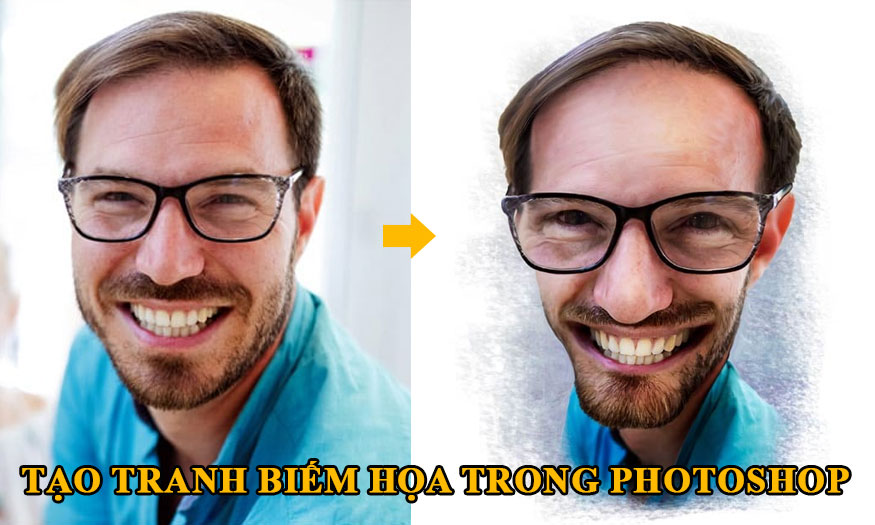
Caricatures are characterized by unusually exaggerated or reduced details with a humorous or satirical style. Now you don't need to draw these pictures by hand, you can create caricatures in Photoshop very simply. Let's refer to the specific steps below with SaDesign .

1. Prepare the photo to create a caricature in Photoshop
To create a caricature in Photoshop, we first need to identify the character's outstanding features, and then zoom in on them to create humor.
Step 1: First you need to upload the photo you want to create a caricature of in Photoshop.
.jpg)
In this photo we can see that the character's jawline is quite large, the smile is very prominent. The horn-rimmed glasses are clearly visible, the hairline is starting to thin. These are all interesting points of the character that we can base on to adjust.
Step 2: Now we need to separate the character from the background. On the toolbar select the Magic Wand Tool (I), click Select Topic and then press Ctrl+J to create a cutout layer of the man named Body.
.jpg)
Step 3: Use the Curvature Pen Tool (P) to create separate selections. First, create a layer with the face and neck selected separately, then press Ctrl+Enter to turn the outline into a selection as shown below. Name it Head.
.jpg)
.jpg)
Continue selecting the chin area, make a large selection so that we can blend it naturally later. After having the selection, Ctrl+J and name it Chin.
.jpg)
Continue with the mouth layer selection outside the lips area to have room to blend it in later. Duplicate the mouth selection and name it Mouth
.jpg)
Similarly, create a large selection around the nose, name this layer nose.
.jpg)
Continue to create a selection around the glasses including the eyes and name it glasses.
.jpg)
Create another selection around the outer border of the ear as shown below and name it Ear.
.jpg)
Step 4: We need to convert each layer into Smart Object for flexible customization. Select each layer individually and right-click => Convert to Smart Object.
.jpg)
2. Resize elements to create a caricature in Photoshop
After separating all the parts, we will proceed to resize them.
Step 1: A popular cartoon style is to make the head bigger. To do this, shrink the body layer using Edit => Free Transform (or Ctrl+T ).
.jpg)
Step 2: On the menu bar, select Edit => Transform => Warp to start shaping the Head layer. Fit the neck to the shirt neckline and puff up the top of the head. The goal of this step is just to establish the basic shape of the head and serve as a foundation for other layers to build on.
.jpg)
Step 3: Deform the chin layer to stretch it and sharpen it a bit. Try to keep the top straight so the seams aren't visible. Hold Ctrl to drag the corners separately.
.jpg)
Step 4: Make the smile bigger by pressing Ctrl+T and stretching the mouth layer.
.jpg)
Step 5: Select the nose layer and enlarge it to create a funny look.
.jpg)
Step 6: The glasses layer requires more attention than the other layers. On the menu bar, select the Edit => Transform => Warp tool, then drag to adjust the glasses to fit the head size.
.jpg)
Step 7: Continue at the ear layer to enlarge the ear.
.jpg)
Step 8: Now, add a Layer Mask to each layer and use a soft black brush to blend the individual elements into a cohesive whole.
.jpg)
.jpg)
Step 9: Add a new layer above all the clipped layers. Then use the Spot Healing Brush (J) set to Sample All Layers to paint over any obvious seams or troublesome areas that escaped the masking process.
.jpg)
3. Curve the facial features of the caricature
Once we have enlarged the highlight parts we can get more creative with some curves.
Step 1: Select all the layers containing the parts and the top connection overlay layer then merge them with a single Smart Object with Layer => Smart Object => Convert to Smart Object.
.jpg)
Step 2: Go to Filter => Liquify. Use the Forward Warp Tool with a large brush to increase the size of his forehead. Gently push the skin up towards the hairline.
.jpg)
Step 3: Use the Bloat Tool to click a few times on the tip of his nose to make it look bigger.
.jpg)
Step 4: Use the Freeze Mask Tool to highlight the frame of the glasses. This will help prevent the frame from being distorted when we work with our eyes.
.jpg)
Step 5: Use the Bloat Tool to create a slightly larger shape for the eye. Reduce the brush size so that it is similar in size to the eyeball. When you are finished, click the None button in the Mask Options to release the masked area.
.jpg)
Step 6: Widen the chin a bit more using the Forward Warp Tool and create a rounder end using the Bloat Tool.
.jpg)
Step 7: Finally, make his smile look even brighter by using the Forward Warp Tool to push the corners of his mouth up along the creases in his cheeks. Be careful not to warp the shape of his teeth.
.jpg)
Now the overall result after the adjustment steps we will get as shown below.
.jpg)
4. Add a background to a cartoon in Photoshop
Once we have the caricature character, we need a base layer to make the drawing look its best.
Step 1: Add a Layer Mask to the cartoon layer and use the Sponge Brush Projection brush to blur the bottom of the layer. You can find this brush in the Legacy brush set.
.jpg)
.jpg)
Step 2: You need to download the attached texture file to your computer, then open it and place the BackgroundTexture.jpg from as a layer below the cartoon layer.
.jpg)
Step 3: Add a new layer on top of the texture. Fill it with white and use a brush with the same texture as the mask to add a white brushed effect.
.jpg)
5. Add painterly effects to caricatures
To make the picture more impressive, we can add some effects as if drawn by an artist.
Step 1: Smaller details tend to disrupt the smearing of paint, so it's best to smooth them out first. Go to Filter => Blur => Smart Blur. Set the Quality to High and experiment with the sliders.
.jpg)
.jpg)
Step 2: The highlights in the image appear a little bright. Fix this by using Curves to reduce the highlights. Select Create a new fill or adjustment layer at the bottom of the layers palette and select Curves. Adjust the curve as needed.
.jpg)
Customize the curve to fit.
.jpg)
Step 3: Create a new layer on top. Select the Smudge Tool with a Brush Size of about 40 pixels. Set the Strength to 80% and select the Sample All Layers option.
Then start blurring along the main features of the image. tao-tranh-biem-hoa-trong-photoshop-37
Step 4: Reduce the brush size to about 5 pixels and start smudging along the smaller details of the image like eyebrows, individual hairs, eyes and teeth.
(1).jpg)
Step 5: Select the smudge layer, the cartoon layer and the adjustment layer at the same time by pressing Ctrl+E. Then go to Filter => Other High Pass and set the Radius to 5.0 Pixels or higher. Call this layer Details.
.jpg)
The results obtained are:
.jpg)
Step 6: Change the Blending Mode of the Details layer to Overlay, reduce the Opacity to 78%, then go to Layer => Layer Mask => Hide All. Paint a soft, white brush over the mask to reveal the details in the eyes, eyebrows, nose, mouth, and beard.
.jpg)
.jpg)
Step 7: Add a new layer called Dodge/Burn and fill it with 50% gray via Edit => Fill. Set the Blending Mode to Overlay and then use a soft black brush at 30% Opacity to simulate the Burn effect. Switch to white to simulate the Dodge effect.
.jpg)
Step 8: Add the final color effect. Press Ctrl+Alt+Shift-E to merge all layers. Then go to Filter => Camera Raw and experiment with Contrast, Clarity, and Vibrance to create a more beautiful effect.
.jpg)
The final result we get is:
So we have completed creating a caricature in Photoshop. The image now looks impressive and unique. Let's do it together to have interesting designs.


