Best Selling Products
Create floral text effect in Photoshop with SaDesign
Nội dung
The letters hidden by the petals will help your design more attractive and appealing. We can completely achieve the flower text effect in Photoshop by combining some tools together. Let's refer to the details of how to do it with SaDesign in the following sharing section.

1. Create a flower selection for a floral text effect in Photoshop
With the floral text effect in Photoshop, flowers are one of the main elements. Therefore, first, let's create a flower selection so that the later part can be inserted into the text.
Step 1: Open the image of any flower you like, here we use a photo of a rose.
On the Quick Selection Tool toolbar and click the Add to selection icon on the options bar.
Then click and drag to select the rose in the image. You can hold the Alt key to shrink the selection if needed.
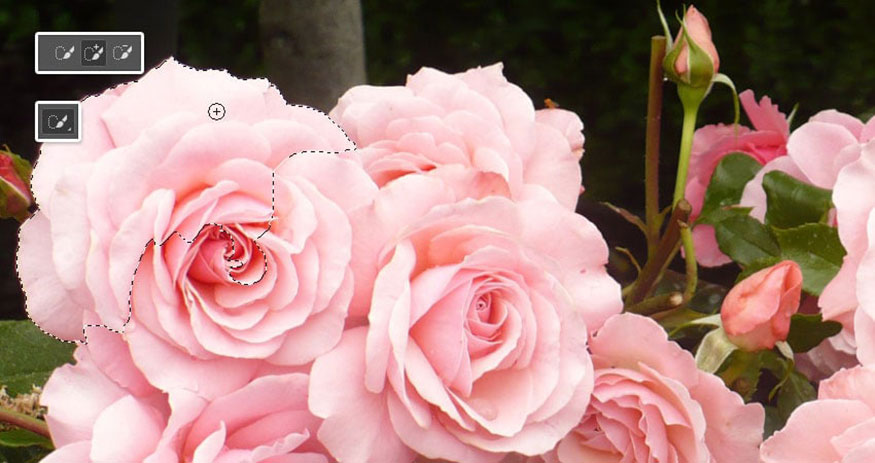
Step 2: Once you have created a flower selection, click the Select and Mask button on the options bar.
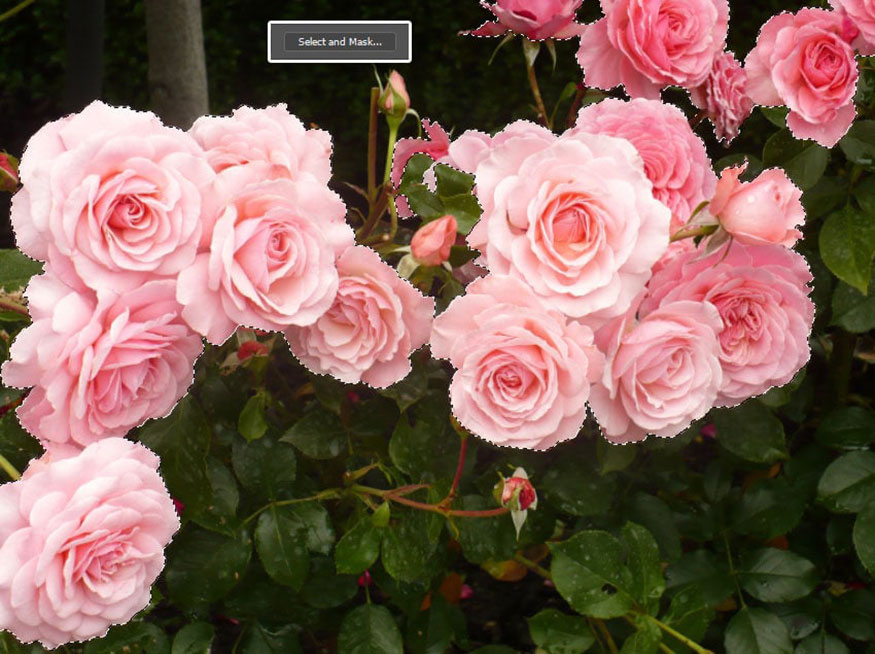
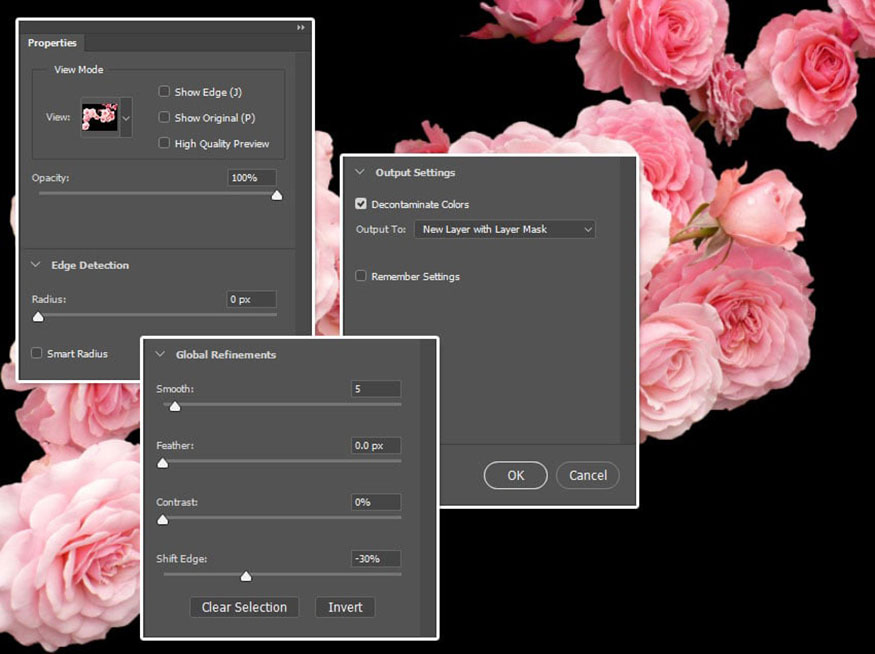
Step 3: In the Properties panel that appears, change the View mode to On Black and increase the Opacity to 100%.
Adjust the remaining settings to get a smooth and precise selection.
Here, the Smooth value is set to 5 and the Shift Edge to -30%. This creates a softer selection and ensures the edges do not include any areas outside the flower.
You can also check the Decontaminate Colors box to reduce the amount of color spill and set the Output to New Layer with Layer Mask.
Change View mode to On Black and increase Opacity to 100%.
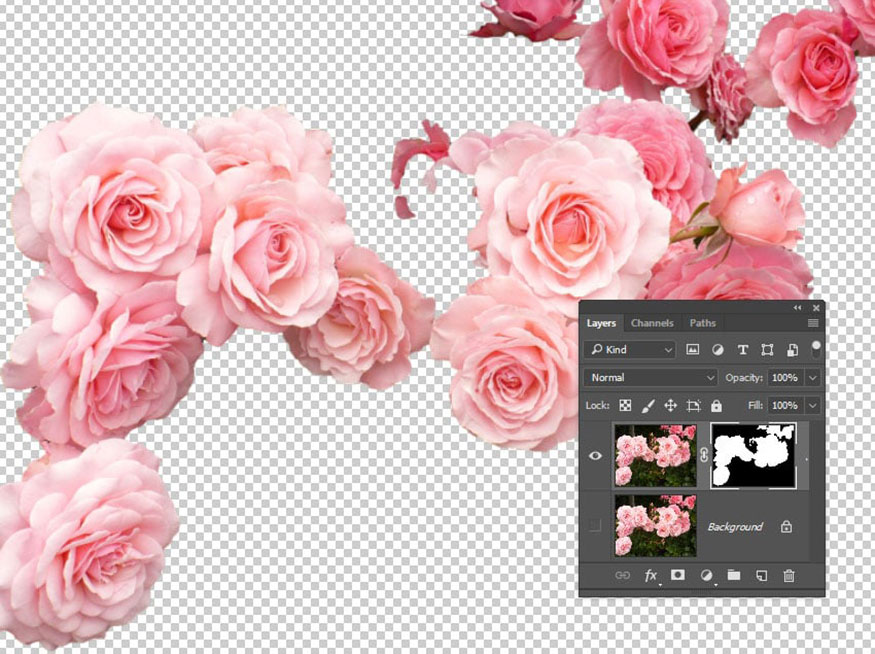
Step 4: This will create a selection in a new layer using a layer mask. You can now make any adjustments to the layer mask if needed and refine the selection further.
Create a selection in a new layer.
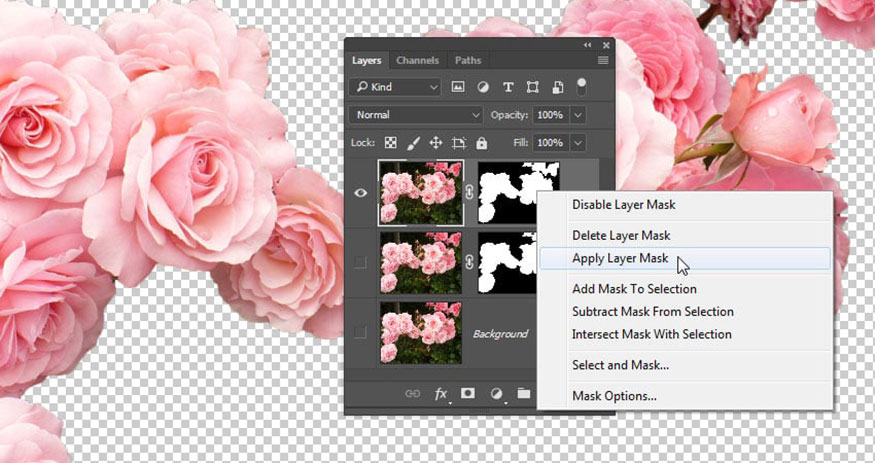
Step 5: Duplicate the selected layer using Ctrl+J, then right-click on the mask of the copy and select Apply Layer Mask.
Select Apply Layer Mask.
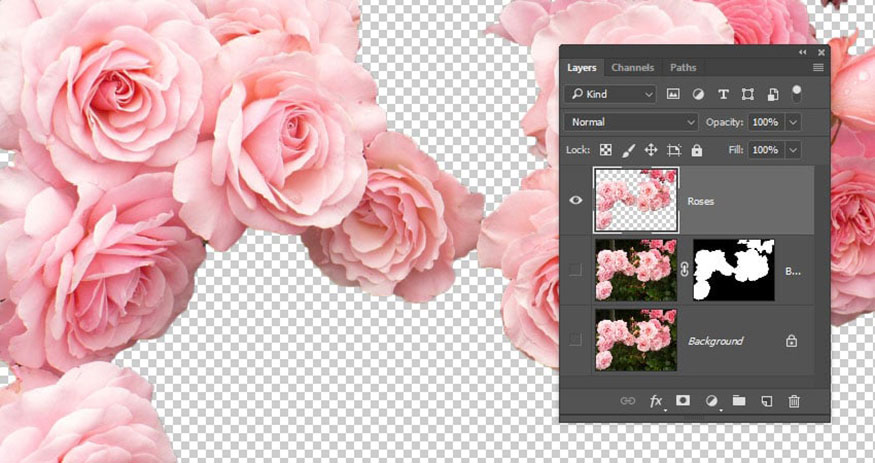
Step 6: Rename the resulting layer to Roses, save the file as PSD and keep it open because we will use it in the following steps.
2. Create Text for Floral Text Effect in Photoshop
Once we have the flower part, we will proceed to create the text part for the effect.
Step 1: Create a new document sized 1150 x 850 px, click the Create new fill or adjustment layer icon at the bottom of the Layers panel and select Gradient.
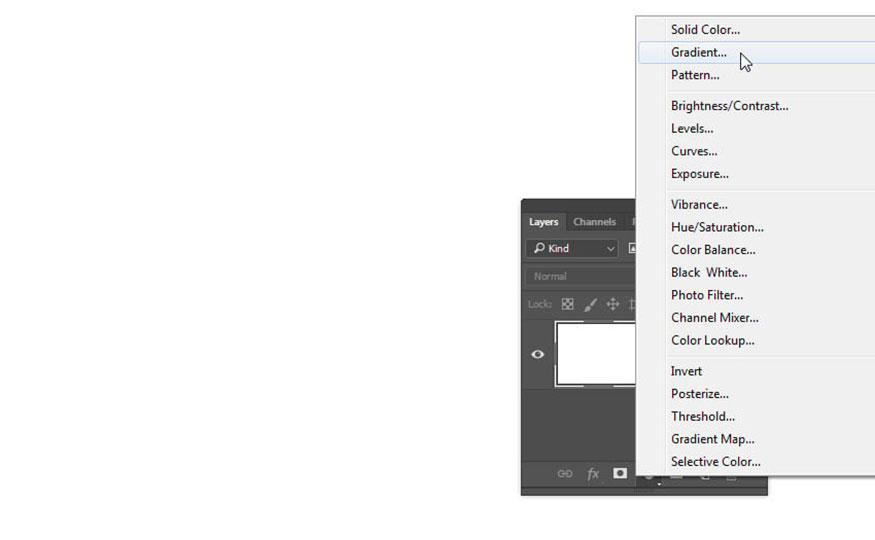
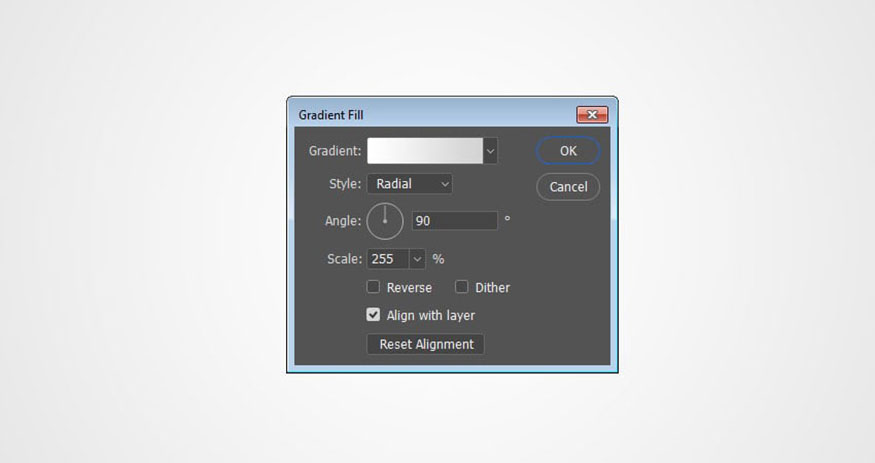
Step 2: Create a gradient fill using the Colors #ffffff on the left and #d3d3d3 on the right. Change the Style to Radial and the Scale to 255.
Create gradient fill
Step 3: Now we will create the text using the font Lust Script. Set the Size to 350 pt and the Color to #160742. Here I used the text with the content Bold.
Create text using Lust Script font.

3. Add flowers to the text and edit
Once you have the text, let's insert flowers into the text to get the floral text effect in Photoshop.
Step 1: Place the Roses layer above the text layer, right-click on it and select Convert to Smart Object. Then right-click on it again and select Create Clipping Mask.
Converting a layer to a Smart Object allows us to make all the changes non-destructively to our design. However, for older versions of Photoshop, it may not be possible to apply some adjustments directly to a Smart Object. So you can rasterize the layer or use Adjustment Layers instead.

Step 2: On the menu bar go to Image => Adjustments => Selective Color and use the following settings:
Reds
Cyan: -10
Magenta: 5
Yellow: 10
Black: 30
Whites
Cyan: 35
Magenta: -30
Black: -10
Neutrals
Cyan: 35
Magenta: 5
Yellow: -50
Black: 15
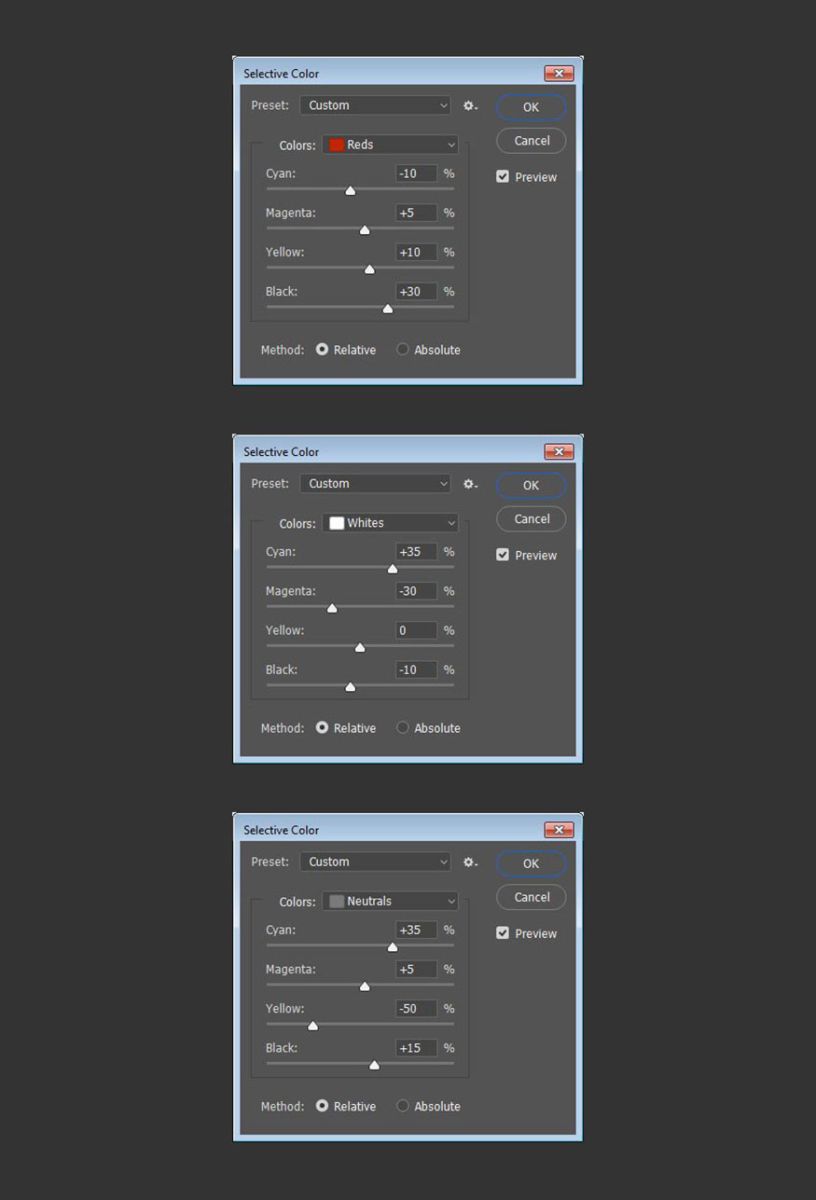
This is to enhance the overall color and add some blue to the darker areas. You can use different values to get different results, especially if you are using a different image.

Step 3: On the menu bar go to Image => Adjustments => Levels and use the following settings:
RGB
Input Shadows: 20
Gamma: 0.85
Output Highlights: 235
Blue
Output Shadows: 20
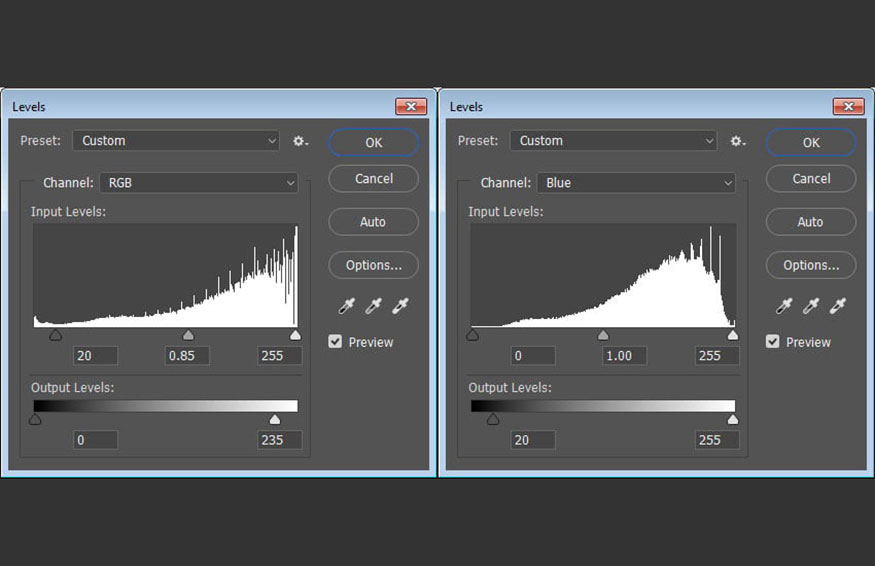
This will darken the image and add a bit of blue to the floral design, giving us the result we have in the picture.

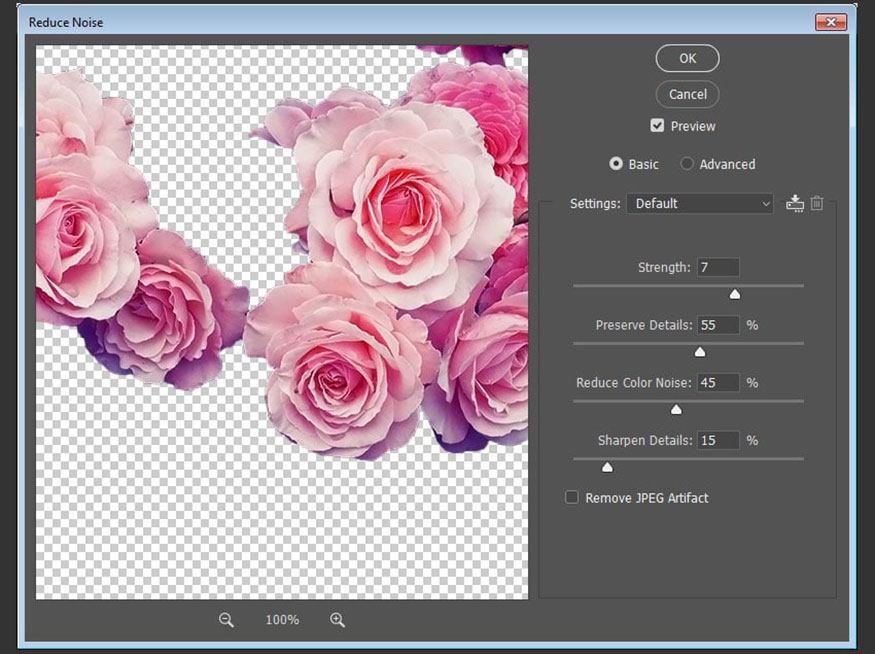
Step 4: Still on the menu bar, go to Filter => Noise => Reduce Noise and use the following settings:
Strength: 7
Preserve Details: 55
Reduce Color Noise: 45
Sharpen Details: 15
This is an optional step that adds a touch of sophistication to the rose.
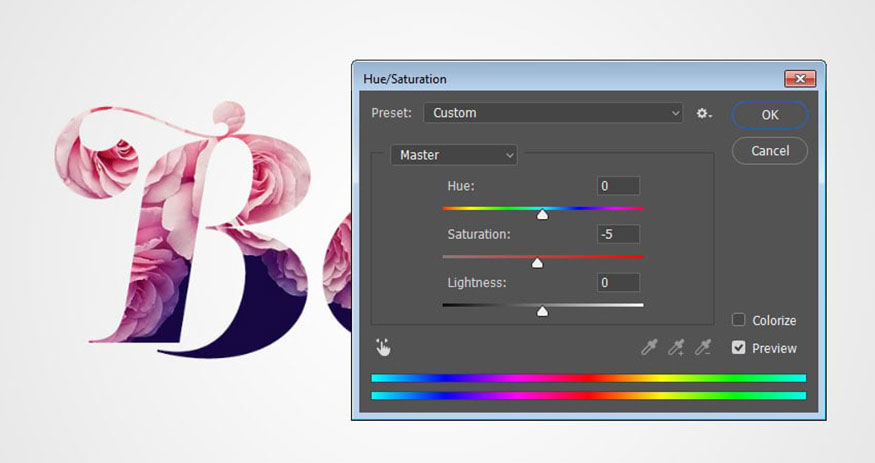
Step 5: Go to Image => Adjustments => Hue/Saturation and change Saturation to -5.
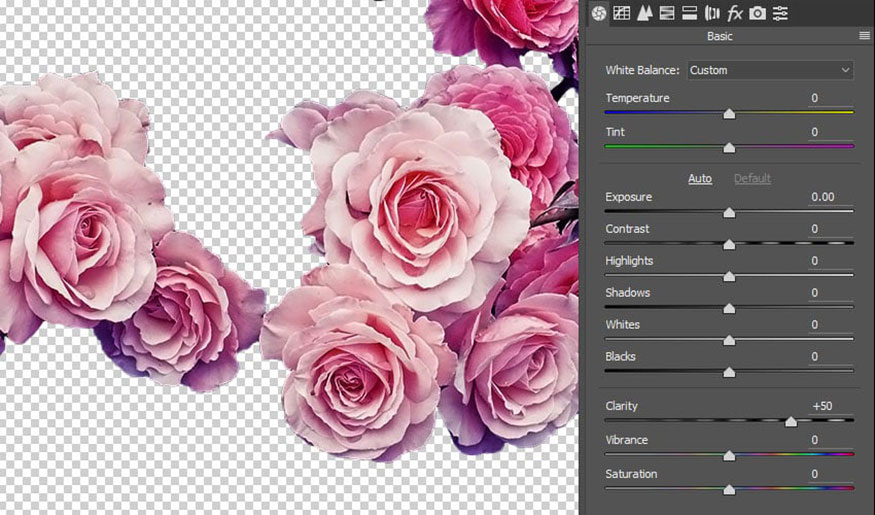
Step 6: Go to Filter => Camera Raw Filter, then in the Basic tab, change Clarity to 50.
Filter => Camera Raw Filter
4. Combine colors of different images
We have created a floral text effect in Photoshop. However, let's add some extra flair to the design by adding some separate flowers outside the text.
Step 1: Open the Rose 01 image, then select and mask the rose image in the same way as you did with the original rose image.
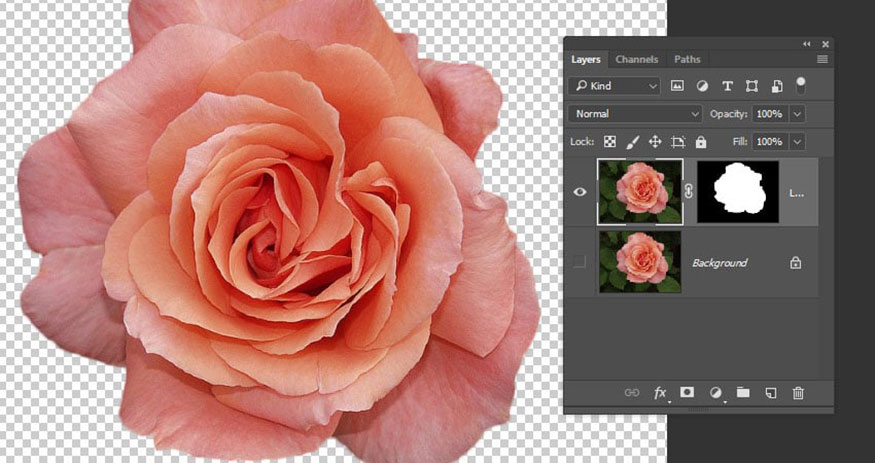
Step 2: Apply a layer mask to get the raster layer.
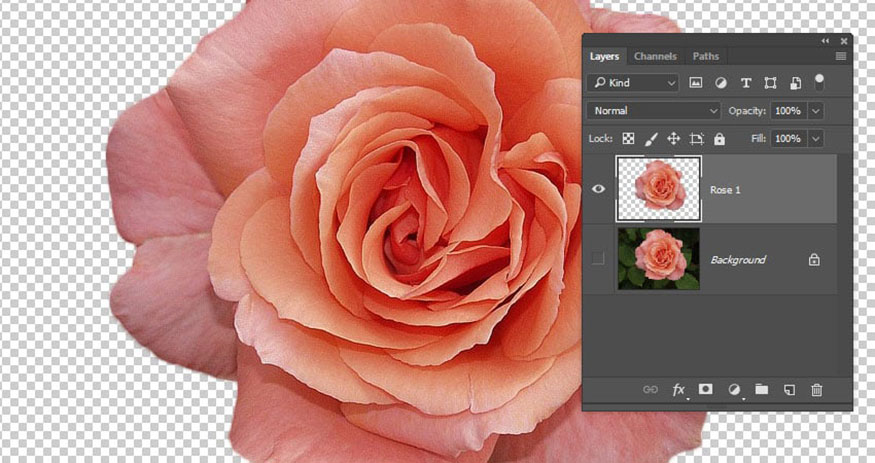
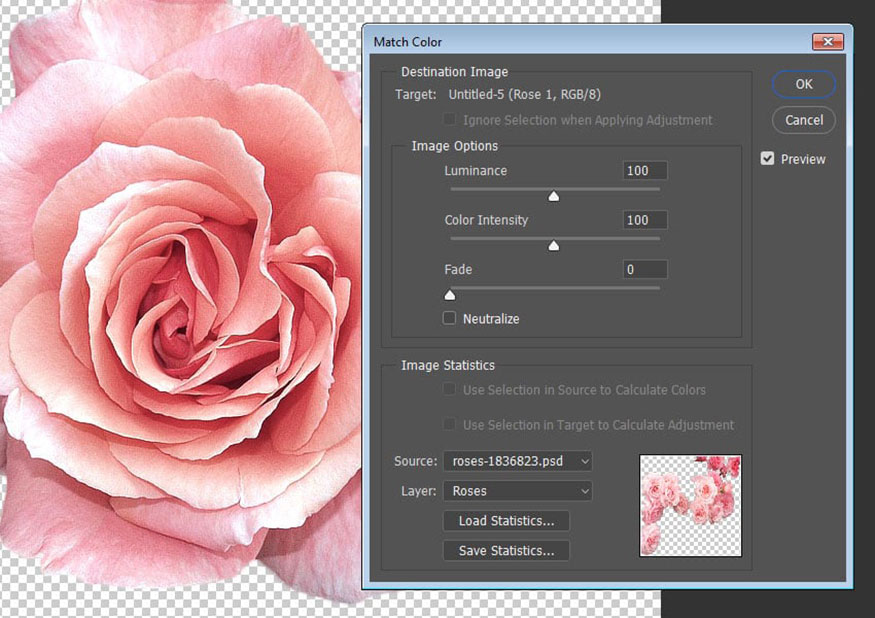
Step 3: To add the rose image to the original document, the colors of the two flowers need to match. This can be done in many different ways, but the fastest way in this case is through Match Color.
So go to Image => Adjustments => Match Color.
In Image Statistics, set the Source to the original rose PSD file you saved at the beginning of the tutorial and select the Roses layer from the Layer menu.
This is where creating rasterized layers comes in handy, as having a layer mask or using a raw image can make color matching a bit more difficult.
After selecting the source file and layer, you can adjust the Image Options settings if needed, then click OK.
5. How to copy Smart Filters
We already have Smart Filters like the above, instead of adding many effects ourselves, we can copy effects from Smart Filters to make the process faster and have consistent effects.
Step 1: Add the edited rose image to the original file, rename its layer to Rose 1 and convert it to a smart object.
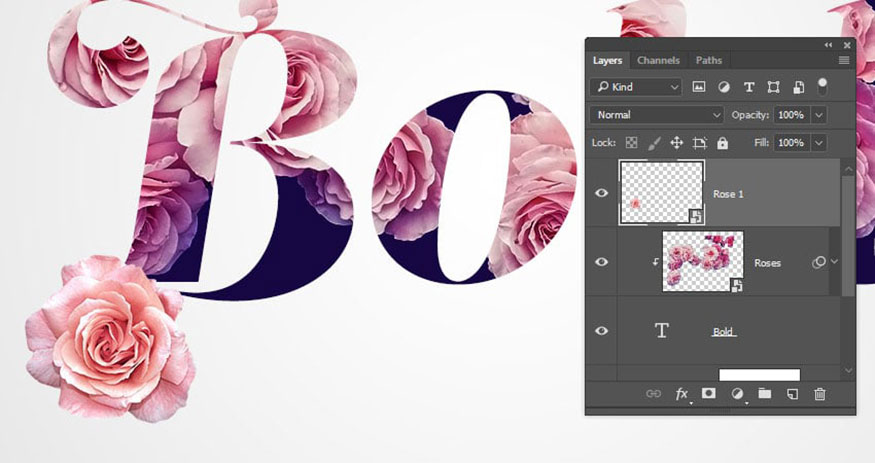
Step 2: Expand the filter list of the Rose layer. Then hold down the Alt key and drag the Smart Filters tab to the Rose 1 layer.
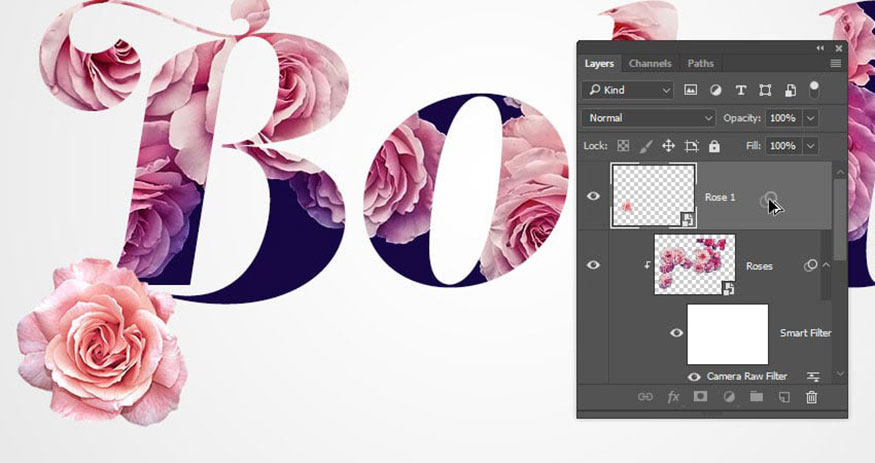
Step 3: The Camera Raw Filter effect might be a bit strong for the rose image, so drag the tab of that effect to the Delete icon at the bottom of the Layers panel to remove it.
You can remove and adjust any other filters as needed.
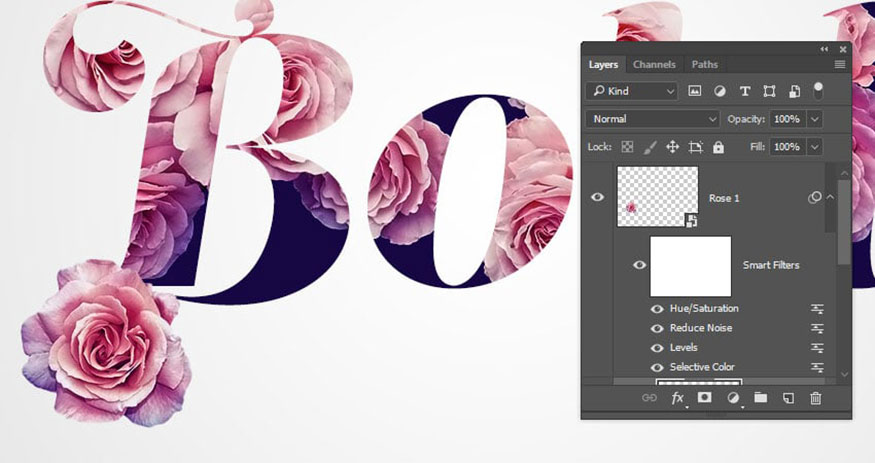
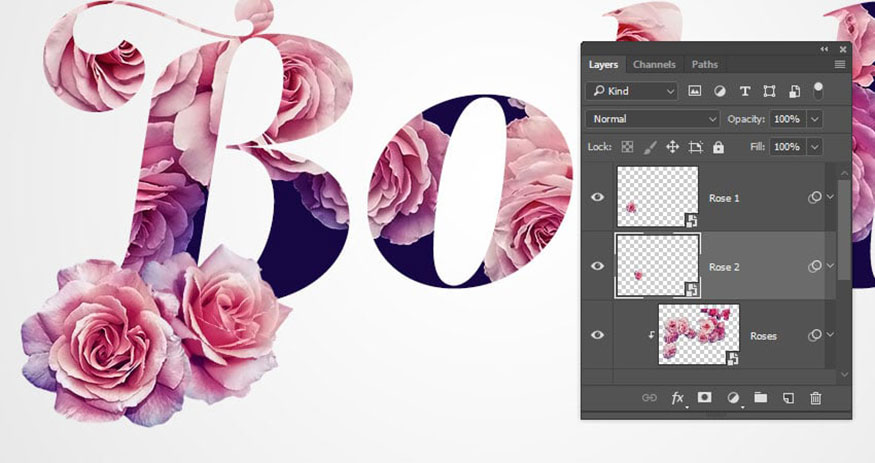
Step 4: Add the Rose 02 and Rose 03 images to the document using the same steps.
You can even duplicate and transform any image to get more roses without using too many different images.
6. Add depth of field effect
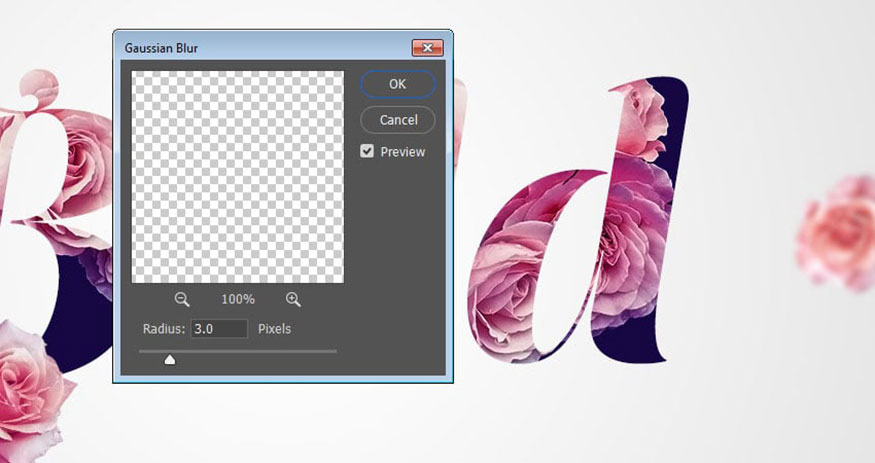
You can add smaller flowers and make them appear faded behind the text to give the photo depth.
Step 1: To do this, select the rose layer you want to blur, then go to Filter => Blur => Gaussian Blur and use a Radius value of about 3.
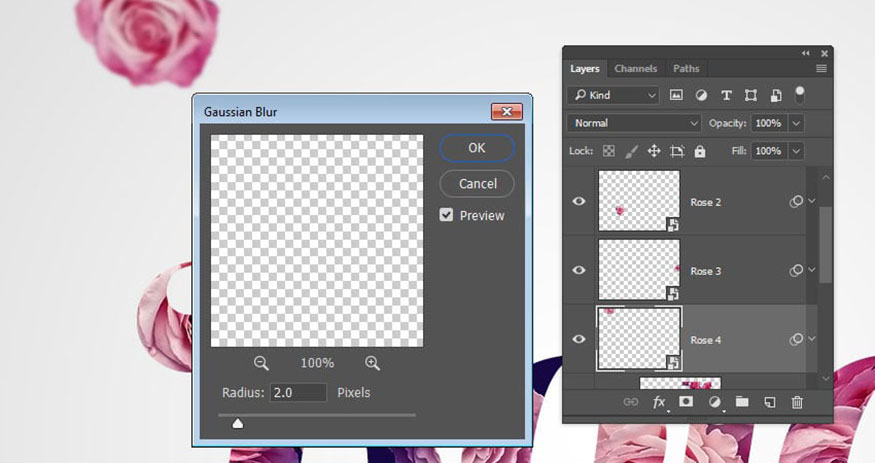
Step 2: You can also add slightly larger roses and use a smaller Gaussian Blur Radius value to create a more dynamic effect.
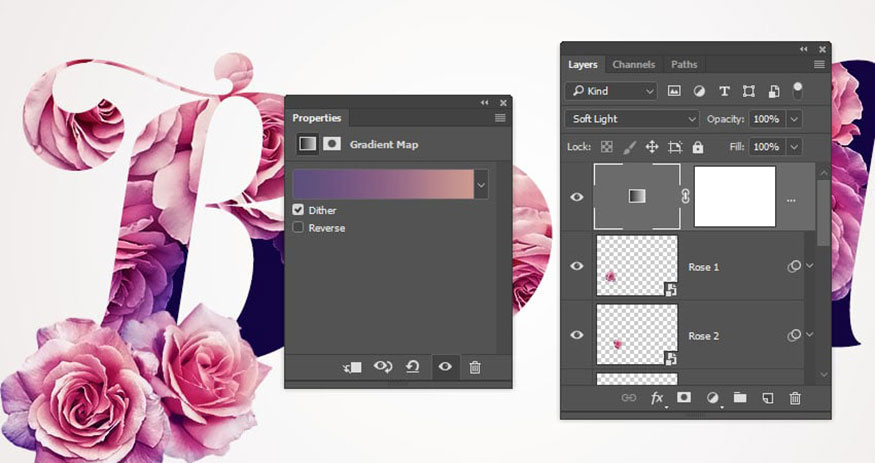
Step 3: When done, add a Gradient Map layer on top of all layers.
Create a gradient fill effect using the colors #5d4e7c on the left, #8d6385 in the middle, and #cd9a90 on the right.
Then, check the Dither box and change the Blend Mode of the Gradient Map layer to Soft Light.
So you have completed the flower text effect in Photoshop. The flowers are cleverly inserted into the text, very unique.

Above is a summary of the steps to create a floral text effect in Photoshop. Try customizing the parameters to get unique results.


