Best Selling Products
Create perspective grid in Photoshop in DETAIL with SaDesign
Nội dung
Unlike Adobe Illustrator, Photoshop does not have a dedicated perspective grid tool, so if you want to create a perspective grid in Photoshop, you need to use a special brush or set up the tools specifically. The following article SaDesign will guide you in detail on how to create a perspective grid in Photoshop.

Unlike Adobe Illustrator, Photoshop does not have a dedicated perspective grid tool, so if you want to create a perspective grid in Photoshop, you need to use a special brush or set up the tools specifically. The following article SaDesign will guide you in detail on how to create a perspective grid in Photoshop.
1. How to create a perspective grid in Photoshop
Step 1: To start creating a perspective grid in Photoshop, you need to open the software and create a new File with the size of 5,000px x 5,000 px and keep the background white.
(1).jpg)
Step 2: Open the Shape Tool menu on the toolbar and select Polygon Tool
(1).jpg)
Step 3:
(1).jpg)
Step 4: Continue clicking anywhere in the canvas - a new window will appear and you make the following adjustments:
Set length and width to 5000 px
Number of Sides to 100
Star Ratio month 1%
(1).jpg)
Step 5: Continue selecting 2 layers by pressing the Shift key, use the Move Tool (V) and Align Horizontal and Vertical Center to position the grid accurately.
select 2 layers
(1).jpg)
Use Move Tool (V) and Align Horizontal and Vertical Center
2. How to create a perspective grid Photosh
(1).jpg)
op brush
Step 1: You can create a perspective grid in Photoshop this way whenever you need to, but it's easier to convert it into a perspective grid brush or simply a custom shape. To do so, just go to Edit > Define Brush Preset and give it a name.
(1).jpg)
Step 2: You can then create your perspective grid by clicking on the canvas. However, this grid cannot be quickly resized to sizes larger than 5,000px. You can resize it after drawing, however, it is raster so it will reduce the quality of the image.
(1).jpg)
Step 3: The second method of drawing a perspective grid is to turn the grid into a custom shape. To do this, you need to select the layer with the grid and select the Polygon Tool (U). Then continue to select Edit > Define Custom Shape and give it a name.
(1).jpg)
Step 4: Your perspective grid will be available in the list of shapes of the Custom Shape tool.
(1).jpg)
(1).jpg)
Step 5: In the Path Options panel, select From Center so you can easily place the vanishing point where you want it. Check Defined Proportions to keep the mesh symmetrical.
(1).jpg)
Step 6: Now you can draw the grid by clicking and dragging.
(1).jpg)
3. Drawing perspective in Photoshop
Step 1: Once you have the grid tools, all you need to do is decide where you want the horizon line and vanishing points to be in Photoshop. You can draw the horizon line using the Line Tool (U) from the Shape Tool menu. Use the same settings as before and set the Weight to 1px.
(1).jpg)
menu Shape Tool
(1).jpg)
Step 2: To create a one-point perspective grid in Photoshop, place your vanishing point right in the middle. You don't have to be precise - once you've drawn the grid, you can use the Move Tool (V) and the arrow keys to move it into place.
(1).jpg)
Use the Move Tool (V) and use the arrow keys to move the mesh into the correct position.
(1).jpg)
Note: Use the Shift key to draw straight lines.
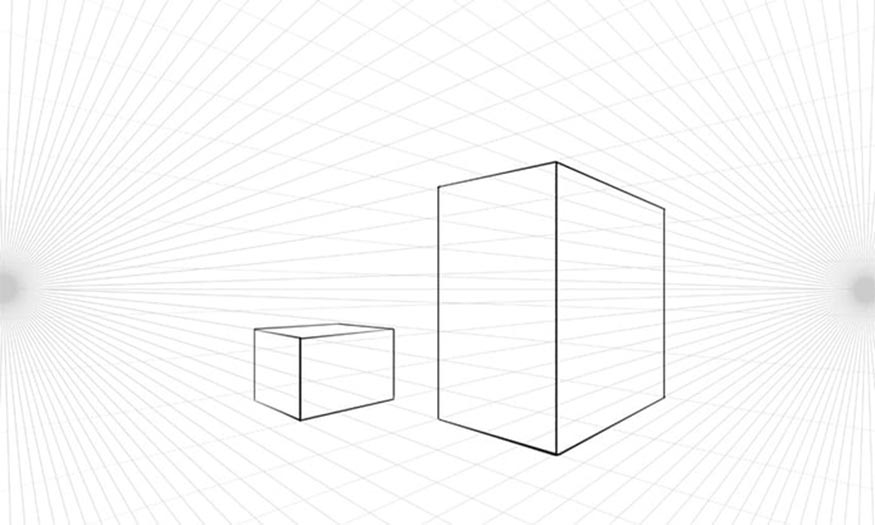
Step 3: To create a 2-point perspective grid, place 2 vanishing points on the horizon line.
(1).jpg)
(2).jpg)
4. Some Top Recommended Photoshop Brushes
If you're looking for a Photoshop brush set that's designed to look like traditional tools, check out these brushes:
4.1. Pencil Brushes (ABR)
(2).jpg)
The pencil is the simplest drawing tool, but it is the perfect base for any work of art, from technical sketches to detailed portraits.
4.2. Pen Brushes
(2).jpg)
If you're interested in technical drawing, digital brushes that mimic ballpoint pen strokes can make your sketches more beautiful, while retaining the natural effect of traditional drawing.
4.3. Marker Brushes
(2).jpg)
Sometimes you will need to use thicker strokes for your artwork and although it is possible to make pencil or pen strokes thicker, it will lose the natural effect. If you want thicker strokes, use Marker Brushes.
4.4. Dry Marker Brushes
If you want to make your drawings more convincing and beautiful, you can add a “dried ink” effect to them. This brush set contains 70 markers with realistic pen strokes.
Dry Marker Brushes
Above are the details on how to create a perspective grid in Photoshop that SaDesign wants to share with readers. Hopefully this article will help readers create unique and attractive photos.


