Best Selling Products

Genuine Adobe Illustrator account
99 USD

Upgrade Duolingo Super
29 USD

Freepik Premium Account
59 USD

Copyright Adobe Lightroom Account
59 USD

Capcut Pro 1 Year
39 USD

Autodesk All App Account Copyright
120 USD

Plugin Retouch4me
69 USD

MidJourney Account
29 USD

Adobe Premiere Pro Account
99 USD

Upgrade genuine Capture One account
120 USD

ChatGPT Plus Account (GPT-4)
16 USD

Genuine Cheap Canva Pro
39 USD

Adobe Photoshop Copyright - Full App
120 USD

Windows 10 & 11 Pro Key
36 USD

Upgrade Genuine Office 365
49 USD
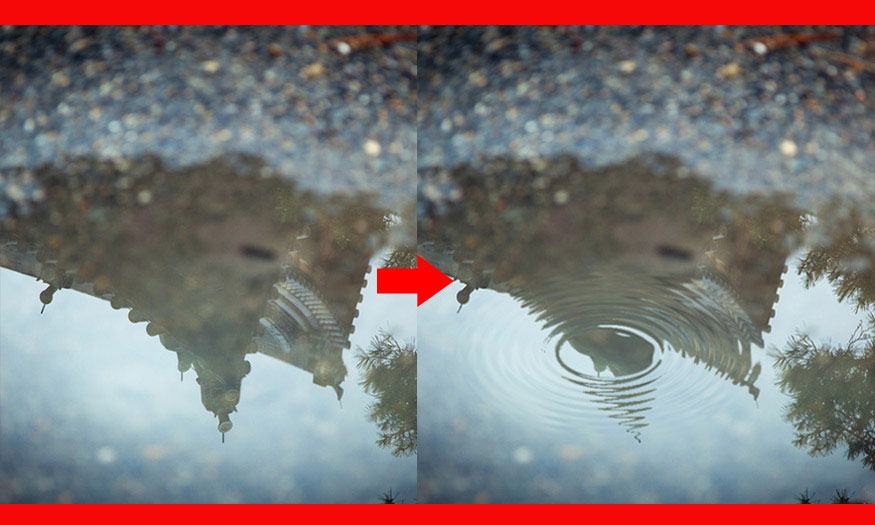
How to create water ripples in Photoshop
Static water surface images now seem more alive with the water ripple effect. You can completely create water ripples in Photoshop with just a few basic steps. Let's see how to do it with Sadesign in the article shared below.
Static water surface images now seem more alive with the water ripple effect. You can completely create water ripples in Photoshop with just a few basic steps. Let's see how to do it with Sadesign in the article shared below.
Steps to create water ripples in Photoshop

The water ripple effect with circles radiating around will make the photo of the water surface more natural and vivid. To be able to create water ripples in Photoshop we need to follow the following steps.
Step 1: The first step is to open the photo you want to create water ripples in Photoshop.
To open an image, select File on the menu bar => Open => select the image to open => Open. Or you can press the key combination Ctrl+O.

Step 2: According to the photo just uploaded, we will need to create water ripples in Photoshop on the water surface.
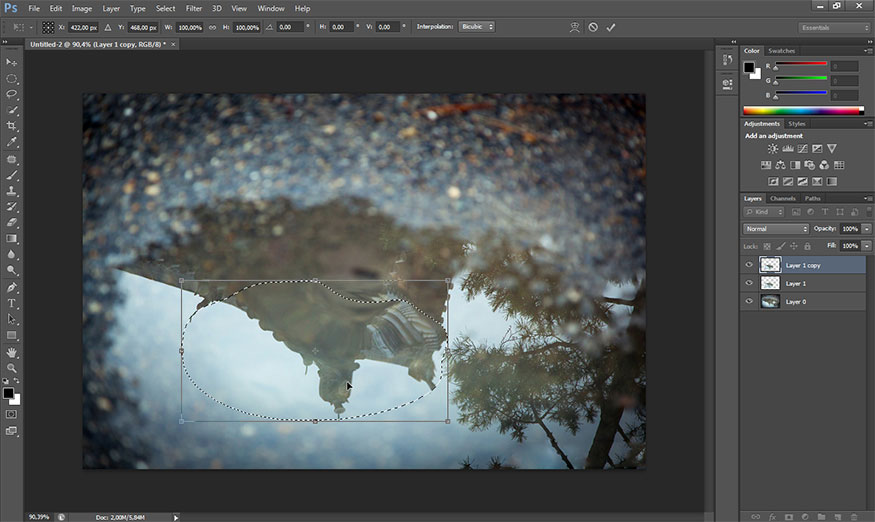
Now on the toolbar, select Elliptical Marquee Tool.
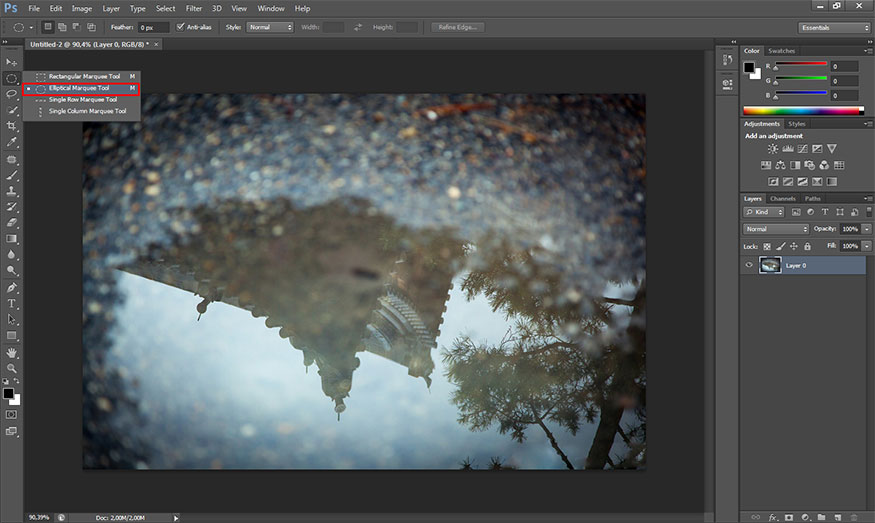
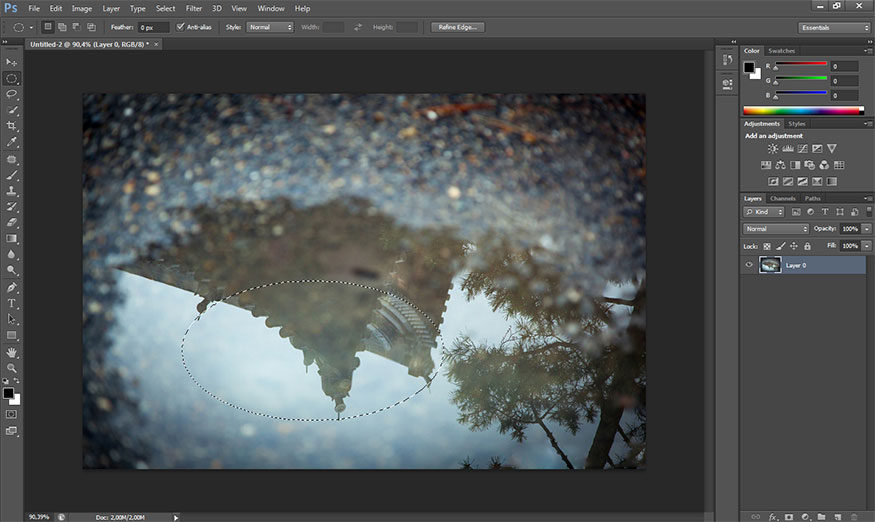
Then select the area in the photo where you want to create water ripples in Photoshop. Circle the area just the right size for a realistic effect.
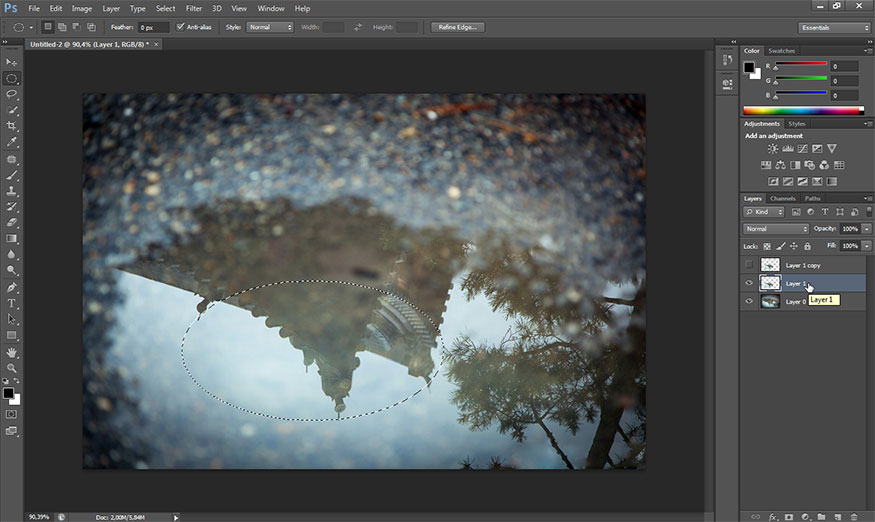
Step 3: Now press the key combination Ctrl + J (Windows) or Command + J (Mac) twice to create 2 different copies.

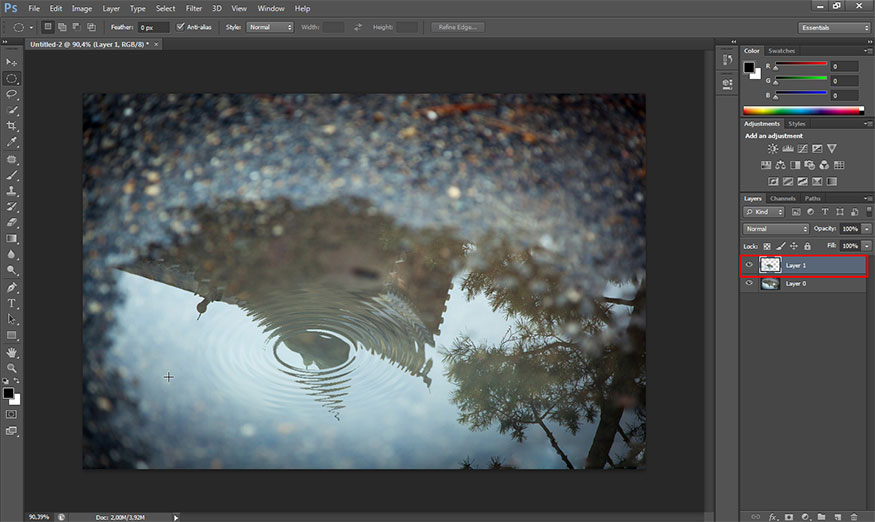
Step 4: To continue, we need to temporarily hide the layer at the top (Layer 1 copy) by clicking the eye icon on the left side of the layer.

We will proceed to work on the layer below (layer 1).
Hold down the Ctrl (Windows) or Command (Mac) key and select the layer you want to work with (Layer 1). The original selection will now appear again.
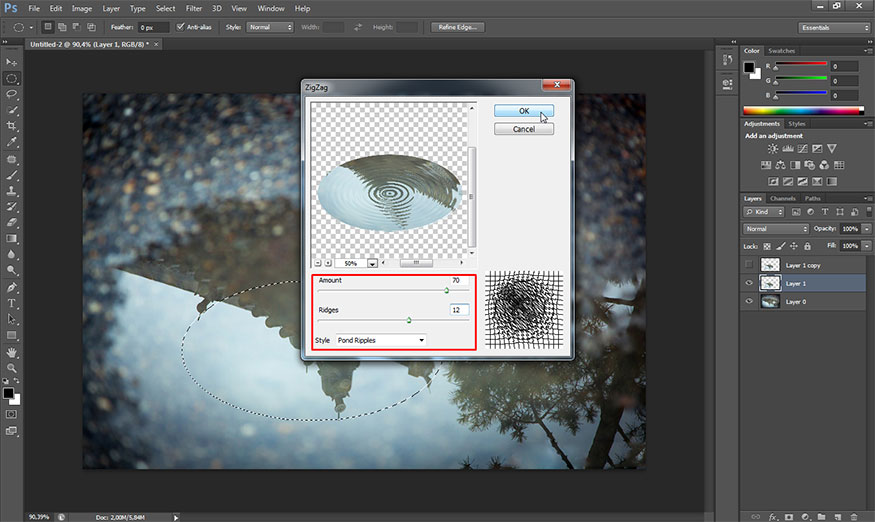
Step 5: On menu, select Filter => Distort => ZigZag.
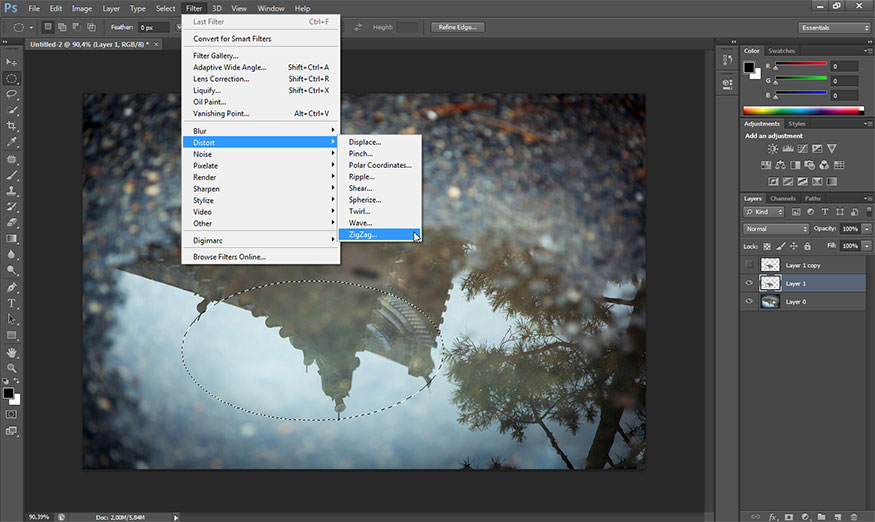
This filter is used to turn details in the selection into water ripples. In the ZigZag dialog box that appears, the Amount control section changes the intensity of the water ripples that will appear, and the Ridges parameter affects the number of water ripples. Depending on your own feeling and intuition, choose the appropriate parameters. For example, I applied the parameters Ridges 12, Amount 70 and selected the Style as Pond Ripples. Finally click OK.
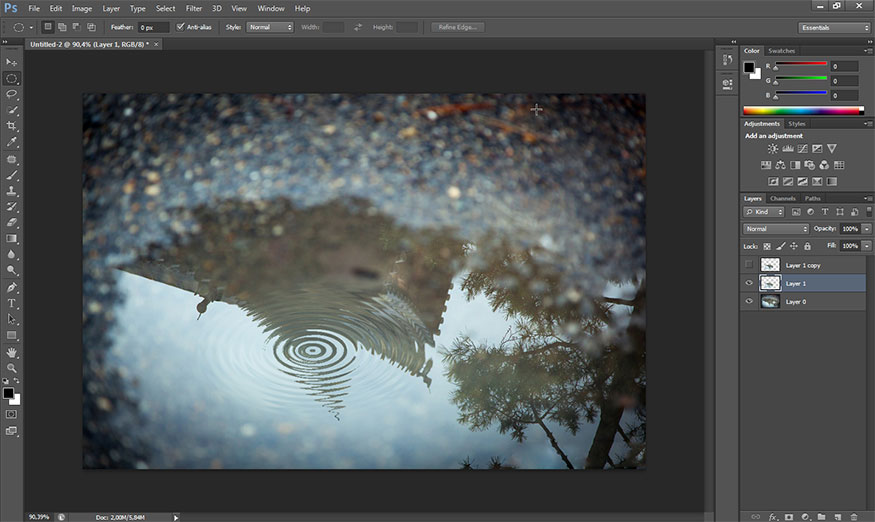
Now, we have the result:
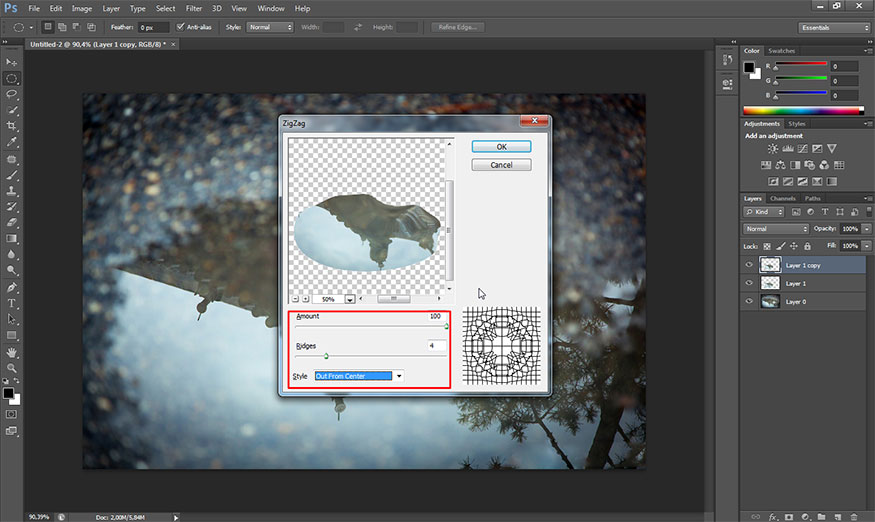
Step 6: Re-display layer 1 copy by clicking on the eye that you have turned off. Now we will use the ZigZag filter again. Press the keyboard shortcut Ctrl + Alt + F (Windows) or Command + Option + F (Mac) to use the most recently used filter. Specifically, this time the area applying the effect will be the center of the new puddle just created in the above step. So, change the Style section to Out From Center, Ridges to 4 and set Amount to 100 then click OK.
Step 7: On menu, select Select => Transform Selection
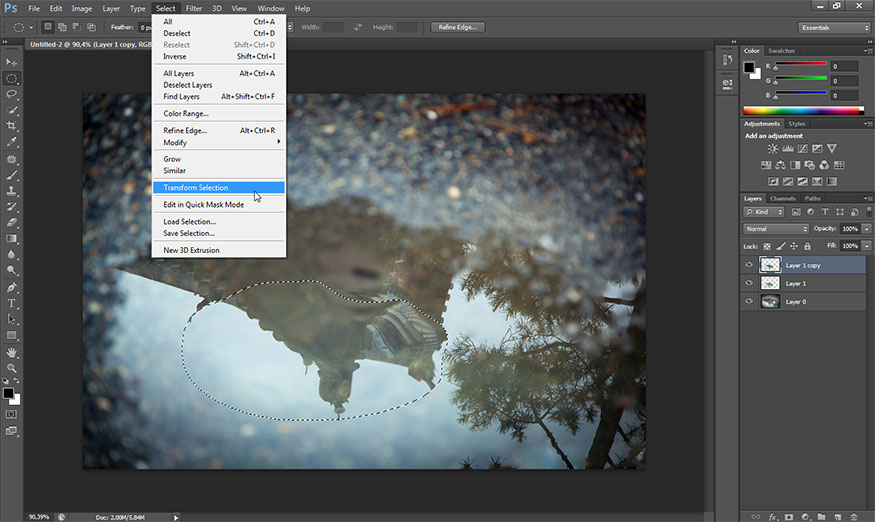
This Transform Selection feature is similar to Free Transform feature of Photoshop, except the process affects the outside selection. Hold Shift + Alt (Windows) or Shift + Option (Mac) and select the upper left corner of the selection (rectangular), then gradually drag towards the center of the image until the area is about 50 – 60% of original size. Press Enter (Windows) or Return (Mac) to apply the change.
On the menu ba, select Select => Inverse or use the keyboard shortcut Shift + Ctrl + I (Windows) or Shift + Command + I (Mac). This process inverts the selection, then press Backspace (Windows) or Delete (Mac) to delete all elements around the center of the puddle. Press Ctrl + D (Windows) or Command + D (Mac) to remove the selection. At this point we get the results as shown.

Step 8: On the menu bar, select Layer => Merge, or press the shortcut Ctrl+E (Windows) or Command+E (Mac) to merge. Now, these two layers are merged into the first layer, as shown in the figure.
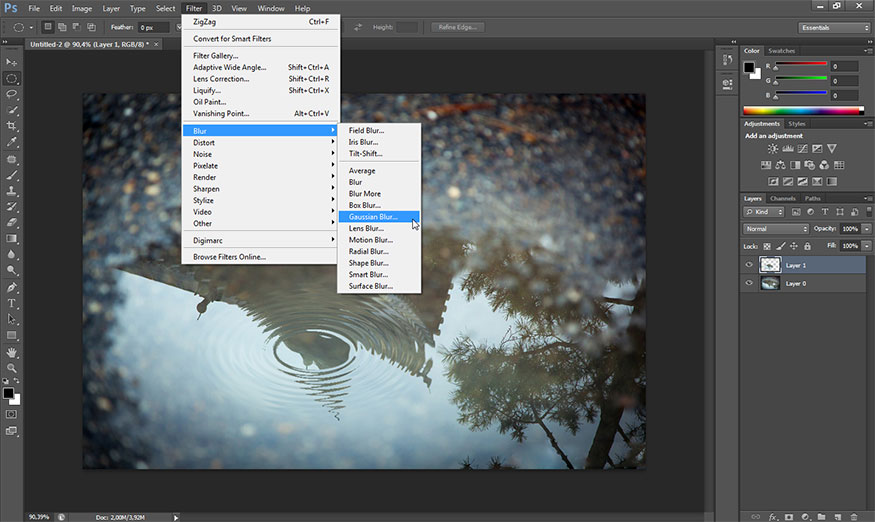
Step 9: However, applying the ZigZag filter above created jagged water ripple details. Therefore, the photo does not look really natural. Let's soften these details with the Gaussian Blur filter. On the menu bar, select Filter => Blur => Gaussian Blur.
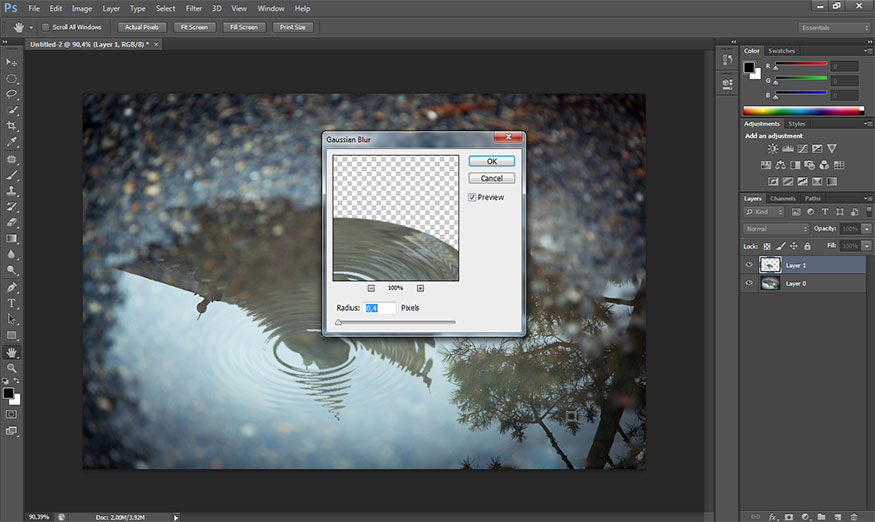
On the Gaussian Blur dialog box, adjust the Radius value to 0.4 . Then click OK.
At this point, the result is a photo of water ripples in Photoshop as shown. Remember to save the photo.

Above are detailed instructions on how to create water ripples in Photoshop. The method is very simple, so try it now.


VIP Products


Best Selling Products
Genuine Adobe Illustrator account
99 USD
Upgrade Duolingo Super
29 USD
Freepik Premium Account
59 USD
Copyright Adobe Lightroom Account
59 USD
Capcut Pro 1 Year
39 USD
Autodesk All App Account Copyright
120 USD
Plugin Retouch4me
69 USD
MidJourney Account
29 USD
Adobe Premiere Pro Account
99 USD
Upgrade genuine Capture One account
120 USD
ChatGPT Plus Account (GPT-4)
16 USD
Genuine Cheap Canva Pro
39 USD
Adobe Photoshop Copyright - Full App
120 USD
Windows 10 & 11 Pro Key
36 USD
Upgrade Genuine Office 365
49 USD