Best Selling Products

Plugin Retouch4me
69 USD

Copyright Adobe Lightroom Account
59 USD

Genuine Cheap Canva Pro
39 USD

MidJourney Account
29 USD

Upgrade Duolingo Super
29 USD

Upgrade Genuine Office 365
49 USD

Adobe Photoshop Copyright - Full App
120 USD

Capcut Pro 1 Year
39 USD

Autodesk All App Account Copyright
120 USD

ChatGPT Plus Account (GPT-4)
16 USD

Genuine Adobe Illustrator account
99 USD

Adobe Premiere Pro Account
99 USD

Freepik Premium Account
59 USD

Windows 10 & 11 Pro Key
36 USD

Upgrade genuine Capture One account
120 USD
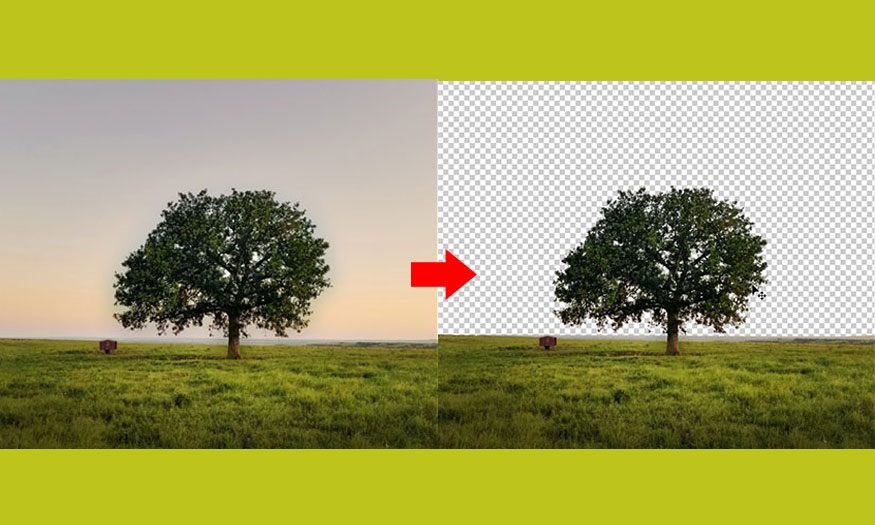
How to separating the background of photos
Photos with simple objects such as people, vases, bottles, etc. are very simple to separate from the background. You just need to use tools that have the function of creating selections such as the Pen Tool, Selection tool group. However, with difficult objects like trees, it is not possible. Small leaves with too many details will be lost and the edges will become jagged. So how to separate the background of an image with complex details in Photoshop? Join Sadesign to learn how to do it through the sharing below.

Photos with simple objects such as people, vases, bottles, etc. are very simple to separate from the background. You just need to use tools that have the function of creating selections such as the Pen Tool, Selection tool group. However, with difficult objects like trees, it is not possible. Small leaves with too many details will be lost and the edges will become jagged. So how to separate the background of an image with complex details in Photoshop? Join Sadesign to learn how to do it through the sharing below.
1. Steps to separate image backgrounds with complex details in Photoshop
Trees with too many and small leaves will not be able to separate them all from the background with just regular area selection tools. We need to combine many different tools.
To be able to separate image backgrounds with complex details in Photoshop such as trees, follow these steps.
Step 1: First we need to open the photo we want to separate the background with complex details in Photoshop. Select File on the menu bar => Open => select the image => click Open.
Or you can press the key combination Ctrl+O.
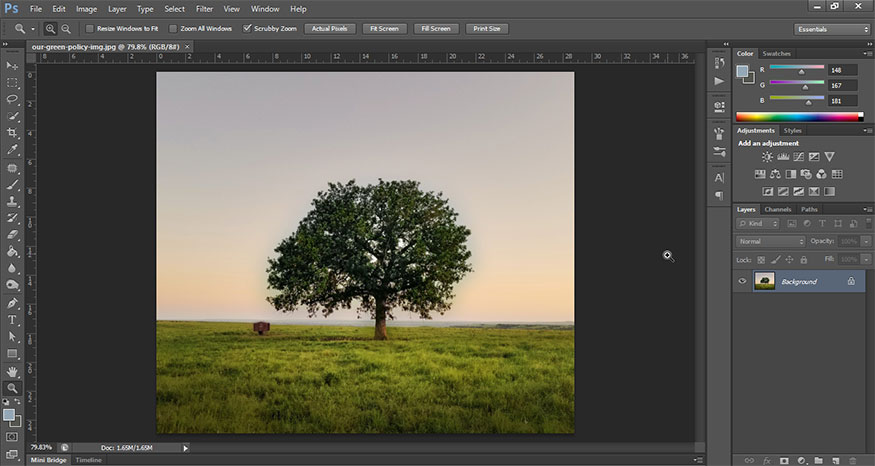
Step 2: Double click on the background layer to unlock it. When the layer dialog box appears, you can give it a new name and then click OK. For example, I name it “Layer 0”.

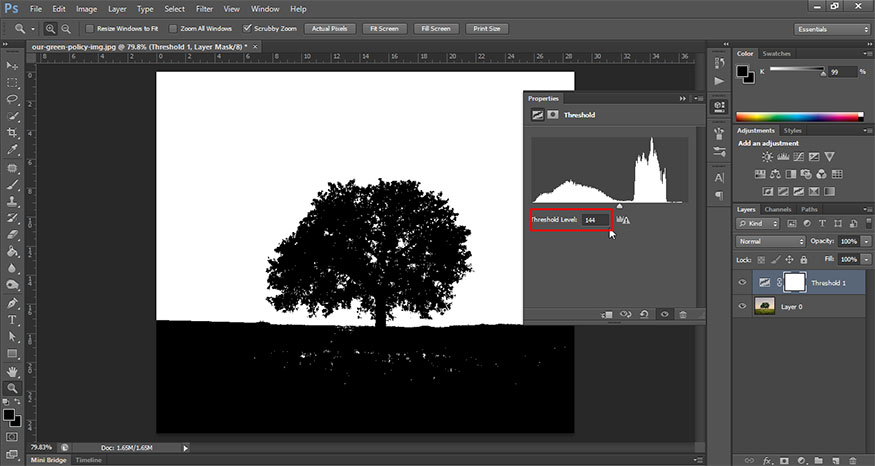
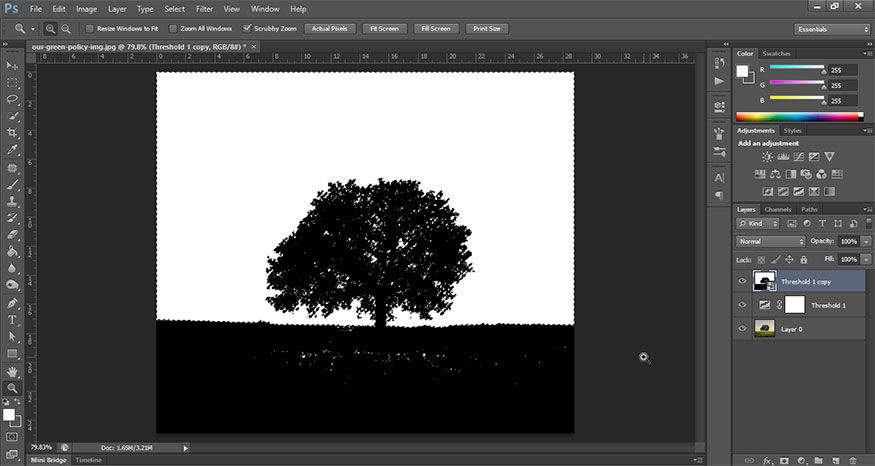
Step 3: At the bottom of the Layers panel, let's choose Create new fill or adjustment layer - the divided circle icon. Then select Threshold…

At this point, our photo will be converted to black and white. Threshold is a parameter that represents the contrast value at the edge. The smaller the value, the noisier the image will be; the larger the value is, the more blurred the image will be. Please adjust the Threshold level to a moderate level, here I set the value to 144.
Step 4: Now hold down the Shift key and then select both layers. Please press Ctrl + J to duplicate both of these layers. At this point we get the result as shown.
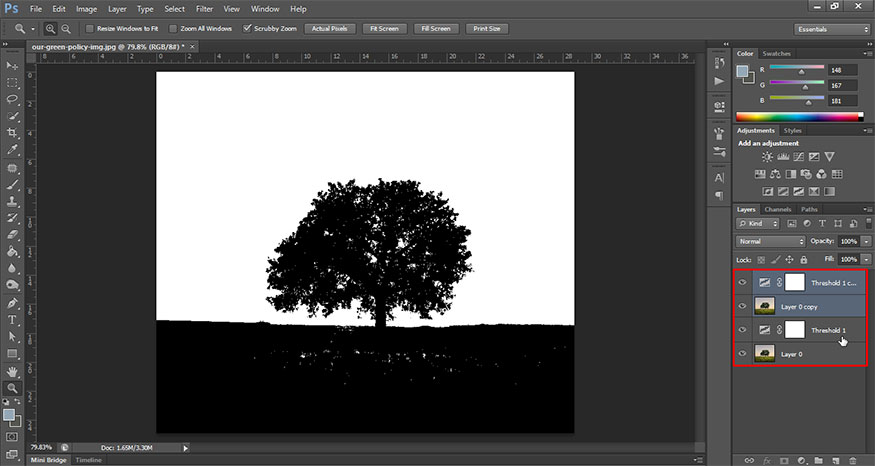
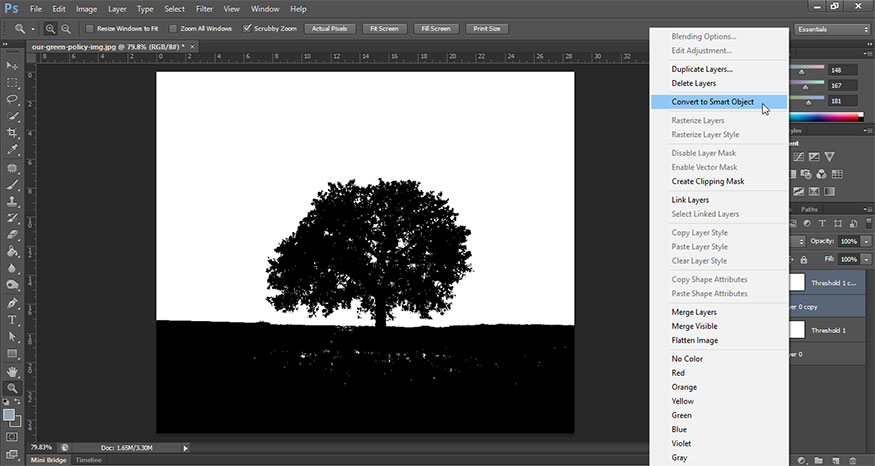
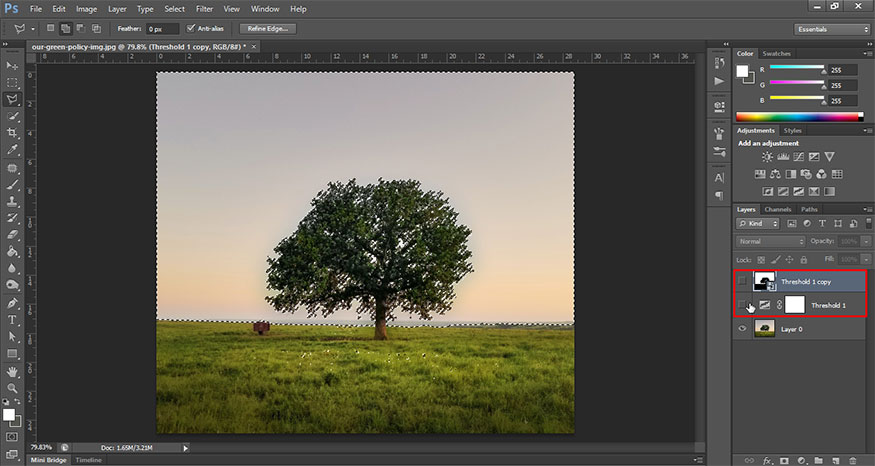
At the top 2 copy layers, right-click, then select Convert to smart object.
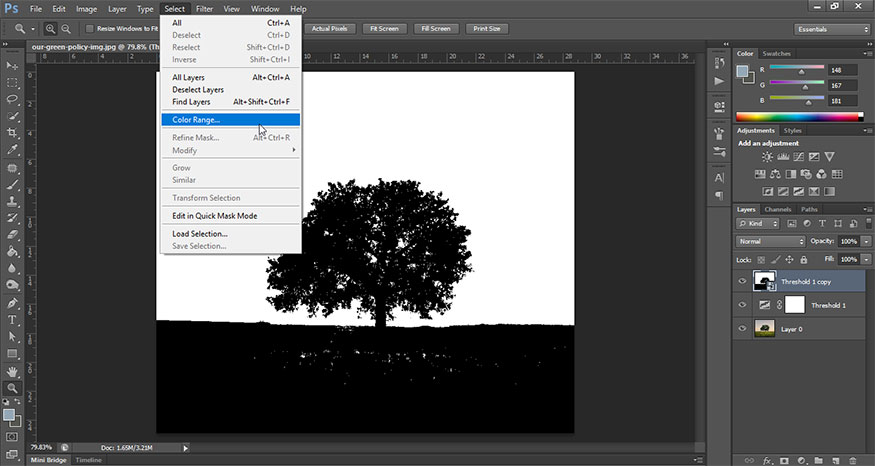
At Threshold 1 copy layer, on the menu, Select => Color range…
In the Color range dialog box that appears, note Fuzziness. This is the reference value. When you click on a point on the image to get the reference color, Photoshop will take the pixels whose color is closest to that color. You can adjust the color range to be similar by changing the value. Here I set the fuzziness value to 200. Then click OK.
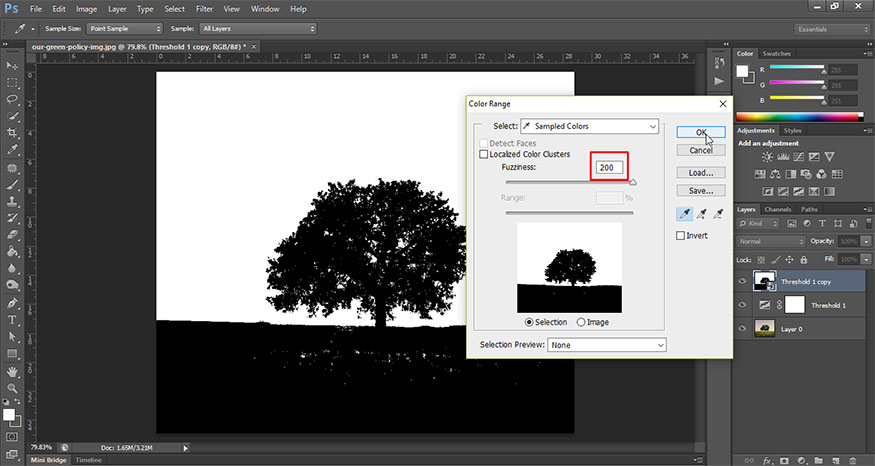
At this point we will get the result as shown. We can see that the white areas are all selected.
Step 5: We can see that behind the tree trunk there is a horizontal line. To separate the complexly detailed image background in Photoshop for this tree, we need to remove this entire horizon background. On the toolbar, select Polygonal Lasso Tool. On the Option bar at the top, select Add to selection.

For now, temporarily hide the Threshold 1 copy layer and the Threshold 1 layer. Hide the layer by clicking on the eye image to the left of the layer. Now your photo returns to its original color with the selection still present.
With the Polygonal Lasso Tool, we will create a selection in the grass below. Press Alt and use the Polygonal Lasso Tool straight along the horizon and around the grass to create a selection as shown.
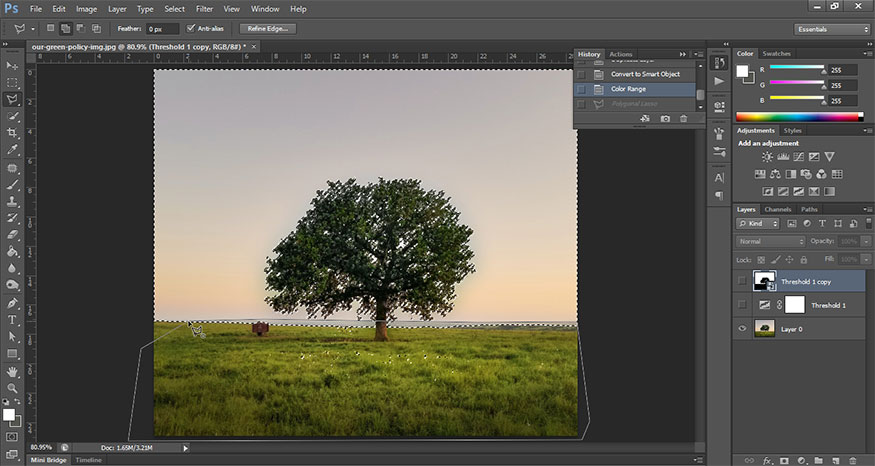
After reaching the anchor endpoint, we will press Ctrl. Now you will see the selection removes the horizon line as shown. Only the sky area is selected, dark areas such as trees and grass are omitted.

Step 6: At layer 0, give it a mask by selecting Add layer mask at the bottom of the layer panel.
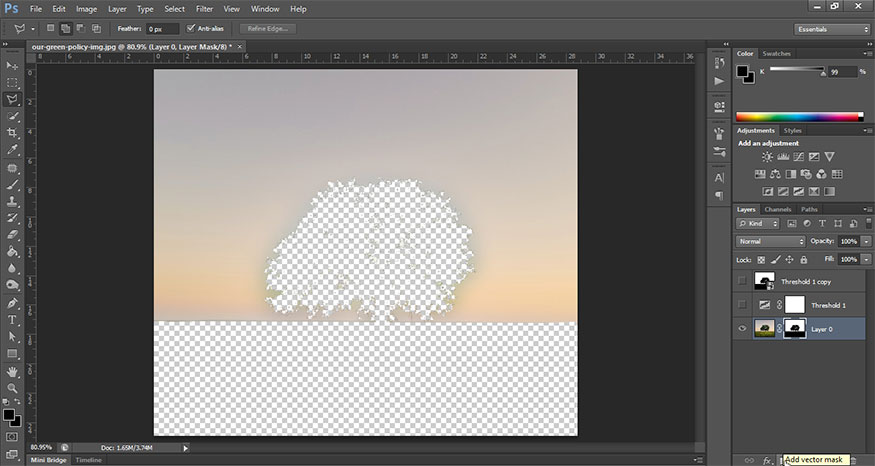
Step 7: Now press the key combination Ctrl + I to invert the selection. Now you will get the result as shown.
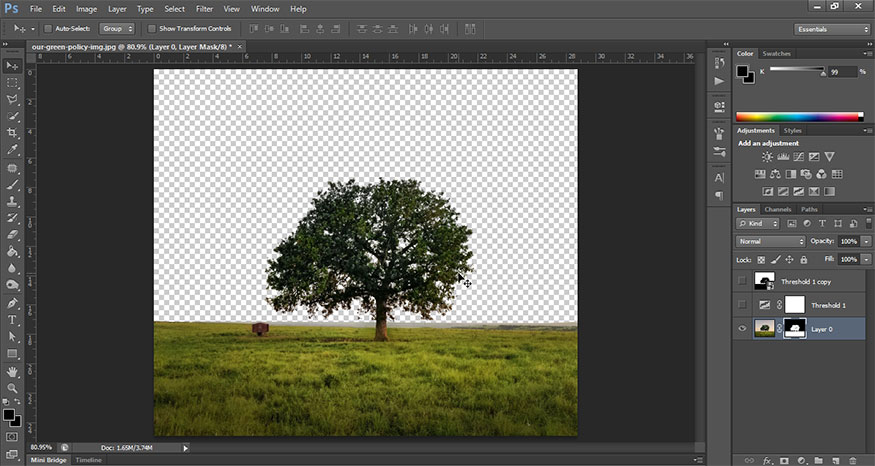
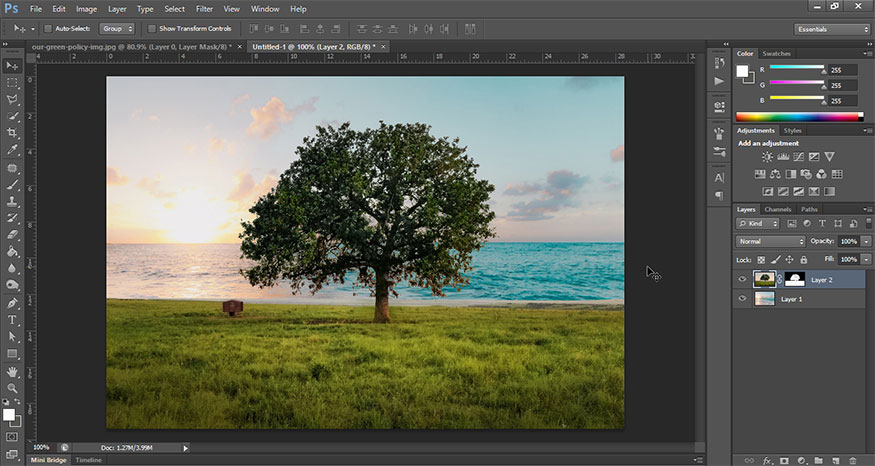
Now we get an image with the trees and grass separated from the sky. The sky becomes transparent. Even the small white background squares between the leaves are transparent. Now you can combine this tree into many different photo backgrounds. For example, pairing it with a beach like in the picture.
So, we have removed the background of images with complex details in Photoshop. How to do it is not too difficult, right? Hopefully Sadesign's sharing can make your photo editing work easier.


VIP Products


Best Selling Products
Plugin Retouch4me
69 USD
Copyright Adobe Lightroom Account
59 USD
Genuine Cheap Canva Pro
39 USD
MidJourney Account
29 USD
Upgrade Duolingo Super
29 USD
Upgrade Genuine Office 365
49 USD
Adobe Photoshop Copyright - Full App
120 USD
Capcut Pro 1 Year
39 USD
Autodesk All App Account Copyright
120 USD
ChatGPT Plus Account (GPT-4)
16 USD
Genuine Adobe Illustrator account
99 USD
Adobe Premiere Pro Account
99 USD
Freepik Premium Account
59 USD
Windows 10 & 11 Pro Key
36 USD
Upgrade genuine Capture One account
120 USD