Best Selling Products

Freepik Premium Account
59 USD

Genuine Cheap Canva Pro
39 USD

Upgrade Duolingo Super
29 USD

Autodesk All App Account Copyright
120 USD

Upgrade Genuine Office 365
49 USD

Capcut Pro 1 Year
39 USD

Genuine Adobe Illustrator account
99 USD

Copyright Adobe Lightroom Account
59 USD

Adobe Premiere Pro Account
99 USD

Plugin Retouch4me
69 USD

ChatGPT Plus Account (GPT-4)
16 USD

Upgrade genuine Capture One account
120 USD

Windows 10 & 11 Pro Key
36 USD

MidJourney Account
29 USD

Adobe Photoshop Copyright - Full App
120 USD
How tot Create a custom Music Poster in Photoshop using Bitmap
Nội dung
Designing a music poster is one of the particularly interesting projects, requiring high creativity. To get an eye-catching and impressive product, the following article SaDesign will guide you how to create a custom music poster in Photoshop using Bitmap.
Designing a music poster is one of the particularly interesting projects, requiring high creativity. To get an eye-catching and impressive product, the following article SaDesign will guide you how to create a custom music poster in Photoshop using Bitmap.

1. How to create a new file in Photoshop
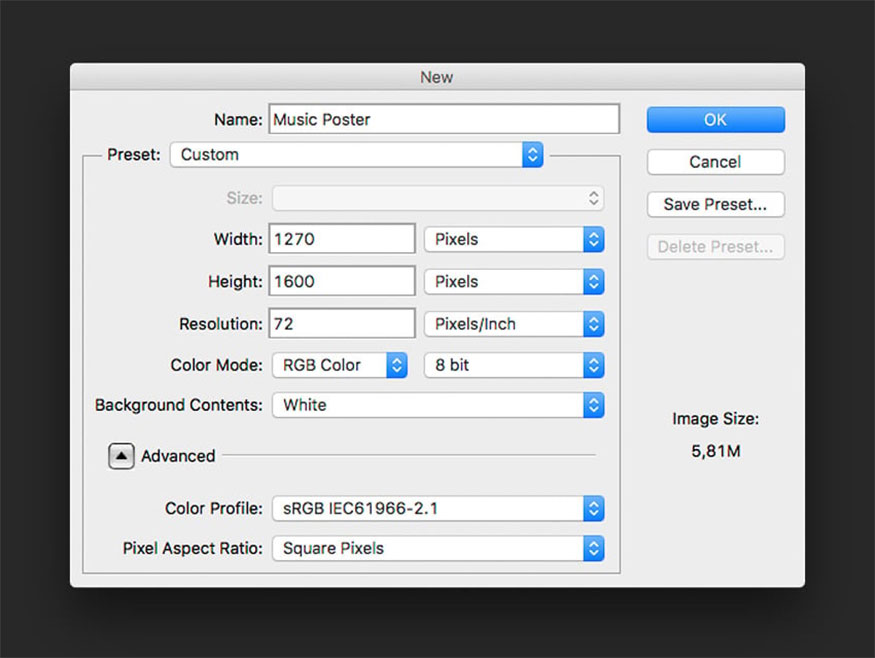
- Step 1: Open Photoshop => File => New to create a document, name this new document “Music Poster”. Set the file parameters to Width of 1270 px and Height of 1600 px. Set Resolution to 72 Pixels/Inch then click OK to complete creating a new file for the design.
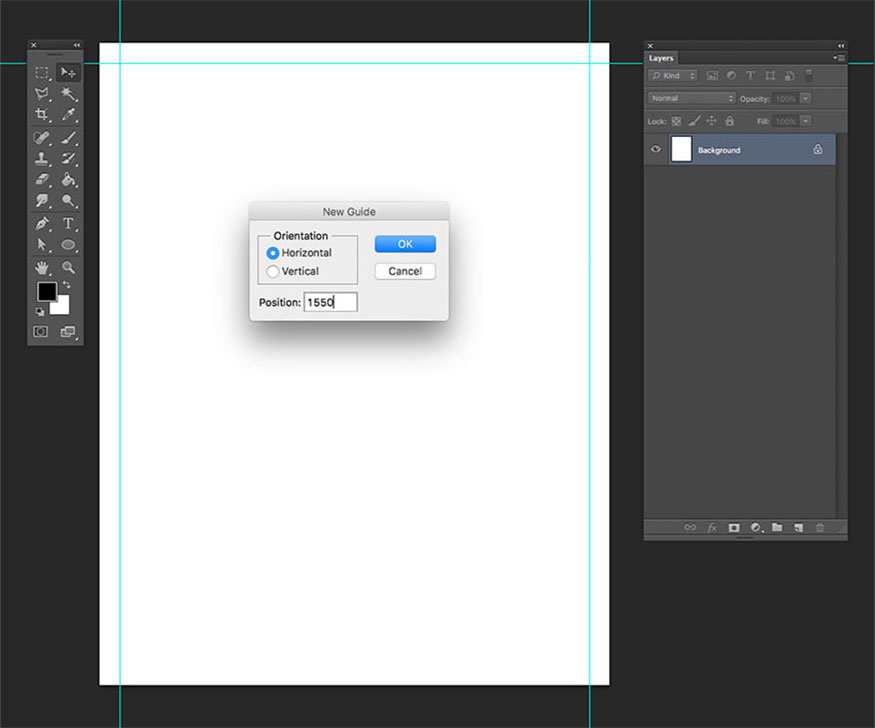
- Step 2: Next, press Command-R to display the rules around the document. Go to View => New Guide. In the New Guide option, click Horizontal and set the guide to 50px => click OK.
Do the same for the remaining sides of the document by subtracting 50 px from the final size.
- Step 3: To create an interesting layout, instead of the traditional centered layout, create a slightly off-center layout to create something surprising for this bitmap Photoshop poster.
To determine this composition, apply the rule “1/3”. This technique is applied by dividing the poster size into three uneven rows and columns. The goal is for them to be different from regular posters. Create 4 spaces to mix text and images.
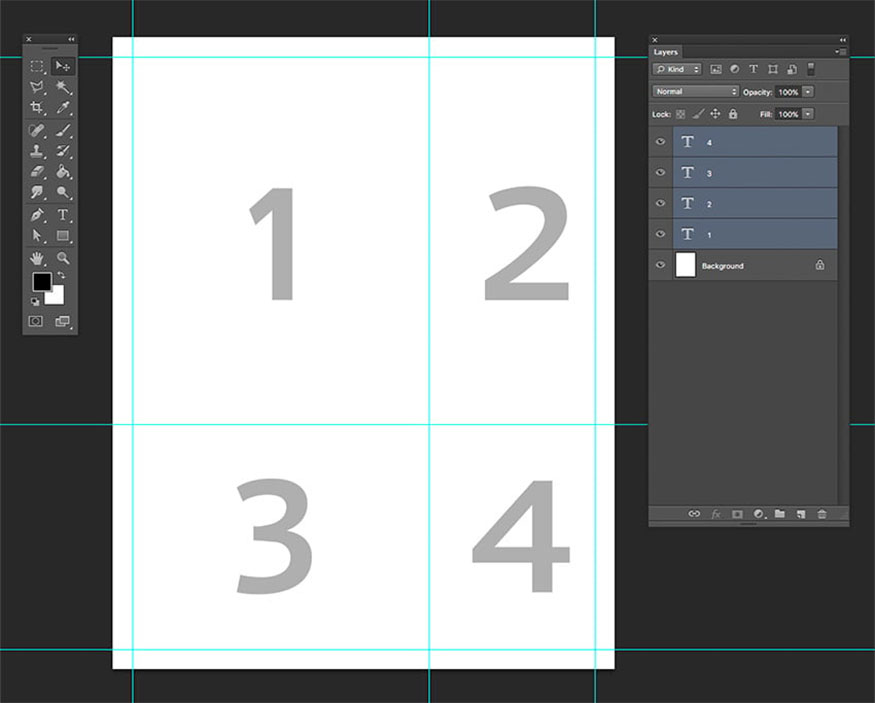
Then go to View => New Guide. At the newly opened New Guide option, select Vertical and set the size to 800px => click OK.
Do the same with the horizontal guides and set them to 980px => press OK. To activate and deactivate instructions, click Command.
2. Instructions for using Bitmap mode
Bitmap Photoshop is considered an alternative to vector, in which images are converted into black and white pixels. This technique is often applied to screen printing or newspaper printing.
We can choose between several different templates and set the amount of detail we want to maintain. To create screened images, you need to open them separately.
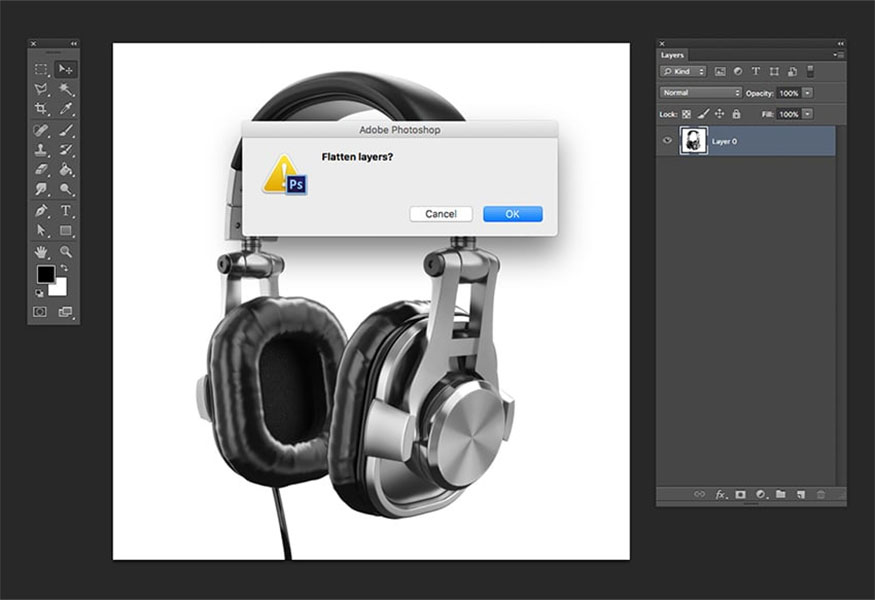
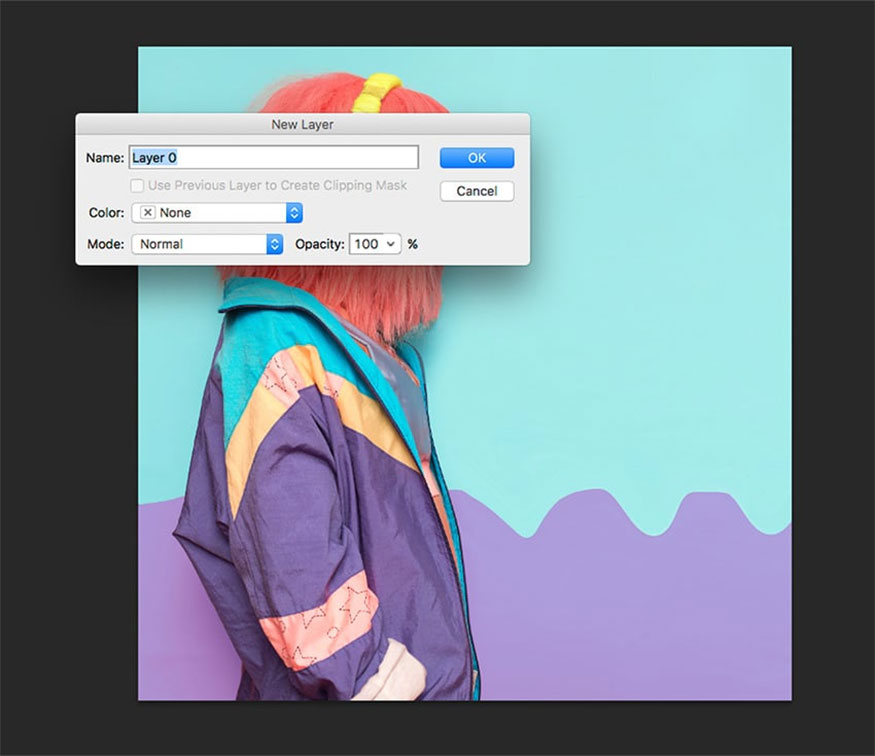
- Step 1: Open the headphone image
In the layers panel, unlock the main layer by clicking twice on the lock. Click OK in the New Layer options window.

- Step 2: Go to Image => Mode => Grayscale, then go to Image => Mode => Bitmap. In the Flatten Layers window, click OK.
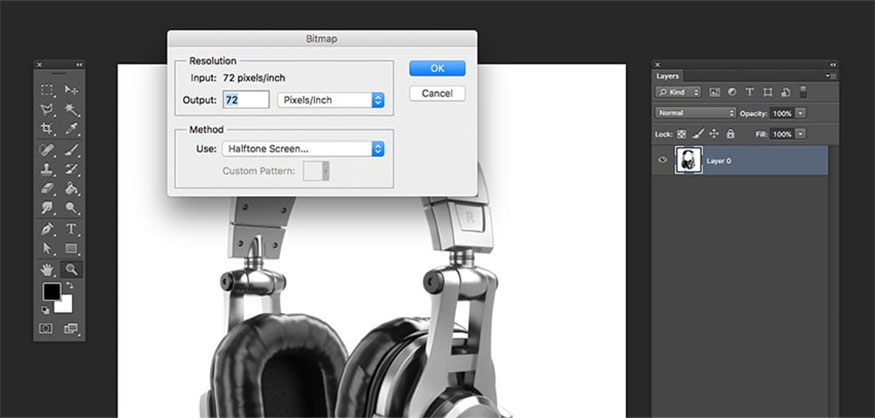
- Step 3: In the Bitmap options window, set the following:
-
Output: 72 Pixels/Inch
-
Under Method
-
Use: Halftone Screen.
Click OK.
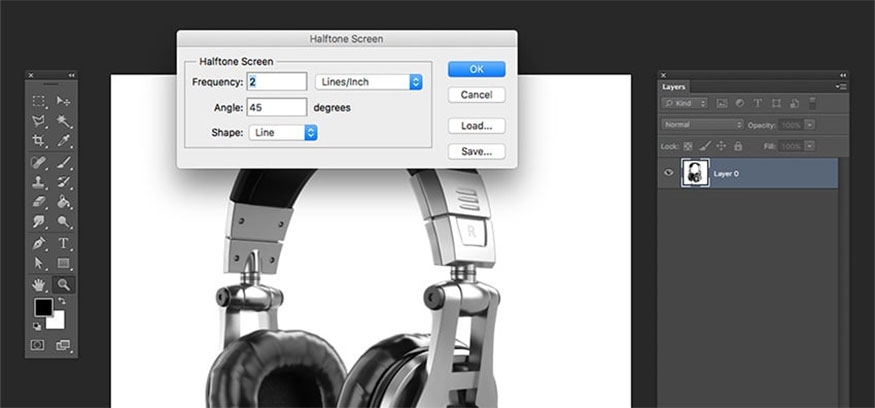
- Step 4: In the Halftone Screen options window, set the frequency to 2 Lines/Inch, Angle to 45 and Shape to Line. Then click OK.
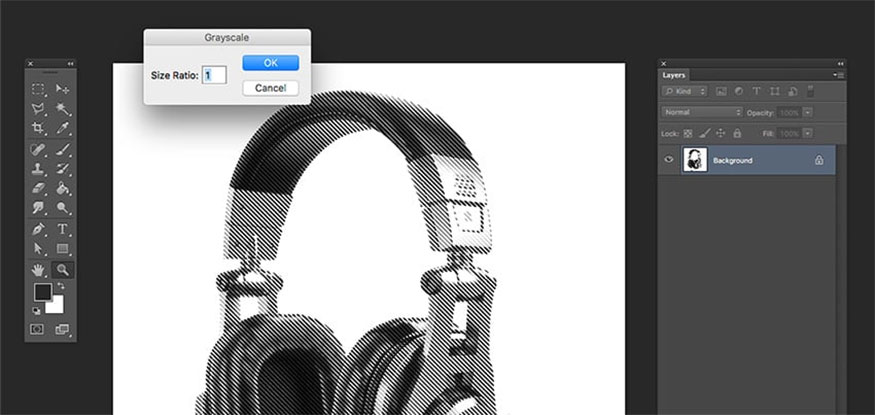
- Step 5: To use the image, you need to convert it to Grayscale by going to Image => Mode => Grayscale. In the Grayscale options window, set Billion Size to 1 then click OK.
- Step 6: Copy the image into the music poster. In the layers panel, click Duplicate Layer. When the Duplicate Layer window opens, name this headphone layer “headphones”. In Destination, select the Music Poster Photoshop file then click OK.
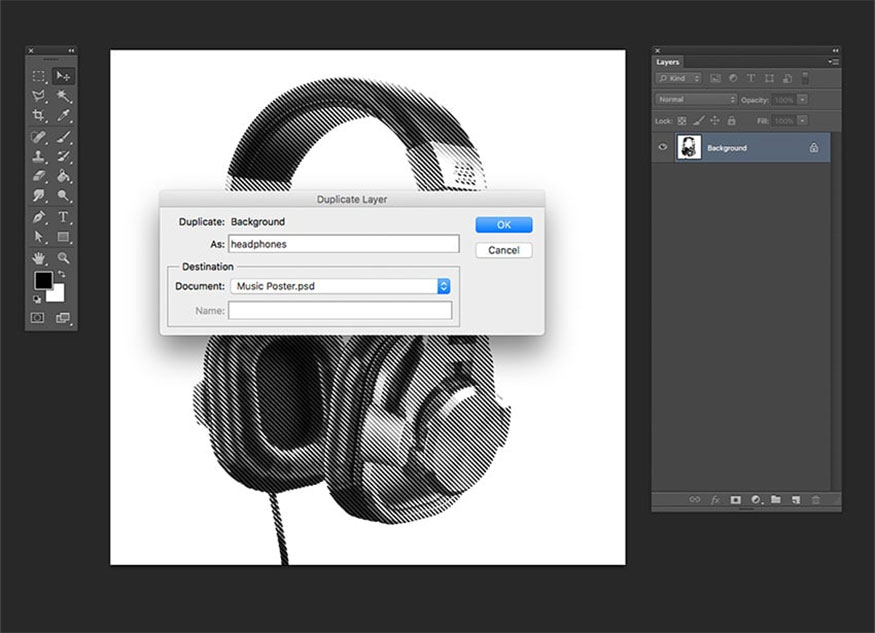
Close the headphone image without saving because we copied it to the main Photoshop file.
- Step 7: Open the DJ image, in the Layers panel, double click on the layer to unlock it. In the New Layer options window, click OK.
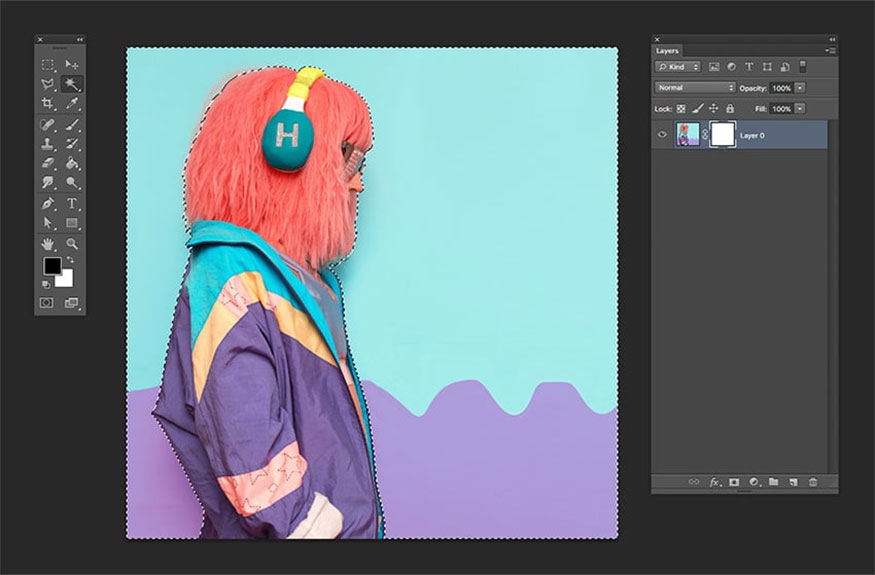
- Step 8: For this specific image, we need to remove the background to get our scene DJ. In the layers panel, click the Add a layer mask button to add a layer mask.
In the Tools panel, select the Magic Wand Tool (W), click to select the background and hold down the Shift key on the keyboard to add to the selection. Although they don't need to be perfect, you should remove as much of the background as possible.
- Step 9: After you have selected the background, press Command-I on the keyboard to invert the mask. Make sure you are performing this action above the Layer Mask that has been added to the main layer. To deselect, press Command-D.
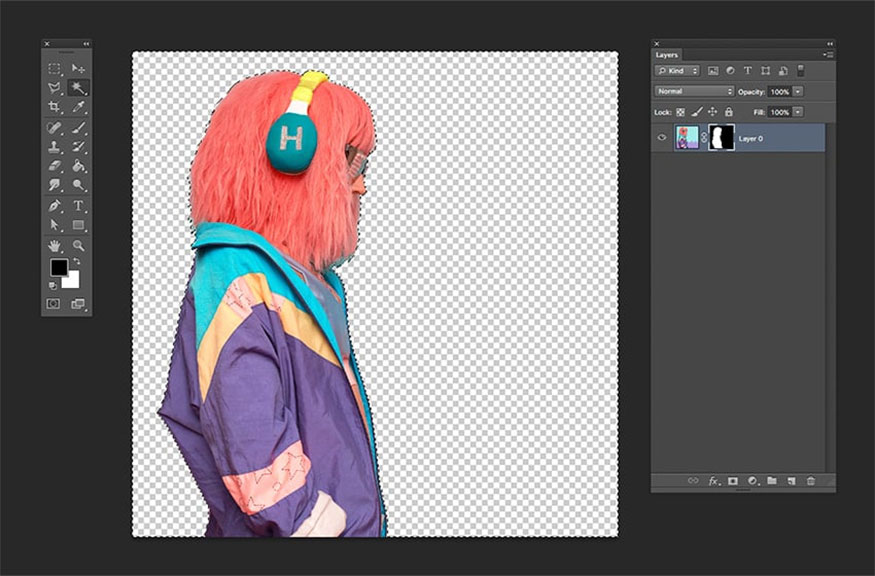
- Step 10: To continue, apply a Layer Mask to the main layer by right-clicking and clicking Apply Layer Mask.
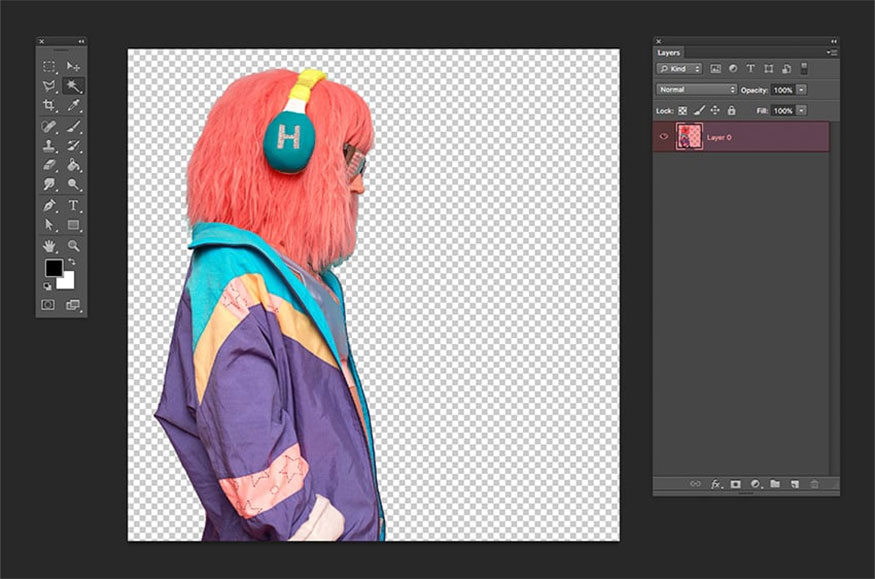
- Step 11: Go to Image => Mode => Grayscale, then select Image => Mode => Bitmap => in the options window, click OK.
In the Bitmap preferences, you make the following settings:
-
Output: 240 Pixels/Inch.
-
Under Method
-
Use: Halftone Screen.
Click OK.
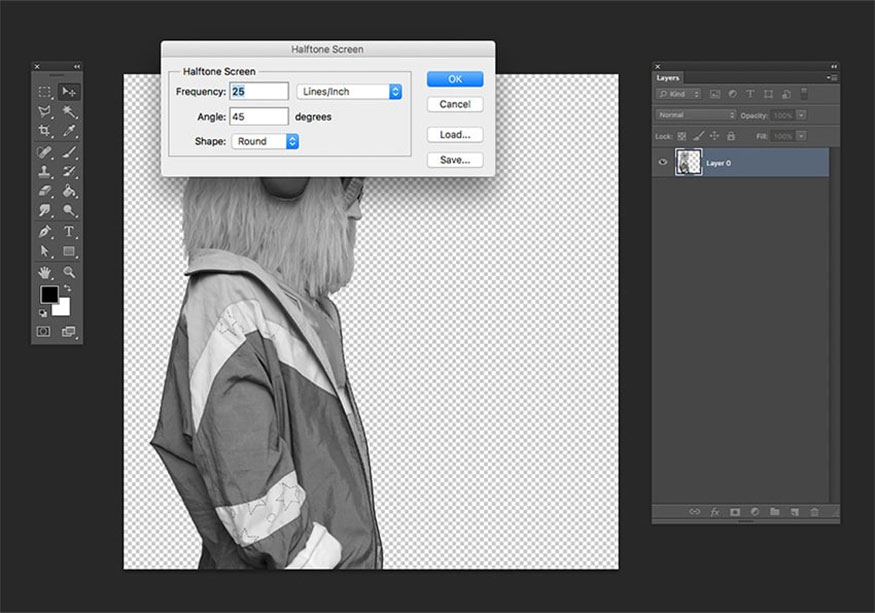
In the Halftone Screen options window:
-
Frequency: 25 25 Lines/Inch
-
Angle: 45 degrees
-
Shape: Round
Click OK.
Convert the file back to Grayscale by selecting Image => Mode => Grayscale. In the Grayscale options window, set Size Ratio to 1 and click OK.
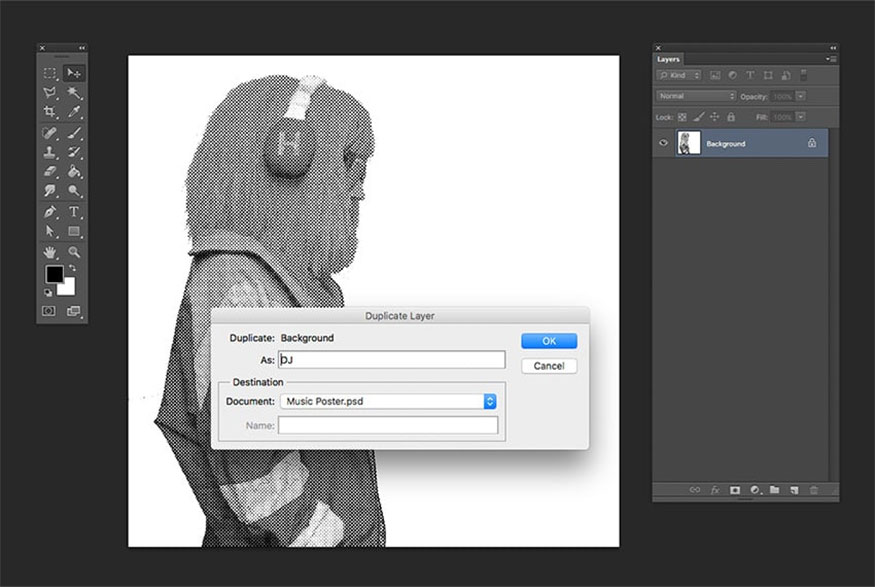
- Step 12: Copy this image to Music Poster, then right click on the layer and select Duplicate Layer. In the Duplicate Layer window, name the layer “DJ”.
In Destination, select the Music Poster Photoshop file then click OK.
Close the image and there's no need to save it because we've already copied it to the main Photoshop file.
- Step 13: Return to the main Music Poster file to change the image size. To display the instructions, press Command+;
To resize the image to fit the space, start with the DJ layer first. Press Command-T to transform, then select the option and activate the Maintain Aspect Ratio button. Set Width or Height to 85% then press Enter. Place the image on the right side of the poster.
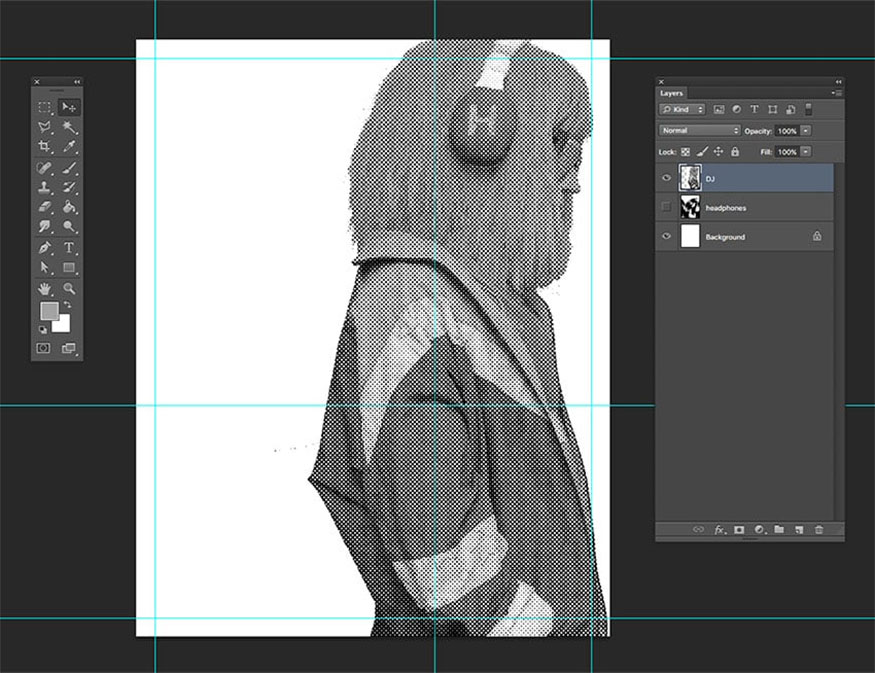
- Step 14: Add a Layer Mask to erase unused parts of the layer. Click the Add Layer Mask button to add a layer mask. Take the Rectangular Marquee Tool (M), then select the left side of the poster. Press Command-I to invert the mask, if you want to deselect it, press Command-D.

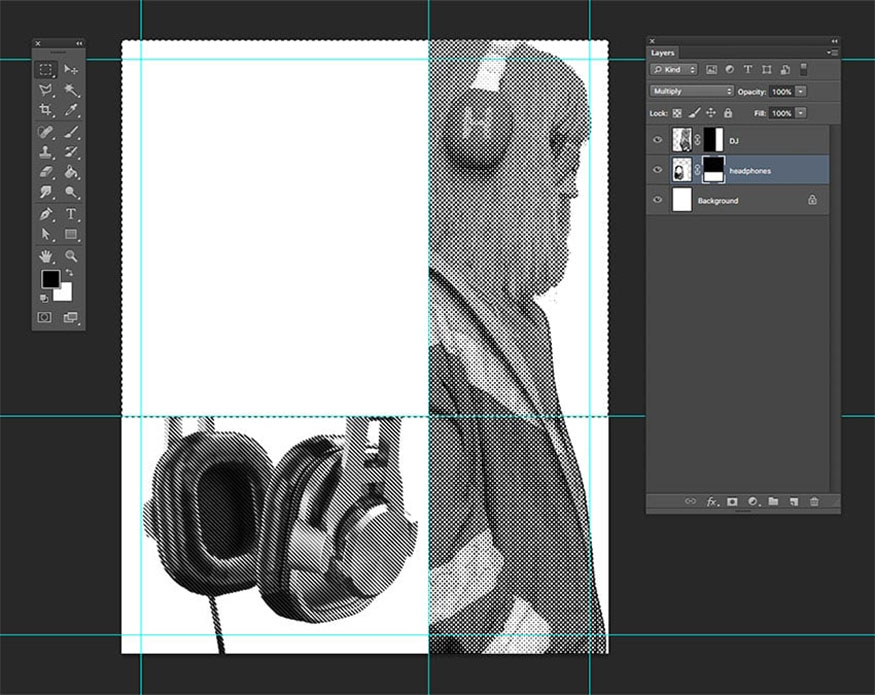
- Step 15: Let's work on the headphone layer, press Command-T to transform. Go to the options bar and click on Maintain Aspect Ratio, set Width or Height to 22% and press Enter. Place the image in the lower left quadrant of the poster.
Similar to the step above, add a Layer Mask and delete unused parts. Click Add Layer Mask to add a layer mask. Use the Rectangular Marquee Tool (M) to select the top edge of the image. Press Command-I to invert the mask, and if you want to deselect it, press Command-D.
3. Instructions for creating digital screen effects
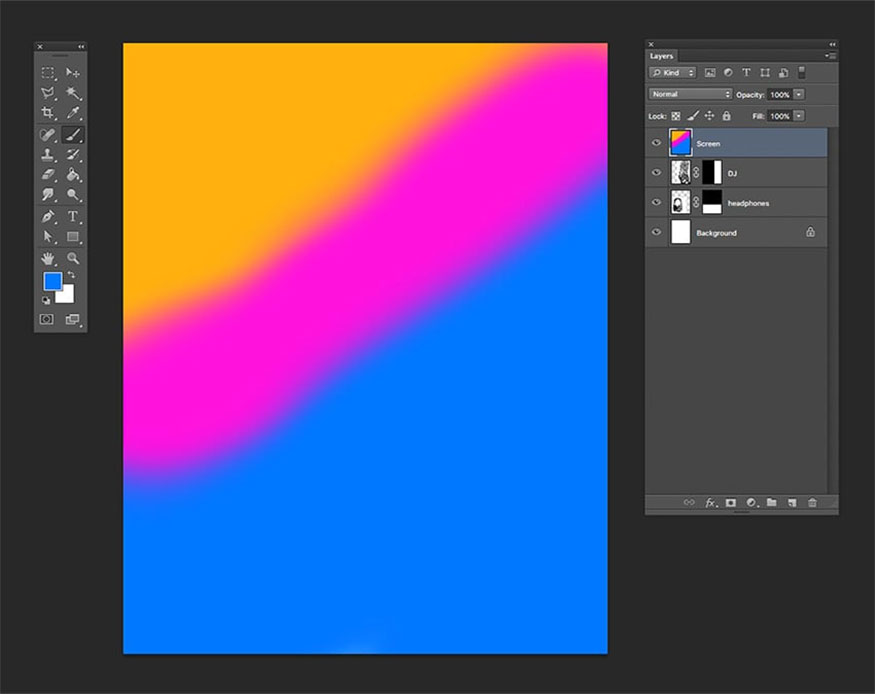
- Step 1: In the Layers panel, create a new layer by pressing Shift-Command-N. Then name the layer “Screen” and click OK.
Select the Brush Tool (B) from the Tools panel, then right-click to change the settings. Set Size to 400px and Hardness to 0%. Use the color codes below to scan through the pages:
-
Yellow: #ffb20e
-
Pink: #ff12de
-
Blue: #0078ff
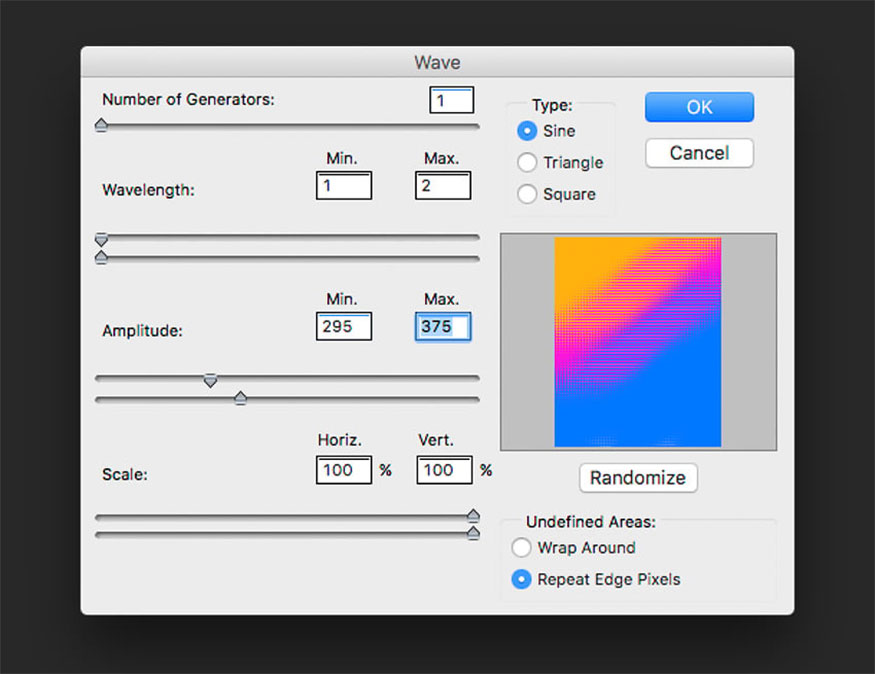
- Step 2: Go to Filter => Twist => Wave. In the Wave options window, perform the following settings:
-
Number of Generators: 1
-
Type: Sine
-
Wavelength: Min. 1 and Max. 2
-
Amplitude: Min. 295 and Max. 375
-
Scale: Horiz. 100% and Vert. 100%.
-
Undefined Areas: Repeat Edge Pixels
Click OK.
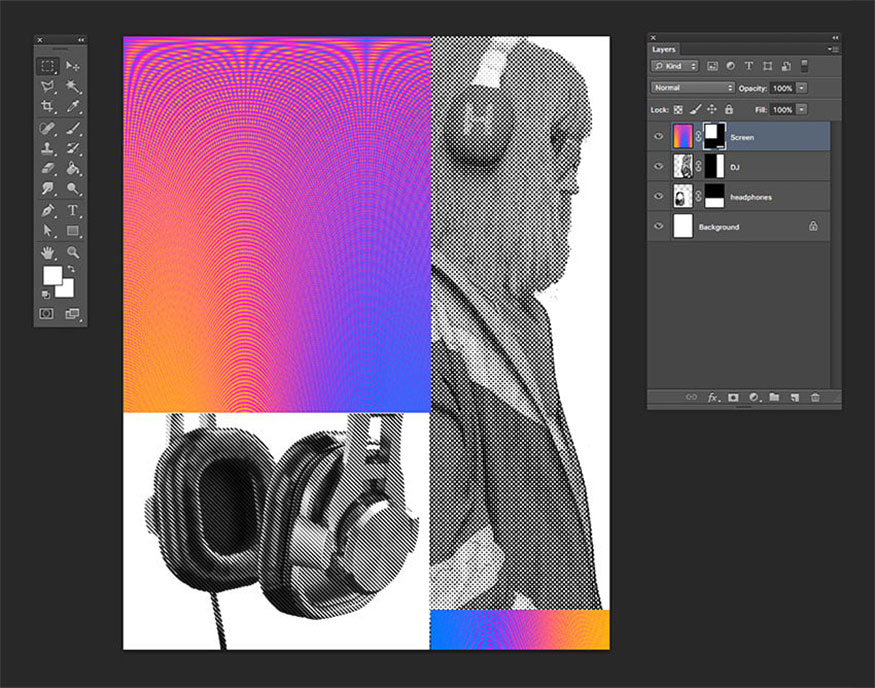
- Step 3: To create a cardioid pattern, you need to run this image through a second process. In the same layer, go to Filter => Distort => Polar Coordinates.
In the Polar Coordinates options window, press the Polar Rectangular option and click OK.
In case the color is not as expected, you can edit it later.

- Step 4: Using the Rectangular Marquee Tool (M), select the top left quadrant of the poster. Press Shift to add to the selection then select a small part in the lower right.
If you have these two options, click the Layer Mask button to create a mask around the selection.
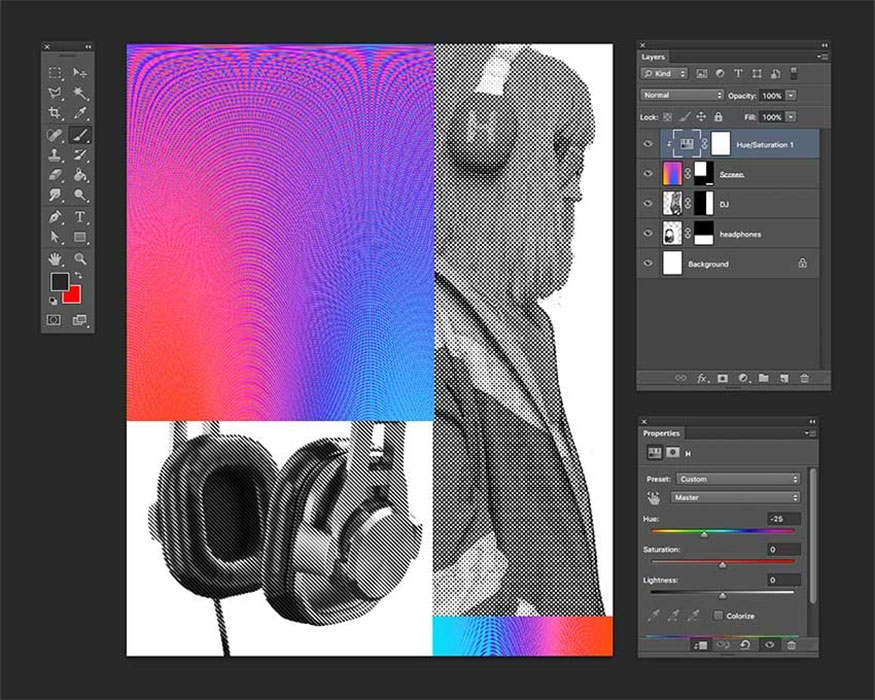
- Step 5: To change the color of the Screen layer, click Create a new fill or adjustment layer => Hue/Saturation. The Properties panel will automatically open.
If not, double-click the Hue/Saturation layer thumbnail. In this example we set Hue to -25.
To apply this adjustment layer to the Screen layer, right-click and select Create Clipping Mask.
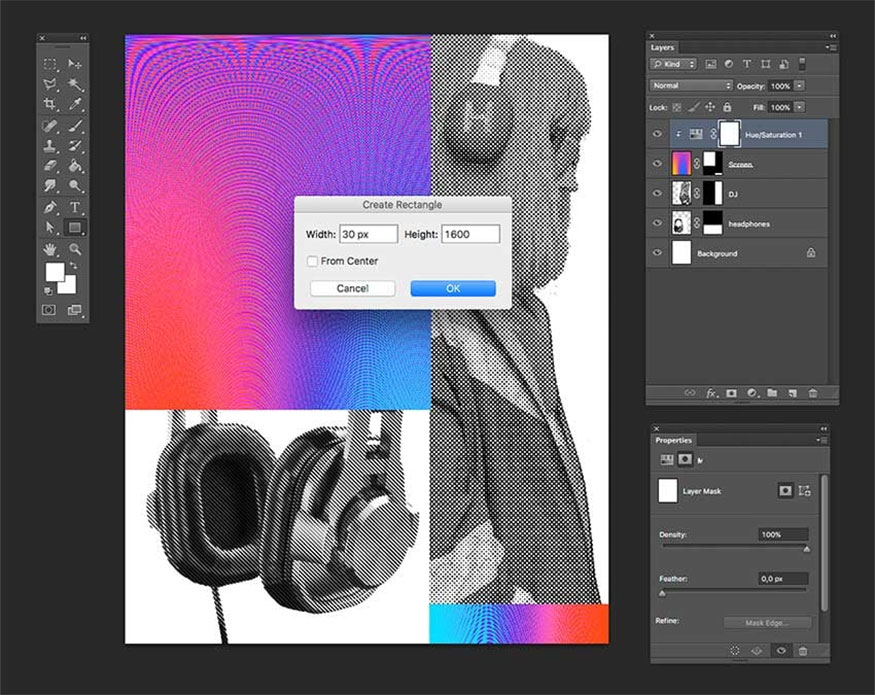
- Step 6: It can be seen that at this point the poster looks a bit flat, the purpose is to create tension to lead the viewer from the main content to the remaining information.
The tension in the poster is important to provide focus and contrast against other elements. At the same time they will create the path that the eye will follow.
From the Tools panel select the Rectangle Tool (U), click on the page and set Width to 30 px and Height to 1600 px. Then click Agree.
Go to the Options bar and set Fill to black. Place a rectangle vertically between the Screen and DJ images.
4. Instructions for adding text
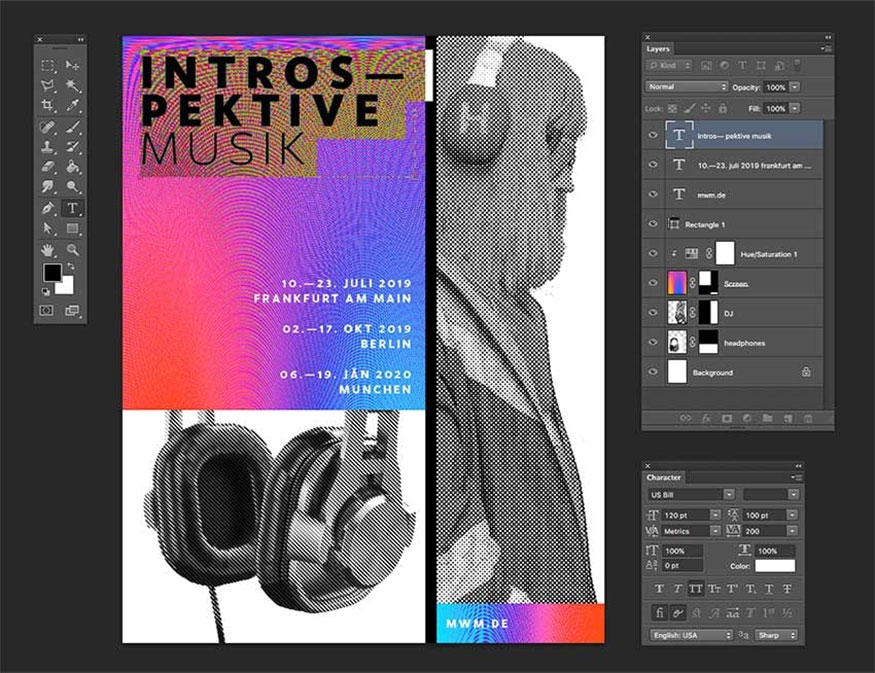
To use a larger font size in the following example, we will divide the Introspektive text into two lines.
Then add specific text as follows:
- In the Tools panel, click Text Tool (T), use white as the text color to contrast with the background, thereby helping the text more outstanding.
- Use the Fonseca Font Family Pack typeface, then open the tool panel by going to Type => Panels => Character Panel. Here are the text details we added to the design:
- INTROS—PEKTIVEMUSIC (US Bill in ExtraBold and Light, Size: 120 pt, Leading: 100 pt and Tracking: 200 pt)
- 10.—23. JULI 2019FRANKFURT AM MAIN02.—17. OKT 2019BERLIN06.—19. JÄN 2020MUNCHEN (Bold, Size: 30 pt, Leading: 40 pt, Tracking: 200 pt)
- MWM.DE (Bold, Size: 30 pt, Leading: 40 pt, Tracking: 200 pt)
5. Instructions for saving files for the web
Go to File => Save to save the file as usual.
To save a JPEG file for the web, go to File => Save for Web or press the keyboard shortcut Shift-Option-Command-S. Select the file you want to save => JPEG format and set Quality to 100.
In image size, you can change the pixel size if there are any size limitations.
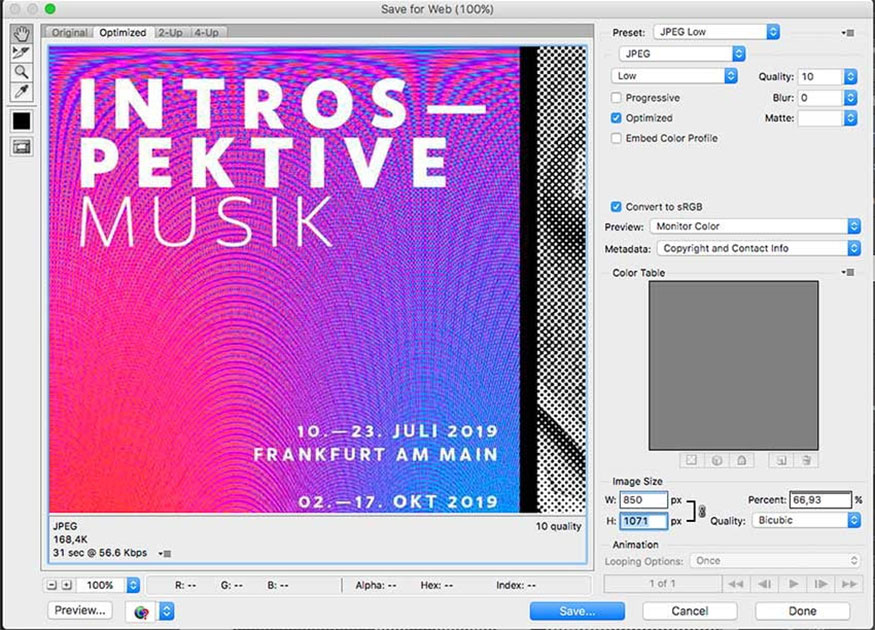
At the bottom left, you can see a file size preview. This is useful when there are size limitations on a website, you need to reduce the quality or size of the image.
Click Save… to select the location in the new window and click Save again.
So , we have our Photoshop bitmap poster.
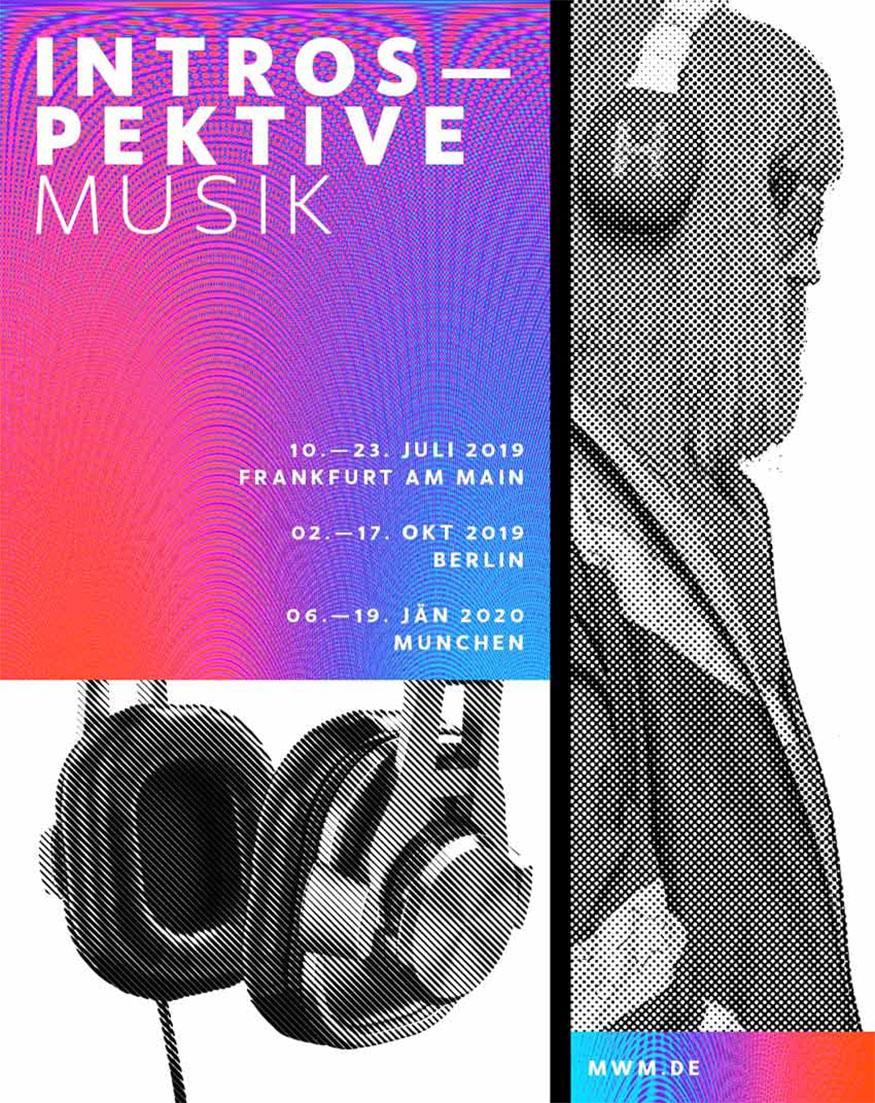
Wishing you success with these ways to create a custom music poster in Photoshop. Try applying it and see the results, you will definitely design yourself an extremely impressive poster.


VIP Products


Best Selling Products
Freepik Premium Account
59 USD
Genuine Cheap Canva Pro
39 USD
Upgrade Duolingo Super
29 USD
Autodesk All App Account Copyright
120 USD
Upgrade Genuine Office 365
49 USD
Capcut Pro 1 Year
39 USD
Genuine Adobe Illustrator account
99 USD
Copyright Adobe Lightroom Account
59 USD
Adobe Premiere Pro Account
99 USD
Plugin Retouch4me
69 USD
ChatGPT Plus Account (GPT-4)
16 USD
Upgrade genuine Capture One account
120 USD
Windows 10 & 11 Pro Key
36 USD
MidJourney Account
29 USD
Adobe Photoshop Copyright - Full App
120 USD