Best Selling Products

Freepik Premium Account
59 USD

Adobe Photoshop Copyright - Full App
120 USD

Genuine Cheap Canva Pro
39 USD

Genuine Adobe Illustrator account
99 USD

Adobe Premiere Pro Account
99 USD

Plugin Retouch4me
69 USD

Capcut Pro 1 Year
39 USD

Windows 10 & 11 Pro Key
36 USD

MidJourney Account
29 USD

Upgrade Genuine Office 365
49 USD

Upgrade genuine Capture One account
120 USD

Autodesk All App Account Copyright
120 USD

Upgrade Duolingo Super
29 USD

ChatGPT Plus Account (GPT-4)
16 USD

Copyright Adobe Lightroom Account
59 USD
Designing Photo Albums Using Photoshop: A Detailed Guide from A to Z for Photographers
Nội dung
- 1. Why Designing Albums with Photoshop Remains the Top Choice for Photographers
- 2. Steps to Design a Photo Album in Photoshop Using the Photo Frame Tool
- 2.1 Step 1: Open a New File
- 2.2 Step 2: Setting Up the Support Line
- 2.3 Step 3: Create a Frame for Your Photo
- 2.4 Step 4: Fill the Photo Frames with Photos
- 2.5 Step 5: Save Your Work
- 2.6 Step 6: Export for Printing
- 3. Supporting Tools and Plugins
- 4. Common Mistakes and How to Correct Them
- 5. Conclusion
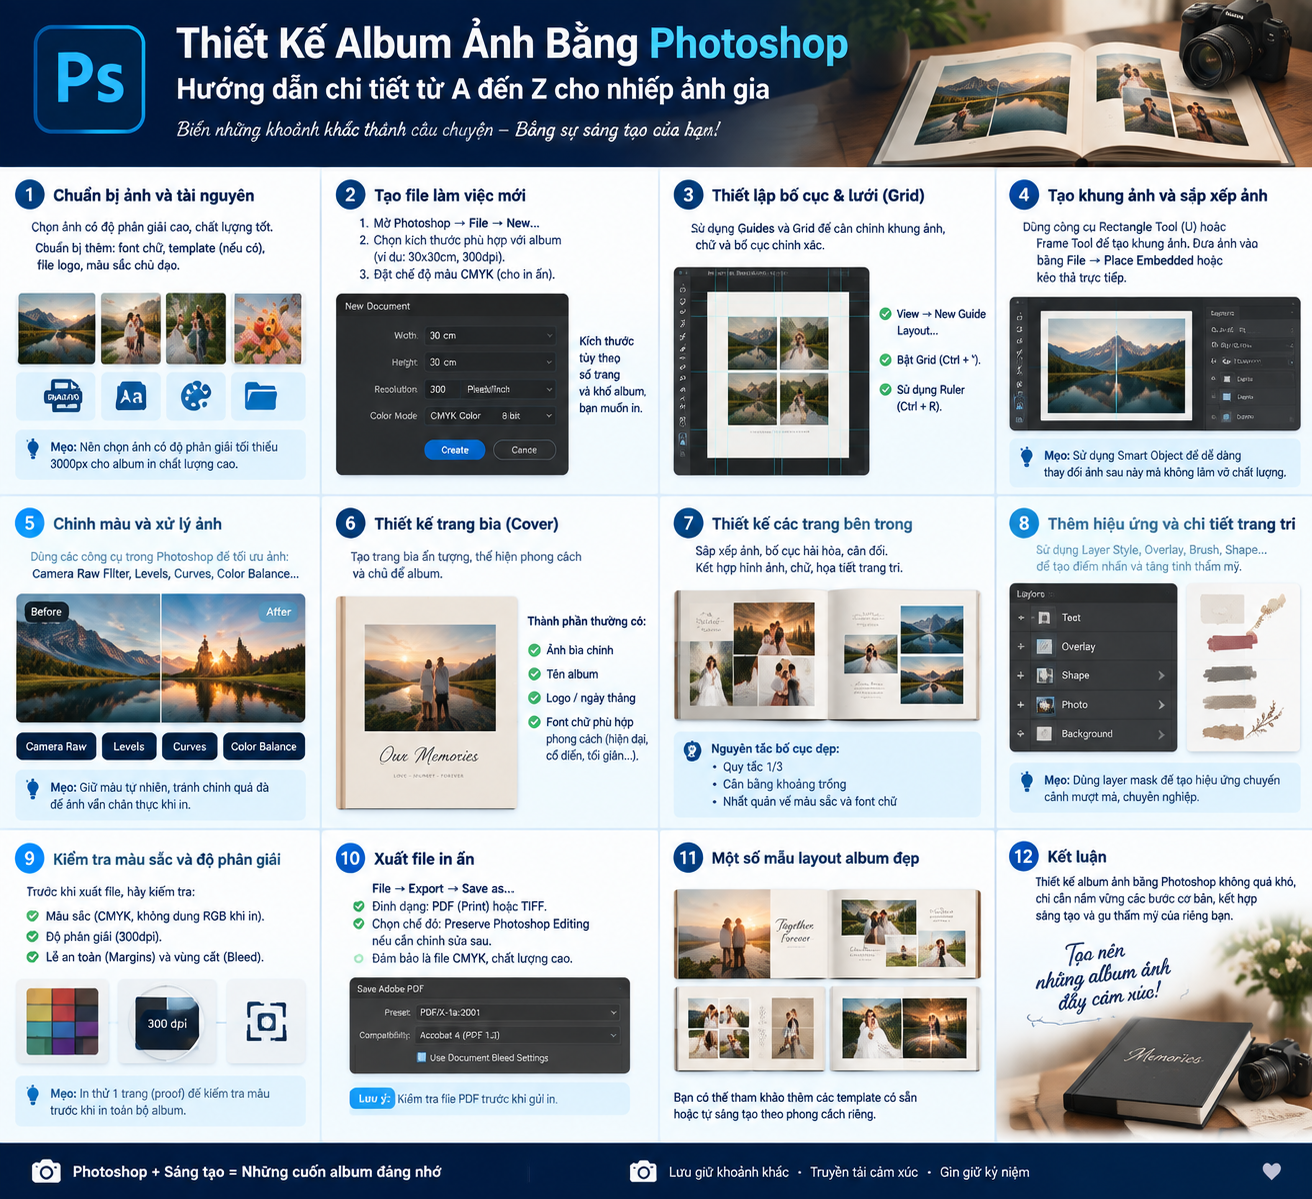
A beautiful photo album requires not only high-quality photos but also a well-planned layout and presentation. Photoshop offers many tools to help you control every detail in your album design. This guide will walk you through the entire process, from selecting photos to exporting the final file. You will also learn how to avoid common layout mistakes when designing an album.
1. Why Designing Albums with Photoshop Remains the Top Choice for Photographers
Over the years, Photoshop has become an indispensable part of the workflow for most photographers, from beginners to seasoned professional studios. There are many reasons why this software has maintained its appeal even as the market has seen the emergence of many new design tools.
First of all, most photographers already have Photoshop in their daily toolkit, as it's the software they use for image editing and post-processing. This eliminates the need to invest additional costs or time in learning entirely new software solely for album layout. Using a single tool for both image editing and layout design also makes the workflow seamless and saves considerable time.
Secondly, Photoshop possesses powerful image processing capabilities that few layout software programs can match. Photographers can directly adjust colors, combine images, process lighting, create artistic effects, and fine-tune even the smallest details within the album design file itself, without switching back and forth between different software programs. This is a huge advantage when working with wedding photos, family photos, or event photos that require complex editing.
Thirdly, most album printing services, including high-end studios catering to photographers, provide pre-designed templates in Photoshop PSD file format. This makes it easy for photographers to get started without having to manually set up all the technical parameters such as size, safe area, or resolution from scratch.
Finally, the flexibility in controlling each layer of images and every detail on the design page is also what makes Photoshop so popular. With the frame tool, arranging multiple images on the same page, changing the aspect ratio, rotating, or cropping images becomes incredibly simple while maintaining maximum control over the final product.
2. Steps to Design a Photo Album in Photoshop Using the Photo Frame Tool
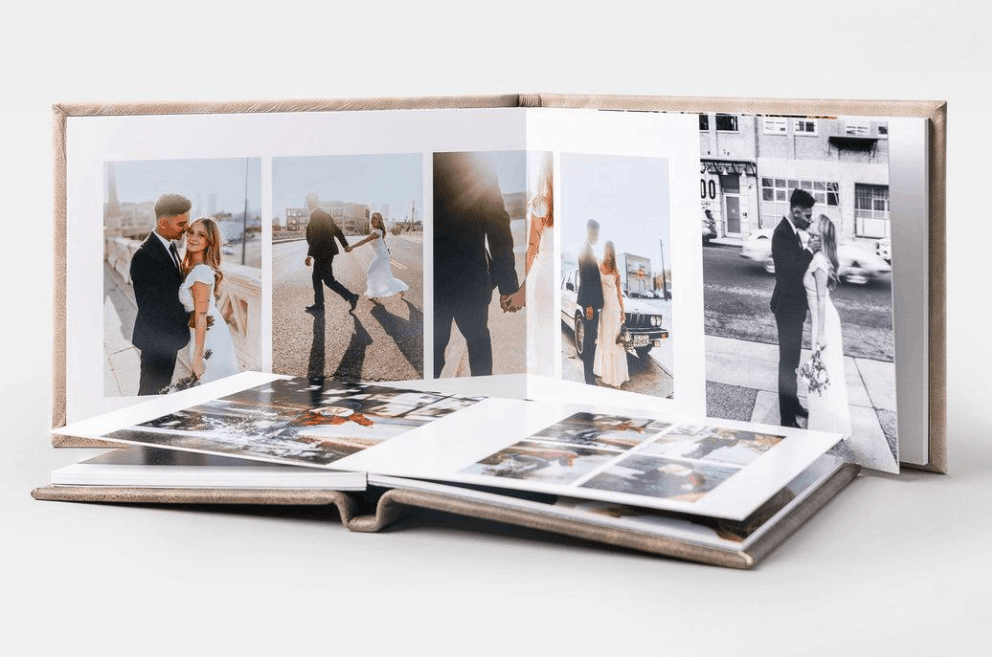
The following section will provide detailed instructions on how to design a complete photo album using the photo frame tool in Photoshop, using a 30 x 30 cm album as an example, one of the most common sizes for printing wedding or anniversary photo albums.
2.1 Step 1: Open a New File
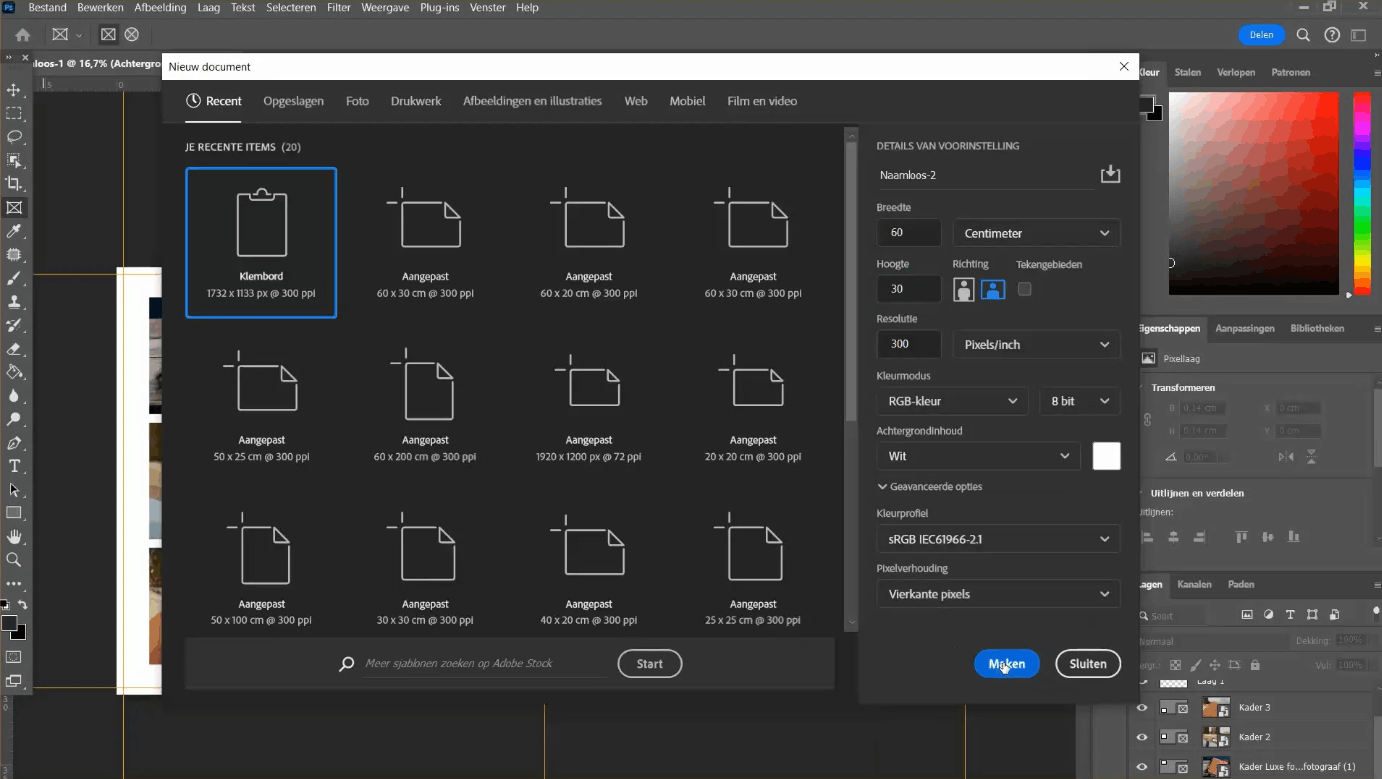
Before you begin designing, you need to open Adobe Photoshop and create a new file specifically for your album. For example, a 30 x 30 cm album, when opened as a two-page layout, will require a file size of 60 x 30 cm, as one page layout includes both the left and right pages joined together.
To do this, go to File, then select New. In the settings window, enter a width of 60 cm, a height of 30 cm, a resolution of 300 dpi to ensure sharp print quality, and select the sRGB color system, the standard color system recommended by most printing companies. After completing the parameters, press the Create button to create a new file. If your album has different dimensions, please refer to the specifications provided by the printing company to ensure the design file accurately matches the actual product that will be printed.
2.2 Step 2: Setting Up the Support Line
Once the working file is ready, the next step is to set up a guideline system to ensure the design layout is accurately aligned and free from cropping errors during printing.
Go to View, select Guides, then select New Guide Layout to create a new guide layout. Here, you need to position the guides approximately 0.5 cm from the outer edge of the file, applying this to all four edges, both horizontally and vertically. The area within this 0.5 cm range is often referred to as the safe zone.
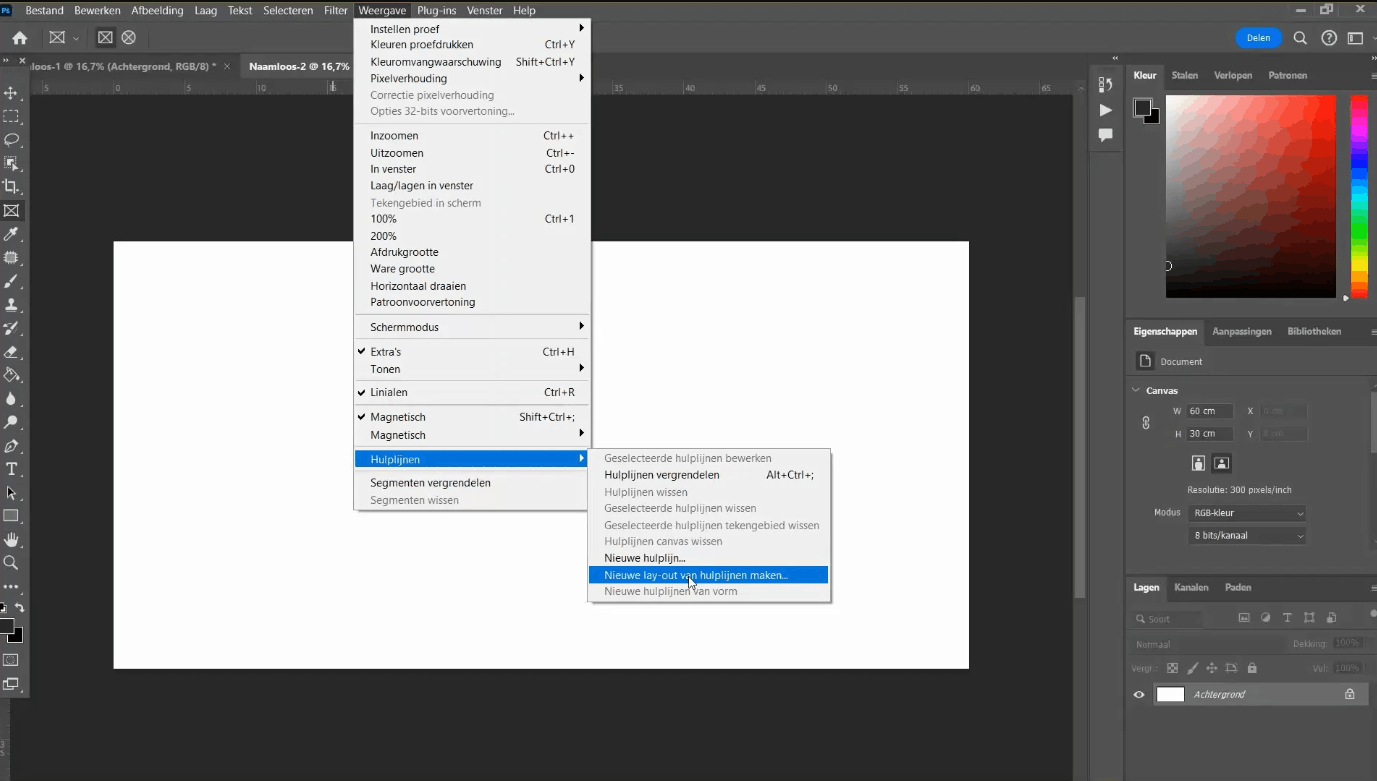
The safe zone plays a crucial role in the entire design process, as this is the area that will be cut off during the album binding and finishing. Therefore, you should absolutely not place any important details such as faces, text, or key decorative elements within this zone. If you intend to design the album with a white border, ensure that the border is significantly wider than the safe zone, ideally 1.5 cm or more. After trimming, the actual white border remaining on the product will be approximately 1 cm. Conversely, if you want to design a full-page style, meaning the image covers the entire page without a white border, you need to ensure the image extends beyond the safe zone to the very edge of the page.
2.3 Step 3: Create a Frame for Your Photo
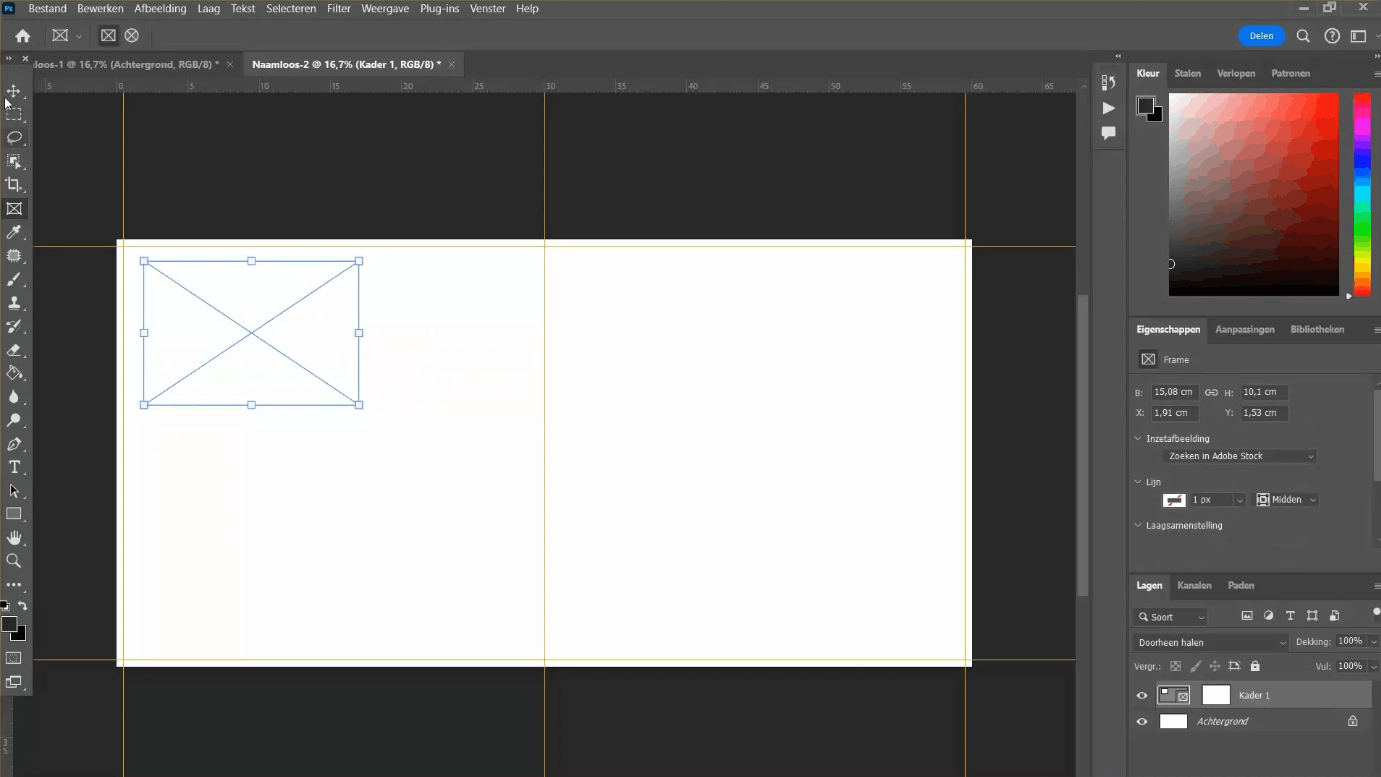
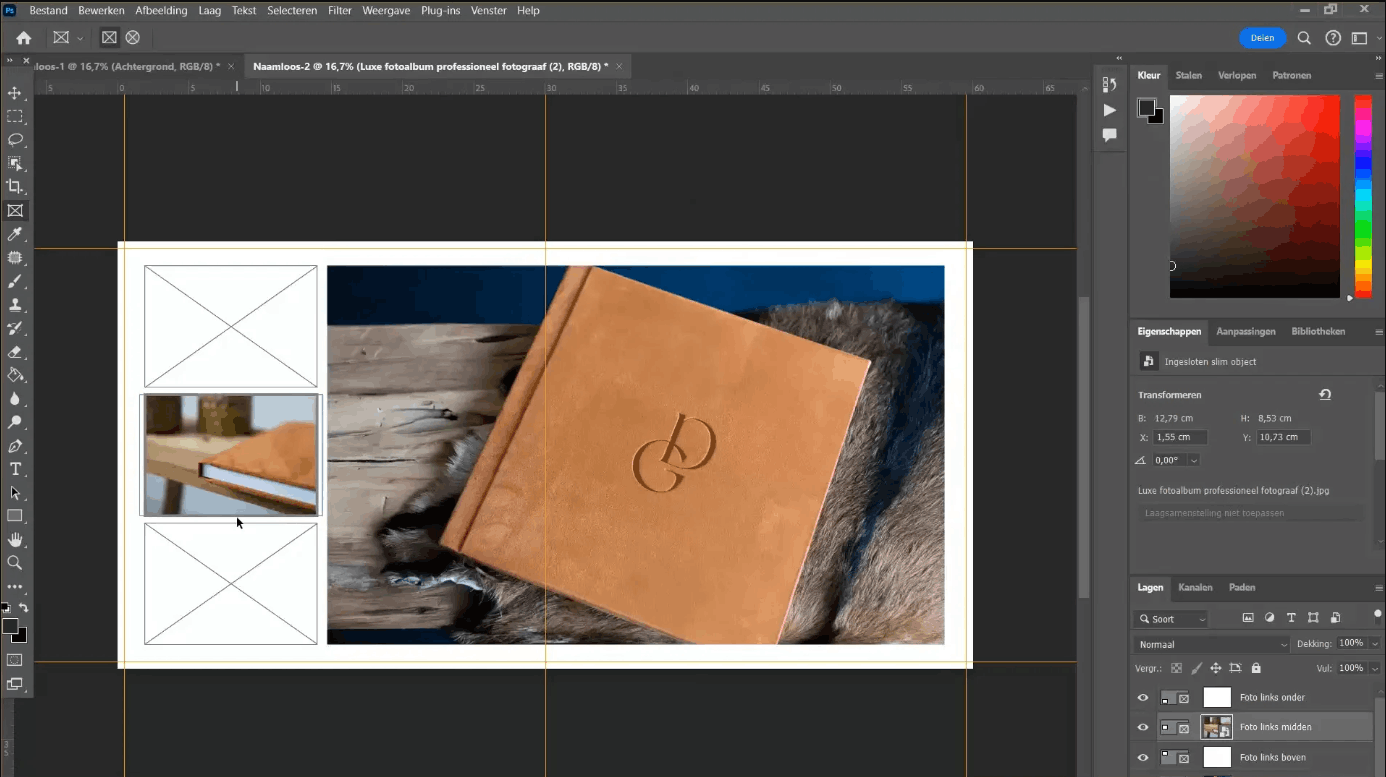
Once you have a framework of supporting lines as a basis, you can begin creating image frames for your design page. In the left-hand toolbar of Photoshop, select the Frame tool, identified by its rectangular icon with a plus sign in the middle.
After selecting this tool, you can drag and drop to create a frame on half the page, or extend the frame across both pages if you want to design a full-size image that spans the entire double page. Repeat this process across the entire page to create a complete layout, which may include multiple frames of varying sizes and positions depending on your presentation ideas. Throughout the framing process, frequently refer to the guidelines established in the previous step to ensure the frames are aligned neatly, evenly, and visually balanced.
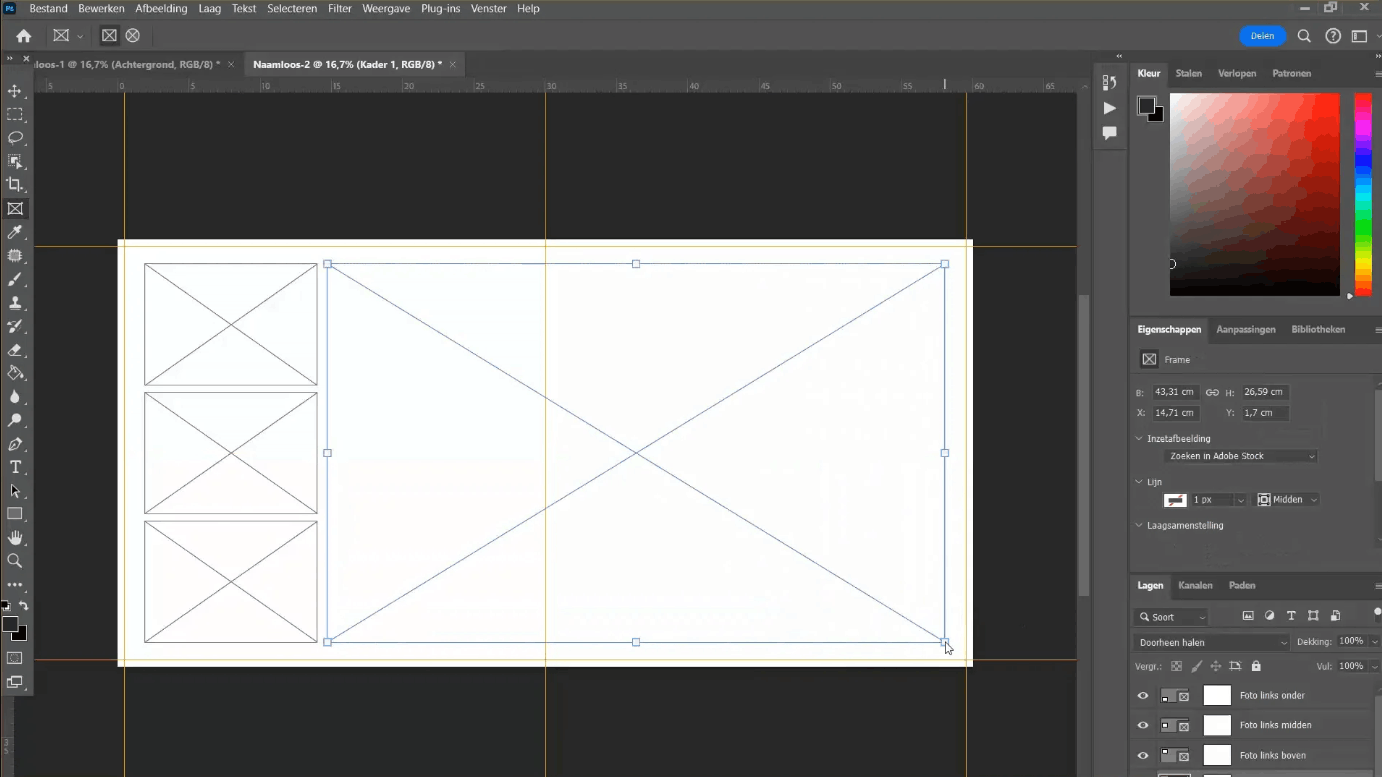
An important point to note is that you should carefully consider the layout rhythm throughout the entire album, avoiding repeating the same photo arrangement too many times in a row, as this can make viewers feel monotonous when flipping through the pages.
2.4 Step 4: Fill the Photo Frames with Photos
After completing the photo frame system for the design page, you proceed to insert actual images into each frame. First, open the folder containing the edited and selected photos to be used in the album.
Simply drag and drop your desired image directly into the corresponding frame; the image will automatically be cropped to fit the frame's size and aspect ratio without affecting the original file. To adjust the position or zoom level of the image within the frame, double-click the image to activate the frame content editing mode, then drag or zoom until you achieve the desired layout. This method allows you to quickly experiment with various layout options without compromising the image's quality or original aspect ratio.
2.5 Step 5: Save Your Work
After finalizing the layout for each page, organizing your work files is an essential step. You should save your entire album project in Photoshop format, specifically as a PSD file, so you can easily revisit and edit it in the future if needed.
To do this, go to File, select Save As, then choose a save location and name the file. Since an album usually includes many different cover pages, you need to number each file clearly and consistently, as this order will determine the arrangement of the pages in the complete album after printing. For example, an album with fifteen cover pages will correspond to fifteen separate files.
You should name your files using a structure that includes the project name followed by a sequential number, such as Rob-Marloes 001, Rob-Marloes 002, Rob-Marloes 003, and so on until the last page. Consistent naming not only makes project management easier but also minimizes the risk of page order confusion when submitting files to the printing company.
2.6 Step 6: Export for Printing
The final step in the design process is exporting the file to a suitable format for printing. Go to File, select Save As, and then choose JPEG, a common format accepted by most album printing shops.
During the file export process, it's crucial to maintain the naming structure used in the previous saving step to avoid pages being scrambled during uploading to the printing company's system. You should also double-check all pages before exporting to ensure there are no blank spaces or alignment errors.
After the file export is complete, you can proceed to print the album and upload all the cover pages to the production company's system.
3. Supporting Tools and Plugins
In addition to the tools built into Photoshop, many photographers also utilize plugins and supplementary software to shorten design time and improve the quality of the final product.
First, there are the template sets, also known as PSD templates, which are often provided free of charge or included with printing services by album printing companies. These templates are pre-set with dimensions, safe zones, and layout grids, saving photographers a lot of time in the initial setup phase and allowing them to focus on creating the layout and selecting images.
Next are plugins that support automatic framing and intelligent grid layout creation, making it faster to arrange multiple photos on the same page compared to manually dragging and dropping each frame. Some specialized toolsets for wedding album design even integrate hundreds of diverse layout templates, allowing photographers to apply them with just a few simple steps, and then customize them to their own style.
Furthermore, image editing and optimization plugins play an equally important role in the album design process. Tools specializing in processing original image data help photographers maximize detail and contrast from captured images, while plugins specializing in lighting effects, color correction, or skin smoothing provide strong support in perfecting the final appearance of each image before incorporating it into the design.
Finally, some photographers also incorporate online image library and photo management software directly into Photoshop, making searching, selecting, and organizing hundreds, or even thousands, of photos from a single shoot much more systematic and efficient than manually manipulating them in a conventional file manager.
4. Common Mistakes and How to Correct Them
One of the most common mistakes is placing important details like character faces, text, or logos too close to the safety zone, putting them at risk of being cut off or misaligned after processing. To remedy this, you should always display support lines throughout the design process and absolutely avoid placing any key elements within this area, while also leaving a safety buffer if the detail is crucial to the overall layout.
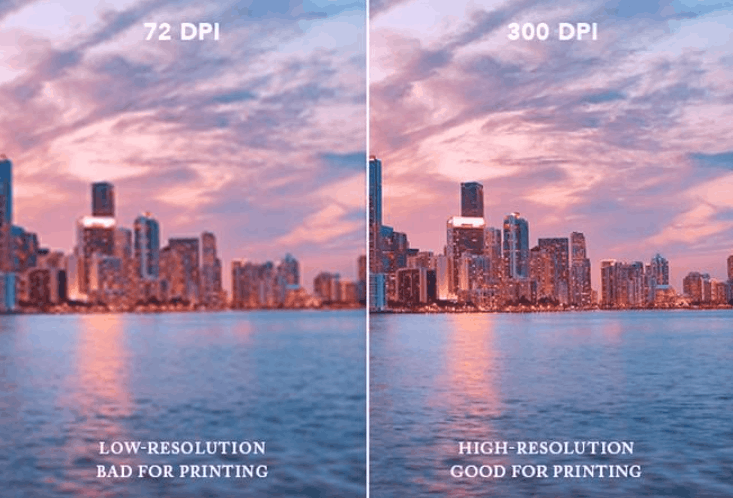
Another common mistake is using images with a lower resolution than necessary for the actual print size, resulting in pixelated, blurry, or grainy images when printed in large sizes. This often stems from over-enlarging the image within the frame without checking the actual resolution. An effective solution is to always check the image magnification ratio within the frame before saving the final file, ensuring the actual resolution is no lower than 300 dpi at the actual print size.
Furthermore, many designers struggle to maintain consistency in color and tone throughout the entire album, resulting in pages that feel disjointed and visually unconnected. The solution to this problem is to establish a consistent color palette and color grading process from the outset, then apply it uniformly to all images before incorporating them into the design layout.
Finally, a small but quite common mistake is overly dense layout, cramming too many photos onto a single page, making it visually overwhelming and detracting from the main focus of the story. The advice here is to leave reasonable spacing between photos, and carefully consider the role and importance of each photo before deciding to include it in the design, in order to maintain a harmonious balance for the entire album.
5. Conclusion
Designing photo albums using Photoshop with its frame tool is not an overly complicated process, but it requires meticulousness and patience at each step, from setting up the working file, building the support system, creating the frame, filling in the image, to the final storage and export of the file. Thanks to its flexible image processing capabilities and widespread popularity in the photography community, Photoshop continues to assert its position as a reliable tool for those who want to create personalized photo albums without incurring additional costs for other specialized software.
Mastering the basic process, combined with the right tools and plugins, will help photographers significantly shorten design time while ensuring the highest quality final product. At the same time, proactively identifying and avoiding common mistakes from the outset is crucial in creating perfect albums that are worthy of the effort and dedication that both the photographer and the client have invested in each moment captured within.





















VIP Products








Best Selling Products
Freepik Premium Account
59 USD
Adobe Photoshop Copyright - Full App
120 USD
Genuine Cheap Canva Pro
39 USD
Genuine Adobe Illustrator account
99 USD
Adobe Premiere Pro Account
99 USD
Plugin Retouch4me
69 USD
Capcut Pro 1 Year
39 USD
Windows 10 & 11 Pro Key
36 USD
MidJourney Account
29 USD
Upgrade Genuine Office 365
49 USD
Upgrade genuine Capture One account
120 USD
Autodesk All App Account Copyright
120 USD
Upgrade Duolingo Super
29 USD
ChatGPT Plus Account (GPT-4)
16 USD
Copyright Adobe Lightroom Account
59 USD