Best Selling Products

Autodesk All App Account Copyright
120 USD

Adobe Photoshop Copyright - Full App
120 USD

Genuine Cheap Canva Pro
39 USD

Plugin Retouch4me
69 USD

Capcut Pro 1 Year
39 USD

Adobe Premiere Pro Account
99 USD

Upgrade Duolingo Super
29 USD

ChatGPT Plus Account (GPT-4)
16 USD

Freepik Premium Account
59 USD

Genuine Adobe Illustrator account
99 USD

Upgrade Genuine Office 365
49 USD

Copyright Adobe Lightroom Account
59 USD

MidJourney Account
29 USD

Windows 10 & 11 Pro Key
36 USD

Upgrade genuine Capture One account
120 USD
Discover the Mysterious Beauty of Silhouette Photos & Tips for Perfect Photography
Nội dung
- 1. Understanding Silhouette Photos
- 1.1. Definition of Silhouette in Photography
- 1.2. Distinguishing Silhouette vs Regular Backlight
- 1.3. Application and style
- 2. Principles of Silhouette Photography
- 2.1. Arrange the subject of the photo
- 2.2. Light in Silhouette Photography
- 2.3. Exposure lock
- 2.4. Focus on the subject
- 3. Layout and creative shapes
- 3.1. Basic layout rules
- 3.2. Using foreground as frame (frame within frame)
- 3.3. Exploiting curves and shapes
- 3.4. Combining multiple subjects
- 4. Choose the ideal time and lighting conditions
- 4.1. Golden Hour and Blue Hour
- 4.2. Weather and environmental factors
- 4.3. Artificial light
- 5. Common errors and how to fix them
- 6. Some ideas & inspiration
Make silhouettes the focus! Learn how to take silhouette photos and create stunning compositions that will leave an impression at first sight.
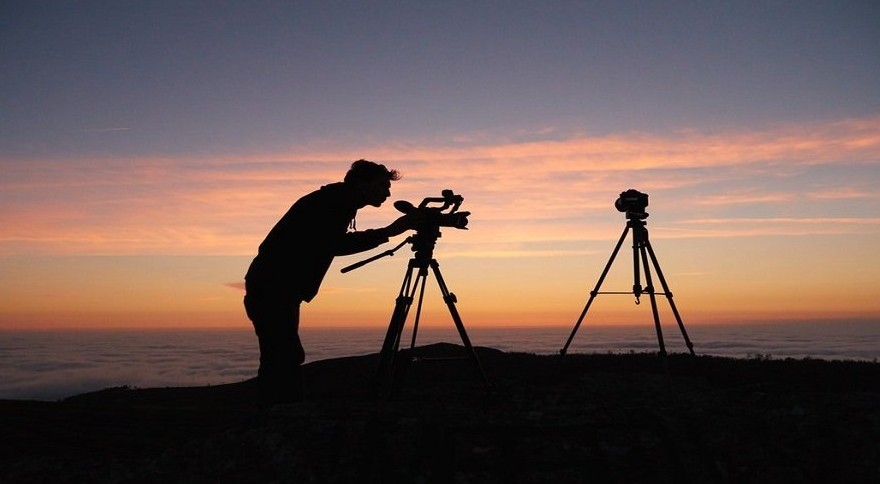
In the world of photography, light plays a decisive role in creating an impressive photo. Among them, Silhouette Photography , also known as backlit photography, is loved by many photographers. A silhouette photo not only captures the moment but also stimulates the viewer's imagination: you only see lines and shapes, but you can fill in the story yourself.
Silhouette Photography possesses a beauty that is both simple and profound; it forces us to focus on composition, lines, contrasts and emotions. Instead of complex details, we exploit the “power of absence” a space for the viewer to imagine, visualize and explore. This is the reason why this technique is so popular in travel, portrait, art and commercial photography. Let’s explore each step with SaDesign so you can capture bold, impressive and artistic silhouette photos!
1. Understanding Silhouette Photos
1.1. Definition of Silhouette in Photography
Silhouette means “shadow” in French, and in photography, silhouette refers to an image of a subject that is backlit, making the subject appear as a solid black mass with little or no detail, standing out against a bright background. While photographs often focus on the details of the subject, silhouettes celebrate the beauty of lines, shapes, and composition.
.png)
1.2. Distinguishing Silhouette vs Regular Backlight
Backlight (normal backlight): Light shines from behind, creating a bright rim light around the subject, but can still retain details of the subject if we adjust the exposure.
Silhouette: The goal is to overexpose the background so that the subject is completely dark, almost losing detail, creating a black mass that contrasts strongly with the background.
1.3. Application and style
Silhouette Photography is very diverse in style:
Artistic portrait: Celebrates body shape, gestures, creates a sense of mystery.
Landscape: Silhouettes of trees, mountains or architecture against a sunset background.
Product design: Create highlights for the product without revealing the details inside, arousing curiosity.
Commercial – advertising: Take advantage of simplicity and impression to attract attention, making the message easier to remember.
.png)
2. Principles of Silhouette Photography
2.1. Arrange the subject of the photo
This is the first and basic point that you need to remember when performing the Silhouette backlighting technique. To ensure a satisfactory silhouette photo, there must be only one light source of light contrasting with the subject's position, and the light source should be covered by the subject to maintain the exposure ratio. It is recommended to choose subjects that are clearly distinguished, sharp and bold in contrast to the light; do not choose small and less detailed subjects.
.png)
If your subject is a person, you should separate the facial features such as nose, eyes, lips, hands from the background instead of just focusing on the outline. This will contribute significantly to making your photo look more soulful and interesting. You can also try to separate the elements of the subject instead of just linking and unifying them into a block; this can increase the ability to convey inspiration in your photo.
2.2. Light in Silhouette Photography
If you are using a compact camera, turning off the flash is a must when taking a Silhouette. You can try adjusting the lighting of the background instead of just focusing on the lighting of the subject. Take the time to adjust the lighting so that the subject is darkened without affecting the background of the entire image. Make sure that your background is brighter than the subject because if there is too much light, the light will fall on the subject and the subject can be seen. On the contrary, if there is not enough light, your background will turn gray and ruin the silhouette image immediately.
.png)
In addition to the technique of capturing sharp overall silhouettes, you can study the technique of capturing partial silhouettes. To do this, you just need to add a small detail of light to the center of the subject. Thanks to that, your photo will look much more vivid and realistic.
2.3. Exposure lock
The next principle to keep in mind after you have positioned your subject correctly and adjusted the lighting is to compose your frame and lock the exposure to the background instead of the subject. To lock the exposure correctly, press the shutter button halfway to meter the bright part of the image. This is an effective way to make your camera “think” that the bright part of the image is neutral. This ensures that the darker areas of the subject become completely black.
.png)
The key to locking exposure is to make sure you are metering an area that is not a bright light source like the sun or any other bright light source to get the best exposure time. Doing so will cause your subject to be underexposed and may even become completely black. If you are using a digital camera with spot and center-weighted metering, switch the metering mode to the center of the frame instead of metering multiple spots. This will allow your camera to select the basic element to expose for complete black.
2.4. Focus on the subject
The final rule when shooting Silhouette is to focus on the subject instead of the background. Following this rule will help the subject to be sharper without being blurred or blurred, and the perspective of the shadow will also be better applied. Instead of standing far away to capture the scene, move closer to the subject and place the strongest light source behind it easily as well as change the shooting angle when necessary. In case neither you nor the subject can move, zoom in on the image to complete your photo.
.png)
3. Layout and creative shapes
3.1. Basic layout rules
Rule of Thirds: Place the subject on the intersection or dividing line of the frame.
Leading Lines: Use the horizon, road, or tree line to direct the eye.
3.2. Using foreground as frame (frame within frame)
Use arches, tree branches, and windows to frame and add interest and depth.
The silhouette subject is “inside” a dark frame, with a bright background outside.
.png)
3.3. Exploiting curves and shapes
Smooth curves (curved human figures, bird wings) or square shapes (architecture, buildings) both convey different emotions.
Try different shapes: triangles, circles, semicircles… to find a balanced composition.
3.4. Combining multiple subjects
Couples, groups of friends, flocks of birds… create interesting stories.
Pay attention to the distance between silhouettes so they don't stick together, keep the negative space reasonable.
The composition is set, next we learn when and where to press the shutter to get the perfect light.
4. Choose the ideal time and lighting conditions
.png)
4.1. Golden Hour and Blue Hour
Golden Hour: About 30 minutes after sunrise or 30 minutes before sunset. Soft, warm light.
Blue Hour: After sunset or before sunrise, the sky turns a deep blue, giving it a magical feel.
4.2. Weather and environmental factors
Cloudy sky: Clouds create structure in the background, soft diffused light.
Mist: Creates a vague, dreamy feeling.
Clear air: The sky color is clear and contrasts well.
4.3. Artificial light
Street lights, car lights, neon billboards… in the city at night can replace sunlight, creating colorful urban silhouettes.
.png)
5. Common errors and how to fix them
Error
Reason
How to fix
Silhouette is not solid black
Light meter is wrong, EV is not negative enough
Switch to spot metering, increase underexposure
Overexposed background
Highlights are out, lack of detail in the sky
Reduce EV further, pull highlights in post-production
Focus error, blurry image
AF wrong point, camera shake
Use manual focus, use tripod/remote shutter
Subject is stuck to the background
Subject-background distance is too small
Move further, change the angle or background
Now, to spark some ideas, let's take a look at some examples and inspiration from top photographers.
.png)
6. Some ideas & inspiration
Photographer Aaron Priest: silhouette photos of mountains and vast seas, taking advantage of the majesty of nature.
Photographer Silke Hennig: specializes in silhouette portraits combined with smoke to create a magical effect.
“Shadows” exhibition at the International Photography Museum (IPE): dozens of works using silhouettes to tell stories about people and cities.
Silhouette Photography is a simple yet profound challenge in photography: it does not require too much special equipment, but requires you to understand light, composition and the ability to "squeeze light" to create a bold black block. Through the article, SaDesign has introduced everything from concepts, equipment, camera settings, shooting techniques, composition, timing, post-production to tips to fix errors. Apply it today, because only real-life experience can help you practice your artistic eye and professional silhouette photography skills.


VIP Products


Best Selling Products
Autodesk All App Account Copyright
120 USD
Adobe Photoshop Copyright - Full App
120 USD
Genuine Cheap Canva Pro
39 USD
Plugin Retouch4me
69 USD
Capcut Pro 1 Year
39 USD
Adobe Premiere Pro Account
99 USD
Upgrade Duolingo Super
29 USD
ChatGPT Plus Account (GPT-4)
16 USD
Freepik Premium Account
59 USD
Genuine Adobe Illustrator account
99 USD
Upgrade Genuine Office 365
49 USD
Copyright Adobe Lightroom Account
59 USD
MidJourney Account
29 USD
Windows 10 & 11 Pro Key
36 USD
Upgrade genuine Capture One account
120 USD